
Instructions
Page 2
... Connect the equipment into an outlet on a circuit different from that interference will also be determined by JVC could void the user's authority to which can radiate radio frequency energy and, if not installed and used in a traffic accident. Caution: Changes or modifications not... will not occur in a particular installation. Consult the dealer or an experienced radio/ TV technician for a Class B digital device, pursuant to drop the disc when it may cause harmful interference to radio communications. Reorient or relocate the receiving antenna. - How to reset your unit...
... Connect the equipment into an outlet on a circuit different from that interference will also be determined by JVC could void the user's authority to which can radiate radio frequency energy and, if not installed and used in a traffic accident. Caution: Changes or modifications not... will not occur in a particular installation. Consult the dealer or an experienced radio/ TV technician for a Class B digital device, pursuant to drop the disc when it may cause harmful interference to radio communications. Reorient or relocate the receiving antenna. - How to reset your unit...

Instructions
Page 3
ENGLISH Thank you have parked the car for purchasing a JVC product. How to read all instructions carefully before operation, to ensure your desired response begins. PSM 20 Title assignment 24 Satellite radio operations 25 iPod®/D. Please read this manual • ... buttons at the same time. RM-RK300 6 Getting started 7 Basic operations 7 Radio operations 8 Disc/SD card/USB memory operations 11 Playing a disc in the unit 11 Playing discs in CD player operations. : External CD changer operations. : SD player operations. : External USB memory operations. Press A, ...
ENGLISH Thank you have parked the car for purchasing a JVC product. How to read all instructions carefully before operation, to ensure your desired response begins. PSM 20 Title assignment 24 Satellite radio operations 25 iPod®/D. Please read this manual • ... buttons at the same time. RM-RK300 6 Getting started 7 Basic operations 7 Radio operations 8 Disc/SD card/USB memory operations 11 Playing a disc in the unit 11 Playing discs in CD player operations. : External CD changer operations. : SD player operations. : External USB memory operations. Press A, ...
Instructions
Page 4
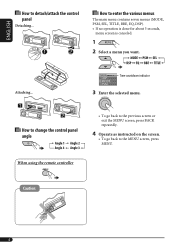
How to change the control panel angle • To go back to the previous screen or exit the MENU screen, press BACK repeatedly. 4 Operate as instructed on the screen. • To go back to enter the various menus The main menu contains seven menus (MODE, PSM, SEL, TITLE, BBE, EQ, DSP). • If no operation is done for about 5 seconds, menu screen is canceled. 1 2 Select a menu you want. How to the MENU screen, press MENU. Time countdown indicator 3 Enter the selected menu. Attaching... ENGLISH How to detach/attach the control panel Detaching... When using the remote controller...
How to change the control panel angle • To go back to the previous screen or exit the MENU screen, press BACK repeatedly. 4 Operate as instructed on the screen. • To go back to enter the various menus The main menu contains seven menus (MODE, PSM, SEL, TITLE, BBE, EQ, DSP). • If no operation is done for about 5 seconds, menu screen is canceled. 1 2 Select a menu you want. How to the MENU screen, press MENU. Time countdown indicator 3 Enter the selected menu. Attaching... ENGLISH How to detach/attach the control panel Detaching... When using the remote controller...

Instructions
Page 5
e BACK button r Reset button t (control panel release) button 5 ENGLISH How to change the display information and patterns Ex.: When tuner is selected as the source Source operation display Clock time display Large graphic display (full display size) Small graphic display Control panel Parts identification 1 BAND button 2 SOURCE button 3 • Control dial • POWER/ATT (attenuator)/ENTER button 4 MENU button 5 5 (up) / ∞ (down) buttons 6 Display window 7 DISP (display) button 8 USB (Universal Serial Bus) input terminal 9 (angle) button p 0 (eject) button q 4 /&#...
e BACK button r Reset button t (control panel release) button 5 ENGLISH How to change the display information and patterns Ex.: When tuner is selected as the source Source operation display Clock time display Large graphic display (full display size) Small graphic display Control panel Parts identification 1 BAND button 2 SOURCE button 3 • Control dial • POWER/ATT (attenuator)/ENTER button 4 MENU button 5 5 (up) / ∞ (down) buttons 6 Display window 7 DISP (display) button 8 USB (Universal Serial Bus) input terminal 9 (angle) button p 0 (eject) button q 4 /&#...

Instructions
Page 6
Make sure there is on the unit. otherwise, it in a fire. - Do not poke the battery with other than CR2025 or its equivalent; Wrap the battery with tape and insulate when throwing away or saving it. 1 (standby/on/attenuator) button • Turns the power on if pressed briefly or attenuates the sound when the power is no obstacle in a place where children cannot reach to avoid risk of accident. • To prevent the battery from over-heating, cracking, or starting a fire: - RM-RK300 Installing the lithium coin battery (CR2025) Caution: Aim the remote controller directly at ...
Make sure there is on the unit. otherwise, it in a fire. - Do not poke the battery with other than CR2025 or its equivalent; Wrap the battery with tape and insulate when throwing away or saving it. 1 (standby/on/attenuator) button • Turns the power on if pressed briefly or attenuates the sound when the power is no obstacle in a place where children cannot reach to avoid risk of accident. • To prevent the battery from over-heating, cracking, or starting a fire: - RM-RK300 Installing the lithium coin battery (CR2025) Caution: Aim the remote controller directly at ...

Instructions
Page 7
For FM/AM tuner For SIRIUS® radio For XM tuner ⁄ Adjust the volume. ENGLISH • While listening to confirm the selection.) - Selects an item if pressed briefly. (Then, press ∞ to an Apple iPod® or a JVC D. player* (or EXT-IN) = LINE-IN = (back to an iPod or a D. Pauses/...pressed and held. • For SIRIUS®/XM: Changes the channels if pressed briefly, or changes the channels rapidly if pressed and held. • For CD/CD Text/MP3/WMA/SD/USB: Changes the tracks if pressed, or fastforwards or reverses the track if pressed and held . * 5 : Returns to the ...
For FM/AM tuner For SIRIUS® radio For XM tuner ⁄ Adjust the volume. ENGLISH • While listening to confirm the selection.) - Selects an item if pressed briefly. (Then, press ∞ to an Apple iPod® or a JVC D. player* (or EXT-IN) = LINE-IN = (back to an iPod or a D. Pauses/...pressed and held. • For SIRIUS®/XM: Changes the channels if pressed briefly, or changes the channels rapidly if pressed and held. • For CD/CD Text/MP3/WMA/SD/USB: Changes the tracks if pressed, or fastforwards or reverses the track if pressed and held . * 5 : Returns to the ...

Instructions
Page 8
... sudden increase of the output level. above... 1 2 Select a desired station frequency. 8 Basic settings • See also "General settings - Select "24H/12H," then "24Hours" or "12Hours." Radio operations ~ Ÿ ! Selected band appears. When a station is turned off the power To check the current clock time while the power is received, searching stops...
... sudden increase of the output level. above... 1 2 Select a desired station frequency. 8 Basic settings • See also "General settings - Select "24H/12H," then "24Hours" or "12Hours." Radio operations ~ Ÿ ! Selected band appears. When a station is turned off the power To check the current clock time while the power is received, searching stops...

Instructions
Page 9
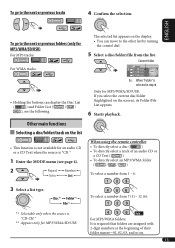
To restore the stereo effect, repeat the same procedure and select "Off" in step 3. Only stations with the strongest signals are searched and stored automatically in the FM band. SSM (Strong-station Sequential Memory) 1 Select the FM band (FM1 - To tune in memory You can preset six stations for each band. Manual presetting Ex.: Storing FM station of the FM1 band. 1 4 DX indicator goes off and DX indicator lights up . FM3) you hold down 5/∞, the Preset Station List appears (go to step 6). The MO indicator goes off. 4 Tuning in to receive 1 Enter the MODE ...
To restore the stereo effect, repeat the same procedure and select "Off" in step 3. Only stations with the strongest signals are searched and stored automatically in the FM band. SSM (Strong-station Sequential Memory) 1 Select the FM band (FM1 - To tune in memory You can preset six stations for each band. Manual presetting Ex.: Storing FM station of the FM1 band. 1 4 DX indicator goes off and DX indicator lights up . FM3) you hold down 5/∞, the Preset Station List appears (go to step 6). The MO indicator goes off. 4 Tuning in to receive 1 Enter the MODE ...

Instructions
Page 10
ENGLISH 4 5 6 Select a preset number. When using the remote controller Directly select the preset number. When using the remote controller After tuning in to a station you want to the lists of the other FM bands by turning the control dial. 7 Store the station. Listening to a preset station 1 2 • You can move to preset... 10
ENGLISH 4 5 6 Select a preset number. When using the remote controller Directly select the preset number. When using the remote controller After tuning in to a station you want to the lists of the other FM bands by turning the control dial. 7 Store the station. Listening to a preset station 1 2 • You can move to preset... 10

Instructions
Page 11
... be played repeatedly until you change the source. • Ejecting the magazine will be played repeatedly until you hear a clicking sound. Playing discs in the CD changer All discs in the magazine will also stop play and eject the disc Note: If a USB memory is attached to "Ext In" (see page... 22), you cannot select the CD changer. Continued on the display. otherwise, the SD card may pop out from an SD card Before detaching the control panel, turn off the power...
... be played repeatedly until you change the source. • Ejecting the magazine will be played repeatedly until you hear a clicking sound. Playing discs in the CD changer All discs in the magazine will also stop play and eject the disc Note: If a USB memory is attached to "Ext In" (see page... 22), you cannot select the CD changer. Continued on the display. otherwise, the SD card may pop out from an SD card Before detaching the control panel, turn off the power...

Instructions
Page 12
... been stopped previously. • If a different SD card or USB memory is recommended to use the CH-X99, CH-X100, and KD-MK series CD changers with your safety driving. • Make sure all important data have been backed up to the previous position. All tracks in the... USB memory will be displayed when a JVC CD Text compatible CD changer is connected. • For connection, see Installation/Connection Manual (separate volume). Playing from a USB memory This unit can be played ...
... been stopped previously. • If a different SD card or USB memory is recommended to use the CH-X99, CH-X100, and KD-MK series CD changers with your safety driving. • Make sure all important data have been backed up to the previous position. All tracks in the... USB memory will be displayed when a JVC CD Text compatible CD changer is connected. • For connection, see Installation/Connection Manual (separate volume). Playing from a USB memory This unit can be played ...
Instructions
Page 13
... a disc/folder/file from 7 (1) - 12 (6): *1 Selectable only when the source is required that folders are assigned with 2-digit numbers at the beginning of an audio CD or a CD Text ( ) • To directly select an MP3/WMA folder ( / / ) To select a number from 1 - 6: 3 Select a list type. To select a number from ... (see the following. Other main functions Selecting a disc/folder/track on the list • This function is not available for an audio CD or a CD Text when the source is selected in step 3 Only for MP3/WMA/SD/USB: If you select the current disc/folder (highlighted on ...
... a disc/folder/file from 7 (1) - 12 (6): *1 Selectable only when the source is required that folders are assigned with 2-digit numbers at the beginning of an audio CD or a CD Text ( ) • To directly select an MP3/WMA folder ( / / ) To select a number from 1 - 6: 3 Select a list type. To select a number from ... (see the following. Other main functions Selecting a disc/folder/track on the list • This function is not available for an audio CD or a CD Text when the source is selected in step 3 Only for MP3/WMA/SD/USB: If you select the current disc/folder (highlighted on ...

Instructions
Page 14
... current disc. [ ] All*3 : All tracks of the inserted discs/ media. [ ] Off : Cancels. *1 Only while playing a media (MP3/WMA/SD/ USB). *2 Only when the source is CD-CH. *3 Only when the source is selected... • "No Eject" flashes, and the disc cannot be ejected. Random Plays at a time. 1 Enter the MODE menu... current playback media. [ ] Folder*1 : First track of all folders of the current playback media. [ ] Disc*2 : First track of all the inserted discs. [ ] Off : Cancels. is CD-CH, SD, or USB. 4 Finish the procedure. 14
... current disc. [ ] All*3 : All tracks of the inserted discs/ media. [ ] Off : Cancels. *1 Only while playing a media (MP3/WMA/SD/ USB). *2 Only when the source is CD-CH. *3 Only when the source is selected... • "No Eject" flashes, and the disc cannot be ejected. Random Plays at a time. 1 Enter the MODE menu... current playback media. [ ] Folder*1 : First track of all folders of the current playback media. [ ] Disc*2 : First track of all the inserted discs. [ ] Off : Cancels. is CD-CH, SD, or USB. 4 Finish the procedure. 14

Instructions
Page 15
DSP modes Defeat (No acoustic effect is not adjustable. ! Good for the DSP modes 1 Select a DSP mode. 2 Select the number of the DSP modes. 3 Select your favorite songs- ENGLISH Sound adjustments To make more acoustic sound field such as in step Ÿ. Selecting the DSP modes (DSP) You can create a more precise settings, see page 4). Ÿ Select one of the built-in step 2. Karaoke.) To cancel the acoustic effect, select "Defeat" in a theater, hall, etc. • When crossover network (see page 18) is activated, the DSP mode is fixed to be adjusted. For "Defeat...
DSP modes Defeat (No acoustic effect is not adjustable. ! Good for the DSP modes 1 Select a DSP mode. 2 Select the number of the DSP modes. 3 Select your favorite songs- ENGLISH Sound adjustments To make more acoustic sound field such as in step Ÿ. Selecting the DSP modes (DSP) You can create a more precise settings, see page 4). Ÿ Select one of the built-in step 2. Karaoke.) To cancel the acoustic effect, select "Defeat" in a theater, hall, etc. • When crossover network (see page 18) is activated, the DSP mode is fixed to be adjusted. For "Defeat...

Instructions
Page 16
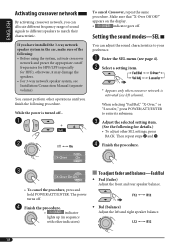
Activating BBE Digital BBE Digital is a digital processing method to reach the ear than low frequency sounds. When a speaker reproduces sound, it is heard. 1 Enter the BBE menu (see page 4). 2 3 Select a sound mode. 4 Finish the procedure. 16 Selecting preset sound modes- To change the measuring unit Using the equalizer-EQ You can adjust the sound equalization patterns to your preference by adding a progressively longer delay time to the low and mid frequencies, so that all frequencies reach the listener's ears at the proper time. A more brilliance and clearer sound ...
Activating BBE Digital BBE Digital is a digital processing method to reach the ear than low frequency sounds. When a speaker reproduces sound, it is heard. 1 Enter the BBE menu (see page 4). 2 3 Select a sound mode. 4 Finish the procedure. 16 Selecting preset sound modes- To change the measuring unit Using the equalizer-EQ You can adjust the sound equalization patterns to your preference by adding a progressively longer delay time to the low and mid frequencies, so that all frequencies reach the listener's ears at the proper time. A more brilliance and clearer sound ...

Instructions
Page 17
Once you select Parametric EQ. 17 Then repeat steps 3 to 6. 7 Finish the procedure. Band1 : 20.0 Hz - 1.2 kHz Band2 : 80.0 Hz - 5.0 kHz Band3 : 315.0 Hz - 20 kHz 4 Adjust the enhanced level for the selected frequency band. 4 Repeat steps 2 and 3 to adjust the other frequency bands. 5 6 Select one of the user modes. 3 Select a band. Adjusting Parametric EQ 1 Enter the EQ menu (see page 4). 2 • To adjust the other bands, press BACK. ENGLISH Storing your own sound modes 1 Select a sound mode. 2 Select a frequency band. 3 Adjust the enhanced level for the selected band. 5 ...
Once you select Parametric EQ. 17 Then repeat steps 3 to 6. 7 Finish the procedure. Band1 : 20.0 Hz - 1.2 kHz Band2 : 80.0 Hz - 5.0 kHz Band3 : 315.0 Hz - 20 kHz 4 Adjust the enhanced level for the selected frequency band. 4 Repeat steps 2 and 3 to adjust the other frequency bands. 5 6 Select one of the user modes. 3 Select a band. Adjusting Parametric EQ 1 Enter the EQ menu (see page 4). 2 • To adjust the other bands, press BACK. ENGLISH Storing your own sound modes 1 Select a sound mode. 2 Select a frequency band. 3 Adjust the enhanced level for the selected band. 5 ...
Instructions
Page 18
ENGLISH Activating crossover network By activating crossover network, you can adjust the sound characteristics to enter its submenu. ! otherwise, it may damage the speakers. • For 3-way network speaker system, see left and right speaker balance. 18 Setting the sound modes-SEL You can allocate different frequency range of the following: • Before using the system, activate crossover network and preset the appropriate cutoff frequencies for HPF/LPF (especially for details.) • To adjust other indicators). You cannot perform other operations until you have ...
ENGLISH Activating crossover network By activating crossover network, you can adjust the sound characteristics to enter its submenu. ! otherwise, it may damage the speakers. • For 3-way network speaker system, see left and right speaker balance. 18 Setting the sound modes-SEL You can allocate different frequency range of the following: • Before using the system, activate crossover network and preset the appropriate cutoff frequencies for HPF/LPF (especially for details.) • To adjust other indicators). You cannot perform other operations until you have ...

Instructions
Page 19
ENGLISH To adjust reproduced frequency level-X-Over This setting is available only when crossover network (see page 18) is made, it will automatically increase or decrease according to the adjusted level. 1 Select a source before entering the SEL menu. 2 Adjust to match the input level to the FM sound level. 19 S.woofer 1 Adjust the output level. HPF : Frequencies lower than the selected level are cut -off . Once an adjustment is activated. 1 Select a filter. When you connect high-range speakers to Front or Rear output, select "On" for the corresponding HPF to prevent the ...
ENGLISH To adjust reproduced frequency level-X-Over This setting is available only when crossover network (see page 18) is made, it will automatically increase or decrease according to the adjusted level. 1 Select a source before entering the SEL menu. 2 Adjust to match the input level to the FM sound level. 19 S.woofer 1 Adjust the output level. HPF : Frequencies lower than the selected level are cut -off . Once an adjustment is activated. 1 Select a filter. When you connect high-range speakers to Front or Rear output, select "On" for the corresponding HPF to prevent the ...

Instructions
Page 20
... [Initial] Display demonstration • Off : Display demonstration will be activated automatically if no operation is automatically adjusted using the clock data provided via the satellite radio channel. : Cancels.
... [Initial] Display demonstration • Off : Display demonstration will be activated automatically if no operation is automatically adjusted using the clock data provided via the satellite radio channel. : Cancels.

Instructions
Page 21
...is 100 kHz. AM/FM intervals are set to 9 kHz/50 kHz (100 kHz during auto search). *1 Displayed only when SIRIUS Satellite radio or XM Satellite radio is connected. *2 Displayed only when "Clock Adj" is set to 10 kHz/200 kHz. : When using in any other areas. ... effect may be lost.) : Subject to DST. : Cancels. AM/FM intervals are set to "On", selecting "1" to "Auto." *3 Displayed only when SIRIUS Satellite radio is connected. *4 Some characters or symbols will not be shown correctly (or will remain. Dimmer • Auto [Initial] • Time Set • Off •...
...is 100 kHz. AM/FM intervals are set to 9 kHz/50 kHz (100 kHz during auto search). *1 Displayed only when SIRIUS Satellite radio or XM Satellite radio is connected. *2 Displayed only when "Clock Adj" is set to 10 kHz/200 kHz. : When using in any other areas. ... effect may be lost.) : Subject to DST. : Cancels. AM/FM intervals are set to "On", selecting "1" to "Auto." *3 Displayed only when SIRIUS Satellite radio is connected. *4 Some characters or symbols will not be shown correctly (or will remain. Dimmer • Auto [Initial] • Time Set • Off •...
