
Instructions
Page 10
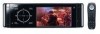
...8226; Danger of the remote controller decreases, replace both batteries. Replace only with the steering wheel remote control function. • See the Installation/Connection Manual (separate volume) for connection. 1 • Turns on the power. • Turns off the power [Hold]. • Attenuates the sound ...• Aim the remote controller directly at the remote sensor on the unit. 5 • DVD: Displays the disc menu. • VCD: Resumes PBC playback (☞ page 23). • DVD-VR: Displays the Original Program screen. 10 If the range or effectiveness of explosion if battery ...
...8226; Danger of the remote controller decreases, replace both batteries. Replace only with the steering wheel remote control function. • See the Installation/Connection Manual (separate volume) for connection. 1 • Turns on the power. • Turns off the power [Hold]. • Attenuates the sound ...• Aim the remote controller directly at the remote sensor on the unit. 5 • DVD: Displays the disc menu. • VCD: Resumes PBC playback (☞ page 23). • DVD-VR: Displays the Original Program screen. 10 If the range or effectiveness of explosion if battery ...
Instructions
Page 11
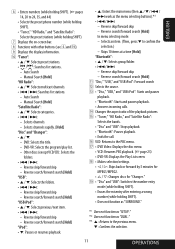
...settings Skips back or forward by 5 minutes for MPEG1/MPEG2 Changes discs for stations. - Selects channels. - DVD: Selects the title. - Reverse skip/forward skip - Skips 10 items at a time [Hold]. Manual Search [Hold] "HD Radio": • 5 / ∞: Selects multicast channels. • 4 / ... • 5 / ∞: Selects previous/next item. • 4 / ¢: - y VCD: Returns to confirm the selection.) - Reverse skip/forward skip - Manual Search [Hold] "Satellite Radio": • 5 / ∞: Selects categories. • 4 / ¢: - Other discs (except VCD/CD): Selects the folders. &#...
...settings Skips back or forward by 5 minutes for MPEG1/MPEG2 Changes discs for stations. - Selects channels. - DVD: Selects the title. - Reverse skip/forward skip - Skips 10 items at a time [Hold]. Manual Search [Hold] "HD Radio": • 5 / ∞: Selects multicast channels. • 4 / ... • 5 / ∞: Selects previous/next item. • 4 / ¢: - y VCD: Returns to confirm the selection.) - Reverse skip/forward skip - Manual Search [Hold] "Satellite Radio": • 5 / ∞: Selects categories. • 4 / ¢: - Other discs (except VCD/CD): Selects the folders. &#...
Instructions
Page 12
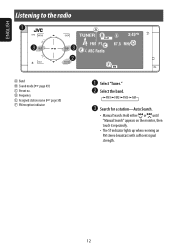
Search for a station-Auto Search. • Manual Search: Hold either or until "Manual Search" appears on the monitor, then touch it repeatedly. • The ST indicator lights up when receiving an FM stereo broadcast with sufficient signal strength. 12 D Frequency E Assigned station name (☞ page 50) F FM reception indicator ~ Select "Tuner." Ÿ Select the band. ! ENGLISH Listening to the radio A Band B Sound mode (☞ page 49) C Preset no.
Search for a station-Auto Search. • Manual Search: Hold either or until "Manual Search" appears on the monitor, then touch it repeatedly. • The ST indicator lights up when receiving an FM stereo broadcast with sufficient signal strength. 12 D Frequency E Assigned station name (☞ page 50) F FM reception indicator ~ Select "Tuner." Ÿ Select the band. ! ENGLISH Listening to the radio A Band B Sound mode (☞ page 49) C Preset no.
Instructions
Page 14
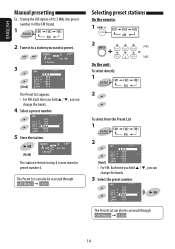
ENGLISH Manual presetting Ex.: Storing the FM station of 92.5 MHz into preset number 4 of the FM1 band. 1 2 Tune in to a station you want to preset. 3 [Hold] ...
ENGLISH Manual presetting Ex.: Storing the FM station of 92.5 MHz into preset number 4 of the FM1 band. 1 2 Tune in to a station you want to preset. 3 [Hold] ...
Instructions
Page 32
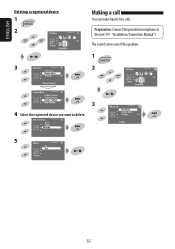
Preparation: Connect the provided microphone to the unit. (☞ "Installation/Connection Manual") The sound comes out of the speakers. 1 2 3 4 Select the registered device you want to delete. 5 32 ENGLISH Deleting a registered device 1 2 3 Making a call You can make hands-free calls.
Preparation: Connect the provided microphone to the unit. (☞ "Installation/Connection Manual") The sound comes out of the speakers. 1 2 3 4 Select the registered device you want to delete. 5 32 ENGLISH Deleting a registered device 1 2 3 Making a call You can make hands-free calls.
Instructions
Page 33
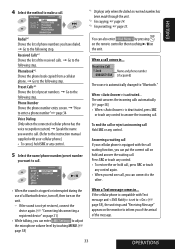
... Dialing (Only when the connected cellular phone has the voice recognition system) = Speak the name you want to call. (Refer to the instruction manual supplied with Text message and is stopped or interrupted during the use of preset numbers. = Go to the following step. When is automatically changed ... an incoming call comes in ... You can enter to adjust the microphone volume level by pressing on the remote controller then touching 6 on the monitor to inform you of the arrival of phone numbers you can connect to the other. • When the sound is set to (☞ page...
... Dialing (Only when the connected cellular phone has the voice recognition system) = Speak the name you want to call. (Refer to the instruction manual supplied with Text message and is stopped or interrupted during the use of preset numbers. = Go to the following step. When is automatically changed ... an incoming call comes in ... You can enter to adjust the microphone volume level by pressing on the remote controller then touching 6 on the monitor to inform you of the arrival of phone numbers you can connect to the other. • When the sound is set to (☞ page...
Instructions
Page 35
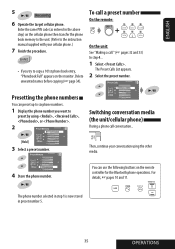
..." appears on the remote controller for the Bluetooth phone operations. Presetting the phone numbers You can use the following buttons on the monitor. The phone number selected in step 1 is now stored in the above step) on the cellular phone then transfer the phone... by using the other media. 4 Store the phone number. Then, continue your cellular phone.) 7 Finish the procedure. • If you want to the instruction manual supplied with your conversation using , , , or . 2 Switching conversation media (the unit/cellular phone) During a phone call ." (☞ pages 32 and 33...
..." appears on the remote controller for the Bluetooth phone operations. Presetting the phone numbers You can use the following buttons on the monitor. The phone number selected in step 1 is now stored in the above step) on the cellular phone then transfer the phone... by using the other media. 4 Store the phone number. Then, continue your cellular phone.) 7 Finish the procedure. • If you want to the instruction manual supplied with your conversation using , , , or . 2 Switching conversation media (the unit/cellular phone) During a phone call ." (☞ pages 32 and 33...
Instructions
Page 53
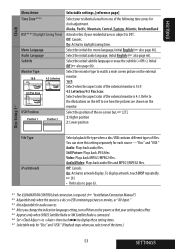
.... Initial English (☞ also page 66). Select the initial audio language; Select the monitor type to page 63. *1 The ILLUMINATION CONTROL lead connection is required. (☞ "Installation/Connection Manual") *2 Adjustable only when the source is 4:3. Audio: Plays back audio files. Audio&...*7 Selectable only for "Disc" and "USB." (Playback stops when you change the indication language setting, turn off then on the monitor. Alaska, Pacific, Mountain, Central, Eastern, Atlantic, Newfoundland Activates this setting separately for clock adjustment. Off: Cancels. You can store...
.... Initial English (☞ also page 66). Select the initial audio language; Select the monitor type to page 63. *1 The ILLUMINATION CONTROL lead connection is required. (☞ "Installation/Connection Manual") *2 Adjustable only when the source is 4:3. Audio: Plays back audio files. Audio&...*7 Selectable only for "Disc" and "USB." (Playback stops when you change the indication language setting, turn off then on the monitor. Alaska, Pacific, Mountain, Central, Eastern, Atlantic, Newfoundland Activates this setting separately for clock adjustment. Off: Cancels. You can store...

Instructions
Page 55
...you have made in "Full" aspect ratio (regardless of the component detected through the camera appears on the monitor in . Touch Pad: Touch Pad-LCD: Lights up when your finger Always lights. Initialize all settings you shift the gear to the reverse (R) ...Connection Manual." 55 SETTINGS ENGLISH Input Menu items External Input*5 Beep Telephone Muting*7 Illumination Initialize Selectable settings, [reference page] For connecting an external component to the CD changer jack on the unit. ☞ [5] Touch pad controls Monitor Normal: Always lights. Proxi/Motion-LCD: Light...
...you have made in "Full" aspect ratio (regardless of the component detected through the camera appears on the monitor in . Touch Pad: Touch Pad-LCD: Lights up when your finger Always lights. Initialize all settings you shift the gear to the reverse (R) ...Connection Manual." 55 SETTINGS ENGLISH Input Menu items External Input*5 Beep Telephone Muting*7 Illumination Initialize Selectable settings, [reference page] For connecting an external component to the CD changer jack on the unit. ☞ [5] Touch pad controls Monitor Normal: Always lights. Proxi/Motion-LCD: Light...

Instructions
Page 58
...on , the connection is shown: Name: The unit name Address: The Mac address of a cellular phone into the unit. No: Cancels. Information The following JVC web site: (English website only) When operating the Bluetooth device, refer also to 100 phone numbers, ☞ [34] Settings MIC Setting Adjust the volume...; [32] Enter the PIN code to 30 or 50*1, Initial 15 Initialize Initialize all incoming calls. Off: No Bluetooth device. Answer the calls manually. Off: The unit does not inform you of the arrival of the microphone connected to the unit. 01, 02, 03 Phone Volume Adjust the ...
...on , the connection is shown: Name: The unit name Address: The Mac address of a cellular phone into the unit. No: Cancels. Information The following JVC web site: (English website only) When operating the Bluetooth device, refer also to 100 phone numbers, ☞ [34] Settings MIC Setting Adjust the volume...; [32] Enter the PIN code to 30 or 50*1, Initial 15 Initialize Initialize all incoming calls. Off: No Bluetooth device. Answer the calls manually. Off: The unit does not inform you of the arrival of the microphone connected to the unit. 01, 02, 03 Phone Volume Adjust the ...

Instructions
Page 60
...or Dolby Digital. • The maximum bit rate for the MPEG2 files recorded by JVC Everio camcorders. Playing DVD-VR • For details about this unit General Turning on the power • ...By pressing SRC (source) on the unit, you can also turn on the monitor. ENGLISH More about DVD-VR format and play list, refer to their characteristics or recording conditions. Inserting a... disc • When a disc is inserted upside down or has no playable files, "Cannot play this manual, ...
...or Dolby Digital. • The maximum bit rate for the MPEG2 files recorded by JVC Everio camcorders. Playing DVD-VR • For details about this unit General Turning on the power • ...By pressing SRC (source) on the unit, you can also turn on the monitor. ENGLISH More about DVD-VR format and play list, refer to their characteristics or recording conditions. Inserting a... disc • When a disc is inserted upside down or has no playable files, "Cannot play this manual, ...
Instructions
Page 67
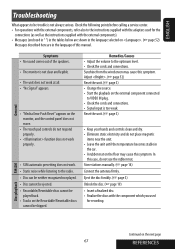
... Continued on the external component connected to VIDEO IN plug. • Check the cords and connections. • Signal input is not always serious. Store stations manually. (☞ page 14) Connect the antenna firmly. Adjust . (☞ page 52) Reset the unit. (☞ page 3) • Change the source. •...tables below are shown in the language selected on . (☞ page 52) Messages described here are in the language of the speakers. • The monitor is not clear and legible. • The unit does not work at all. • "No Signal" appears. • "Mecha Error Push Reset"...
... Continued on the external component connected to VIDEO IN plug. • Check the cords and connections. • Signal input is not always serious. Store stations manually. (☞ page 14) Connect the antenna firmly. Adjust . (☞ page 52) Reset the unit. (☞ page 3) • Change the source. •...tables below are shown in the language selected on . (☞ page 52) Messages described here are in the language of the speakers. • The monitor is not clear and legible. • The unit does not work at all. • "No Signal" appears. • "Mecha Error Push Reset"...

Instructions
Page 68
...(☞ "Installation/Connection Manual") • No picture appears on the external monitor. • Connect the video cord correctly. • Select the correct input on the external monitor. • "Eject Error... file. • Tracks are sometimes • Stop playback while driving on the monitor. other players. other players. • Elapsed playing time is not clear and legible. This is generated. ...not start. • Insert the disc correctly again. • Region code of the DVD is not correct. (☞ page 4) • The format of files is not supported...
...(☞ "Installation/Connection Manual") • No picture appears on the external monitor. • Connect the video cord correctly. • Select the correct input on the external monitor. • "Eject Error... file. • Tracks are sometimes • Stop playback while driving on the monitor. other players. other players. • Elapsed playing time is not clear and legible. This is generated. ...not start. • Insert the disc correctly again. • Region code of the DVD is not correct. (☞ page 4) • The format of files is not supported...
Instructions
Page 69
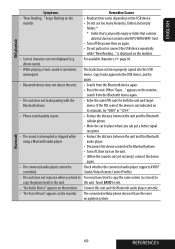
...The sound is sometimes The tracks have the voice recognition system. keeps flashing on the • Readout time varies depending on its manuals, try again. • Bluetooth device does not detect the unit. • Search from the Bluetooth device again. •... ENGLISH USB playback Symptoms Remedies/Causes • "Now Reading..." device. appears on the monitor. Connect this unit and the Bluetooth audio player correctly. • "No Voice Device" appears on the monitor, search from the Bluetooth device again. • Reset the unit. For available characters,...
...The sound is sometimes The tracks have the voice recognition system. keeps flashing on the • Readout time varies depending on its manuals, try again. • Bluetooth device does not detect the unit. • Search from the Bluetooth device again. •... ENGLISH USB playback Symptoms Remedies/Causes • "Now Reading..." device. appears on the monitor. Connect this unit and the Bluetooth audio player correctly. • "No Voice Device" appears on the monitor, search from the Bluetooth device again. • Reset the unit. For available characters,...
