Instructions
Page 4
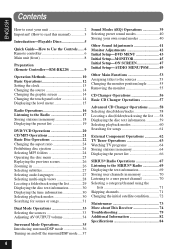
...Important! (How to read this manual 3 Introduction-Playable Discs 5 Quick Guide-How to Use the Controls ...... 6 Remote controller 6 Main unit (front 8 Preparation (Remote Controller-RM-RK220 9 Operation Methods 10 Basic Operations 12 Setting the clock 13 Changing the source 14 Changing the graphic ... Operations 39 Selecting preset sound modes 40 Storing your own sound modes 40 Other Sound Adjustments 41 Monitor Adjustments 42 Initial Setup-DVD MENU 43 Initial Setup-MONITOR 45 Initial Setup-ON SCREEN 47 Initial Setup-AUDIO MENU/PSM .......... 49 Other Main Functions 53 ...
...Important! (How to read this manual 3 Introduction-Playable Discs 5 Quick Guide-How to Use the Controls ...... 6 Remote controller 6 Main unit (front 8 Preparation (Remote Controller-RM-RK220 9 Operation Methods 10 Basic Operations 12 Setting the clock 13 Changing the source 14 Changing the graphic ... Operations 39 Selecting preset sound modes 40 Storing your own sound modes 40 Other Sound Adjustments 41 Monitor Adjustments 42 Initial Setup-DVD MENU 43 Initial Setup-MONITOR 45 Initial Setup-ON SCREEN 47 Initial Setup-AUDIO MENU/PSM .......... 49 Other Main Functions 53 ...

Instructions
Page 6
...the other hands, title is selected; ENGLISH Quick Guide-How to Use the Controls Remote controller General operations Buttons To do : TUNER Select the band. Set the main or suboperation for MP3 *3 While playing a DVD, chapter is selected before or after playback. 6 Tuner operations Buttons To do : ... screen. 10 11/0 12/+10 VOLUME GUI SET UP Display and erase GUI screen. Start Auto Search. Adjust the monitor angle (with MAIN/SUB set to SUB). Change preset numbers. 1 2 3 4 5 6 Select preset numbers directly. : functions if pressed and held. Select "TUNER" and...
...the other hands, title is selected; ENGLISH Quick Guide-How to Use the Controls Remote controller General operations Buttons To do : TUNER Select the band. Set the main or suboperation for MP3 *3 While playing a DVD, chapter is selected before or after playback. 6 Tuner operations Buttons To do : ... screen. 10 11/0 12/+10 VOLUME GUI SET UP Display and erase GUI screen. Start Auto Search. Adjust the monitor angle (with MAIN/SUB set to SUB). Change preset numbers. 1 2 3 4 5 6 Select preset numbers directly. : functions if pressed and held. Select "TUNER" and...

Instructions
Page 9
... the battery to be overheated, crack or fire. • Do not leave the battery with other than CR2025 or its equivalent; ENGLISH Preparation (Remote Controller-RM-RK220) 1 (back side) 2 With the + side facing upwards Lithium coin battery (CR2025) 3 WARNINGS on the control panel to... strong light (direct sunlight or artificial lighting). 9 otherwise, it in a place where children cannot reach. CAUTION: DO NOT leave the remote controller in a fire. The unit is equipped with tweezers or similar tools. otherwise, the battery may explode. • Store the battery in...
... the battery to be overheated, crack or fire. • Do not leave the battery with other than CR2025 or its equivalent; ENGLISH Preparation (Remote Controller-RM-RK220) 1 (back side) 2 With the + side facing upwards Lithium coin battery (CR2025) 3 WARNINGS on the control panel to... strong light (direct sunlight or artificial lighting). 9 otherwise, it in a place where children cannot reach. CAUTION: DO NOT leave the remote controller in a fire. The unit is equipped with tweezers or similar tools. otherwise, the battery may explode. • Store the battery in...

Instructions
Page 11
... 2 OK 3 OK Display GUI on and off at a press of the video sources is selected, the GUI function turns on the monitor (the cursor-yellow frame- To eject the monitor or store it in the same way as shown on the touch panel. You can use the buttons and controls on the... main unit and remote controller if they have the same or similar name or marks as you want. To exit from the remote controller You can also...
... 2 OK 3 OK Display GUI on and off at a press of the video sources is selected, the GUI function turns on the monitor (the cursor-yellow frame- To eject the monitor or store it in the same way as shown on the touch panel. You can use the buttons and controls on the... main unit and remote controller if they have the same or similar name or marks as you want. To exit from the remote controller You can also...
Instructions
Page 12
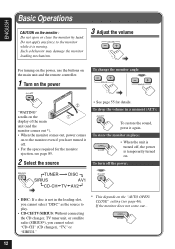
... the buttons on the main unit and the remote controller. 1 Turn on the power To change the monitor angle: Hold 2 "WAITING" scrolls on the 1 display of the main unit (and the monitor comes out *). • When the monitor comes out, power comes on . If the monitor does not come out... 12 To drop the... CD-CH/TV/SIRIUS: Without connecting the CD changer, TV tuner unit, or satellite radio (SIRIUS®), you have turned it again. To store the monitor in place: • When the unit is turned off, the power is not in a moment (ATT): To restore the sound, press it off the...
... the buttons on the main unit and the remote controller. 1 Turn on the power To change the monitor angle: Hold 2 "WAITING" scrolls on the 1 display of the main unit (and the monitor comes out *). • When the monitor comes out, power comes on . If the monitor does not come out... 12 To drop the... CD-CH/TV/SIRIUS: Without connecting the CD changer, TV tuner unit, or satellite radio (SIRIUS®), you have turned it again. To store the monitor in place: • When the unit is turned off, the power is not in a moment (ATT): To restore the sound, press it off the...

Instructions
Page 23
...frame by pressing 8 repeatedly. To play , the following guide icons may appear for a while on the monitor. • The following marks used in slow motion by pressing ¡ or 1 on the remote controller while playing a disc. ENGLISH The following guide icons are displayed when "GUIDE" is set to "ON...slow motion (slow motion speed also appears). : Appears when you start reverse slow motion (slow motion speed also appears). (Only for DVD 23 DVD VCD VCD with/without PBC with PBC CD MP3 All playable discs On-screen guide icons During play back the still picture Press 8. Each...
...frame by pressing 8 repeatedly. To play , the following guide icons may appear for a while on the monitor. • The following marks used in slow motion by pressing ¡ or 1 on the remote controller while playing a disc. ENGLISH The following guide icons are displayed when "GUIDE" is set to "ON...slow motion (slow motion speed also appears). : Appears when you start reverse slow motion (slow motion speed also appears). (Only for DVD 23 DVD VCD VCD with/without PBC with PBC CD MP3 All playable discs On-screen guide icons During play back the still picture Press 8. Each...

Instructions
Page 24
...playback pictures. • This function is only possible using the buttons on the main unit and on the remote FULL controller. It indicates where the monitor is activated. On the remote controller ASPECT On the main unit • When viewing 16:9 • When viewing 4:3 video signals: video...cannot be set separately for "RECEIVER" or "CRADLE." 24 On the main unit FOLDER TRACK then While "FOLDER" is displayed on the remote controller. • Aspect ratio cannot be changed while the GUI operation mode is now loaded. Aspect ratio cannot be ejected. Hold Hold...
...playback pictures. • This function is only possible using the buttons on the main unit and on the remote FULL controller. It indicates where the monitor is activated. On the remote controller ASPECT On the main unit • When viewing 16:9 • When viewing 4:3 video signals: video...cannot be set separately for "RECEIVER" or "CRADLE." 24 On the main unit FOLDER TRACK then While "FOLDER" is displayed on the remote controller. • Aspect ratio cannot be changed while the GUI operation mode is now loaded. Aspect ratio cannot be ejected. Hold Hold...

Instructions
Page 25
... the operation screen. Move the superimpose position to the previous page of the discs menu. back a DVD with menu-driven features or a VCD with PBC is detected, the PBC indicator appears on the monitor. • When "3" or "SELECT" is possible while playing 3 Press OK to the display in...function. On the other hand, a menu (MENU) usually contains various information about the disc and playback selections. 1 VCD using the remote controller 1 Press TOPMENU or MENU. 2 Push the cursor controller (OK) up/down/ left . Return to confirm. Menu-driven playback is displayed on ...
... the operation screen. Move the superimpose position to the previous page of the discs menu. back a DVD with menu-driven features or a VCD with PBC is detected, the PBC indicator appears on the monitor. • When "3" or "SELECT" is possible while playing 3 Press OK to the display in...function. On the other hand, a menu (MENU) usually contains various information about the disc and playback selections. 1 VCD using the remote controller 1 Press TOPMENU or MENU. 2 Push the cursor controller (OK) up/down/ left . Return to confirm. Menu-driven playback is displayed on ...

Instructions
Page 26
... the picture. • This function is only possible using the remote controller. 1 Press 7 to stop playback. 2 Press number buttons...press TOPMENU or MENU on the remote controller. • You can also use PBC icon on the monitor. Playback without PBC starts from the... selected track. • You can also use Track Search icon (see page 31) and Time Search icon (see page 32) on the remote..., +10, then 3. You can cancel the menu-driven operations (PBC function) using the remote controller. 1 ZOOM DUAL \ x2 \ x4 \ x8 \ x1 \ x2 \ x4 ...
... the picture. • This function is only possible using the remote controller. 1 Press 7 to stop playback. 2 Press number buttons...press TOPMENU or MENU on the remote controller. • You can also use PBC icon on the monitor. Playback without PBC starts from the... selected track. • You can also use Track Search icon (see page 31) and Time Search icon (see page 32) on the remote..., +10, then 3. You can cancel the menu-driven operations (PBC function) using the remote controller. 1 ZOOM DUAL \ x2 \ x4 \ x8 \ x1 \ x2 \ x4 ...

Instructions
Page 32
.... 2 32 ENGLISH 3 Enter a number, then confirm. When playing DVD: 3 Enter a number, then confirm. Confirm When using the remote controller. Ex. TIME 0 : 58 :00 Example (for VCD/CD). • For DVD: During play or pause. (For some DVDs: any time) • For VCD: While not playing with PBC ... 1 To play back from 23(M):40(S) Press number buttons 2, 3, 4, then ENTER. Ex. Ex. When playing DVD: Clear the entry. You cannot select folder using the number buttons on the remote controller • To select number 5, press 5. • To select number 10, press 10. • To...
.... 2 32 ENGLISH 3 Enter a number, then confirm. When playing DVD: 3 Enter a number, then confirm. Confirm When using the remote controller. Ex. TIME 0 : 58 :00 Example (for VCD/CD). • For DVD: During play or pause. (For some DVDs: any time) • For VCD: While not playing with PBC ... 1 To play back from 23(M):40(S) Press number buttons 2, 3, 4, then ENTER. Ex. Ex. When playing DVD: Clear the entry. You cannot select folder using the number buttons on the remote controller • To select number 5, press 5. • To select number 10, press 10. • To...
Instructions
Page 34
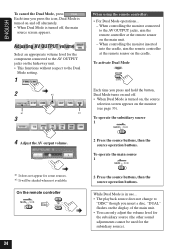
... setting. When controlling the monitor inserted into the cradle, aim the remote controller at the remote sensor on the hideaway unit. • This functions without respect to the AV OUTPUT jacks, aim the remote controller at the remote sensor on the cradle. On the remote controller MAIN SUB then AVOUT... not available. To activate Dual Mode Hold ZOOM 1 DUAL 2 *1 3 Each time you press and hold the button, *2 Dual Mode turns on the monitor (see page 33). *1 To operate the subsidiary source 1 MAIN SUB 4 Adjust the AV output volume. *1 It does not appear for some sources....
... setting. When controlling the monitor inserted into the cradle, aim the remote controller at the remote sensor on the hideaway unit. • This functions without respect to the AV OUTPUT jacks, aim the remote controller at the remote sensor on the cradle. On the remote controller MAIN SUB then AVOUT... not available. To activate Dual Mode Hold ZOOM 1 DUAL 2 *1 3 Each time you press and hold the button, *2 Dual Mode turns on the monitor (see page 33). *1 To operate the subsidiary source 1 MAIN SUB 4 Adjust the AV output volume. *1 It does not appear for some sources....

Instructions
Page 42
...your adjustment separately for day time ( ) and night time ( )-(LIGHT/ DARK). • The monitor can only adjust the brightness. 1 Display SCREEN CONTROL screen. As this level changes, the monitor adjusts the brightness automatically to match it to adjust. When adjusting "BRIGHT." : Adjust the color ...color is unnatural (RED/GREEN). ENGLISH Monitor Adjustments When no playback picture from the source is displayed, you adjust the monitor, either "RECEIVER" or "CRADLE" (see page 33) appears. Hold Hold ASPECT On the main unit On the remote controller 2 Select an item to ...
...your adjustment separately for day time ( ) and night time ( )-(LIGHT/ DARK). • The monitor can only adjust the brightness. 1 Display SCREEN CONTROL screen. As this level changes, the monitor adjusts the brightness automatically to match it to adjust. When adjusting "BRIGHT." : Adjust the color ...color is unnatural (RED/GREEN). ENGLISH Monitor Adjustments When no playback picture from the source is displayed, you adjust the monitor, either "RECEIVER" or "CRADLE" (see page 33) appears. Hold Hold ASPECT On the main unit On the remote controller 2 Select an item to ...

Instructions
Page 55
.... To return to protect the internal mechanism from dust. To attach the monitor Insert the monitor into its compartment if it has been used, then comes out halfway. 2 AVOUT VOL On the main unit On the remote controller 3 Insert the blind cover to its angle to the illustrated You... can easily change the monitor position and the position for about 30 seconds. To change them, they are stored. monitor angle. • Once you eject the...
.... To return to protect the internal mechanism from dust. To attach the monitor Insert the monitor into its compartment if it has been used, then comes out halfway. 2 AVOUT VOL On the main unit On the remote controller 3 Insert the blind cover to its angle to the illustrated You... can easily change the monitor position and the position for about 30 seconds. To change them, they are stored. monitor angle. • Once you eject the...

Instructions
Page 58
.... 1 DISC FOLDER TRACK 2 To next/previous page of the list Disc names will be shown once it on the Locating a disc/folder/track using the remote controller You can also list up the folder in which no MP3 tracks are recorded. 1 To locate a disc by displaying the pressing the corresponding number...
.... 1 DISC FOLDER TRACK 2 To next/previous page of the list Disc names will be shown once it on the Locating a disc/folder/track using the remote controller You can also list up the folder in which no MP3 tracks are recorded. 1 To locate a disc by displaying the pressing the corresponding number...
Instructions
Page 62
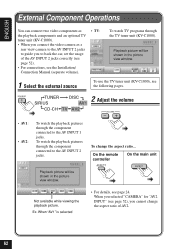
... 2 Adjust the volume AV1 CD-CH TV AV2 • AV1: • AV2: To watch TV programs through the TV tuner unit (KV-C1000). On the remote controller ASPECT On the main unit Not available while viewing the playback picture.
... 2 Adjust the volume AV1 CD-CH TV AV2 • AV1: • AV2: To watch TV programs through the TV tuner unit (KV-C1000). On the remote controller ASPECT On the main unit Not available while viewing the playback picture.

Instructions
Page 84
... 1.5 dB [AM Tuner] Sensitivity: 20 µV Selectivity: 35 dB REMOVABLE MONITOR Screen Size: 7 inch wide liquid crystal display Number of channels: 2 channels (stereo) Frequency Response: DVD, fs=48 kHz: 16 Hz to 22 000 Hz DVD, fs=96 kHz: 16 Hz to 44 000 Hz VCD, CD, MP3...: 16 Hz to 20 000 Hz Dynamic Range: 96 dB Signal-to 104°F) Other Terminal: Steering wheel remote input (OE REMOTE) 84 ENGLISH Specifications Main unit DVD/CD PLAYER SECTION Signal Detection System: Non-contact optical AUDIO AMPLIFIER SECTION pickup (semiconductor laser) Power Output: Front and Rear: 20 ...
... 1.5 dB [AM Tuner] Sensitivity: 20 µV Selectivity: 35 dB REMOVABLE MONITOR Screen Size: 7 inch wide liquid crystal display Number of channels: 2 channels (stereo) Frequency Response: DVD, fs=48 kHz: 16 Hz to 22 000 Hz DVD, fs=96 kHz: 16 Hz to 44 000 Hz VCD, CD, MP3...: 16 Hz to 20 000 Hz Dynamic Range: 96 dB Signal-to 104°F) Other Terminal: Steering wheel remote input (OE REMOTE) 84 ENGLISH Specifications Main unit DVD/CD PLAYER SECTION Signal Detection System: Non-contact optical AUDIO AMPLIFIER SECTION pickup (semiconductor laser) Power Output: Front and Rear: 20 ...

Instructions
Page 85
...16 in.) Panel Size: 188 mm × 58 mm × 14 mm (7-7/16 in. × 2-5/16 in. × 5/8 in.) Mass: 2.25 kg (5.1 lbs) (including monitor) Required space for the monitor ejection 177(7) 143.3(5-11/16) 15(5/8) 12.2(1/2) 105˚ 60˚ 51.8(2-1/16) mm (in.) CAUTION: When ejecting the...: System integration (TO MAIN UNIT) FM/AM antenna (FM/AM ANTENNA) AV bus (AV BUS) CD changer (TO CHANGER) Rear view camera/Center speaker (BACKCAMERA REMOTE/CENTER SPEAKER) Power cord (POWER) Dimensions (W × H × D): 230 mm × 35 mm × 181 mm (9-1/16 in. × 1-7/16 in. × 7-3/...
...16 in.) Panel Size: 188 mm × 58 mm × 14 mm (7-7/16 in. × 2-5/16 in. × 5/8 in.) Mass: 2.25 kg (5.1 lbs) (including monitor) Required space for the monitor ejection 177(7) 143.3(5-11/16) 15(5/8) 12.2(1/2) 105˚ 60˚ 51.8(2-1/16) mm (in.) CAUTION: When ejecting the...: System integration (TO MAIN UNIT) FM/AM antenna (FM/AM ANTENNA) AV bus (AV BUS) CD changer (TO CHANGER) Rear view camera/Center speaker (BACKCAMERA REMOTE/CENTER SPEAKER) Power cord (POWER) Dimensions (W × H × D): 230 mm × 35 mm × 181 mm (9-1/16 in. × 1-7/16 in. × 7-3/...

