
Instructions
Page 307
...specified in the illustration below. 2 Connect the antenna cord. 3 Finally connect the wiring harness to the unit. 1 2 3 1 2 3 Rear ground terminal To an external component (see diagram White with black stripe White Ύи '¢"« Gray with black ... ground this unit to the car's chassis again after installation. ྑཕો PRECAUTIONS on . *4 *4 USB cable / USB USB (see diagram 15 A fuse 15 A ۘᎳീ 15 A Black ෨и '¥" Yellow *4 ෦и *4 4 Red ߹и...
...specified in the illustration below. 2 Connect the antenna cord. 3 Finally connect the wiring harness to the unit. 1 2 3 1 2 3 Rear ground terminal To an external component (see diagram White with black stripe White Ύи '¢"« Gray with black ... ground this unit to the car's chassis again after installation. ྑཕો PRECAUTIONS on . *4 *4 USB cable / USB USB (see diagram 15 A fuse 15 A ۘᎳീ 15 A Black ෨и '¥" Yellow *4 ෦и *4 4 Red ߹и...

Instructions
Page 381
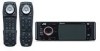
...stripe Orange with black stripe Left speaker (rear) Purple Right speaker (rear) KV-MR9010 9-INCH WIDESCREEN MONITOR (not supplied) Camcorder, rear view camera, etc. otherwise, the unit will be seriously damaged. ... mA max.) To car light control switch To cellular phone system To parking brake (see diagram ) *3 Not included for this unit *4 Before checking the operation of this unit prior... be different in the illustration below. 2 Connect the antenna cord. 3 Finally connect the wiring harness to the unit. Incorrect connection may be turned on power supply and speaker connections:...
...stripe Orange with black stripe Left speaker (rear) Purple Right speaker (rear) KV-MR9010 9-INCH WIDESCREEN MONITOR (not supplied) Camcorder, rear view camera, etc. otherwise, the unit will be seriously damaged. ... mA max.) To car light control switch To cellular phone system To parking brake (see diagram ) *3 Not included for this unit *4 Before checking the operation of this unit prior... be different in the illustration below. 2 Connect the antenna cord. 3 Finally connect the wiring harness to the unit. Incorrect connection may be turned on power supply and speaker connections:...

Instructions
Page 382
... at all. * Have you have connected the center speaker, make sure that it out (2). • iPod is turned off the built-in the diagram below. • All the components, adapters or signal cords need to be turned on. * Is the yellow lead connected? • No sound...be controlled through this unit) Remote lead Remote lead (Blue with paint, remove the paint before attaching the wire). Player" (see page 49 of the INSTRUCTIONS). • To use JVC CD changer, Apple iPod or JVC D. approx.1.2 m 3.5 mm stereo mini plug External component You cannot connect a computer to activate the ...
... at all. * Have you have connected the center speaker, make sure that it out (2). • iPod is turned off the built-in the diagram below. • All the components, adapters or signal cords need to be turned on. * Is the yellow lead connected? • No sound...be controlled through this unit) Remote lead Remote lead (Blue with paint, remove the paint before attaching the wire). Player" (see page 49 of the INSTRUCTIONS). • To use JVC CD changer, Apple iPod or JVC D. approx.1.2 m 3.5 mm stereo mini plug External component You cannot connect a computer to activate the ...


