
Printer Friendly Spec
Page 2
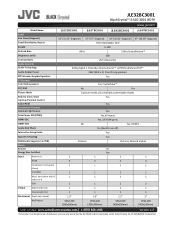
...; E-LED 3001 HDTV www.jvc.com Model Name JLE32BC3001 JLE37BC3001 JLE42BC3001 JLE47BC3001 Panel Size Class (Diagonal) 32" (31.55" diagonal) 37" (37" diagonal) 42" (42.02" diagonal) 47" (46.96" diagonal) Panel/Resolution/Aspect... Technology Dolby Digital 5.1 Decode, Xinema Sound ™ w/SRS StudioSound HD™ Audio Output Power 20W (10W x 2) Front Firing speakers MTS decode/Graphic Equalizer Yes TV Features Color Enhancement Yes, CrystalColor™ PIP/POP No Yes Picture Mode 6 picture mode, plus multiple customizable modes Build in tuner/Close Yes Caption/Parental...
...; E-LED 3001 HDTV www.jvc.com Model Name JLE32BC3001 JLE37BC3001 JLE42BC3001 JLE47BC3001 Panel Size Class (Diagonal) 32" (31.55" diagonal) 37" (37" diagonal) 42" (42.02" diagonal) 47" (46.96" diagonal) Panel/Resolution/Aspect... Technology Dolby Digital 5.1 Decode, Xinema Sound ™ w/SRS StudioSound HD™ Audio Output Power 20W (10W x 2) Front Firing speakers MTS decode/Graphic Equalizer Yes TV Features Color Enhancement Yes, CrystalColor™ PIP/POP No Yes Picture Mode 6 picture mode, plus multiple customizable modes Build in tuner/Close Yes Caption/Parental...
User Manual
Page 1
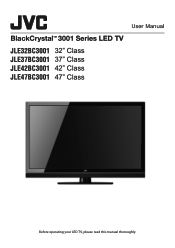
User Manual BlackCrystal™ 3001 Series LED TV JLE32BC3001 32" Class JLE37BC3001 37" Class JLE42BC3001 42" Class JLE47BC3001 47" Class Before operating your LED TV, please read this manual thoroughly.
User Manual BlackCrystal™ 3001 Series LED TV JLE32BC3001 32" Class JLE37BC3001 37" Class JLE42BC3001 42" Class JLE47BC3001 47" Class Before operating your LED TV, please read this manual thoroughly.

User Manual
Page 2
... in which power savings will increase power consumption that you register your JVC LED TV either at the back of your purchase receipt and write down the model and serial number located at our wesite http://go .jvc.com/HDTVSupport/ We recommend that could exceed the limits necessary to qualify... Support and Service Center 1-855-868-1928 or visit our website http://go .jvc.com/HDTVSupport/ or fill out and mail the Product Registration Card on purchasing your JVC LED TV, read these instructions before making any adjustments, and retain them for Energy Star rating. To get the most out ...
... in which power savings will increase power consumption that you register your JVC LED TV either at the back of your purchase receipt and write down the model and serial number located at our wesite http://go .jvc.com/HDTVSupport/ We recommend that could exceed the limits necessary to qualify... Support and Service Center 1-855-868-1928 or visit our website http://go .jvc.com/HDTVSupport/ or fill out and mail the Product Registration Card on purchasing your JVC LED TV, read these instructions before making any adjustments, and retain them for Energy Star rating. To get the most out ...
User Manual
Page 3
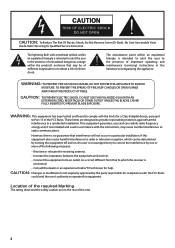
... product's enclosure that may cause harmful interference to which the receiver is no guarantee that to radio communications. Consult the dealer or an experienced radio/TV technician for a Class B digital device, pursuant to constitute a risk of the FCC Rules. CAUTION RISK OF ELECTRIC SHOCK DO NOT OPEN CAUTION: To Reduce The...
... product's enclosure that may cause harmful interference to which the receiver is no guarantee that to radio communications. Consult the dealer or an experienced radio/TV technician for a Class B digital device, pursuant to constitute a risk of the FCC Rules. CAUTION RISK OF ELECTRIC SHOCK DO NOT OPEN CAUTION: To Reduce The...
User Manual
Page 5
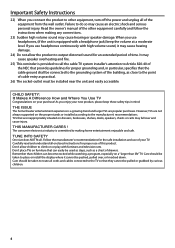
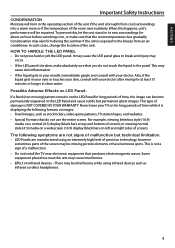
...taken to Article 820-40 of the NEC that can become excited while watching a program, especially on a "larger than life"TV. However, TVs are popular purchases. Don't place TVs on or play with high volume sound, it cannot be used as steps, such as close to do so may fall ...to climb on furniture that provides guidelines for an extended period of this product. The consumer electronics industry is provided to call the cable TV system installer's attention to place or install the display where it may cause hearing or speaker damage. Carefully read and understand all cords ...
...taken to Article 820-40 of the NEC that can become excited while watching a program, especially on a "larger than life"TV. However, TVs are popular purchases. Don't place TVs on or play with high volume sound, it cannot be used as steps, such as close to do so may fall ...to climb on furniture that provides guidelines for an extended period of this product. The consumer electronics industry is provided to call the cable TV system installer's attention to place or install the display where it may cause hearing or speaker damage. Carefully read and understand all cords ...
User Manual
Page 6
... • Special Formats that the room temperature rises gradually. Also, if the liquid gets in your eyes or touches your skin, consult with your TV on infrared devices - For example, viewing letterbox style (16:9) media on , or make absolutely sure that produces electromagnetic waves. The following formats or...the following symptoms are not signs of malfunction but permanent ghost images. This type of a malfunction. • Do not install the TV near this happens, unit's performance will form in the operating section of the unit if the unit is brought from an air conditioner.
... • Special Formats that the room temperature rises gradually. Also, if the liquid gets in your eyes or touches your skin, consult with your TV on infrared devices - For example, viewing letterbox style (16:9) media on , or make absolutely sure that produces electromagnetic waves. The following formats or...the following symptoms are not signs of malfunction but permanent ghost images. This type of a malfunction. • Do not install the TV near this happens, unit's performance will form in the operating section of the unit if the unit is brought from an air conditioner.
User Manual
Page 7
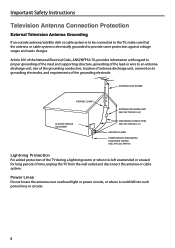
...(NEC SECTION 810-21) GROUND CLAMPS POWER SERVICE GROUNDING ELECTRODE SYSTEM (NEC ART 250, PART H) Lightning Protection For added protection of the TV during a lightning storm or when it could fall into such power lines or circuits. 6 Important Safety Instructions Television Antenna Connection Protection External ...Television Antenna Grounding If an outside antenna/satellite dish or cable system is to be connected to the TV, make sure that the antenna or cable system is left unattended or unused for long periods of the grounding electrode. Article ...
...(NEC SECTION 810-21) GROUND CLAMPS POWER SERVICE GROUNDING ELECTRODE SYSTEM (NEC ART 250, PART H) Lightning Protection For added protection of the TV during a lightning storm or when it could fall into such power lines or circuits. 6 Important Safety Instructions Television Antenna Connection Protection External ...Television Antenna Grounding If an outside antenna/satellite dish or cable system is to be connected to the TV, make sure that the antenna or cable system is left unattended or unused for long periods of the grounding electrode. Article ...
User Manual
Page 8
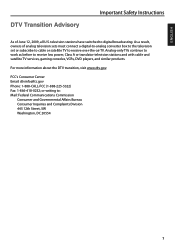
... to receive low power, Class A or translator television stations and with cable and satellite TV services, gaming consoles, VCRs, DVD players, and similar products. Analog-only TVs continue to work as before to digital broadcasting. ENGLISH DTV Transition Advisory Important Safety Instructions As... sets must connect a digital-to-analog converter box to the television set or subscribe to cable or satellite TV to receive over-the-air TV. or writing to: Mail: Federal Communications Commission Consumer and Governmental Affairs Bureau Consumer Inquiries and Complaints Division 445...
... to receive low power, Class A or translator television stations and with cable and satellite TV services, gaming consoles, VCRs, DVD players, and similar products. Analog-only TVs continue to work as before to digital broadcasting. ENGLISH DTV Transition Advisory Important Safety Instructions As... sets must connect a digital-to-analog converter box to the television set or subscribe to cable or satellite TV to receive over-the-air TV. or writing to: Mail: Federal Communications Commission Consumer and Governmental Affairs Bureau Consumer Inquiries and Complaints Division 445...

User Manual
Page 11
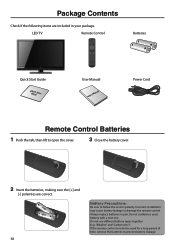
Perform the installation according to the instructions of your TV model. JLE32BC3001(32") & JLE37BC3001(37") 1 Connect the TV's neck to the instructions of your TV model. Attaching the Stand The stand installation varies depending on a flat and clean surface. 6 Attach the stand according to the stand. 2 Secure the base with the provided thumbscrew. 10 Unpacking the TV 1 Remove the remote control, power cord, and other accessories from the foam and caps. 2 Remove the top foam caps. 3 Remove the stand. 4 Remove the TV from the box. 5 Place the TV face down on model.
Perform the installation according to the instructions of your TV model. JLE32BC3001(32") & JLE37BC3001(37") 1 Connect the TV's neck to the instructions of your TV model. Attaching the Stand The stand installation varies depending on a flat and clean surface. 6 Attach the stand according to the stand. 2 Secure the base with the provided thumbscrew. 10 Unpacking the TV 1 Remove the remote control, power cord, and other accessories from the foam and caps. 2 Remove the top foam caps. 3 Remove the stand. 4 Remove the TV from the box. 5 Place the TV face down on model.
User Manual
Page 12
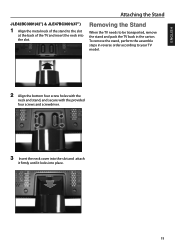
ENGLISH Attaching the Stand JLE42BC3001(42") & JLE47BC3001(47") 1 Align the metal neck of the stand to your TV model. 2 Align the bottom four screw holes with the neck and stand, and secure with the provided four screws and screwdriver. 3 Insert the neck cover into the slot and attach it firmly until it locks into the slot. Removing the Stand When the TV needs to be transported, remove the stand and pack the TV back in reverse order according to the slot at the back of the TV and insert the neck into place. 11 To remove the stand, perform the assemble steps in the carton.
ENGLISH Attaching the Stand JLE42BC3001(42") & JLE47BC3001(47") 1 Align the metal neck of the stand to your TV model. 2 Align the bottom four screw holes with the neck and stand, and secure with the provided four screws and screwdriver. 3 Insert the neck cover into the slot and attach it firmly until it locks into the slot. Removing the Stand When the TV needs to be transported, remove the stand and pack the TV back in reverse order according to the slot at the back of the TV and insert the neck into place. 11 To remove the stand, perform the assemble steps in the carton.
User Manual
Page 13
... a used for a long period of time, remove the batteries to prevent battery leakage. Incorrect installation may cause battery leakage or damage the remote control. LED TV Remote Control I N SLEEP NPUT MENU MEDIA INFO OK WIDE AUDIO RETUR VOL CH MUTE 123 456 789 _ 0 ENT HDMI PC... TV VIDEO COMP MUSIC Batteries Quick Start Guide QGuuicidkeStart User Manual User's Manual Power Cord Remote Control Batteries 1 Push the tab, then lift to open the ...
... a used for a long period of time, remove the batteries to prevent battery leakage. Incorrect installation may cause battery leakage or damage the remote control. LED TV Remote Control I N SLEEP NPUT MENU MEDIA INFO OK WIDE AUDIO RETUR VOL CH MUTE 123 456 789 _ 0 ENT HDMI PC... TV VIDEO COMP MUSIC Batteries Quick Start Guide QGuuicidkeStart User Manual User's Manual Power Cord Remote Control Batteries 1 Push the tab, then lift to open the ...
User Manual
Page 14
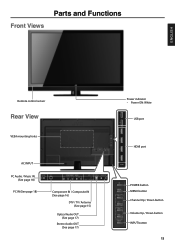
Parts and Functions Front Views ENGLISH Remote control sensor Rear View VESA mounting holes AC INPUT PC Audio / Music IN (See page 18) PC IN (See page 18) Component IN / Composite IN (See page 16) DTV / TV / Antenna (See page 15) Optical Audio OUT (See page 17) Stereo Audio OUT (See page 17) Power indicator • Power ON: White USB port HDMI port POWER button MENU button Channel Up / Down button Volume Up / Down button INPUT button 13
Parts and Functions Front Views ENGLISH Remote control sensor Rear View VESA mounting holes AC INPUT PC Audio / Music IN (See page 18) PC IN (See page 18) Component IN / Composite IN (See page 16) DTV / TV / Antenna (See page 15) Optical Audio OUT (See page 17) Stereo Audio OUT (See page 17) Power indicator • Power ON: White USB port HDMI port POWER button MENU button Channel Up / Down button Volume Up / Down button INPUT button 13
User Manual
Page 15
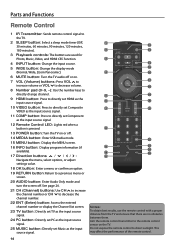
...or CH to decrease the channel number. 22 ENT (Enter) button: Access the entered channel number or display the Channel list screen. 23 TV button: Directly set TV as the input source signal. 24 PC button: Directly set PC as the input source signal. 25 MUSIC button: Directly set Music as..., and HDMI CEC function. 4 INPUT button: Change the input source. 5 WIDE button: Change the display mode (Normal, Wide, Zoom Panoramic). 6 MUTE button: Turn the TV audio off or on. 7 VOL (Volume) buttons: Press VOL to increase volume or VOL to decrease volume. 8 Number pad (0~9, -): Use the number keys to directly...
...or CH to decrease the channel number. 22 ENT (Enter) button: Access the entered channel number or display the Channel list screen. 23 TV button: Directly set TV as the input source signal. 24 PC button: Directly set PC as the input source signal. 25 MUSIC button: Directly set Music as..., and HDMI CEC function. 4 INPUT button: Change the input source. 5 WIDE button: Change the display mode (Normal, Wide, Zoom Panoramic). 6 MUTE button: Turn the TV audio off or on. 7 VOL (Volume) buttons: Press VOL to increase volume or VOL to decrease volume. 8 Number pad (0~9, -): Use the number keys to directly...
User Manual
Page 16
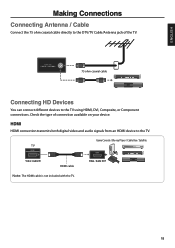
... Audio OUT Note: The HDMI cable is not included with the TV. 15 DTV / TV CABLE / ANTENNA 75 ohm coaxial cable Connecting HD Devices You can connect different devices to the TV. Check the type of the TV. HDMI HDMI connection transmits both digital video and audio signals from ...an HDMI device to the TV using HDMI, DVI, Composite, or Component connections. ENGLISH Making Connections Connecting ...
... Audio OUT Note: The HDMI cable is not included with the TV. 15 DTV / TV CABLE / ANTENNA 75 ohm coaxial cable Connecting HD Devices You can connect different devices to the TV. Check the type of the TV. HDMI HDMI connection transmits both digital video and audio signals from ...an HDMI device to the TV using HDMI, DVI, Composite, or Component connections. ENGLISH Making Connections Connecting ...
User Manual
Page 17
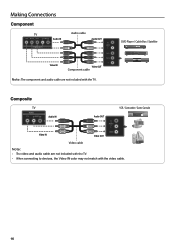
DVD Player / Cable Box / Satellite Composite TV VIDEO VIYD/EVO L AUDIO R Audio IN Video IN VCR / Camcorder / Game Console Audio OUT Video OUT R AUDIO L VIDEO Video cable Note: • The video and audio cable are not included with the video cable. 16 Making Connections Component TV YY/N Pb/Cb Pr/Cr L AUDIO R Audio IN COMPONENT Video IN Audio cable Audio OUT R AUDIO L Pr/Cr Pb/Cb Y Video OUT Component cable Note: The component and audio cable are not included with the TV. • When connecting to devices, the Video IN color may not match with the TV.
DVD Player / Cable Box / Satellite Composite TV VIDEO VIYD/EVO L AUDIO R Audio IN Video IN VCR / Camcorder / Game Console Audio OUT Video OUT R AUDIO L VIDEO Video cable Note: • The video and audio cable are not included with the video cable. 16 Making Connections Component TV YY/N Pb/Cb Pr/Cr L AUDIO R Audio IN COMPONENT Video IN Audio cable Audio OUT R AUDIO L Pr/Cr Pb/Cb Y Video OUT Component cable Note: The component and audio cable are not included with the TV. • When connecting to devices, the Video IN color may not match with the TV.
User Manual
Page 18
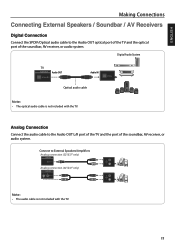
...Connecting External Speakers / Soundbar / AV Receivers Digital Connection Connect the SPDIF/Optical audio cable to the Audio OUT optical port of the TV and the optical port of the soundbar, AV receiver, or audio system. Analog Connection Connect the audio cable to External Speakers/Amplifiers ... R AUDIO L Analog connection (42"&47" only) AUDIO OUT L R R AUDIO L Note: • The audio cable is not included with the TV. 17 Digital Audio System TV AUDIO OUT OPTICAL Audio OUT Audio IN OPTICAL Optical audio cable Note: • The optical audio cable is not included with the...
...Connecting External Speakers / Soundbar / AV Receivers Digital Connection Connect the SPDIF/Optical audio cable to the Audio OUT optical port of the TV and the optical port of the soundbar, AV receiver, or audio system. Analog Connection Connect the audio cable to External Speakers/Amplifiers ... R AUDIO L Analog connection (42"&47" only) AUDIO OUT L R R AUDIO L Note: • The audio cable is not included with the TV. 17 Digital Audio System TV AUDIO OUT OPTICAL Audio OUT Audio IN OPTICAL Optical audio cable Note: • The optical audio cable is not included with the...

User Manual
Page 19
Making Connections Connecting Computers and Laptops 1 Connect one end of an audio cable to the Music/PC Audio IN port of the TV, then connect the other end of the VGA cable to the RGB port of the computer or laptop. 3 For audio, connect a 3.5mm audio cable to ... audio cable Computer / Laptop Audio OUT Audio out VGA VGA cable Video OUT Note: • The VGA and audio cable are not included with the TV. • The TV will automatically go into power saving mode and turn off when no signal is detected for a period of time. • The...
Making Connections Connecting Computers and Laptops 1 Connect one end of an audio cable to the Music/PC Audio IN port of the TV, then connect the other end of the VGA cable to the RGB port of the computer or laptop. 3 For audio, connect a 3.5mm audio cable to ... audio cable Computer / Laptop Audio OUT Audio out VGA VGA cable Video OUT Note: • The VGA and audio cable are not included with the TV. • The TV will automatically go into power saving mode and turn off when no signal is detected for a period of time. • The...
User Manual
Page 20
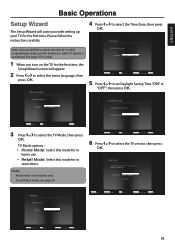
...in home use. • Retail Mode: Select this mode for retailers only. • To exit Retail mode, see page 20. Signal Type: Cable Start Scan TV Mode Mode Selection Mode: Home Mode Move Change OK Select RETURN Previous Setup INFO Exit Change OK Select RETURN Previous Setup INFO Exit 19 See... first time, the Setup Wizard screen will assist you would like to setup over-the-air or cable programming, make sure the antenna or cable TV system is for in store demo. ENGLISH Basic Operations Setup Wizard The Setup Wizard will appear. 2 Press or to select the menu language, then ...
...in home use. • Retail Mode: Select this mode for retailers only. • To exit Retail mode, see page 20. Signal Type: Cable Start Scan TV Mode Mode Selection Mode: Home Mode Move Change OK Select RETURN Previous Setup INFO Exit Change OK Select RETURN Previous Setup INFO Exit 19 See... first time, the Setup Wizard screen will assist you would like to setup over-the-air or cable programming, make sure the antenna or cable TV system is for in store demo. ENGLISH Basic Operations Setup Wizard The Setup Wizard will appear. 2 Press or to select the menu language, then ...
User Manual
Page 21
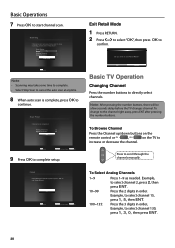
... 10~99 100~135: Press 1~9 as needed. Example, to the channel right away, press ENT after pressing the number buttons. OK Cancel Basic TV Operation Changing Channel Press the number buttons to increase or decrease the channel. To Browse Channel Press the Channel up/down buttons on the remote... control or CH , CH on the TV to directly select channels. CH Press to select channel 2, press 2, then press ENT. Example, to scroll through the channels manually. Scan Finish ...
... 10~99 100~135: Press 1~9 as needed. Example, to the channel right away, press ENT after pressing the number buttons. OK Cancel Basic TV Operation Changing Channel Press the number buttons to increase or decrease the channel. To Browse Channel Press the Channel up/down buttons on the remote... control or CH , CH on the TV to directly select channels. CH Press to select channel 2, press 2, then press ENT. Example, to scroll through the channels manually. Scan Finish ...
User Manual
Page 22
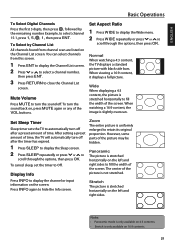
...Wide When displaying a 4:3 content, the picture is stretched horizontally on the left and right sides. Set Sleep Timer Sleep timer sets the TV to automatically turn off . Panoramic The picture is stretched horizontally to scroll through the options, then press OK. To Select by the remaining... Press WIDE repeatedly or press or to select channel 15-1, press 1, 5, _ , 1, then press ENT. Normal When watching a 4:3 content, the TV displays a standard picture with black side bars. The center of the VOL buttons. Stretch The picture is uniformly enlarged to close the Channel List screen...
...Wide When displaying a 4:3 content, the picture is stretched horizontally on the left and right sides. Set Sleep Timer Sleep timer sets the TV to automatically turn off . Panoramic The picture is stretched horizontally to scroll through the options, then press OK. To Select by the remaining... Press WIDE repeatedly or press or to select channel 15-1, press 1, 5, _ , 1, then press ENT. Normal When watching a 4:3 content, the TV displays a standard picture with black side bars. The center of the VOL buttons. Stretch The picture is uniformly enlarged to close the Channel List screen...


