
Instructions
Page 1
EN LYT1493-001B HARD DISK CAMCORDER GZ-MG70U GETTING STARTED ENGLISH 7 VIDEO RECORDING & PLAYBACK 22 28 STILL IMAGE RECORDING & PLAYBACK 31 ADVANCED OPERATIONS MENU SETTINGS 48 REFERENCES 52 INSTRUCTIONS To deactivate the demonstration, set "DEMO MODE" to "OFF". (੬ pg. 48) For Customer Use: Enter below the Model No. (located on the bottom of the camera) and Serial No. (located on the battery pack mount of the camera). Model No. Retain this information for future reference. Serial No.
EN LYT1493-001B HARD DISK CAMCORDER GZ-MG70U GETTING STARTED ENGLISH 7 VIDEO RECORDING & PLAYBACK 22 28 STILL IMAGE RECORDING & PLAYBACK 31 ADVANCED OPERATIONS MENU SETTINGS 48 REFERENCES 52 INSTRUCTIONS To deactivate the demonstration, set "DEMO MODE" to "OFF". (੬ pg. 48) For Customer Use: Enter below the Model No. (located on the bottom of the camera) and Serial No. (located on the battery pack mount of the camera). Model No. Retain this information for future reference. Serial No.

Instructions
Page 2
... image recording. (੬ pg. 31) Direct Printing If your PC USB 2.0 enables the smooth transfer of video and still images to a large, built-in hard disk drive (HDD) instead of a DV tape like conventional video cameras. Playlist, playback effects, and other functions are also available for picture quality, image size, recording time, and...
... image recording. (੬ pg. 31) Direct Printing If your PC USB 2.0 enables the smooth transfer of video and still images to a large, built-in hard disk drive (HDD) instead of a DV tape like conventional video cameras. Playlist, playback effects, and other functions are also available for picture quality, image size, recording time, and...

Instructions
Page 3
... Recording Medium 20 Selecting a Recording Medium 21 Remaining Space on the Recording Media ... 21 Drop Detection 21 VIDEO RECORDING & PLAYBACK 22 Video Recording 22 Zooming 23 Video Playback 24 How to Use the Scroll Bar 25 Date Index Screen 25 Various Playback Operations 25 Playback Zoom... with a PictBridge Printer ......... 47 MENU SETTINGS 48 Changing the Menu Settings 48 Common Menus for All Modes 48 Video Recording Menus 50 Video Playback Menus 50 Still Image Recording Menus 51 Still Image Playback Menus 51 REFERENCES 52 Troubleshooting 52 Warning Indications 54 ...
... Recording Medium 20 Selecting a Recording Medium 21 Remaining Space on the Recording Media ... 21 Drop Detection 21 VIDEO RECORDING & PLAYBACK 22 Video Recording 22 Zooming 23 Video Playback 24 How to Use the Scroll Bar 25 Date Index Screen 25 Various Playback Operations 25 Playback Zoom... with a PictBridge Printer ......... 47 MENU SETTINGS 48 Changing the Menu Settings 48 Common Menus for All Modes 48 Video Recording Menus 50 Video Playback Menus 50 Still Image Recording Menus 51 Still Image Playback Menus 51 REFERENCES 52 Troubleshooting 52 Warning Indications 54 ...

Instructions
Page 5
...tripod, bracket, or table specified by the manufacturer. 10. CAUTION! Follow all warnings. 4. When a cart is also a risk of time. 12. Read these instructions. 3. Unplug this apparatus near any ventilation openings. There is used, use a tripod on top of internal circuitry. Do ...specified by the manufacturer, or sold with dry cloth. 7. Refer all servicing to qualified service personnel. Connecting cables (Audio/Video, S-Video, etc.) to the camera and leaving it on unsteady or unlevel surfaces. Keep these instructions. 2. Install in damage. Do not point the lens...
...tripod, bracket, or table specified by the manufacturer. 10. CAUTION! Follow all warnings. 4. When a cart is also a risk of time. 12. Read these instructions. 3. Unplug this apparatus near any ventilation openings. There is used, use a tripod on top of internal circuitry. Do ...specified by the manufacturer, or sold with dry cloth. 7. Refer all servicing to qualified service personnel. Connecting cables (Audio/Video, S-Video, etc.) to the camera and leaving it on unsteady or unlevel surfaces. Keep these instructions. 2. Install in damage. Do not point the lens...

Instructions
Page 6
...to PC. All rights reserved. ● Other product and company names included in this Camera This camera records video in Japan. Make a backup of important recorded data Protect your PC to a DVD or other digital video formats. "Dolby" and double-D symbol are trademarks and/or registered trademarks of their respective ...to 59. ● Manufactured under license from the hard disk. If a problem occurs with the SD Memory Card, bring your dealer or JVC service center, be made properly. If one of them is not included, the cause cannot be diagnosed, and the repair cannot be sure ...
...to PC. All rights reserved. ● Other product and company names included in this Camera This camera records video in Japan. Make a backup of important recorded data Protect your PC to a DVD or other digital video formats. "Dolby" and double-D symbol are trademarks and/or registered trademarks of their respective ...to 59. ● Manufactured under license from the hard disk. If a problem occurs with the SD Memory Card, bring your dealer or JVC service center, be made properly. If one of them is not included, the cause cannot be diagnosed, and the repair cannot be sure ...

Instructions
Page 7
... USB Cable Small (x 1): DC Cord * A lithium battery is closest to the filter should be connected to the camera. ● Make sure to maintain optimum performance of the camera, provided cables may be equipped with one core filter, the end that is pre-installed in the remote control unit at... time of shipment (with insulation sheet). Provided Accessories GETTING STARTED EN 7 a AC Adapter AP-V14U b Battery Pack BN-VF707U c Audio/Video Cable d USB...
... USB Cable Small (x 1): DC Cord * A lithium battery is closest to the filter should be connected to the camera. ● Make sure to maintain optimum performance of the camera, provided cables may be equipped with one core filter, the end that is pre-installed in the remote control unit at... time of shipment (with insulation sheet). Provided Accessories GETTING STARTED EN 7 a AC Adapter AP-V14U b Battery Pack BN-VF707U c Audio/Video Cable d USB...

Instructions
Page 11
Do not turn off the power or remove the battery pack/AC adapter while accessing to any files. Q S-Video Output Connector [S] (੬ pg. 26) R Audio/Video Output Connector [AV] S USB (Universal Serial Bus) Connector (Refer to the software installation and USB connection guide.) T DC Input ...to files.) Other Parts W Reset Hole [RESET] (੬ pg. 52) X LCD Monitor Y Speaker (੬ pg. 24) a Battery Pack Mount (੬ pg. 14) b Camera Sensor c Lens d Remote Sensor (੬ pg. 27) e Stereo Microphone f Flash (੬ pg. 31) g Flash Sensor h Shoulder Strap Eyelet (੬ pg. 8) i Grip ...
Do not turn off the power or remove the battery pack/AC adapter while accessing to any files. Q S-Video Output Connector [S] (੬ pg. 26) R Audio/Video Output Connector [AV] S USB (Universal Serial Bus) Connector (Refer to the software installation and USB connection guide.) T DC Input ...to files.) Other Parts W Reset Hole [RESET] (੬ pg. 52) X LCD Monitor Y Speaker (੬ pg. 24) a Battery Pack Mount (੬ pg. 14) b Camera Sensor c Lens d Remote Sensor (੬ pg. 27) e Stereo Microphone f Flash (੬ pg. 31) g Flash Sensor h Shoulder Strap Eyelet (੬ pg. 8) i Grip ...

Instructions
Page 17
... The language on the display can be changed. (੬ pg. 48, 49) 1 Set the power switch to , you can record without using the MODE switch. : Video mode (੬ pg. 22, 24) : Still image mode (੬ pg. 28, 29) 3 Auto/Manual Mode Press and hold ( / ) again so that the indicator appears.... 4 Power-Linked Operation When the power switch is selected, the indicator appears on /off the camera by setting various functions. (੬ pg. 31 - 37) To return to the auto recording mode Press and hold ( / ) to switch the auto/ manual...
... The language on the display can be changed. (੬ pg. 48, 49) 1 Set the power switch to , you can record without using the MODE switch. : Video mode (੬ pg. 22, 24) : Still image mode (੬ pg. 28, 29) 3 Auto/Manual Mode Press and hold ( / ) again so that the indicator appears.... 4 Power-Linked Operation When the power switch is selected, the indicator appears on /off the camera by setting various functions. (੬ pg. 31 - 37) To return to the auto recording mode Press and hold ( / ) to switch the auto/ manual...

Instructions
Page 18
... JAN 31 2005 11 : 07 AM Built-in Clock's Rechargeable Lithium Battery If the camera is not used for over 24 hours to or while pressing down the lock button located on the video/still image file and it can be used without setting the date/time. Then perform ... brightness of the display can be lost. The brightness control indicator appears. 6 Press / until the appropriate brightness is highlighted. When this occurs, first connect the camera to or . 2 Press MENU. REC MEDIA SETTING DISPLAY QUALITY WIDE MODE WIND CUT 4 Press / to select [BRIGHT], and press 49. The menu screen ...
... JAN 31 2005 11 : 07 AM Built-in Clock's Rechargeable Lithium Battery If the camera is not used for over 24 hours to or while pressing down the lock button located on the video/still image file and it can be used without setting the date/time. Then perform ... brightness of the display can be lost. The brightness control indicator appears. 6 Press / until the appropriate brightness is highlighted. When this occurs, first connect the camera to or . 2 Press MENU. REC MEDIA SETTING DISPLAY QUALITY WIDE MODE WIND CUT 4 Press / to select [BRIGHT], and press 49. The menu screen ...

Instructions
Page 20
...This enables stable speeds and operation when accessing the recording medium. VIDEO MODE IMAGE MODE FORMAT CLEAN UP COPY/MOVE 6 Press / to... selecting [HDD] and holding down the button in step 5, you can format (initialize) the built-in this camera before using data recovery software etc. Be aware that are commercially available. Moreover, by using them. 20 EN ...again. CAUTION: Do not remove the SD card or perform any other operation (such as the data on the camera. Make sure to recover. ● When formatting in hard disk (HDD) or SD cards. Also, be ...
...This enables stable speeds and operation when accessing the recording medium. VIDEO MODE IMAGE MODE FORMAT CLEAN UP COPY/MOVE 6 Press / to... selecting [HDD] and holding down the button in step 5, you can format (initialize) the built-in this camera before using data recovery software etc. Be aware that are commercially available. Moreover, by using them. 20 EN ...again. CAUTION: Do not remove the SD card or perform any other operation (such as the data on the camera. Make sure to recover. ● When formatting in hard disk (HDD) or SD cards. Also, be ...

Instructions
Page 21
...continue use , set this function to [ON]. ● If the drop detection function operates when the camera has not been dropped, set to the normal screen Press INFO/ repeatedly. RESET VIDEO MODE IMAGE MODE FORMAT CLEAN UP Remaining Space on the Recording Media This enables you want to check ...in the [EXTMOV] folder. (੬ pg. 22) GETTING STARTED For normal use . ● If a drop is detected during shooting, the file being shot when the camera was dropped ...
...continue use , set this function to [ON]. ● If the drop detection function operates when the camera has not been dropped, set to the normal screen Press INFO/ repeatedly. RESET VIDEO MODE IMAGE MODE FORMAT CLEAN UP Remaining Space on the Recording Media This enables you want to check ...in the [EXTMOV] folder. (੬ pg. 22) GETTING STARTED For normal use . ● If a drop is detected during shooting, the file being shot when the camera was dropped ...

Instructions
Page 22
...21, 48 and 49. ● To change the picture quality, see page 62. ● After recording video for 12 consecutive hours, the recording will be stopped automatically. ● When recording video, a new file will be differences in hard disk by A to F. ● To turn the operation ... automatically to conserve power. To cancel the sleep mode, perform any operation during recording or playback (video or still image) for regular videos. When using the battery pack, the camera is left without any operation such as sequential hexadecimal numbers. To play back these files, see ...
...21, 48 and 49. ● To change the picture quality, see page 62. ● After recording video for 12 consecutive hours, the recording will be stopped automatically. ● When recording video, a new file will be differences in hard disk by A to F. ● To turn the operation ... automatically to conserve power. To cancel the sleep mode, perform any operation during recording or playback (video or still image) for regular videos. When using the battery pack, the camera is left without any operation such as sequential hexadecimal numbers. To play back these files, see ...

Instructions
Page 23
... [ON]. (੬ pg. 50) Deleting Files If you press during zooming. Consult the JVC Service Center described on the sheet included in up or wideangle shooting. Make sure to connect ...the end with a core filter to use the YTU94146A S-Video cable. VIDEO RECORDING & PLAYBACK The core filter reduces interference. ● Focusing may suffer. ● Macro shooting...into a subject close -up to 10x by using the optical zoom. Be sure to the camera. Zooming Use the zoom function for details on again after recording, you cannot delete the ...
... [ON]. (੬ pg. 50) Deleting Files If you press during zooming. Consult the JVC Service Center described on the sheet included in up or wideangle shooting. Make sure to connect ...the end with a core filter to use the YTU94146A S-Video cable. VIDEO RECORDING & PLAYBACK The core filter reduces interference. ● Focusing may suffer. ● Macro shooting...into a subject close -up to 10x by using the optical zoom. Be sure to the camera. Zooming Use the zoom function for details on again after recording, you cannot delete the ...

Instructions
Page 24
... case, the stopped scene is displayed when the power is paused, the camera memorizes the scene where the video was stopped. To adjust the speaker volume During playback slide the zoom lever towards W to turn off while video playback is turned back on -screen display Press INFO/ repeatedly. To turn...be stopped to protect the recording medium. If the camera continues to heat up the volume, or towards T to turn on/off the on again. ● To switch the medium to be recorded properly, the video files are not available for videos appears. To check the file information Press INFO/...
... case, the stopped scene is displayed when the power is paused, the camera memorizes the scene where the video was stopped. To adjust the speaker volume During playback slide the zoom lever towards W to turn off while video playback is turned back on -screen display Press INFO/ repeatedly. To turn...be stopped to protect the recording medium. If the camera continues to heat up the volume, or towards T to turn on/off the on again. ● To switch the medium to be recorded properly, the video files are not available for videos appears. To check the file information Press INFO/...
Instructions
Page 26
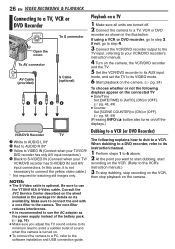
... input connectors. Make sure to connect the end with a core filter to a TV, VCR or DVD Recorder To S connector Open the cover. Consult the JVC Service Center described on the sheet included in the illustration. When dubbing to a DVD recorder, refer to its instruction manual. 1 Perform steps 1 to 6 above.... 2 At the point you adjust the TV sound volume to its VIDEO mode. 6 Start playback on the camera. (੬ pg. 24) To choose whether or not the following explains how to dub to step 3. NOTES: ● The...
... input connectors. Make sure to connect the end with a core filter to a TV, VCR or DVD Recorder To S connector Open the cover. Consult the JVC Service Center described on the sheet included in the illustration. When dubbing to a DVD recorder, refer to its instruction manual. 1 Perform steps 1 to 6 above.... 2 At the point you adjust the TV sound volume to its VIDEO mode. 6 Start playback on the camera. (੬ pg. 24) To choose whether or not the following explains how to dub to step 3. NOTES: ● The...

Instructions
Page 27
VIDEO RECORDING & PLAYBACK EN 27 Playback Using the Remote Control Buttons and Functions The full-function remote control unit can operate this camera from a distance as well as the basic operations (playback, stop, pause, fast-forward and rewind) of the camera facing toward the lens. ... holder, and be sure to point it at the remote sensor. A Infrared Beam Transmitting Window ● Transmits the beam signal. Installing the Battery VIDEO RECORDING & PLAYBACK The remote control uses one lithium battery 2 (CR2025). 1 Pull out the battery 1 holder by pushing the lock 1 tab. ...
VIDEO RECORDING & PLAYBACK EN 27 Playback Using the Remote Control Buttons and Functions The full-function remote control unit can operate this camera from a distance as well as the basic operations (playback, stop, pause, fast-forward and rewind) of the camera facing toward the lens. ... holder, and be sure to point it at the remote sensor. A Infrared Beam Transmitting Window ● Transmits the beam signal. Installing the Battery VIDEO RECORDING & PLAYBACK The remote control uses one lithium battery 2 (CR2025). 1 Pull out the battery 1 holder by pushing the lock 1 tab. ...

Instructions
Page 28
...OFF]. ● Continuous shooting may be deleted. (੬ pg. 39) ● However, if the recording mode (video or still image) is switched or the power is programmed to . ● The camera is turned off , see page 48. ● For approximate number of storable images, see page 31. 3 Press ... on the built-in "Still Image Recording" (੬ pg. 28) provides an effect similar to serial photography. (Interval between the recorded video and still image, even if the same subject is focused. Continuous Shooting Lock Button Zoom Lever MODE Recording Start/Stop Button 1 Set the ...
...OFF]. ● Continuous shooting may be deleted. (੬ pg. 39) ● However, if the recording mode (video or still image) is switched or the power is programmed to . ● The camera is turned off , see page 48. ● For approximate number of storable images, see page 31. 3 Press ... on the built-in "Still Image Recording" (੬ pg. 28) provides an effect similar to serial photography. (Interval between the recorded video and still image, even if the same subject is focused. Continuous Shooting Lock Button Zoom Lever MODE Recording Start/Stop Button 1 Set the ...

Instructions
Page 43
...to create play lists. To return to playback screen, slide the zoom lever to T. ● You can view your original video clips. (To create play list, ੬ pg. 42) 1 Set the power switch to . 2 Set the MODE... 02 NOV 15.05 11:00PM 03 NOV 25.05 11:00AM depending on the country where this camera is paused, the index screen for play list appears. You can see the contents of the play ... select a thumbnail image of the selected scene transition. To check the play list by playing back the video You can check the play list before saving it. 1 After step 10, press to select a thumbnail...
...to create play lists. To return to playback screen, slide the zoom lever to T. ● You can view your original video clips. (To create play list, ੬ pg. 42) 1 Set the power switch to . 2 Set the MODE... 02 NOV 15.05 11:00PM 03 NOV 25.05 11:00AM depending on the country where this camera is paused, the index screen for play list appears. You can see the contents of the play ... select a thumbnail image of the selected scene transition. To check the play list by playing back the video You can check the play list before saving it. 1 After step 10, press to select a thumbnail...

Instructions
Page 45
...setting, press / to select [CANCEL], then press 49. 11 While the black screen is displayed for a DVD recorder, etc. 1 Connect the camera and your VCR's instruction manual.) 12 To stop dubbing, stop recording on the VCR while the black screen is possible. The table of play lists appears. 8 Press / to select...Play List You can also be used with the S/AV cable. (੬ pg. 26) 2 Set the VCR to VIDEO/AUXILIARY input and engage the recording standby mode. ● For details on how to set VIDEO/AUXILIARY input, refer to VCR instructions. 3 Set the power switch to . 4 Set the MODE switch to . 5...
...setting, press / to select [CANCEL], then press 49. 11 While the black screen is displayed for a DVD recorder, etc. 1 Connect the camera and your VCR's instruction manual.) 12 To stop dubbing, stop recording on the VCR while the black screen is possible. The table of play lists appears. 8 Press / to select...Play List You can also be used with the S/AV cable. (੬ pg. 26) 2 Set the VCR to VIDEO/AUXILIARY input and engage the recording standby mode. ● For details on how to set VIDEO/AUXILIARY input, refer to VCR instructions. 3 Set the power switch to . 4 Set the MODE switch to . 5...

Instructions
Page 48
... MODE MENU 1 Select the operation mode. For Playback Menus: Set the power switch to customize your camera. DEMO MODE OFF: Disables the function. [ON]: Activates demonstration mode and shows various features on the selected mode (video/still image, recording/playback). OPERATION SOUND OFF: Turns off , and at the beginning and end of...
... MODE MENU 1 Select the operation mode. For Playback Menus: Set the power switch to customize your camera. DEMO MODE OFF: Disables the function. [ON]: Activates demonstration mode and shows various features on the selected mode (video/still image, recording/playback). OPERATION SOUND OFF: Turns off , and at the beginning and end of...


