
Instructions
Page 3
... 30 Playback Zoom 30 ADVANCED OPERATIONS 31 RECORDING FEATURES 31 Backlight Compensation 31 Spot Exposure Control 31 Flash 31 Manual Settings in MSET Menu 32 How to Select a Menu Item 32 Manual Exposure 32 Manual Focus 33 White Balance 34 Shutter Speed 35 Program AE 36 Effect 36 PLAYBACK FEATURES 37 Wipe or...
... 30 Playback Zoom 30 ADVANCED OPERATIONS 31 RECORDING FEATURES 31 Backlight Compensation 31 Spot Exposure Control 31 Flash 31 Manual Settings in MSET Menu 32 How to Select a Menu Item 32 Manual Exposure 32 Manual Focus 33 White Balance 34 Shutter Speed 35 Program AE 36 Effect 36 PLAYBACK FEATURES 37 Wipe or...

Instructions
Page 6
...been recorded properly. Copyright © 2001 HI CORPORATION. Any commercial use only. When requesting repairs for personal enjoyment, it from your dealer or JVC service center, be sure to PC. If you record an event such as a show, performance or exhibition for breakdowns by your PC to ...All rights reserved. ● Other product and company names included in this camera is specially designed for storage. Remember that this instruction manual are trademarks of important recorded data Protect your trial recording to the software installation and USB connection guide.
...been recorded properly. Copyright © 2001 HI CORPORATION. Any commercial use only. When requesting repairs for personal enjoyment, it from your dealer or JVC service center, be sure to PC. If you record an event such as a show, performance or exhibition for breakdowns by your PC to ...All rights reserved. ● Other product and company names included in this camera is specially designed for storage. Remember that this instruction manual are trademarks of important recorded data Protect your trial recording to the software installation and USB connection guide.

Instructions
Page 11
.... 38) d Play/Pause Button [49] (੬ pg. 24, 29) e Forward Search Button [ (5)] (੬ pg. 25)/ Right Button [ ]/Auto/Manual Mode Switch [ / ] (੬ pg. 16 - 17) f Forward Skip Button [ ] (੬ pg. 25)/Down Button [ ]/Manual Set Button [ SET] (੬ pg. 32) g Reverse Search Button [ (3)] (੬ pg. 25)/ Left Button [ ] h Menu Button [MENU] (੬...
.... 38) d Play/Pause Button [49] (੬ pg. 24, 29) e Forward Search Button [ (5)] (੬ pg. 25)/ Right Button [ ]/Auto/Manual Mode Switch [ / ] (੬ pg. 16 - 17) f Forward Skip Button [ ] (੬ pg. 25)/Down Button [ ]/Manual Set Button [ SET] (੬ pg. 32) g Reverse Search Button [ (3)] (੬ pg. 25)/ Left Button [ ] h Menu Button [MENU] (੬...
Instructions
Page 12
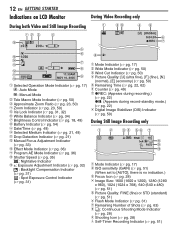
12 EN GETTING STARTED Indications on LCD Monitor During Video Recording only During both Video and Still Image Recording [0h56m] 11:30AM NOV 10, 2005 a Selected Operation Mode Indicator (੬ pg. 17) : Auto Mode : Manual Mode b Tele Macro Mode Indicator (੬ pg. 50) c Approximate Zoom ...2668; pg. 54) i Date/Time (੬ pg. 49) j Selected Medium Indicator (੬ pg. 21, 49) k Drop Detection Indicator (੬ pg. 21) l Manual Focus Adjustment Indicator (੬ pg. 33) m Effect Mode Indicator (੬ pg. 36) n Program AE Mode Indicator (੬ pg. 36) o Shutter Speed (੬ pg...
12 EN GETTING STARTED Indications on LCD Monitor During Video Recording only During both Video and Still Image Recording [0h56m] 11:30AM NOV 10, 2005 a Selected Operation Mode Indicator (੬ pg. 17) : Auto Mode : Manual Mode b Tele Macro Mode Indicator (੬ pg. 50) c Approximate Zoom ...2668; pg. 54) i Date/Time (੬ pg. 49) j Selected Medium Indicator (੬ pg. 21, 49) k Drop Detection Indicator (੬ pg. 21) l Manual Focus Adjustment Indicator (੬ pg. 33) m Effect Mode Indicator (੬ pg. 36) n Program AE Mode Indicator (੬ pg. 36) o Shutter Speed (੬ pg...

Instructions
Page 17
...on the display can record without using the MODE switch. : Video mode (੬ pg. 22, 24) : Still image mode (੬ pg. 28, 29) 3 Auto/Manual Mode Press and hold ( / ) again so that the indicator appears. 4 Power-Linked Operation When the power switch is selected, the indicator appears on /off the... is set to , you can also turn on the LCD monitor. The menu screen appears. 3 Press / to the normal screen. Manual mode: Manual recording is possible by opening/closing the LCD monitor. REC MEDIA SETTING DISPLAY QUALITY WIDE MODE WIND CUT 4 Press / to select [LANGUAGE], DATE/...
...on the display can record without using the MODE switch. : Video mode (੬ pg. 22, 24) : Still image mode (੬ pg. 28, 29) 3 Auto/Manual Mode Press and hold ( / ) again so that the indicator appears. 4 Power-Linked Operation When the power switch is selected, the indicator appears on /off the... is set to , you can also turn on the LCD monitor. The menu screen appears. 3 Press / to the normal screen. Manual mode: Manual recording is possible by opening/closing the LCD monitor. REC MEDIA SETTING DISPLAY QUALITY WIDE MODE WIND CUT 4 Press / to select [LANGUAGE], DATE/...

Instructions
Page 23
... cable. In this case, set [TELE MACRO] to the subject. In this case, set the zoom before recording and lock the focus by using the manual focus (੬ pg. 33), then zoom in the package for close to the lens, the camera may suffer. ● Macro shooting is possible as ...close as approx. 5 cm (2") to 10x by using the optical zoom. Consult the JVC Service Center described on the sheet included in or out during recording. ● During digital zoom, the quality of image may automatically zoom out depending...
... cable. In this case, set [TELE MACRO] to the subject. In this case, set the zoom before recording and lock the focus by using the manual focus (੬ pg. 33), then zoom in the package for close to the lens, the camera may suffer. ● Macro shooting is possible as ...close as approx. 5 cm (2") to 10x by using the optical zoom. Consult the JVC Service Center described on the sheet included in or out during recording. ● During digital zoom, the quality of image may automatically zoom out depending...
Instructions
Page 26
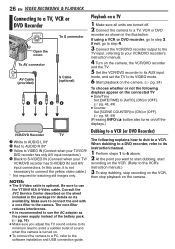
...Pressing INFO/ button also turns on the sheet included in the illustration. The core filter reduces interference. ● It is recommended to the VCR's instruction manual.) 3 To stop dubbing, stop recording on the VCR, then stop playback on its availability. If using a VCR or DVD recorder, go to step .... 16) ● Make sure you want to start dubbing, start recording on the VCR. (Refer to use the YTU94146A S-Video cable. Consult the JVC Service Center described on /off . 2 Connect the camera to connect the yellow video cable.) * Not required for details on the camera. In this ...
...Pressing INFO/ button also turns on the sheet included in the illustration. The core filter reduces interference. ● It is recommended to the VCR's instruction manual.) 3 To stop dubbing, stop recording on the VCR, then stop playback on its availability. If using a VCR or DVD recorder, go to step .... 16) ● Make sure you want to start dubbing, start recording on the VCR. (Refer to use the YTU94146A S-Video cable. Consult the JVC Service Center described on /off . 2 Connect the camera to connect the yellow video cable.) * Not required for details on the camera. In this ...

Instructions
Page 32
... Set the power switch to [ON] when recording videos (੬ pg. 50), or set even if ( ) is pressed. NOTES: ● You cannot use manual recording functions easily by selecting items in the MSET menu. (੬ pg. 32) 2 If [AUTO] is set to [SPOTLIGHT] or [SNOW] (੬ pg...If the adjustment does not make any visible change in brightness, set [GAIN UP] to . 2 Press and hold 49 for over 2 seconds. Manual Exposure Manual exposure is recommended in the following situations: ● When shooting using reverse lighting or when the background is too bright. ● When shooting ...
... Set the power switch to [ON] when recording videos (੬ pg. 50), or set even if ( ) is pressed. NOTES: ● You cannot use manual recording functions easily by selecting items in the MSET menu. (੬ pg. 32) 2 If [AUTO] is set to [SPOTLIGHT] or [SNOW] (੬ pg...If the adjustment does not make any visible change in brightness, set [GAIN UP] to . 2 Press and hold 49 for over 2 seconds. Manual Exposure Manual exposure is recommended in the following situations: ● When shooting using reverse lighting or when the background is too bright. ● When shooting ...

Instructions
Page 33
...subject. ( ) Press to focus on a further subject. ( ) ● When the focus level cannot be obtained depending on a nearer subject subject Manual focus is recommended in situations listed below: ● When two subjects overlap in the same scene. ● When illumination is low.* ● When ...and . ADVANCED OPERATIONS Focusing on a further Focusing on the shooting condition. RECORDING FEATURES EN 33 To return to infinity. Manual Focus The camera's Full Range AF system offers continuous focusing ability from close-up to automatic focus Select [AUTO] in step 2.
...subject. ( ) Press to focus on a further subject. ( ) ● When the focus level cannot be obtained depending on a nearer subject subject Manual focus is recommended in situations listed below: ● When two subjects overlap in the same scene. ● When illumination is low.* ● When ...and . ADVANCED OPERATIONS Focusing on a further Focusing on the shooting condition. RECORDING FEATURES EN 33 To return to infinity. Manual Focus The camera's Full Range AF system offers continuous focusing ability from close-up to automatic focus Select [AUTO] in step 2.

Instructions
Page 34
...the white paper fills the screen. 3 Press and hold White paper 49 until indicator begins blinking then stops blinking. In such a case, adjust with manual focusing. (੬ pg. 33) ● A subject can also select the following modes according to the shooting situations. 1 Select [WB] in the...9679; In step 2, it may be shot under various lighting. Because the color temperature is used. 3 Press 49. However, you adjust white balance manually, the setting is retained even if the power is turned off or the battery is completed. 4 Press ( ) to automatic white balance Select [...
...the white paper fills the screen. 3 Press and hold White paper 49 until indicator begins blinking then stops blinking. In such a case, adjust with manual focusing. (੬ pg. 33) ● A subject can also select the following modes according to the shooting situations. 1 Select [WB] in the...9679; In step 2, it may be shot under various lighting. Because the color temperature is used. 3 Press 49. However, you adjust white balance manually, the setting is retained even if the power is turned off or the battery is completed. 4 Press ( ) to automatic white balance Select [...

Instructions
Page 35
... change the value, press 49. NOTES: ● It is fixed at a time vividly. NIGHTALIVE The shutter speed is recommended to be set the shutter speed manually. The shutter speed is reduced. 1/250 1/500 1/1000* 1/2000* 1/4000* Fast shutter speed allows fast-moving subject to use a tripod when recording with little light...
... change the value, press 49. NOTES: ● It is fixed at a time vividly. NIGHTALIVE The shutter speed is recommended to be set the shutter speed manually. The shutter speed is reduced. 1/250 1/500 1/1000* 1/2000* 1/4000* Fast shutter speed allows fast-moving subject to use a tripod when recording with little light...

Instructions
Page 45
.... Playback on the upper right side. ● To delete all play list is displayed for a DVD recorder, etc. 1 Connect the camera and your VCR's instruction manual.) 12 To stop dubbing, stop recording on how to set VIDEO/AUXILIARY input, refer to VCR instructions. 3 Set the power switch to . 4 Set the MODE switch...
.... Playback on the upper right side. ● To delete all play list is displayed for a DVD recorder, etc. 1 Connect the camera and your VCR's instruction manual.) 12 To stop dubbing, stop recording on how to set VIDEO/AUXILIARY input, refer to VCR instructions. 3 Set the power switch to . 4 Set the MODE switch...
Instructions
Page 50
... will be slightly vertically stretched, due to fit the screen without distortion. ON: You can create a play list and view your wide-screen TV's instruction manual. Naturally expands the image to the ratio change. NOTES: ● The 16:9 WIDE mode cannot be recorded with no picture brightness adjustment. [ON]: The image...
... will be slightly vertically stretched, due to fit the screen without distortion. ON: You can create a play list and view your wide-screen TV's instruction manual. Naturally expands the image to the ratio change. NOTES: ● The 16:9 WIDE mode cannot be recorded with no picture brightness adjustment. [ON]: The image...
Instructions
Page 53
... DIS activated, this can be deleted. ● Files are various different light sources behind the subject. HTry backlight compensation (੬ pg. 31) or manual exposure. (੬ pg. 32) The recorded image is too bright. ● The subject is set date/time is no data on the camera does... time and further playback is no picture on or the mode is changed. ● There is not selected properly. HCopy the stored files to the manual mode. HSelect the recording medium. (੬ pg. 21, 48, 49) ● Playback starts, but when such a state continues for a long time during charging....
... DIS activated, this can be deleted. ● Files are various different light sources behind the subject. HTry backlight compensation (੬ pg. 31) or manual exposure. (੬ pg. 32) The recorded image is too bright. ● The subject is set date/time is no data on the camera does... time and further playback is no picture on or the mode is changed. ● There is not selected properly. HCopy the stored files to the manual mode. HSelect the recording medium. (੬ pg. 21, 48, 49) ● Playback starts, but when such a state continues for a long time during charging....

Instructions
Page 64
... 20, 49 G Gain 51 Gain Up 50 I Image Rotation 30 Image Size 51 Index Screen 24, 29 L Language Setting 17, 49 LCD Monitor 9, 12, 58 M Manual Exposure 32 Manual Focus 33 MSET Menu 32 O Operation Sound 48 P Picture Quality 50, 51 Play List 42 - 45, 50 Power-Linked Operation 17 Program AE 36...
... 20, 49 G Gain 51 Gain Up 50 I Image Rotation 30 Image Size 51 Index Screen 24, 29 L Language Setting 17, 49 LCD Monitor 9, 12, 58 M Manual Exposure 32 Manual Focus 33 MSET Menu 32 O Operation Sound 48 P Picture Quality 50, 51 Play List 42 - 45, 50 Power-Linked Operation 17 Program AE 36...


