
Software Guide
Page 13
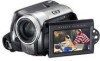
... with the USB cable. Please install and use the provided software (PowerDirector Express NE, PowerProducer 3 NE, PowerDVD 5 NE). ● If you perform installation of the battery pack. ● When the USB cable is already installed, uninstallation will start. PC To AC outlet AC adapter To USB connector To DC connector USB...
... with the USB cable. Please install and use the provided software (PowerDirector Express NE, PowerProducer 3 NE, PowerDVD 5 NE). ● If you perform installation of the battery pack. ● When the USB cable is already installed, uninstallation will start. PC To AC outlet AC adapter To USB connector To DC connector USB...
Software Guide
Page 21
... PC Connect the camera to the PC to the PC with the provided power cord. 3 Turn on or off the camera causes malfunctions of the battery pack. ● When the USB cable is turned off before making any connections. 2 Connect the AC adapter to the camera, then plug the AC adapter...
... PC Connect the camera to the PC to the PC with the provided power cord. 3 Turn on or off the camera causes malfunctions of the battery pack. ● When the USB cable is turned off before making any connections. 2 Connect the AC adapter to the camera, then plug the AC adapter...

Instructions
Page 1
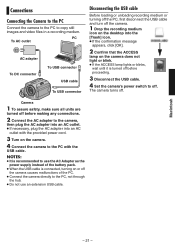
...: Enter the Model No. (located on the bottom of the camera) and Serial No. (located on the battery pack mount of this product. Model No. Serial No. INSTRUCTIONS HARD DISK CAMCORDER GZ-MG77U ENGLISH GETTING STARTED 8 RECORDING 18 22 28 PLAYBACK 32 EDITING/PRINTING 38 DUBBING 49 MENU SETTINGS 54 To deactivate the demonstration mode...
...: Enter the Model No. (located on the bottom of the camera) and Serial No. (located on the battery pack mount of this product. Model No. Serial No. INSTRUCTIONS HARD DISK CAMCORDER GZ-MG77U ENGLISH GETTING STARTED 8 RECORDING 18 22 28 PLAYBACK 32 EDITING/PRINTING 38 DUBBING 49 MENU SETTINGS 54 To deactivate the demonstration mode...

Instructions
Page 3
...problem occurs with the SD card, bring the card together with the SD card. Precautions on the hard disk of these batteries must be replaced. Using generic non-JVC batteries can prevent it only in well-ventilated areas. ● After 5 minutes has elapsed in hard disk or SD cards....this video file, please refer to "Deleting Files" (੬ pg. 38)/"Formatting a Recording Medium" (੬ pg. 41). Use the JVC BN-VF707U/ VF714U/VF733U battery packs. Reset the camera if it again. ● This product includes patented and other media are used, they may fail to be strictly...
...problem occurs with the SD card, bring the card together with the SD card. Precautions on the hard disk of these batteries must be replaced. Using generic non-JVC batteries can prevent it only in well-ventilated areas. ● After 5 minutes has elapsed in hard disk or SD cards....this video file, please refer to "Deleting Files" (੬ pg. 38)/"Formatting a Recording Medium" (੬ pg. 41). Use the JVC BN-VF707U/ VF714U/VF733U battery packs. Reset the camera if it again. ● This product includes patented and other media are used, they may fail to be strictly...

Instructions
Page 4
... injuries, as well as lead to allow for ventilation (10 cm (3-15/ 16") or more on both sides, on Replaceable lithium battery The battery used battery promptly. ● Keep away from children. ● Do not disassemble and do not place any containers filled with Panasonic (Matsushita Electric... lightning flash with water. WARNING: TO PREVENT FIRE OR SHOCK HAZARD, DO NOT EXPOSE THIS UNIT TO RAIN OR MOISTURE. When discarding batteries, environmental problems must be exposed to the presence of internal circuitry. Caution on top and at the rear). 4 EN Safety Precautions CAUTION...
... injuries, as well as lead to allow for ventilation (10 cm (3-15/ 16") or more on both sides, on Replaceable lithium battery The battery used battery promptly. ● Keep away from children. ● Do not disassemble and do not place any containers filled with Panasonic (Matsushita Electric... lightning flash with water. WARNING: TO PREVENT FIRE OR SHOCK HAZARD, DO NOT EXPOSE THIS UNIT TO RAIN OR MOISTURE. When discarding batteries, environmental problems must be exposed to the presence of internal circuitry. Caution on top and at the rear). 4 EN Safety Precautions CAUTION...
Instructions
Page 6
...Attaching the Lens Cap 9 Attaching the Core Filter 9 Index 10 Indications on LCD Monitor 12 Necessary Settings before Use 14 Power Related Preparations (Using the Battery Pack 14 Language Setting 15 Date/Time Setting 15 Other Settings 16 Grip Adjustment 16 Tripod Mounting 16 Data... Battery System 16 When Using an SD Card 17 RECORDING Video Video Recording 18 Registering Files to Events 19 Zooming 20 Changing the Screen Size 20 Deleting a File 21 Checking the Remaining ...
...Attaching the Lens Cap 9 Attaching the Core Filter 9 Index 10 Indications on LCD Monitor 12 Necessary Settings before Use 14 Power Related Preparations (Using the Battery Pack 14 Language Setting 15 Date/Time Setting 15 Other Settings 16 Grip Adjustment 16 Tripod Mounting 16 Data... Battery System 16 When Using an SD Card 17 RECORDING Video Video Recording 18 Registering Files to Events 19 Zooming 20 Changing the Screen Size 20 Deleting a File 21 Checking the Remaining ...

Instructions
Page 8
Core Filter for remote control unit) Pre-installed in the remote control unit at time of shipment. 8 EN Accessories or AC Adapter AP-V18U / AP-V14U Battery Pack BN-VF707U Audio/Video Cable USB Cable (੬ SOFTWARE INSTALLATION AND USB CONNECTION GUIDE) Shoulder Strap (੬ pg. 9) Lens Cap (੬ pg. 9) CD-ROM Remote Control Unit RM-V730U (੬ pg. 35) Lithium Battery CR2025 (for Cables (੬ pg. 9) Large-A (x 1): Audio/Video Cable Large-B (x 2): USB/S-Video Cable Small (x 1): DC Cord
Core Filter for remote control unit) Pre-installed in the remote control unit at time of shipment. 8 EN Accessories or AC Adapter AP-V18U / AP-V14U Battery Pack BN-VF707U Audio/Video Cable USB Cable (੬ SOFTWARE INSTALLATION AND USB CONNECTION GUIDE) Shoulder Strap (੬ pg. 9) Lens Cap (੬ pg. 9) CD-ROM Remote Control Unit RM-V730U (੬ pg. 35) Lithium Battery CR2025 (for Cables (੬ pg. 9) Large-A (x 1): Audio/Video Cable Large-B (x 2): USB/S-Video Cable Small (x 1): DC Cord

Instructions
Page 11
...connecting to a DVD burner [sold separately].) (੬ pg. 49) Other Parts T Reset Button [RESET] (੬ pg. 60) U Speaker (੬ pg. 28) V Battery Pack Mount (੬ pg. 14) W Flash (੬ pg. 23) X Lens Y Stereo Microphone a Camera Sensor Remote Sensor (੬ pg. 35) Flash Sensor b Grip ...; pg. 24) g Menu Button [MENU] (੬ pg. 54) h Delete Button [ ] (੬ pg. 21) i Recording Start/Stop Button [REC/SNAP] (੬ pg. 18, 22) j Control Lever : Reverse Skip (੬ pg. 29)/Up/Backlight Compensation [ ] (੬ pg. 27)/Spot Exposure Control [ ] (੬ pg. 27) : Forward Skip ...
...connecting to a DVD burner [sold separately].) (੬ pg. 49) Other Parts T Reset Button [RESET] (੬ pg. 60) U Speaker (੬ pg. 28) V Battery Pack Mount (੬ pg. 14) W Flash (੬ pg. 23) X Lens Y Stereo Microphone a Camera Sensor Remote Sensor (੬ pg. 35) Flash Sensor b Grip ...; pg. 24) g Menu Button [MENU] (੬ pg. 54) h Delete Button [ ] (੬ pg. 21) i Recording Start/Stop Button [REC/SNAP] (੬ pg. 18, 22) j Control Lever : Reverse Skip (੬ pg. 29)/Up/Backlight Compensation [ ] (੬ pg. 27)/Spot Exposure Control [ ] (੬ pg. 27) : Forward Skip ...
Instructions
Page 12
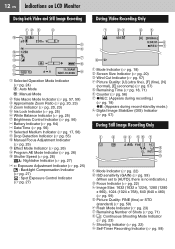
...23) e Iris Lock Indicator (੬ pg. 25) f White Balance Indicator (੬ pg. 25) g Brightness Control Indicator (੬ pg. 56) h Battery Indicator (੬ pg. 64) i Date/Time (੬ pg. 56) j Selected Medium Indicator (੬ pg. 17, 56) k Drop Detection Indicator (&#...Adjustment Indicator (੬ pg. 25) : Backlight Compensation Indicator (੬ pg. 27) : Spot Exposure Control Indicator (੬ pg. 27) a Mode Indicator (੬ pg. 18) b Screen Size Indicator (੬ pg. 20) c Wind Cut Indicator (੬ pg. 57) d Picture Quality: [U] (ultra fine), [F] (fine), [N] (normal), ...
...23) e Iris Lock Indicator (੬ pg. 25) f White Balance Indicator (੬ pg. 25) g Brightness Control Indicator (੬ pg. 56) h Battery Indicator (੬ pg. 64) i Date/Time (੬ pg. 56) j Selected Medium Indicator (੬ pg. 17, 56) k Drop Detection Indicator (&#...Adjustment Indicator (੬ pg. 25) : Backlight Compensation Indicator (੬ pg. 27) : Spot Exposure Control Indicator (੬ pg. 27) a Mode Indicator (੬ pg. 18) b Screen Size Indicator (੬ pg. 20) c Wind Cut Indicator (੬ pg. 57) d Picture Quality: [U] (ultra fine), [F] (fine), [N] (normal), ...

Instructions
Page 13
...High-Speed Search 9U : Forward Slow-Motion Y9 : Reverse Slow-Motion (The number on the left shows speed.) e Counter (੬ pg. 56) f Volume Level Indicator g Battery Indicator (੬ pg. 64) h Date/Time (੬ pg. 56) i Selected Medium Indicator (੬ pg. 17, 56) j Effect Mode Indicator (੬ pg. 36... (੬ pg. 36) NOV.10.2006 a Mode Indicator (੬ pg. 32) b Folder/File Number c Slide Show Playback Indicator (੬ pg. 33) d Battery Indicator (੬ pg. 64) e Date (੬ pg. 56) f Selected Medium Indicator (੬ pg. 17, 56) g Effect Mode Indicator (੬ pg. 36)
...High-Speed Search 9U : Forward Slow-Motion Y9 : Reverse Slow-Motion (The number on the left shows speed.) e Counter (੬ pg. 56) f Volume Level Indicator g Battery Indicator (੬ pg. 64) h Date/Time (੬ pg. 56) i Selected Medium Indicator (੬ pg. 17, 56) j Effect Mode Indicator (੬ pg. 36... (੬ pg. 36) NOV.10.2006 a Mode Indicator (੬ pg. 32) b Folder/File Number c Slide Show Playback Indicator (੬ pg. 33) d Battery Indicator (੬ pg. 64) e Date (੬ pg. 56) f Selected Medium Indicator (੬ pg. 17, 56) g Effect Mode Indicator (੬ pg. 36)

Instructions
Page 14
...until it locks in this section Power Switch Power/Charge Lamp To detach the battery pack Slide and hold BATT. (੬ step 2), then remove the battery pack. INDEX / / / / 49 MENU Power off Playback Recording Lock button 2 Attach the battery pack. BN-VF733U 5 hr. 40 min. 4 hr. 55 min.... DC Connector AC Adapter (ex. Power Related Preparations (Using the Battery Pack) 1 Set the power switch to the AC adapter. Bottom of the Camera BATT. 3 Charge the battery pack by connecting to OFF. 14 EN Necessary Settings before Use Be sure to configure the following...
...until it locks in this section Power Switch Power/Charge Lamp To detach the battery pack Slide and hold BATT. (੬ step 2), then remove the battery pack. INDEX / / / / 49 MENU Power off Playback Recording Lock button 2 Attach the battery pack. BN-VF733U 5 hr. 40 min. 4 hr. 55 min.... DC Connector AC Adapter (ex. Power Related Preparations (Using the Battery Pack) 1 Set the power switch to the AC adapter. Bottom of the Camera BATT. 3 Charge the battery pack by connecting to OFF. 14 EN Necessary Settings before Use Be sure to configure the following...

Instructions
Page 16
... min 0% NOTES: ● Battery information is displayed for approx. 5 seconds if the button is pressed and released quickly, and for several seconds. ● If "COMMUNICATING ERROR" appears instead of the Camera Align the camera stud hole with the tripod stud, and the mounting socket with your nearest JVC dealer. ● The recordable...
... min 0% NOTES: ● Battery information is displayed for approx. 5 seconds if the button is pressed and released quickly, and for several seconds. ● If "COMMUNICATING ERROR" appears instead of the Camera Align the camera stud hole with the tripod stud, and the mounting socket with your nearest JVC dealer. ● The recordable...

Instructions
Page 19
...; When the camera heats up to 3 different destinations within each event (for example: BABY1, BABY2, BABY3). Select Set 3 Select [ON/SELECT]. RECORDING When using the battery pack, it turns itself off . Instead, the files are not saved to the [SD_VIDEO] folder, which is not compatible with SD-VIDEO format. Remember that...
...; When the camera heats up to 3 different destinations within each event (for example: BABY1, BABY2, BABY3). Select Set 3 Select [ON/SELECT]. RECORDING When using the battery pack, it turns itself off . Instead, the files are not saved to the [SD_VIDEO] folder, which is not compatible with SD-VIDEO format. Remember that...

Instructions
Page 22
... indicator appears and becomes green when the captured image is shipped from the factory. To change the recording medium, see page 17. When using the battery pack, it is focused. Slide while pressing down the lock button. Zoom Lever 3 Press the REC/SNAP button to start recording. 40 FINE PHOTO The...
... indicator appears and becomes green when the captured image is shipped from the factory. To change the recording medium, see page 17. When using the battery pack, it is focused. Slide while pressing down the lock button. Zoom Lever 3 Press the REC/SNAP button to start recording. 40 FINE PHOTO The...
Instructions
Page 34
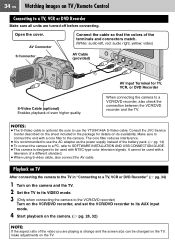
... recorder and the TV. The core filter reduces interference. ● It is recommended to use the AC adapter as the power supply instead of the battery pack. (੬ pg. 14) ● To connect the camera to a PC, refer to SOFTWARE INSTALLATION AND USB CONNECTION GUIDE. ● This camera is... designed to use the YTU94146A S-Video cable. Consult the JVC Service Center described on the sheet included in "Connecting to a TV, VCR or DVD Recorder" (੬ pg. 34) 1 Turn on the camera and...
... recorder and the TV. The core filter reduces interference. ● It is recommended to use the AC adapter as the power supply instead of the battery pack. (੬ pg. 14) ● To connect the camera to a PC, refer to SOFTWARE INSTALLATION AND USB CONNECTION GUIDE. ● This camera is... designed to use the YTU94146A S-Video cable. Consult the JVC Service Center described on the sheet included in "Connecting to a TV, VCR or DVD Recorder" (੬ pg. 34) 1 Turn on the camera and...

Instructions
Page 35
... N Next Button O Down Button Rotate Button (clockwise) (੬ pg. 33) P INDEX Button Q DATE Button Beam Effective Area Effective distance for indoor use . To Reinsert the Battery The remote control uses one lithium battery (CR2025). Pull out the battery holder by pressing the lock tab. Playback Using the Remote Control...
... N Next Button O Down Button Rotate Button (clockwise) (੬ pg. 33) P INDEX Button Q DATE Button Beam Effective Area Effective distance for indoor use . To Reinsert the Battery The remote control uses one lithium battery (CR2025). Pull out the battery holder by pressing the lock tab. Playback Using the Remote Control...

Instructions
Page 38
... Set To exit the file delete screen Select [CANCEL] in this section MODE Switch Power Switch Zoom Lever / /// 49 2 DELETE? Also, be corrupted if the battery becomes exhausted during recording mode, the file recorded most recently will be deleted. 38 EN Managing Files You can select the file that you want...
... Set To exit the file delete screen Select [CANCEL] in this section MODE Switch Power Switch Zoom Lever / /// 49 2 DELETE? Also, be corrupted if the battery becomes exhausted during recording mode, the file recorded most recently will be deleted. 38 EN Managing Files You can select the file that you want...

Instructions
Page 55
... the chances of the operation remote control. REMOTE OFF: The camera does not receive the signal from the remote control [ON]: Enables operation with the battery. - DROP DETECTION OFF: Disables the function. for All Modes Menus Settings ([ ] = Factory-preset) ੬ BASIC SETTING Press 49 and then select sub menus...
... the chances of the operation remote control. REMOTE OFF: The camera does not receive the signal from the remote control [ON]: Enables operation with the battery. - DROP DETECTION OFF: Disables the function. for All Modes Menus Settings ([ ] = Factory-preset) ੬ BASIC SETTING Press 49 and then select sub menus...

Instructions
Page 60
...instrument. 60 EN Troubleshooting The camera is not solved, reset the camera. (੬ right column) ● If the problem persists, please consult your nearest JVC dealer. External noise and interference (from a TV, a radio, etc.) might prevent it . 3) Execute [PRESET] from functioning properly. ● To ... the instructions below. ● If the problem is a microcomputer-controlled device. The camera returns to OFF and remove the power supply (battery pack or AC adapter) from the camera, then reattach it from the menu. To reset the camera 1) Press RESET using the AC ...
...instrument. 60 EN Troubleshooting The camera is not solved, reset the camera. (੬ right column) ● If the problem persists, please consult your nearest JVC dealer. External noise and interference (from a TV, a radio, etc.) might prevent it . 3) Execute [PRESET] from functioning properly. ● To ... the instructions below. ● If the problem is a microcomputer-controlled device. The camera returns to OFF and remove the power supply (battery pack or AC adapter) from the camera, then reattach it from the menu. To reset the camera 1) Press RESET using the AC ...

Instructions
Page 61
...recording, the ● Set [DATE/TIME] to extremely high/low - on the LCD monitor become dark. To protect the battery, it in clock's rechargeable lithium battery is discharged, so 14 the previously set the date/ time. life, images on the camera does not temperatures. Then set date...on the picture. When the screen is ● This is recorded at 4:3 mode if playing back on the LCD monitor. Consult your nearest JVC dealer. These spots are not recorded on a 4:3 screen TV. Record videos at 16:9 20 slightly vertically mode. Images on the LCD &#...
...recording, the ● Set [DATE/TIME] to extremely high/low - on the LCD monitor become dark. To protect the battery, it in clock's rechargeable lithium battery is discharged, so 14 the previously set the date/ time. life, images on the camera does not temperatures. Then set date...on the picture. When the screen is ● This is recorded at 4:3 mode if playing back on the LCD monitor. Consult your nearest JVC dealer. These spots are not recorded on a 4:3 screen TV. Record videos at 16:9 20 slightly vertically mode. Images on the LCD &#...


