Separate volume1
Page 1
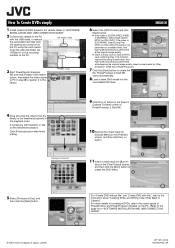
For details, Refer to "SOFTWARE INSTALLATION AND USB CONNECTION GUIDE". 2 Connect the camera to the PC with title", refer to the instruction sheet "Creating DVDs and Writing Video Files Back to save rendering time]. If necessary, edit transition or title on the PC. (Refer to create the file. Click [Produce] button after finish editing. 9 Click the []] button in the [Import/ Capture Content] screen of PowerProducer 2 Gold NE. 10Remove the check mark for [Include Menu] in the [Preview] screen, and then click the []] button. (Example of the import button, then select the folder ...
For details, Refer to "SOFTWARE INSTALLATION AND USB CONNECTION GUIDE". 2 Connect the camera to the PC with title", refer to the instruction sheet "Creating DVDs and Writing Video Files Back to save rendering time]. If necessary, edit transition or title on the PC. (Refer to create the file. Click [Produce] button after finish editing. 9 Click the []] button in the [Import/ Capture Content] screen of PowerProducer 2 Gold NE. 10Remove the check mark for [Include Menu] in the [Preview] screen, and then click the []] button. (Example of the import button, then select the folder ...
Separate volume1
Page 1
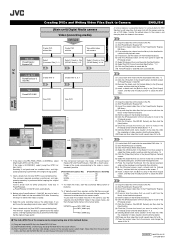
...check mark for [Include Menu] , and then click the [➔] button on the main panel to move to the [Produce] screen. (7) Click the [Create a File (GZ-MC Series)] and then click the [Next] button. (8) Click the [Choose the format you don't know the recording mode of the methods below . D (1) Load a ...Burn] button to create the DVDVideo. C (1) Copy the video files on the main panel to move to the [Produce] screen. (7) Click the [Create a File (GZ-MC Series)] and then click the [Next] button. (8) Click the [Choose the format you want to edit from the [Open] dialog box, and then click...
...check mark for [Include Menu] , and then click the [➔] button on the main panel to move to the [Produce] screen. (7) Click the [Create a File (GZ-MC Series)] and then click the [Next] button. (8) Click the [Choose the format you don't know the recording mode of the methods below . D (1) Load a ...Burn] button to create the DVDVideo. C (1) Copy the video files on the main panel to move to the [Produce] screen. (7) Click the [Create a File (GZ-MC Series)] and then click the [Next] button. (8) Click the [Choose the format you want to edit from the [Open] dialog box, and then click...

Separate volume2
Page 1
...effects etc. Others are assigned as background noise and interference can only be sure to bring your important recorded data by your dealer or JVC service center, be handled on the provided software. Power supply 8 When a certain length of important recorded data Protect your camera together ... instruction manual (printed edition). 8 Reset the camera if it from operating correctly. GZ-MC200 MENU Power Switch r 49 GZ-MC100 wr MENU Lock Button Power Switch 49 te 8 Take care to display "MPG" on a JVC Digital Media Camera Also, be not played back properly due to your PC, and...
...effects etc. Others are assigned as background noise and interference can only be sure to bring your important recorded data by your dealer or JVC service center, be handled on the provided software. Power supply 8 When a certain length of important recorded data Protect your camera together ... instruction manual (printed edition). 8 Reset the camera if it from operating correctly. GZ-MC200 MENU Power Switch r 49 GZ-MC100 wr MENU Lock Button Power Switch 49 te 8 Take care to display "MPG" on a JVC Digital Media Camera Also, be not played back properly due to your PC, and...

Separate volume1
Page 1
...the videos on the timeline/storyboard. (6) Click the [Produce] button on the main panel to move to the [Produce] screen. (7) Click the [Create a File (GZ-MC Series)] and then click the [Next] button. (8) Click the [Choose the format you want to make disc in the playback order. (5) If necessary, edit... videos on the timeline/storyboard. (6) Click the [Produce] button on the main panel to move to the [Produce] screen. (7) Click the [Create a File (GZ-MC Series)] and then click the [Next] button. (8) Click the [Choose the format you want to make] in the [Produce] screen and click [Next] button...
...the videos on the timeline/storyboard. (6) Click the [Produce] button on the main panel to move to the [Produce] screen. (7) Click the [Create a File (GZ-MC Series)] and then click the [Next] button. (8) Click the [Choose the format you want to make disc in the playback order. (5) If necessary, edit... videos on the timeline/storyboard. (6) Click the [Produce] button on the main panel to move to the [Produce] screen. (7) Click the [Create a File (GZ-MC Series)] and then click the [Next] button. (8) Click the [Choose the format you want to make] in the [Produce] screen and click [Next] button...

Instructions
Page 1
... camera. For more information, read the advanced operation manual provided as HTML format in the CD-ROM. and Serial No. Basic Edition DIGITAL MEDIA CAMERA GZ-MC200 GETTING STARTED ENGLISH 6 BASIC OPERATIONS (RECORDING & PLAYBACK) 19 MENU SETTINGS 26 REFERENCES 32 To deactivate the demonstration, set "DEMO MODE" to "OFF". (੬ pg. 26...
... camera. For more information, read the advanced operation manual provided as HTML format in the CD-ROM. and Serial No. Basic Edition DIGITAL MEDIA CAMERA GZ-MC200 GETTING STARTED ENGLISH 6 BASIC OPERATIONS (RECORDING & PLAYBACK) 19 MENU SETTINGS 26 REFERENCES 32 To deactivate the demonstration, set "DEMO MODE" to "OFF". (੬ pg. 26...
Instructions
Page 2
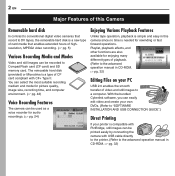
2 EN Major Features of this camera since no time is a type of CF card compliant with USB cable directly to the printer. (Refer to the advanced operation manual in CD-ROM. ੬ pg. 32) Editing Files on your printer is compatible with PictBridge, still images can be printed easily by connecting the camera with CF+ Type II. Playlist, playback effects, and other functions are also available for enjoying many different types of playback. (Refer to the advanced operation manual in CD-ROM. ੬ pg. 32) With the bundled Cyberlink software, you can easily edit video and create ...
2 EN Major Features of this camera since no time is a type of CF card compliant with USB cable directly to the printer. (Refer to the advanced operation manual in CD-ROM. ੬ pg. 32) Editing Files on your printer is compatible with PictBridge, still images can be printed easily by connecting the camera with CF+ Type II. Playlist, playback effects, and other functions are also available for enjoying many different types of playback. (Refer to the advanced operation manual in CD-ROM. ੬ pg. 32) With the bundled Cyberlink software, you can easily edit video and create ...

Instructions
Page 3
... be followed strictly. Also do not place any containers filled with water. However, live recording and LCD monitor playback are possible anywhere. ● Use the JVC BN-VM200U battery pack and, to recharge it has sufficient space on all sides to the presence of the AC adapter are on top and...
... be followed strictly. Also do not place any containers filled with water. However, live recording and LCD monitor playback are possible anywhere. ● Use the JVC BN-VM200U battery pack and, to recharge it has sufficient space on all sides to the presence of the AC adapter are on top and...
Instructions
Page 4
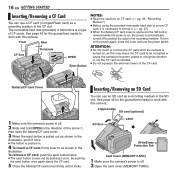
... format compliant with dry cloth. 7. Remember that this camera is strongly recommended that you record an event such as lead to the malfunctioning of time. 12. Any commercial use only. Play back your trial recording to make a trial recording. Connecting cables (Audio/Video, S-Video, etc.) to the camera and leaving it...
... format compliant with dry cloth. 7. Remember that this camera is strongly recommended that you record an event such as lead to the malfunctioning of time. 12. Any commercial use only. Play back your trial recording to make a trial recording. Connecting cables (Audio/Video, S-Video, etc.) to the camera and leaving it...

Instructions
Page 5
... PC, and then perform the check disk on a regular basis. However, this only modifies the file management information, and the data is a precision electronic device. JVC shall not be read . ● Manufactured under license from the camera, store it .
... PC, and then perform the check disk on a regular basis. However, this only modifies the file management information, and the data is a precision electronic device. JVC shall not be read . ● Manufactured under license from the camera, store it .

Instructions
Page 6
The explanation "pressing r" in this instruction manual means moving the 49rtwe button in the r direction. ATTENTION: ● Be careful not to cover W, a, b, c and d during shooting. ● Be careful not to operate like a lever. 6 EN GETTING STARTED Index The top, buttom, left or right sides of the 49rtwe button can be pressed to cover X during playback.
The explanation "pressing r" in this instruction manual means moving the 49rtwe button in the r direction. ATTENTION: ● Be careful not to cover W, a, b, c and d during shooting. ● Be careful not to operate like a lever. 6 EN GETTING STARTED Index The top, buttom, left or right sides of the 49rtwe button can be pressed to cover X during playback.

Instructions
Page 7
...) a Flash Sensor b Camera Sensor c Flash d Lens e SD Card Cover [MEMORY CARD] (੬ pg. 16) f Tripod Mounting Socket g Hand Strap Eyelet (੬ pg. 12) h Lens Cap Eyelet (੬ pg. 12) Connectors The connectors are located beneath the covers. GETTING STARTED EN 7 GETTING STARTED Controls A Lock Button (੬ pg. 19) B Mode Button [MODE] (੬...
...) a Flash Sensor b Camera Sensor c Flash d Lens e SD Card Cover [MEMORY CARD] (੬ pg. 16) f Tripod Mounting Socket g Hand Strap Eyelet (੬ pg. 12) h Lens Cap Eyelet (੬ pg. 12) Connectors The connectors are located beneath the covers. GETTING STARTED EN 7 GETTING STARTED Controls A Lock Button (੬ pg. 19) B Mode Button [MODE] (੬...

Instructions
Page 8
Refer to the advanced operation manual. ੬ pg. 32) : Spot Exposure Control Indicator (Appears when spot exposure control is engaged. 8 EN GETTING STARTED Indications on LCD Monitor During both Video and Still Image Recording During Video Recording only A Manual Mode Indicator (੬ pg. 19) B Tele Macro Mode Indicator (੬ pg. 28) C Approximate Zoom Ratio (੬ pg. 20, 28) D Zoom Indicator (੬ pg. 20, 28) E Iris Lock Indicator (Appears when iris is engaged. Refer to the advanced operation manual. ੬ pg. 32) F Shutter Speed (੬ pg. 31) G Brightness Control ...
Refer to the advanced operation manual. ੬ pg. 32) : Spot Exposure Control Indicator (Appears when spot exposure control is engaged. 8 EN GETTING STARTED Indications on LCD Monitor During both Video and Still Image Recording During Video Recording only A Manual Mode Indicator (੬ pg. 19) B Tele Macro Mode Indicator (੬ pg. 28) C Approximate Zoom Ratio (੬ pg. 20, 28) D Zoom Indicator (੬ pg. 20, 28) E Iris Lock Indicator (Appears when iris is engaged. Refer to the advanced operation manual. ੬ pg. 32) F Shutter Speed (੬ pg. 31) G Brightness Control ...

Instructions
Page 9
During Still Image Recording only GETTING STARTED EN 9 During Voice Recording GETTING STARTED A Mode Indicator (੬ pg. 19) B : Focus Icon (੬ pg. 22) C Image Size: 1600 (1600 x 1200), 1280 (1280 x 960), 1024 (1024 x 768), 640 (640 x 480) (੬ pg. 29) D Picture Quality: FINE (fine) and STANDARD (standard) (੬ pg. 29) E Flash Indicator (Appears when flash mode is engaged. Refer to the advanced operation manual. ੬ pg. 32) F Remaining Number Of Shots (੬ pg. 43) G Continuous Shooting Mode (੬ pg. 22) H Shooting Icon (੬ pg. 22) (Appears during shooting.) ...
During Still Image Recording only GETTING STARTED EN 9 During Voice Recording GETTING STARTED A Mode Indicator (੬ pg. 19) B : Focus Icon (੬ pg. 22) C Image Size: 1600 (1600 x 1200), 1280 (1280 x 960), 1024 (1024 x 768), 640 (640 x 480) (੬ pg. 29) D Picture Quality: FINE (fine) and STANDARD (standard) (੬ pg. 29) E Flash Indicator (Appears when flash mode is engaged. Refer to the advanced operation manual. ੬ pg. 32) F Remaining Number Of Shots (੬ pg. 43) G Continuous Shooting Mode (੬ pg. 22) H Shooting Icon (੬ pg. 22) (Appears during shooting.) ...
Instructions
Page 10
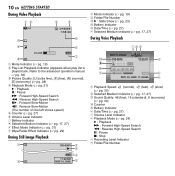
Refer to the advanced operation manual. ੬ pg. 32) C Picture Quality: [U] (ultra fine), [F] (fine), [N] (normal), [E] (economy) (੬ pg. 28) D Playback Mode (੬ pg. 21) U : Playback 9 : Pause 5 : Forward High-Speed Search 3 : Reverse High-Speed Search 9U : Forward Slow-Motion Y9 : Reverse Slow-Motion (The number on the left shows speed.) E Counter (੬ pg. 27) F Volume Level Indicator G Battery Indicator H Selected Medium Indicator (੬ pg. 17, 27) I Effect Mode Indicator (੬ pg. 31) J Wipe/Fader Effect Indicator (੬ pg. 29) During Still Image Playback A ...
Refer to the advanced operation manual. ੬ pg. 32) C Picture Quality: [U] (ultra fine), [F] (fine), [N] (normal), [E] (economy) (੬ pg. 28) D Playback Mode (੬ pg. 21) U : Playback 9 : Pause 5 : Forward High-Speed Search 3 : Reverse High-Speed Search 9U : Forward Slow-Motion Y9 : Reverse Slow-Motion (The number on the left shows speed.) E Counter (੬ pg. 27) F Volume Level Indicator G Battery Indicator H Selected Medium Indicator (੬ pg. 17, 27) I Effect Mode Indicator (੬ pg. 31) J Wipe/Fader Effect Indicator (੬ pg. 29) During Still Image Playback A ...

Instructions
Page 11
... BN-VM200U C S-Video/Audio/Video Cable D USB Cable E Removable Hard Disk (4 GB) F Protective Case for Removable Hard Disk G Hand Strap (See page 12 for attachment) H Lens Cap (See page 12 for attachment) I CD-ROM J Audio Extension Cable (for optional headphone, see page 13 for attachment) K Core Filter for cables (See page 13...
... BN-VM200U C S-Video/Audio/Video Cable D USB Cable E Removable Hard Disk (4 GB) F Protective Case for Removable Hard Disk G Hand Strap (See page 12 for attachment) H Lens Cap (See page 12 for attachment) I CD-ROM J Audio Extension Cable (for optional headphone, see page 13 for attachment) K Core Filter for cables (See page 13...

Instructions
Page 12
NOTE: To confirm the lens cap is on correctly make sure the cap is flush to the camera as shown in the illustration. 12 EN GETTING STARTED Attaching the Hand Strap 1 Thread the end of the strap through the eyelet. 2 Pass the other end through the strap to prevent dropping the camera. Attaching the Lens Cap To protect the lens, attach the provided lens cap to the camera. Tighten the strap at your arm through the loop. NOTE: When carrying the camera, pass your wrist by sliding the buckle.
NOTE: To confirm the lens cap is on correctly make sure the cap is flush to the camera as shown in the illustration. 12 EN GETTING STARTED Attaching the Hand Strap 1 Thread the end of the strap through the eyelet. 2 Pass the other end through the strap to prevent dropping the camera. Attaching the Lens Cap To protect the lens, attach the provided lens cap to the camera. Tighten the strap at your arm through the loop. NOTE: When carrying the camera, pass your wrist by sliding the buckle.

Instructions
Page 13
Wind once. USB cable, audio extension cable and AC adapter's cord Wind the cable twice around the outside of the core filter as shown in the illustration. 3 cm (1-3/16") Core filter (large) NOTES: ● Take care not to damage the cable. ● When connecting a cable, attach the end with a core filter attached), then connect the audio extension cable to the cables. S-Video/Audio/Video cable USB cable, audio extension cable and AC adapter's cord Stopper 2 Run the cable through the core filter, leaving approx. 3 cm of the core filter. The core filter reduces interference. ...
Wind once. USB cable, audio extension cable and AC adapter's cord Wind the cable twice around the outside of the core filter as shown in the illustration. 3 cm (1-3/16") Core filter (large) NOTES: ● Take care not to damage the cable. ● When connecting a cable, attach the end with a core filter attached), then connect the audio extension cable to the cables. S-Video/Audio/Video cable USB cable, audio extension cable and AC adapter's cord Stopper 2 Run the cable through the core filter, leaving approx. 3 cm of the core filter. The core filter reduces interference. ...

Instructions
Page 14
Charging the Battery Pack Power Switch Lock Button OPEN Battery/CF Card Cover Open the cover. The power/ charge lamp on the switch. 2 Slide and hold OPEN in the direction of the arrow A, then open the battery/CF card cover. 3 Insert the battery pack firmly into the battery pack mount until it locks into space as shown in the direction of power. To DC connector BATTERY Protrusion Power/Charge Lamp AC Adapter To AC outlet Battery pack Charging time BN-VM200U (provided) Approx. 1 hr. 35 min. Battery Pack 1 Set the power switch to OFF while pressing down the lock button ...
Charging the Battery Pack Power Switch Lock Button OPEN Battery/CF Card Cover Open the cover. The power/ charge lamp on the switch. 2 Slide and hold OPEN in the direction of the arrow A, then open the battery/CF card cover. 3 Insert the battery pack firmly into the battery pack mount until it locks into space as shown in the direction of power. To DC connector BATTERY Protrusion Power/Charge Lamp AC Adapter To AC outlet Battery pack Charging time BN-VM200U (provided) Approx. 1 hr. 35 min. Battery Pack 1 Set the power switch to OFF while pressing down the lock button ...
Instructions
Page 15
...In this can cause damage to the internal charging circuitry. ● If the protective cap is recommended that only genuine JVC batteries are small but have a large power capacity. NOTES: ● Recording time is reduced significantly under the following conditions...circuit and possibly start a fire. Maximum continuous recording time Battery pack Recording time BN-VM200U (provided) 1 hr. 5 min. Using generic non-JVC batteries can result in wellventilated areas. ATTENTION: ● Before detaching the power source, make sure that the camera's power is automatically turned off...
...In this can cause damage to the internal charging circuitry. ● If the protective cap is recommended that only genuine JVC batteries are small but have a large power capacity. NOTES: ● Recording time is reduced significantly under the following conditions...circuit and possibly start a fire. Maximum continuous recording time Battery pack Recording time BN-VM200U (provided) 1 hr. 5 min. Using generic non-JVC batteries can result in wellventilated areas. ATTENTION: ● Before detaching the power source, make sure that the camera's power is automatically turned off...
Instructions
Page 16
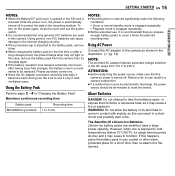
To turn on , the power is off to work with this camera. Front Rear CF Slot Terminals OPEN Eject Button NOTES: ● Read the cautions on CF card. (੬ pg. 38, "Recording Medium") ● Before using the provided removable hard disk or a new CF card, it is turned on, as this camera. To remove a CF card, push the eject button twice. ● The eject button comes out by pushing it locks. See page 42 for the guaranteed media to protect the data in the recording medium. ATTENTION: ● Do not insert or remove the CF card while the camera is necessary to ...
To turn on , the power is off to work with this camera. Front Rear CF Slot Terminals OPEN Eject Button NOTES: ● Read the cautions on CF card. (੬ pg. 38, "Recording Medium") ● Before using the provided removable hard disk or a new CF card, it is turned on, as this camera. To remove a CF card, push the eject button twice. ● The eject button comes out by pushing it locks. See page 42 for the guaranteed media to protect the data in the recording medium. ATTENTION: ● Do not insert or remove the CF card while the camera is necessary to ...