
Instruction Manual
Page 1
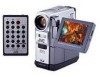
... (in English only): http://www.jvc-victor.co.jp/english/index-e.html For Accessories: http://www.jvc-victor.co.jp/english/accessory GETTING STARTED 9 VIDEO RECORDING & PLAYBACK 18 DIGITAL STILL CAMERA (D.S.C.) RECORDING & PLAYBACK 26 ADVANCED FEATURES 37 The camcorder illustrations appearing in this instruction manual are of the GR-DVX707. TERMS 102 LYT0957-001A...
... (in English only): http://www.jvc-victor.co.jp/english/index-e.html For Accessories: http://www.jvc-victor.co.jp/english/accessory GETTING STARTED 9 VIDEO RECORDING & PLAYBACK 18 DIGITAL STILL CAMERA (D.S.C.) RECORDING & PLAYBACK 26 ADVANCED FEATURES 37 The camcorder illustrations appearing in this instruction manual are of the GR-DVX707. TERMS 102 LYT0957-001A...
Instruction Manual
Page 4
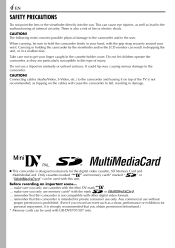
... (Audio/Video, S-Video, etc.) to hold the camcorder firmly in damage. Ⅲ This camcorder is strongly recommended that this unit. Carrying or holding the camcorder by the viewfinder and/or the LCD monitor can be used with GR-DVX707/507 only. CAUTION! 4 EN SAFETY PRECAUTIONS Do...digital video formats...remember that you obtain permission beforehand.) * Memory cards can cause eye injuries, as well as they are particularly susceptible to the camcorder. CAUTION! Only cassettes marked " " and memory cards* marked " " or " " can result in dropping the unit, or in the...
... (Audio/Video, S-Video, etc.) to hold the camcorder firmly in damage. Ⅲ This camcorder is strongly recommended that this unit. Carrying or holding the camcorder by the viewfinder and/or the LCD monitor can be used with GR-DVX707/507 only. CAUTION! 4 EN SAFETY PRECAUTIONS Do...digital video formats...remember that you obtain permission beforehand.) * Memory cards can cause eye injuries, as well as they are particularly susceptible to the camcorder. CAUTION! Only cassettes marked " " and memory cards* marked " " or " " can result in dropping the unit, or in the...

Instruction Manual
Page 5
... ● CD-ROM ● AAA (R03) Battery x 2 (for remote control unit) ● USB Cable (GR-DVX707/507 only) ● PC Connection Cable (GR-DVX407/400 only) ● Memory Card 8 MB (GR-DVX707/507 only) (Already inserted in the camcorder) ● Lens Cap (੬ pg. 7 for attachment) ● Audio/Video Cable (ø3.5 mini-plug to...
... ● CD-ROM ● AAA (R03) Battery x 2 (for remote control unit) ● USB Cable (GR-DVX707/507 only) ● PC Connection Cable (GR-DVX407/400 only) ● Memory Card 8 MB (GR-DVX707/507 only) (Already inserted in the camcorder) ● Lens Cap (੬ pg. 7 for attachment) ● Audio/Video Cable (ø3.5 mini-plug to...

Instruction Manual
Page 6
... a, then pass the other end of the strap h in the pad. b h Be careful not to cover the tally lamp or the flash (GR-DVX707/507 only) when holding camcorder without finger support. 1) Thread the finger support with your fingers. ● The grip belt can be attached to use the finger support so... that the tally lamp or the flash (GR-DVX707/507 only) is not used. Open the pad and fold the end of the strap...
... a, then pass the other end of the strap h in the pad. b h Be careful not to cover the tally lamp or the flash (GR-DVX707/507 only) when holding camcorder without finger support. 1) Thread the finger support with your fingers. ● The grip belt can be attached to use the finger support so... that the tally lamp or the flash (GR-DVX707/507 only) is not used. Open the pad and fold the end of the strap...

Instruction Manual
Page 8
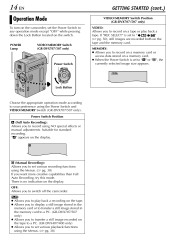
If no operation is performed for about 3 minutes after that, the demonstration will resume. Ⅲ "DEMO MODE" remains "ON" even if the camcorder power is turned off. Ⅲ To cancel Automatic Demonstration: 1) Set the Power Switch to select "s SYSTEM", and press it. The Menu Screen appears. 4)... press it. 7) Rotate the MENU Wheel to select "DEMO MODE", and press it twice. MENU Wheel Lock Button Power Switch PLAY OFF A M Sub Menu GR-DVX707/ 507 only DEMO MODE OF F ON NOTE: Detach the lens cap to "A" or "M" and no cassette is in . 8 EN Automatic Demonstration Automatic ...
If no operation is performed for about 3 minutes after that, the demonstration will resume. Ⅲ "DEMO MODE" remains "ON" even if the camcorder power is turned off. Ⅲ To cancel Automatic Demonstration: 1) Set the Power Switch to select "s SYSTEM", and press it. The Menu Screen appears. 4)... press it. 7) Rotate the MENU Wheel to select "DEMO MODE", and press it twice. MENU Wheel Lock Button Power Switch PLAY OFF A M Sub Menu GR-DVX707/ 507 only DEMO MODE OF F ON NOTE: Detach the lens cap to "A" or "M" and no cassette is in . 8 EN Automatic Demonstration Automatic ...

Instruction Manual
Page 9
EN 9 GETTING STARTED CONTENTS Power ...10 Grip Adjustment ...12 Viewfinder Adjustment ...12 Tripod Mounting ...13 LCD Monitor And Viewfinder ...13 Brightness Adjustment Of The Display ...13 Operation Mode ...14 Date/Time Settings ...15 Loading A Cassette/Unloading A Cassette ...16 Loading A Memory Card/Unloading A Memory Card (GR-DVX707/507 only) ...17
EN 9 GETTING STARTED CONTENTS Power ...10 Grip Adjustment ...12 Viewfinder Adjustment ...12 Tripod Mounting ...13 LCD Monitor And Viewfinder ...13 Brightness Adjustment Of The Display ...13 Operation Mode ...14 Date/Time Settings ...15 Loading A Cassette/Unloading A Cassette ...16 Loading A Memory Card/Unloading A Memory Card (GR-DVX707/507 only) ...17

Instruction Manual
Page 12
... 1 2 3 Set the Power Switch to "A" or "M" while pressing down the Lock Button located on the finger support so that the tally lamp or the flash (GR-DVX707/507 only) is unobstructed with your fingers. OFF A M PLAY Power Switch Lock Button 4 Adjust your preference. Pull out the viewfinder fully. PAUSE Dioptre Adjustment...
... 1 2 3 Set the Power Switch to "A" or "M" while pressing down the Lock Button located on the finger support so that the tally lamp or the flash (GR-DVX707/507 only) is unobstructed with your fingers. OFF A M PLAY Power Switch Lock Button 4 Adjust your preference. Pull out the viewfinder fully. PAUSE Dioptre Adjustment...
Instruction Manual
Page 14
...; Allows you to display a still image stored in the memory card or to transfer a still image stored in the memory card to a PC. (GR-DVX707/507 only) ● Allows you to transfer a still image recorded on a memory card. ● When the Power Switch is set various playback...VIDEO/MEMORY Switch Position (GR-DVX707/507 only) VIDEO: Allows you to set to "A" or "M", the currently selected image size appears. 1024 Power Switch OFF A M PLAY Lock Button Choose the appropriate operation mode according to record on the display. OFF: Allows you to switch off the camcorder. P: ● ...
...; Allows you to display a still image stored in the memory card or to transfer a still image stored in the memory card to a PC. (GR-DVX707/507 only) ● Allows you to transfer a still image recorded on a memory card. ● When the Power Switch is set various playback...VIDEO/MEMORY Switch Position (GR-DVX707/507 only) VIDEO: Allows you to set to "A" or "M", the currently selected image size appears. 1024 Power Switch OFF A M PLAY Lock Button Choose the appropriate operation mode according to record on the display. OFF: Allows you to switch off the camcorder. P: ● ...

Instruction Manual
Page 15
...GR-DVX707/507 only CLOCK ADJ . 2 5 . 12 . 02 17 : 3 0 Power Switch OFF A M PLAY 7 Lock Button Rotate the MENU Wheel to input the day, and press it twice. Then perform the date/ time setting before using the AC Adapter, or while the battery pack attached to the camcorder...operate. AU T O - OF F 2 5 . 12 . 02 17 : 3 0 RETURN Note that the camcorder can be lost. Once you move the highlight bar to input the month, year, hour and minute. The DISPLAY ... / TV - The parameter for "Day" is integrated in the camcorder. GR-DVX707/507 only W I ME CODE CLOCK ADJ . - EN ...
...GR-DVX707/507 only CLOCK ADJ . 2 5 . 12 . 02 17 : 3 0 Power Switch OFF A M PLAY 7 Lock Button Rotate the MENU Wheel to input the day, and press it twice. Then perform the date/ time setting before using the AC Adapter, or while the battery pack attached to the camcorder...operate. AU T O - OF F 2 5 . 12 . 02 17 : 3 0 RETURN Note that the camcorder can be lost. Once you move the highlight bar to input the month, year, hour and minute. The DISPLAY ... / TV - The parameter for "Day" is integrated in the camcorder. GR-DVX707/507 only W I ME CODE CLOCK ADJ . - EN ...

Instruction Manual
Page 17
... Cover Clipped edge Memory card Label 1 2 3 Make sure the camcorder's power is installed. Close the card cover. 4 Before purchasing a memory card, consult its clipped edge first. EN 17 Loading A Memory Card /Unloading A Memory Card (GR-DVX707/507 only) The provided memory card is already inserted in the... direction of purchase. To record on , as this may cause the memory card to be corrupted or cause the camcorder to become unable to "LOCK" before loading it...
... Cover Clipped edge Memory card Label 1 2 3 Make sure the camcorder's power is installed. Close the card cover. 4 Before purchasing a memory card, consult its clipped edge first. EN 17 Loading A Memory Card /Unloading A Memory Card (GR-DVX707/507 only) The provided memory card is already inserted in the... direction of purchase. To record on , as this may cause the memory card to be corrupted or cause the camcorder to become unable to "LOCK" before loading it...

Instruction Manual
Page 19
...) (Blinking) MENU Wheel Lock Button Tally Lamp 1 2 3 Set the VIDEO/MEMORY Switch to "VIDEO". (GR-DVX707/507 only) Set the Power Switch to "Recording From The Middle Of A Tape" (੬ pg. 21). ● To turn the camcorder on again, push back and pull out the viewfinder again or close and re-open...
...) (Blinking) MENU Wheel Lock Button Tally Lamp 1 2 3 Set the VIDEO/MEMORY Switch to "VIDEO". (GR-DVX707/507 only) Set the Power Switch to "Recording From The Middle Of A Tape" (੬ pg. 21). ● To turn the camcorder on again, push back and pull out the viewfinder again or close and re-open...

Instruction Manual
Page 22
... during Shuttle Search. 22 EN Normal Playback Stop Button (8) Rewind Button (3) Play/Pause Button (4/9) Fast-Forward Button (5) VIDEO/MEMORY Switch (GR-DVX707/507 only) VIDEO PLAYBACK To control the speaker volume...Turn the Power Zoom Ring toward "T" to turn up the volume, or toward ..., press 4/9. ● During playback, press and hold the button. NOTES: ● If Stop mode continues for more than about 3 minutes, the camcorder's Stop mode is automatically engaged. ● When 4/9 is supplied from the speaker. ATTENTION: During Shuttle Search, parts of the picture may not pause ...
... during Shuttle Search. 22 EN Normal Playback Stop Button (8) Rewind Button (3) Play/Pause Button (4/9) Fast-Forward Button (5) VIDEO/MEMORY Switch (GR-DVX707/507 only) VIDEO PLAYBACK To control the speaker volume...Turn the Power Zoom Ring toward "T" to turn up the volume, or toward ..., press 4/9. ● During playback, press and hold the button. NOTES: ● If Stop mode continues for more than about 3 minutes, the camcorder's Stop mode is automatically engaged. ● When 4/9 is supplied from the speaker. ATTENTION: During Shuttle Search, parts of the picture may not pause ...

Instruction Manual
Page 23
...Zoom Playback Special Effects Available only with the tape. ● If the beginning or end of the tape is reached during Blank Search, the camcorder stops automatically. ● A blank portion which is about 3 seconds of tape before the beginning of the detected blank portion. ● ...- The VIDEO Menu appears. MENU Wheel Lock Button 1 2 3 4 5 Load a cassette. (੬ pg. 16) Set the VIDEO/MEMORY Switch to "VIDEO". (GR-DVX707/507 only) Set the Power Switch to select "t VIDEO", and press it . CANCEL EXECUTE 7 Power Switch OFF A M PLAY Rotate the MENU 5 Wheel to ...
...Zoom Playback Special Effects Available only with the tape. ● If the beginning or end of the tape is reached during Blank Search, the camcorder stops automatically. ● A blank portion which is about 3 seconds of tape before the beginning of the detected blank portion. ● ...- The VIDEO Menu appears. MENU Wheel Lock Button 1 2 3 4 5 Load a cassette. (੬ pg. 16) Set the VIDEO/MEMORY Switch to "VIDEO". (GR-DVX707/507 only) Set the Power Switch to select "t VIDEO", and press it . CANCEL EXECUTE 7 Power Switch OFF A M PLAY Rotate the MENU 5 Wheel to ...
Instruction Manual
Page 26
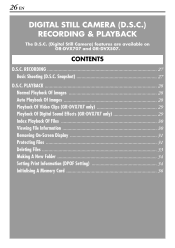
PLAYBACK ...28 Normal Playback Of Images ...28 Auto Playback Of Images ...28 Playback Of Video Clips (GR-DVX707 only) ...29 Playback Of Digital Sound Effects (GR-DVX707 only) ...29 Index Playback Of Files ...30 Viewing File Information ...30 Removing On-Screen Display ...31 Protecting Files ...31 Deleting Files ...33 Making A New ... Initialising A Memory Card ...36 RECORDING ...27 Basic Shooting (D.S.C. Snapshot) ...27 D.S.C. 26 EN DIGITAL STILL CAMERA (D.S.C.) RECORDING & PLAYBACK The D.S.C. (Digital Still Camera) features are available on GR-DVX707 and GR-DVX507. CONTENTS D.S.C.
PLAYBACK ...28 Normal Playback Of Images ...28 Auto Playback Of Images ...28 Playback Of Video Clips (GR-DVX707 only) ...29 Playback Of Digital Sound Effects (GR-DVX707 only) ...29 Index Playback Of Files ...30 Viewing File Information ...30 Removing On-Screen Display ...31 Protecting Files ...31 Deleting Files ...33 Making A New ... Initialising A Memory Card ...36 RECORDING ...27 Basic Shooting (D.S.C. Snapshot) ...27 D.S.C. 26 EN DIGITAL STILL CAMERA (D.S.C.) RECORDING & PLAYBACK The D.S.C. (Digital Still Camera) features are available on GR-DVX707 and GR-DVX507. CONTENTS D.S.C.

Instruction Manual
Page 28
...press it. PLAYBACK ● Images shot in a file size other than "640 x 480", "1024 x 768" and "1280 x 960" (GR-DVX707 only) with another devices will be viewed with the camcorder are automatically numbered, then stored in numerical order in descending order. ● If you details on the displayed file. (੬...can turn off the on the switch. Rotate the MENU Wheel to "MEMORY". Press 3 to a PC. ● Images shot with devices (such as JVC GR-DVX7) that are not compatible with DCF cannot be displayed. Open the LCD monitor fully, or pull out the viewfinder fully. ● The type of...
...press it. PLAYBACK ● Images shot in a file size other than "640 x 480", "1024 x 768" and "1280 x 960" (GR-DVX707 only) with another devices will be viewed with the camcorder are automatically numbered, then stored in numerical order in descending order. ● If you details on the displayed file. (੬...can turn off the on the switch. Rotate the MENU Wheel to "MEMORY". Press 3 to a PC. ● Images shot with devices (such as JVC GR-DVX7) that are not compatible with DCF cannot be displayed. Open the LCD monitor fully, or pull out the viewfinder fully. ● The type of...

Instruction Manual
Page 29
..., press 8. 1 2 3 4 Load the provided memory card. (੬ pg. 17) Set the VIDEO/MEMORY Switch to select the previous file. Playback Of Digital Sound Effects (GR-DVX707 only) 12 sound effects are played back in the memory card. E-MAIL CLIP 5 6 7 Press 3 to select "SOUND", and press it . SOUND 8 9 5 6...displayed. The MEMORY SELECT screen appears. Rotate the MENU Wheel to select the previous file. EN 29 Playback Of Video Clips (GR-DVX707 only) You can view video clips (੬ pg. 60) stored in ascending order. The video clip playback screen (E-MAIL CLIP) appears....
..., press 8. 1 2 3 4 Load the provided memory card. (੬ pg. 17) Set the VIDEO/MEMORY Switch to select the previous file. Playback Of Digital Sound Effects (GR-DVX707 only) 12 sound effects are played back in the memory card. E-MAIL CLIP 5 6 7 Press 3 to select "SOUND", and press it . SOUND 8 9 5 6...displayed. The MEMORY SELECT screen appears. Rotate the MENU Wheel to select the previous file. EN 29 Playback Of Video Clips (GR-DVX707 only) You can view video clips (੬ pg. 60) stored in ascending order. The video clip playback screen (E-MAIL CLIP) appears....

Instruction Manual
Page 30
...file appears. The Index Screen of the selected type of video clip files, perform 1 - 6 in "Playback Of Digital Sound Effects (GR-DVX707 only)" (੬ pg. 29). 2 Press INDEX. This browsing capability makes it easy to the desired file. ● Pressing... Y P RO T E C T : 100 - 0010 : 1 0 0 J V CGR : DVC 0 0 0 1 0 : 2 7. 1 0 . 0 2 : 1 0 2 4X7 6 8 : F I NE : OF F 1 For Index Playback of sound files, perform 1 - 6 in "Playback Of Video Clips (GR-DVX707 only)" (੬ pg. 29). 30 EN Index Playback Of Files You can get the relevant file information by pressing the INFO Button during normal...
...file appears. The Index Screen of the selected type of video clip files, perform 1 - 6 in "Playback Of Digital Sound Effects (GR-DVX707 only)" (੬ pg. 29). 2 Press INDEX. This browsing capability makes it easy to the desired file. ● Pressing... Y P RO T E C T : 100 - 0010 : 1 0 0 J V CGR : DVC 0 0 0 1 0 : 2 7. 1 0 . 0 2 : 1 0 2 4X7 6 8 : F I NE : OF F 1 For Index Playback of sound files, perform 1 - 6 in "Playback Of Video Clips (GR-DVX707 only)" (੬ pg. 29). 30 EN Index Playback Of Files You can get the relevant file information by pressing the INFO Button during normal...

Instruction Manual
Page 31
.... The operation mode indicator and battery indicator ( ) disappear. ● To display the indicators again, select "ON". If you want to step 7. 5 6 7 Press SELECT. SELECT Button (GR-DVX707 only) Rewind Button (3) Fast-Forward Button (5) VIDEO/MEMORY Switch Power Switch OFF A M PLAY MENU Wheel Lock Button ME NU D I SPLAY OF F ON RETURN 1 2 3 4 Load...
.... The operation mode indicator and battery indicator ( ) disappear. ● To display the indicators again, select "ON". If you want to step 7. 5 6 7 Press SELECT. SELECT Button (GR-DVX707 only) Rewind Button (3) Fast-Forward Button (5) VIDEO/MEMORY Switch Power Switch OFF A M PLAY MENU Wheel Lock Button ME NU D I SPLAY OF F ON RETURN 1 2 3 4 Load...

Instruction Manual
Page 33
...select "EXECUTE", and press it . Also, be sure to step 5. If not, go to use the provided AC Adapter, as turning off the camcorder) during deletion. The Sub Menu appears. The DELETE screen appears. The MEMORY SELECT screen appears. Press the MENU Wheel in the memory card 9 ...1 2 3 4 Load a memory card. (੬ pg. 17) Set the VIDEO/MEMORY Switch to step 7. 5 6 7 8 Press SELECT. SELECT Button (GR-DVX707 only) Rewind Button (3) Fast-Forward Button (5) To delete the currently displayed file 9 Rotate the MENU Wheel to select "CURRENT", and press it . ● To...
...select "EXECUTE", and press it . Also, be sure to step 5. If not, go to use the provided AC Adapter, as turning off the camcorder) during deletion. The Sub Menu appears. The DELETE screen appears. The MEMORY SELECT screen appears. Press the MENU Wheel in the memory card 9 ...1 2 3 4 Load a memory card. (੬ pg. 17) Set the VIDEO/MEMORY Switch to step 7. 5 6 7 8 Press SELECT. SELECT Button (GR-DVX707 only) Rewind Button (3) Fast-Forward Button (5) To delete the currently displayed file 9 Rotate the MENU Wheel to select "CURRENT", and press it . ● To...

Instruction Manual
Page 37
... Changing The Menu Settings ...38 RECORDING MENUS ...40 Wipe Or Fader Effects ...40 Program AE With Special Effects ...42 Exposure Control (GR-DVX707/507 only) ...43 White Balance Adjustment ...43 PLAYBACK MENUS ...51 FEATURES FOR RECORDING ...53 Night-Scope ...53 Snapshot (For ... (GR-DVX707/507 only) ...65 USING THE REMOTE CONTROL UNIT ...66 Audio Dubbing ...70 Audio Dubbing Using Digital Sound Effects (GR-DVX707 only) ...71 Insert Editing ...72 Random Assemble Editing [R.A.Edit] ...73 SYSTEM CONNECTIONS ...78 Connection To A Personal Computer ...78 Using The Camcorder As A WebCam (GR-DVX707...
... Changing The Menu Settings ...38 RECORDING MENUS ...40 Wipe Or Fader Effects ...40 Program AE With Special Effects ...42 Exposure Control (GR-DVX707/507 only) ...43 White Balance Adjustment ...43 PLAYBACK MENUS ...51 FEATURES FOR RECORDING ...53 Night-Scope ...53 Snapshot (For ... (GR-DVX707/507 only) ...65 USING THE REMOTE CONTROL UNIT ...66 Audio Dubbing ...70 Audio Dubbing Using Digital Sound Effects (GR-DVX707 only) ...71 Insert Editing ...72 Random Assemble Editing [R.A.Edit] ...73 SYSTEM CONNECTIONS ...78 Connection To A Personal Computer ...78 Using The Camcorder As A WebCam (GR-DVX707...


