User Manual
Page 2
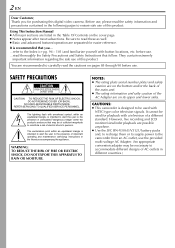
... caution of this digital video camera. It cannot be used for purchasing this product. They contain extremely important information regarding the safe use . ...read the cautions on its upper and lower sides. NO USER-SERVICEABLE PARTS INSIDE. However, live recording and LCD monitor/viewfinder playback are separated for easier reference. SAFETY PRECAUTIONS CAUTION RISK OF ELECTRIC SHOCK DO NOT OPEN CAUTION: TO REDUCE...
... caution of this digital video camera. It cannot be used for purchasing this product. They contain extremely important information regarding the safe use . ...read the cautions on its upper and lower sides. NO USER-SERVICEABLE PARTS INSIDE. However, live recording and LCD monitor/viewfinder playback are separated for easier reference. SAFETY PRECAUTIONS CAUTION RISK OF ELECTRIC SHOCK DO NOT OPEN CAUTION: TO REDUCE...

User Manual
Page 10
...; Zoom or Record-Standby mode is engaged repeatedly. • The LCD monitor is used repeatedly. • The playback mode is engaged repeatedly. ● Before extended use provided power supply units with other notes, ੬ pg. 81. Charging The Battery Pack Lock Button BATT.RELEASE Tab Power Switch CHARGE Lamp To DC connector AC Adapter c To AC outlet d Open the cover. 1 With the arrow on the camcorder blinks to indicate charging...
...; Zoom or Record-Standby mode is engaged repeatedly. • The LCD monitor is used repeatedly. • The playback mode is engaged repeatedly. ● Before extended use provided power supply units with other notes, ੬ pg. 81. Charging The Battery Pack Lock Button BATT.RELEASE Tab Power Switch CHARGE Lamp To DC connector AC Adapter c To AC outlet d Open the cover. 1 With the arrow on the camcorder blinks to indicate charging...
User Manual
Page 11
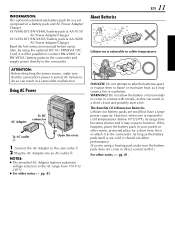
...-use battery pack kit is a set composed of a battery pack and AC Power Adapter/ Charger: VU-V840 KIT: BN-V840U battery pack & AA-V15U AC Power Adapter/Charger VU-V856 KIT: BN-V856U battery pack & AA-V80U AC Power Adapter/Charger Read the kit's instruction manual before using the optional JVC VC-VBN856U DC Cord, it will be possible to connect BN-V840U or BN-V856U battery packs to the camcorder and supply power directly...
...-use battery pack kit is a set composed of a battery pack and AC Power Adapter/ Charger: VU-V840 KIT: BN-V840U battery pack & AA-V15U AC Power Adapter/Charger VU-V856 KIT: BN-V856U battery pack & AA-V80U AC Power Adapter/Charger Read the kit's instruction manual before using the optional JVC VC-VBN856U DC Cord, it will be possible to connect BN-V840U or BN-V856U battery packs to the camcorder and supply power directly...
User Manual
Page 14
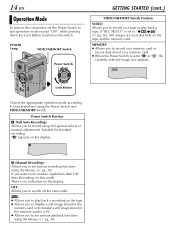
... Operation Mode To turn on the camcorder, set various playback functions using NO special effects or manual adjustments. There is set various recording functions using the Power Switch and VIDEO/MEMORY Switch. OFF: Allows you to record using the Menus. (੬ pg. 38) If "REC SELECT" is no indication on the tape. ● Allows you to display a still image stored in the memory card or to transfer a still image stored in the memory card to a PC. ● Allows you to play back a tape. POWER...
... Operation Mode To turn on the camcorder, set various playback functions using NO special effects or manual adjustments. There is set various recording functions using the Power Switch and VIDEO/MEMORY Switch. OFF: Allows you to record using the Menus. (੬ pg. 38) If "REC SELECT" is no indication on the tape. ● Allows you to display a still image stored in the memory card or to transfer a still image stored in the memory card to a PC. ● Allows you to play back a tape. POWER...

User Manual
Page 15
... tape at all times, but its display can be lost. DEC 25 ' 02 5:3 0 PM 7 Rotate the MENU Wheel to "M" while pressing down the Lock Button located on or off during playback. (੬ pg. 38, 49) POWER Lamp EN 15 5 Rotate the MENU Wheel to operate. When this occurs, first connect the camcorder to charge the clock's rechargeable lithium battery. RETURN Power Switch PLAY OFF A M Lock Button MENU Wheel 1 Set...
... tape at all times, but its display can be lost. DEC 25 ' 02 5:3 0 PM 7 Rotate the MENU Wheel to "M" while pressing down the Lock Button located on or off during playback. (੬ pg. 38, 49) POWER Lamp EN 15 5 Rotate the MENU Wheel to operate. When this occurs, first connect the camcorder to charge the clock's rechargeable lithium battery. RETURN Power Switch PLAY OFF A M Lock Button MENU Wheel 1 Set...
User Manual
Page 25
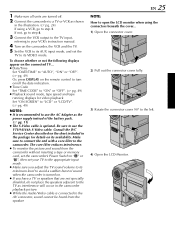
... a tape or memory card, set the camcorder's Power Switch to "A" or "M", then set the TV to its availability. Consult the JVC Service Center described on the sheet included in the package for video playback Set "ON SCREEN" to "LCD" or "LCD/TV". (੬ pg. 49) NOTES: ● It is recommended to use the YTU94146A S-Video cable. EN 25 NOTE: How to open the LCD monitor when using a VCR, go to step 4. 3 Connect the VCR output to...
... a tape or memory card, set the camcorder's Power Switch to "A" or "M", then set the TV to its availability. Consult the JVC Service Center described on the sheet included in the package for video playback Set "ON SCREEN" to "LCD" or "LCD/TV". (੬ pg. 49) NOTES: ● It is recommended to use the YTU94146A S-Video cable. EN 25 NOTE: How to open the LCD monitor when using a VCR, go to step 4. 3 Connect the VCR output to...

User Manual
Page 27
...; Remove the lens cap (੬ pg. 7) VIDEO/MEMORY Switch Power Switch PLAY OFF A M Lock Button SNAPSHOT Button 1 Set the VIDEO/MEMORY Switch to "MEMORY". 2 Set the Power Switch to "OFF". (੬ pg. 48) ● To change the Image Size and/or Picture Quality, ੬ pg. 50. The "O" indication appears while the snapshot is recorded onto the tape. ● Still images taken are compliant to the AV connector, the shutter sound is not heard from the battery pack, the camcorder...
...; Remove the lens cap (੬ pg. 7) VIDEO/MEMORY Switch Power Switch PLAY OFF A M Lock Button SNAPSHOT Button 1 Set the VIDEO/MEMORY Switch to "MEMORY". 2 Set the Power Switch to "OFF". (੬ pg. 48) ● To change the Image Size and/or Picture Quality, ੬ pg. 50. The "O" indication appears while the snapshot is recorded onto the tape. ● Still images taken are compliant to the AV connector, the shutter sound is not heard from the battery pack, the camcorder...

User Manual
Page 34
.... The image playback screen (IMAGE) appears. 7 Press the MENU Wheel in . The NO. Folder and File names Each time shooting takes place, a file name is made using a number which has been played back at the last time is displayed. 5 If the video clip playback (E-MAIL CLIP, (੬ pg. 29)) or the digital sound playback (SOUND, (੬ pg. 29)) screen appears, press SELECT. Even if you delete an image file with the DPOF (Digital Print Order Format...
.... The image playback screen (IMAGE) appears. 7 Press the MENU Wheel in . The NO. Folder and File names Each time shooting takes place, a file name is made using a number which has been played back at the last time is displayed. 5 If the video clip playback (E-MAIL CLIP, (੬ pg. 29)) or the digital sound playback (SOUND, (੬ pg. 29)) screen appears, press SELECT. Even if you delete an image file with the DPOF (Digital Print Order Format...

User Manual
Page 44
... another camcorder, blocks of 40X digital magnification. REC MODE SP Standard Play LP Long Play-more economical, providing 1.5 times the recording time. Sound mode SOUND MODE 12 BIT 16 BIT Enables video recording of 200X digital magnification. * Available only when the VIDEO/MEMORY Switch is set the recording mode (SP or LP) depending on four separate channels, and is switched during recording, the playback picture will be momentary pauses in the sound. Allows you to set to 10X since digital zoom...
... another camcorder, blocks of 40X digital magnification. REC MODE SP Standard Play LP Long Play-more economical, providing 1.5 times the recording time. Sound mode SOUND MODE 12 BIT 16 BIT Enables video recording of 200X digital magnification. * Available only when the VIDEO/MEMORY Switch is set the recording mode (SP or LP) depending on four separate channels, and is switched during recording, the playback picture will be momentary pauses in the sound. Allows you to set to 10X since digital zoom...
User Manual
Page 46
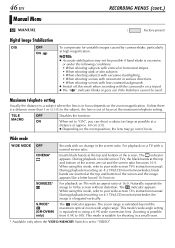
... Manual Menu RECORDING MENUS (cont.) MANUAL ( : Factory-preset) Digital Image Stabilization DIS OFF ON To compensate for shooting in a small room. * Available only when the VIDEO/MEMORY Switch is in the screen ratio. Wide mode WIDE MODE OFF CINEMA* SQUEEZE* S.WIDE* (GR-DVM96 only) Records with the camcorder on the zoom magnification. Naturally expands the image to your wide-screen TV's instruction manual. The indicator appears. During playback on the zoom position, the lens...
... Manual Menu RECORDING MENUS (cont.) MANUAL ( : Factory-preset) Digital Image Stabilization DIS OFF ON To compensate for shooting in a small room. * Available only when the VIDEO/MEMORY Switch is in the screen ratio. Wide mode WIDE MODE OFF CINEMA* SQUEEZE* S.WIDE* (GR-DVM96 only) Records with the camcorder on the zoom magnification. Naturally expands the image to your wide-screen TV's instruction manual. The indicator appears. During playback on the zoom position, the lens...
User Manual
Page 62
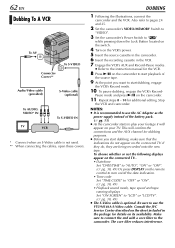
... camcorder and the VCR. This will appear on /off the date indication. • Time code Set "TIME CODE" to "OFF" or "ON". (੬ pg. 38, 49) • Playback sound mode, tape speed and tape running displays Set "ON SCREEN" to the camcorder. Make sure to connect the end with a core filter to "LCD" or "LCD/TV". (੬ pg. 38, 49) ● The S-Video cable is optional. Pause mode and press 4/9 on its availability. Consult the JVC Service...
... camcorder and the VCR. This will appear on /off the date indication. • Time code Set "TIME CODE" to "OFF" or "ON". (੬ pg. 38, 49) • Playback sound mode, tape speed and tape running displays Set "ON SCREEN" to the camcorder. Make sure to connect the end with a core filter to "LCD" or "LCD/TV". (੬ pg. 38, 49) ● The S-Video cable is optional. Pause mode and press 4/9 on its availability. Consult the JVC Service...
User Manual
Page 79
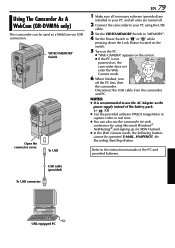
... operated: E-MAIL, SNAPSHOT, the Recording Start/Stop Button. Disconnect the USB cable from the camcorder and PC. USB cable (provided) To USB connector USB-equipped PC To USB EN 79 1 Make sure all necessary software (provided) are installed in your PC and all units are turned off the PC first, then the camcorder. VIDEO/MEMORY Switch Open the connector cover. Refer to the instruction manuals of the battery pack. (੬ pg. 11) ● Use...
... operated: E-MAIL, SNAPSHOT, the Recording Start/Stop Button. Disconnect the USB cable from the camcorder and PC. USB cable (provided) To USB connector USB-equipped PC To USB EN 79 1 Make sure all necessary software (provided) are installed in your PC and all units are turned off the PC first, then the camcorder. VIDEO/MEMORY Switch Open the connector cover. Refer to the instruction manuals of the battery pack. (੬ pg. 11) ● Use...

User Manual
Page 82
... tape's erase tab is set to "OFF". 5. • Set "DATE/TIME" to "A" "P" or "OFF". protection tab to "REC". • The VIDEO/MEMORY (੬ pg. 16) Switch is set to "MEMORY". • Set the VIDEO/MEMORY • "TAPE END" appears. Switch is not a malfunction. 4. illuminated by bright light, high contrast, and is not connected 1. • Connect the AC Adapter properly. When the screen is under 4. • This is set to "MEMORY". 3. direct sunlight during shooting, the screen becomes red...
... tape's erase tab is set to "OFF". 5. • Set "DATE/TIME" to "A" "P" or "OFF". protection tab to "REC". • The VIDEO/MEMORY (੬ pg. 16) Switch is set to "MEMORY". • Set the VIDEO/MEMORY • "TAPE END" appears. Switch is not a malfunction. 4. illuminated by bright light, high contrast, and is not connected 1. • Connect the AC Adapter properly. When the screen is under 4. • This is set to "MEMORY". 3. direct sunlight during shooting, the screen becomes red...
User Manual
Page 85
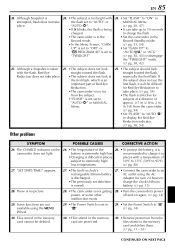
... charge the clock's lithium battery. (੬ pg. 15) 28. "SET DATE/TIME!" Files stored in the memory card cannot be difficult for Red-Eye Reduction to take place. 24. • The subject is too bright with the flash set to "AUTO" or "AUTO C". • If blinks, the flash is being charged. • The camcorder is in the Record mode. • In the Menu Screen, "GAIN UP" is set to "A". 29. • Set the Power Switch...
... charge the clock's lithium battery. (੬ pg. 15) 28. "SET DATE/TIME!" Files stored in the memory card cannot be difficult for Red-Eye Reduction to take place. 24. • The subject is too bright with the flash set to "AUTO" or "AUTO C". • If blinks, the flash is being charged. • The camcorder is in the Record mode. • In the Menu Screen, "GAIN UP" is set to "A". 29. • Set the Power Switch...

User Manual
Page 89
... the cassette is on for a long time, the surface around the LCD monitor and/or the back of the LCD monitor may result. Also refer to direct sunlight. ... Mechanical moving parts used more than once consecutively, damage to shock or excessive vibration during recording, playback, deletion, initialization, etc.)... ...never unload the memory card and never turn off the camcorder. 3. Keep it to the video heads may...
... the cassette is on for a long time, the surface around the LCD monitor and/or the back of the LCD monitor may result. Also refer to direct sunlight. ... Mechanical moving parts used more than once consecutively, damage to shock or excessive vibration during recording, playback, deletion, initialization, etc.)... ...never unload the memory card and never turn off the camcorder. 3. Keep it to the video heads may...
User Manual
Page 92
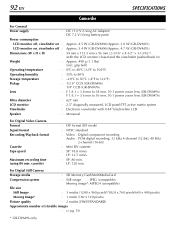
For Digital Still Camera Storage media : SD Memory Card/MultiMediaCard Compression system : Still image : JPEG (compatible) Moving image*: MPEG4 (compatible) File size Still Image : 3 modes (1280 x 960 pixels*/1024 x 768 pixels/640 x 480 pixels) Moving Image* : 1 mode (160 x 120 pixels) Picture quality : 2 modes (FINE/STANDARD) Approximate number of storable images : ੬ pg. 50 * GR-DVM96 only LP: 120 min. cassette) : DV format (SD mode) : NTSC standard : Video : Digital component recording Audio : PCM digital recording, 32 kHz 4-channel (12-bit), 48...
For Digital Still Camera Storage media : SD Memory Card/MultiMediaCard Compression system : Still image : JPEG (compatible) Moving image*: MPEG4 (compatible) File size Still Image : 3 modes (1280 x 960 pixels*/1024 x 768 pixels/640 x 480 pixels) Moving Image* : 1 mode (160 x 120 pixels) Picture quality : 2 modes (FINE/STANDARD) Approximate number of storable images : ੬ pg. 50 * GR-DVM96 only LP: 120 min. cassette) : DV format (SD mode) : NTSC standard : Video : Digital component recording Audio : PCM digital recording, 32 kHz 4-channel (12-bit), 48...

User Manual
Page 95
...].... ੬ pg. 10 i Cassette Open/Eject Switch [OPEN/EJECT pg. 16 j •Play/Pause Button [4/9 pg. 22 •Backlight Compensation Button [BACKLIGHT pg. 57 k •Fast-Forward Button [5 pg. 22 •Night-Alive Button [NIGHT pg. 53 l VIDEO/MEMORY Switch [VIDEO/MEMORY pg. 14 m •Rewind Button [3 pg. 22 •Focus Adjustment Button [FOCUS pg. 55 n •Stop Button [8 pg. 22 •Digital Sound Button [D.SOUND] (GR-DVM96 only pg. 59 •D.S.C. h Stereo Microphone pg. 70 i Lens j Flash Sensor Be careful...
...].... ੬ pg. 10 i Cassette Open/Eject Switch [OPEN/EJECT pg. 16 j •Play/Pause Button [4/9 pg. 22 •Backlight Compensation Button [BACKLIGHT pg. 57 k •Fast-Forward Button [5 pg. 22 •Night-Alive Button [NIGHT pg. 53 l VIDEO/MEMORY Switch [VIDEO/MEMORY pg. 14 m •Rewind Button [3 pg. 22 •Focus Adjustment Button [FOCUS pg. 55 n •Stop Button [8 pg. 22 •Digital Sound Button [D.SOUND] (GR-DVM96 only pg. 59 •D.S.C. h Stereo Microphone pg. 70 i Lens j Flash Sensor Be careful...

User Manual
Page 101
EN 101 Indications Function INSERT ERROR!
EN 101 Indications Function INSERT ERROR!

User Manual
Page 102
... C Changing The Menu Settings 38 Channels (Left/Right 51 Charging The Battery Pack 10 Cleaning The Camcorder 91 Clock adjustment (CLOCK ADJ 15 Connections Charging 10 Dubbing 62 - 65 Random Assemble Editing 73 - 77 To A Personal Computer 78 To A TV Or VCR 24 WebCam 79 D Date/Time Display 49, 52 Settings 15 DCF (Design rule for Camera File system) .....27, 28 Deleting Files 33 Demonstration Mode (DEMO MODE 8, 48 Digital Image Stabilisation (DIS 46 Digital Sound...
... C Changing The Menu Settings 38 Channels (Left/Right 51 Charging The Battery Pack 10 Cleaning The Camcorder 91 Clock adjustment (CLOCK ADJ 15 Connections Charging 10 Dubbing 62 - 65 Random Assemble Editing 73 - 77 To A Personal Computer 78 To A TV Or VCR 24 WebCam 79 D Date/Time Display 49, 52 Settings 15 DCF (Design rule for Camera File system) .....27, 28 Deleting Files 33 Demonstration Mode (DEMO MODE 8, 48 Digital Image Stabilisation (DIS 46 Digital Sound...

User Manual
Page 103
... - 77 Recording media selection (REC SELECT 50 Recording Mode (REC MODE 44, 51 Recording Time Battery Pack 10 Tape 16 Record-Standby 19 Remaining Power Level 100 Remote Control 66 Resetting Menu Settings (CAM RESET 49 Rewind The Tape 22 EN 103 S SD Memory Card 17, 89 Self-Recording 20 Set Remote/VCR Code 73 Shuttle Search 22 Slow-Motion Playback 68 Snapshot 27, 53 Snapshot Mode (SNAP MODE 45 Sound input (SOUND IN 49, 70, 71 Sound Mode (SOUND MODE 44, 51 Speaker Volume 22 Specifications 92, 93 Still Playback 22 Synchro adjustment (SYNCHRO...
... - 77 Recording media selection (REC SELECT 50 Recording Mode (REC MODE 44, 51 Recording Time Battery Pack 10 Tape 16 Record-Standby 19 Remaining Power Level 100 Remote Control 66 Resetting Menu Settings (CAM RESET 49 Rewind The Tape 22 EN 103 S SD Memory Card 17, 89 Self-Recording 20 Set Remote/VCR Code 73 Shuttle Search 22 Slow-Motion Playback 68 Snapshot 27, 53 Snapshot Mode (SNAP MODE 45 Sound input (SOUND IN 49, 70, 71 Sound Mode (SOUND MODE 44, 51 Speaker Volume 22 Specifications 92, 93 Still Playback 22 Synchro adjustment (SYNCHRO...


