

Instructions
Page 3
... car for connection. • Some of the output level. ENGLISH Detaching the control panel How to read this manual: • is used to indicate turn the control dial to make a selection, then press to confirm the selection. • < > is equipped with the steering wheel remote control function. • See the Installation/Connection Manual (separate volume) for a long time in hot or cold weather, wait until the temperature in the menu. Attaching the control panel KD-A805...
... car for connection. • Some of the output level. ENGLISH Detaching the control panel How to read this manual: • is used to indicate turn the control dial to make a selection, then press to confirm the selection. • < > is equipped with the steering wheel remote control function. • See the Installation/Connection Manual (separate volume) for a long time in hot or cold weather, wait until the temperature in the menu. Attaching the control panel KD-A805...

Instructions
Page 5
... 4 SETTINGS Selecting a preset sound mode 27 Menu operations 29 • Creating your own color-User Color 34 • Setting the time for dimmer 35 • Changing the Bluetooth setting 35 Title assignment 37 OPERATIONS Basic operations 6 • Using the control panel 6 • Using the remote controller (RM-RK50)......... 7 Listening to the radio 9 Disc operations 10 USB operations 12 Using the Bluetooth® devices 13 • Connecting a Bluetooth device for the first time 14 • Using the Bluetooth cellular phone 16 • Using the Bluetooth audio player 18...
... 4 SETTINGS Selecting a preset sound mode 27 Menu operations 29 • Creating your own color-User Color 34 • Setting the time for dimmer 35 • Changing the Bluetooth setting 35 Title assignment 37 OPERATIONS Basic operations 6 • Using the control panel 6 • Using the remote controller (RM-RK50)......... 7 Listening to the radio 9 Disc operations 10 USB operations 12 Using the Bluetooth® devices 13 • Connecting a Bluetooth device for the first time 14 • Using the Bluetooth cellular phone 16 • Using the Bluetooth audio player 18...
Instructions
Page 6
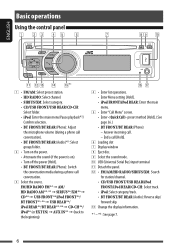
... a phone call conversation. 3 Select the source. e Change the display information. *1 - *6 : See page 7. 6 p USB (Universal Serial Bus) input terminal q Detach the panel. FM/HD RADIO FM*4 = AM/ HD RADIO AM*4, *5 = SIRIUS*6/XM*6 = CD*6 = USB FRONT*6/iPod FRONT*6/ BT FRONT*5, *6 = USB REAR*6/ iPod REAR*6/BT REAR*5, *6 = CD-CH*6/ iPod*6 (or EXT IN) = AUX IN*5 = (back to the beginning) 4 • Enter list operations. • Enter Menu setting [Hold]. • iPod FRONT/iPod REAR: Enter the main menu. 5 • Enter "Call Menu" screen. • Enter preset method...
... a phone call conversation. 3 Select the source. e Change the display information. *1 - *6 : See page 7. 6 p USB (Universal Serial Bus) input terminal q Detach the panel. FM/HD RADIO FM*4 = AM/ HD RADIO AM*4, *5 = SIRIUS*6/XM*6 = CD*6 = USB FRONT*6/iPod FRONT*6/ BT FRONT*5, *6 = USB REAR*6/ iPod REAR*6/BT REAR*5, *6 = CD-CH*6/ iPod*6 (or EXT IN) = AUX IN*5 = (back to the beginning) 4 • Enter list operations. • Enter Menu setting [Hold]. • iPod FRONT/iPod REAR: Enter the main menu. 5 • Enter "Call Menu" screen. • Enter preset method...

Instructions
Page 7
... if battery is incorrectly replaced. Before resume playback, check to be sure that you have not raise the volume level too much. *3 For Bluetooth devices that support AVRCP 1.3. *4 When the HD Radio tuner box is connected, the built-in tuner of this function only when is CD/USB FRONT/USB REAR/iPod FRONT/iPod REAR/BT FRONT/ BT REAR/iPod. For more features, see pages 19 and 20. *5 You cannot select these sources...
... if battery is incorrectly replaced. Before resume playback, check to be sure that you have not raise the volume level too much. *3 For Bluetooth devices that support AVRCP 1.3. *4 When the HD Radio tuner box is connected, the built-in tuner of this function only when is CD/USB FRONT/USB REAR/iPod FRONT/iPod REAR/BT FRONT/ BT REAR/iPod. For more features, see pages 19 and 20. *5 You cannot select these sources...
Instructions
Page 8
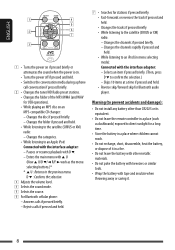
... to direct sunlight for a long time. • Store the battery in menu selecting mode): Connected with the interface adapter: - Changes the channels rapidly if pressed and held . • Changes the tracks if pressed briefly. • While listening to the previous menu. Selects an item if pressed briefly. (Then, press D ∞ to the satellite (SIRIUS or XM) radio: - D ∞ : Confirms the selection. 3 Adjusts the volume level. 4 Selects the sound mode. 5 Selects the source. 6 For Bluetooth cellular phone: - Answers...
... to direct sunlight for a long time. • Store the battery in menu selecting mode): Connected with the interface adapter: - Changes the channels rapidly if pressed and held . • Changes the tracks if pressed briefly. • While listening to the previous menu. Selects an item if pressed briefly. (Then, press D ∞ to the satellite (SIRIUS or XM) radio: - D ∞ : Confirms the selection. 3 Adjusts the volume level. 4 Selects the sound mode. 5 Selects the source. 6 For Bluetooth cellular phone: - Answers...
Instructions
Page 9
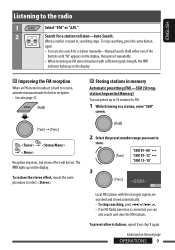
... connected, you want to receive, activate monaural mode for better reception. • See also page 33. To preset other 6 stations, repeat from step 1 again. ENGLISH Listening to the radio 1 Select "FM" or "AM." 2 Search for a station to a station, enter "SSM" screen. [Turn] = [Press] Reception improves, but stereo effect will be lost. To stop searching, press 4 /¢ . • If an HD Radio tuner box is tuned in memory...
... connected, you want to receive, activate monaural mode for better reception. • See also page 33. To preset other 6 stations, repeat from step 1 again. ENGLISH Listening to the radio 1 Select "FM" or "AM." 2 Search for a station to a station, enter "SSM" screen. [Turn] = [Press] Reception improves, but stereo effect will be lost. To stop searching, press 4 /¢ . • If an HD Radio tuner box is tuned in memory...
Instructions
Page 13
... attach another USB device. • Do not start the car engine if a USB device is connected. • This unit may not be able to play the files depending on the power. • The detect time and response time may be connected without cables and communicate with the Bluetooth device. Continued on the display: - HFP (Hands-Free Profile) 1.5 OPP (Object Push Profile) 1.1 A2DP (Advanced Audio Distribution Profile) 1.2 AVRCP (Audio/Video Remote Control Profile...
... attach another USB device. • Do not start the car engine if a USB device is connected. • This unit may not be able to play the files depending on the power. • The detect time and response time may be connected without cables and communicate with the Bluetooth device. Continued on the display: - HFP (Hands-Free Profile) 1.5 OPP (Object Push Profile) 1.1 A2DP (Advanced Audio Distribution Profile) 1.2 AVRCP (Audio/Video Remote Control Profile...
Instructions
Page 14
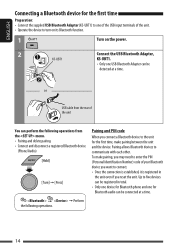
... USB cable from the rear of the unit You can be connected at a time. Pairing allows Bluetooth devices to communicate with each other. Up to five devices can be registered in total. • Only one device for Bluetooth phone and one for the first time, make pairing, you may need to enter the PIN (Personal Identification Number) code of the unit. • Operate the device to turn on its Bluetooth function. 1 Turn on the power. 2 KS-UBT1 Connect the USB Bluetooth Adapter...
... USB cable from the rear of the unit You can be connected at a time. Pairing allows Bluetooth devices to communicate with each other. Up to five devices can be registered in total. • Only one device for Bluetooth phone and one for the first time, make pairing, you may need to enter the PIN (Personal Identification Number) code of the unit. • Operate the device to turn on its Bluetooth function. 1 Turn on the power. 2 KS-UBT1 Connect the USB Bluetooth Adapter...

Instructions
Page 17
...; To answer the incoming call comes in Bluetooth setting menu (see on the next page OPERATIONS 17 Receiving/ending a phone call When a call when is selected for setting). How to delete phone number • Only when is deactivated: or 2 Display the list of phone numbers using the other media. • Operations may be different according to the connected Bluetooth device. Continued on page 30 for in .... The source is activated....
...; To answer the incoming call comes in Bluetooth setting menu (see on the next page OPERATIONS 17 Receiving/ending a phone call When a call when is selected for setting). How to delete phone number • Only when is deactivated: or 2 Display the list of phone numbers using the other media. • Operations may be different according to the connected Bluetooth device. Continued on page 30 for in .... The source is activated....
Instructions
Page 26
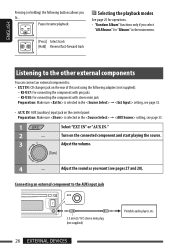
KS-U58: For connecting the component with pin jacks - Adjust the sound as you want (see page 33. • AUX IN: AUX (auxiliary) input jack on the control panel. ENGLISH Pressing (or holding) the following adapters (not supplied): - Turn on the rear of this unit using the following buttons allows you select "All Albums" for "Albums" in the = setting, see page 33. 1 Select "EXT IN" or "AUX IN." 2 - Connecting an external component...
KS-U58: For connecting the component with pin jacks - Adjust the sound as you want (see page 33. • AUX IN: AUX (auxiliary) input jack on the control panel. ENGLISH Pressing (or holding) the following adapters (not supplied): - Turn on the rear of this unit using the following buttons allows you select "All Albums" for "Albums" in the = setting, see page 33. 1 Select "EXT IN" or "AUX IN." 2 - Connecting an external component...
Instructions
Page 28
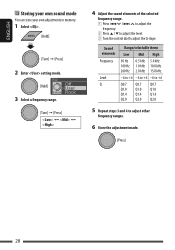
....0 Q1.4 Q1.4 Q1.4 Q2.0 Q2.0 Q2.0 5 Repeat steps 3 and 4 to adjust the Q-slope. ENGLISH Storing your own sound mode You can store your own adjustments in memory. 1 Select . [Turn] = [Press] 2 Enter setting mode. 3 Select a frequency range. [Turn] = [Press] Ô Ô 4 Adjust the sound elements of the selected frequency range. 1 Press 4 / ¢ to adjust the frequency. 2 Press 5 / ∞ to adjust the level. 3 Turn the control dial to adjust other frequency ranges. 6 Store the adjustment made. 28
....0 Q1.4 Q1.4 Q1.4 Q2.0 Q2.0 Q2.0 5 Repeat steps 3 and 4 to adjust the Q-slope. ENGLISH Storing your own sound mode You can store your own adjustments in memory. 1 Select . [Turn] = [Press] 2 Enter setting mode. 3 Select a frequency range. [Turn] = [Press] Ô Ô 4 Adjust the sound elements of the selected frequency range. 1 Press 4 / ¢ to adjust the frequency. 2 Press 5 / ∞ to adjust the level. 3 Turn the control dial to adjust other frequency ranges. 6 Store the adjustment made. 28

Instructions
Page 29
... the power is shown on the next page SETTINGS 29 Initial: Underlined Category Menu items Selectable settings, [reference page] DEMO DEMO • On Display demonstration • Off : Display demonstration will show the clock time for about 20 seconds, [4]. : Cancels. ENGLISH Menu operations 1 Call up the 2 Select the desired item. pressing DISP will be activated automatically if no operation is automatically adjusted using the clock data provided via the satellite radio channel. : Cancels...
... the power is shown on the next page SETTINGS 29 Initial: Underlined Category Menu items Selectable settings, [reference page] DEMO DEMO • On Display demonstration • Off : Display demonstration will show the clock time for about 20 seconds, [4]. : Cancels. ENGLISH Menu operations 1 Call up the 2 Select the desired item. pressing DISP will be activated automatically if no operation is automatically adjusted using the clock data provided via the satellite radio channel. : Cancels...
Instructions
Page 30
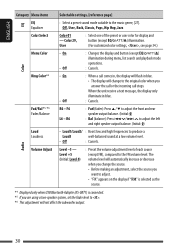
... speaker output balance. (Initial: 0) Loud Loudness • Loud1/Loud2/ : Boost low and high frequencies to the music genre, [27]. Audio Volume Adjust Level -5 - F6 L6 - When the unit receive a text message, the display only illuminate in blue. • The display will not affect the subwoofer output. 30 Level +5 (Initial: Level 0) : Preset the volume adjustment level of the preset or user color for display and button (except EQ/ /0) illumination. (For customized color settings, , see page 34.) Menu Color • On • Off : Changes...
... speaker output balance. (Initial: 0) Loud Loudness • Loud1/Loud2/ : Boost low and high frequencies to the music genre, [27]. Audio Volume Adjust Level -5 - F6 L6 - When the unit receive a text message, the display only illuminate in blue. • The display will not affect the subwoofer output. 30 Level +5 (Initial: Level 0) : Preset the volume adjustment level of the preset or user color for display and button (except EQ/ /0) illumination. (For customized color settings, , see page 34.) Menu Color • On • Off : Changes...
Instructions
Page 31
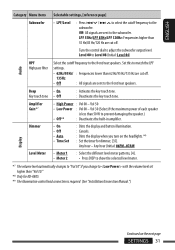
... front/rear speakers. Any hour - ENGLISH Category Menu items Selectable settings, [reference page] Subwoofer • LPF/Level : Press 4 / ¢ to select the cutoff frequency to show the selected level meter. Turn the control dial to prevent damaging the speaker.) • Off*8 : Deactivates the built-in amplifier. • On • Off • Auto • Time Set : Dims the display and button illumination. : Cancels. : Dims the display when you change to with the volume level set higher...
... front/rear speakers. Any hour - ENGLISH Category Menu items Selectable settings, [reference page] Subwoofer • LPF/Level : Press 4 / ¢ to select the cutoff frequency to show the selected level meter. Turn the control dial to prevent damaging the speaker.) • Off*8 : Deactivates the built-in amplifier. • On • Off • Auto • Time Set : Dims the display and button illumination. : Cancels. : Dims the display when you change to with the volume level set higher...
Instructions
Page 33
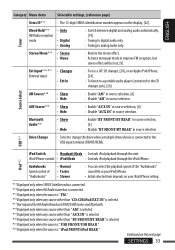
... : To use a JVC CD changer, [20], or an Apple iPod/iPhone, [24]. : To listen to a portable audio player (connected to the USB input terminal (FRONT/REAR). Drive Change : Select to change the drive when a multiple drives device is " iPod FRONT/iPod REAR." Tuner Stereo/Mono*15 • Stereo • Mono : Restore the stereo effect. : Activate monaural mode to analog audio only. ENGLISH Category Menu items Selectable settings, [reference page] Sirius ID*13 : The 12-digit SIRIUS identification number appears on the next page SETTINGS 33 AUX Source*19...
... : To use a JVC CD changer, [20], or an Apple iPod/iPhone, [24]. : To listen to a portable audio player (connected to the USB input terminal (FRONT/REAR). Drive Change : Select to change the drive when a multiple drives device is " iPod FRONT/iPod REAR." Tuner Stereo/Mono*15 • Stereo • Mono : Restore the stereo effect. : Activate monaural mode to analog audio only. ENGLISH Category Menu items Selectable settings, [reference page] Sirius ID*13 : The 12-digit SIRIUS identification number appears on the next page SETTINGS 33 AUX Source*19...
Instructions
Page 35
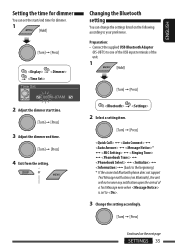
... the USB input terminals of the unit. 1 [Turn] = [Press] 2 Select a setting item. [Turn] = [Press] Ô Ô Ô * Ô Ô Ô Ô Ô Ô Ô (back to the beginning) * If the connected Bluetooth phone does not support Text Message notification (via Bluetooth), the unit will not receive any notification upon the arrival of a Text Message even when is set the start/end time for dimmer You can change the settings...
... the USB input terminals of the unit. 1 [Turn] = [Press] 2 Select a setting item. [Turn] = [Press] Ô Ô Ô * Ô Ô Ô Ô Ô Ô Ô (back to the beginning) * If the connected Bluetooth phone does not support Text Message notification (via Bluetooth), the unit will not receive any notification upon the arrival of a Text Message even when is set the start/end time for dimmer You can change the settings...

Instructions
Page 36
... Phone: Your phone rings to synchronize. • Selectable only when the connected phone supports Phonebook Auto Synchronize. Voice Dial: Display the voice dialling screen. Off: No Bluetooth device. In Unit: Call: Select your preferred ring tone when a call comes in. • Tone 1/2/3 Message: Select your preferred ring tone when a Text Message comes in blue (see on , the connection is connected. ENGLISH menu ( : Initial) Quick Call You can preset the source...
... Phone: Your phone rings to synchronize. • Selectable only when the connected phone supports Phonebook Auto Synchronize. Voice Dial: Display the voice dialling screen. Off: No Bluetooth device. In Unit: Call: Select your preferred ring tone when a call comes in. • Tone 1/2/3 Message: Select your preferred ring tone when a Text Message comes in blue (see on , the connection is connected. ENGLISH menu ( : Initial) Quick Call You can preset the source...
Instructions
Page 42
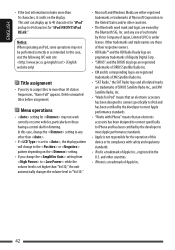
... than 30 station frequencies, "Name Full" appears. and other countries. • The Bluetooth word mark and logos are trademarks of SIRIUS Satellite Radio Inc., and XM Satellite Radio, Inc. • "Made for iPod" means that an electronic accessory has been designed to connect specifically to iPod and has been certified by the developer to meet Apple performance standards. • "Works with iPhone" means that...
... than 30 station frequencies, "Name Full" appears. and other countries. • The Bluetooth word mark and logos are trademarks of SIRIUS Satellite Radio Inc., and XM Satellite Radio, Inc. • "Made for iPod" means that an electronic accessory has been designed to connect specifically to iPod and has been certified by the developer to meet Apple performance standards. • "Works with iPhone" means that...

Instructions
Page 43
... Eject" appears on the display. • Eject the disc forcibly (see page 33). • Disc cannot be selected. Store stations manually. • Static noise while listening to over-heating. Connect the antenna firmly. • "AM" cannot be played back. Remove the control panel, wipe the connector, then attach it again (see page 3). Skip to another track or change to another playback source. • Disc cannot be played back. • Use a disc...
... Eject" appears on the display. • Eject the disc forcibly (see page 33). • Disc cannot be selected. Store stations manually. • Static noise while listening to over-heating. Connect the antenna firmly. • "AM" cannot be played back. Remove the control panel, wipe the connector, then attach it again (see page 3). Skip to another track or change to another playback source. • Disc cannot be played back. • Use a disc...
Instructions
Page 45
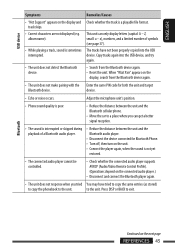
... unit and the Bluetooth audio player. • Disconnect the device connected for both the unit and target Bluetooth device. Copy tracks again into the USB device. When "Wait Pair" appears on the display, search from the Bluetooth device again. • Reset the unit. to exit. This unit can get a better signal reception. • The sound is not yet restored. • The connected audio player cannot be controlled. • Check whether the connected audio player supports AVRCP (Audio/Video Remote Control Profile). (Operations...
... unit and the Bluetooth audio player. • Disconnect the device connected for both the unit and target Bluetooth device. Copy tracks again into the USB device. When "Wait Pair" appears on the display, search from the Bluetooth device again. • Reset the unit. to exit. This unit can get a better signal reception. • The sound is not yet restored. • The connected audio player cannot be controlled. • Check whether the connected audio player supports AVRCP (Audio/Video Remote Control Profile). (Operations...


