Warranty
Page 1
... and parts replaced under this warranty become the property of Insignia and are required after the Warranty Period expires, you must be purchased in ). • Damage due to incorrect operation or maintenance • Connection to an incorrect voltage or power supply • Attempted repair by any person not authorized by any Best Buy store. To obtain warranty service...
... and parts replaced under this warranty become the property of Insignia and are required after the Warranty Period expires, you must be purchased in ). • Damage due to incorrect operation or maintenance • Connection to an incorrect voltage or power supply • Attempted repair by any person not authorized by any Best Buy store. To obtain warranty service...
User Guide
Page 1
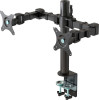
ASSEMBLY GUIDE Dual Screen Desktop Mount NS-PMMD22 Before using your new product, please read these instructions to prevent any damage.
ASSEMBLY GUIDE Dual Screen Desktop Mount NS-PMMD22 Before using your new product, please read these instructions to prevent any damage.
User Guide
Page 2
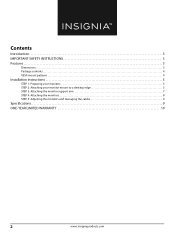
Contents Introduction 3 IMPORTANT SAFETY INSTRUCTIONS 3 Features 3 Dimensions...3 Package contents 4 VESA mount patterns 4 Installation instructions 5 STEP 1: Preparing your monitors 5 STEP 2: Attaching your monitor mount to a desktop edge 5 STEP 3: Attaching the monitor support arm 7 STEP 4: Attaching the monitors 8 STEP 5: Adjusting the monitors and managing the cables 9 Specifications 9 ONE-YEAR LIMITED WARRANTY 10 2 www.insigniaproducts.com
Contents Introduction 3 IMPORTANT SAFETY INSTRUCTIONS 3 Features 3 Dimensions...3 Package contents 4 VESA mount patterns 4 Installation instructions 5 STEP 1: Preparing your monitors 5 STEP 2: Attaching your monitor mount to a desktop edge 5 STEP 3: Attaching the monitor support arm 7 STEP 4: Attaching the monitors 8 STEP 5: Adjusting the monitors and managing the cables 9 Specifications 9 ONE-YEAR LIMITED WARRANTY 10 2 www.insigniaproducts.com
User Guide
Page 3
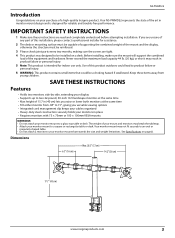
.... See Specifications on your purchase of this product outdoors could be installed on a desk. Your NS-PMMD22 represents the state of this installation, please contact a professional installer for reliable and trouble-free performance. Use of the art in place • Requires monitors with 75 × 75mm or 100 × 100mm VESA mounts WARNINGS: • Do not attach your display • Supports up to...
.... See Specifications on your purchase of this product outdoors could be installed on a desk. Your NS-PMMD22 represents the state of this installation, please contact a professional installer for reliable and trouble-free performance. Use of the art in place • Requires monitors with 75 × 75mm or 100 × 100mm VESA mounts WARNINGS: • Do not attach your display • Supports up to...

User Guide
Page 4
... the parts necessary to assemble your new monitor mount: Cable support brackets (pre-installed) # PART 1 Tube cover 2 Monitor support arm 3 Monitor support tube QTY. 2 1 1 # PART 4 Support base 5 Base clamp 6 Anti-slip rubber pads Hardware Make sure that you have the tools necessary to assemble your new monitor mount: Phillips screwdriver (not provided) F 4 x 4 mm Allen wrench G 5 x 5 mm Allen wrench (provided) (provided) VESA mount patterns Your monitor mount works with the following VESA screw...
... the parts necessary to assemble your new monitor mount: Cable support brackets (pre-installed) # PART 1 Tube cover 2 Monitor support arm 3 Monitor support tube QTY. 2 1 1 # PART 4 Support base 5 Base clamp 6 Anti-slip rubber pads Hardware Make sure that you have the tools necessary to assemble your new monitor mount: Phillips screwdriver (not provided) F 4 x 4 mm Allen wrench G 5 x 5 mm Allen wrench (provided) (provided) VESA mount patterns Your monitor mount works with the following VESA screw...
User Guide
Page 5
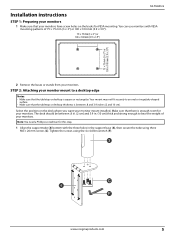
...support tube (3) bottom with VESA mounting patterns of your monitors. 75 × 75 mm (3 × 3") or 100 × 100 mm (3.9 × 3.9") NS-PMMD22 Installation instructions STEP 1: Preparing your monitors 1 Make sure that your monitor mount installed. Select the position on the desk where you want your monitors have screw... × 3.9") 2 Remove the bases or stands from your monitor mount to an oval or irregularly shaped surface. • Make sure that the tabletop or desktop thickness is between .8 in. (2 cm) and 3.9 in the support base (4), then secure the tube using the 4 x 4 ...
...support tube (3) bottom with VESA mounting patterns of your monitors. 75 × 75 mm (3 × 3") or 100 × 100 mm (3.9 × 3.9") NS-PMMD22 Installation instructions STEP 1: Preparing your monitors 1 Make sure that your monitor mount installed. Select the position on the desk where you want your monitors have screw... × 3.9") 2 Remove the bases or stands from your monitor mount to an oval or irregularly shaped surface. • Make sure that the tabletop or desktop thickness is between .8 in. (2 cm) and 3.9 in the support base (4), then secure the tube using the 4 x 4 ...

User Guide
Page 6
Insert two M6 x 10 mm screws (D) through the base clamp (5), then tighten the screws using the 4 × 4 Allen wrench (F). Make sure that the clamp assembly is flush with the desk to use, based on the tops of the clamp screws. 3 Slide the support base/base clamp assembly over the edge of your monitor mount installed, then tighten both base clamp screws by turning them counterclockwise. Desktop 6 www.insigniaproducts.com 2 Determine which mounting holes to prevent wobbling. Place the anti-slip rubber pads (6) on the thickness of the desk where you want your desk.
Insert two M6 x 10 mm screws (D) through the base clamp (5), then tighten the screws using the 4 × 4 Allen wrench (F). Make sure that the clamp assembly is flush with the desk to use, based on the tops of the clamp screws. 3 Slide the support base/base clamp assembly over the edge of your monitor mount installed, then tighten both base clamp screws by turning them counterclockwise. Desktop 6 www.insigniaproducts.com 2 Determine which mounting holes to prevent wobbling. Place the anti-slip rubber pads (6) on the thickness of the desk where you want your desk.

User Guide
Page 7
... will be level with your eyes. 1 Slide the monitor support arm (2) over the top of the support tube. www.insigniaproducts.com 7 Make sure that the cable support brackets are installed and evenly spaced along the monitor support arm. NS-PMMD22 STEP 3: Attaching the monitor support arm Note: The monitor support arm is at the same height. As you decide where...
... will be level with your eyes. 1 Slide the monitor support arm (2) over the top of the support tube. www.insigniaproducts.com 7 Make sure that the cable support brackets are installed and evenly spaced along the monitor support arm. NS-PMMD22 STEP 3: Attaching the monitor support arm Note: The monitor support arm is at the same height. As you decide where...

User Guide
Page 8
...on the monitor plate at the end of the monitor support bar. 3 Align the mounting holes on the monitor with the holes on the back of your monitors, you need (A or B) by hand-threading a screw into a VESA screw hole. STEP 4: Attaching the monitors Note: Monitors ... either horizontally or vertically. Depending on the VESA screw holes on the monitor plate, then attach the monitor to use the M4 × 12 mm mounting screws (A) or the M5 × 12 mm mounting screws (B). 1 Determine which mounting screws you need to the monitor plate using four screws (A or B) with a Phillips screwdriver, ...
...on the monitor plate at the end of the monitor support bar. 3 Align the mounting holes on the monitor with the holes on the back of your monitors, you need (A or B) by hand-threading a screw into a VESA screw hole. STEP 4: Attaching the monitors Note: Monitors ... either horizontally or vertically. Depending on the VESA screw holes on the monitor plate, then attach the monitor to use the M4 × 12 mm mounting screws (A) or the M5 × 12 mm mounting screws (B). 1 Determine which mounting screws you need to the monitor plate using four screws (A or B) with a Phillips screwdriver, ...
User Guide
Page 9
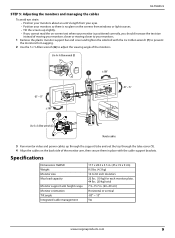
...176; ±180° -85°~15° Use 5 x 5 Allen wrench (G) Monitor cables 3 Run monitor video and power cables up slightly. • If you cannot read the on the back side of the monitors. NS-PMMD22 STEP 5: Adjusting the monitors and managing the cables To avoid eye strain...the screens from sagging. 2 Use the 5 × 5 Allen wrench (G) to adjust the viewing angle of the monitor arm, then secure them in . (20~40 cm) Horizontal or vertical -85° ~ 15° Yes www.insigniaproducts.com 9 Specifications Dimensions HxWxD Weight Monitor size Max load capacity Monitor support ...
...176; ±180° -85°~15° Use 5 x 5 Allen wrench (G) Monitor cables 3 Run monitor video and power cables up slightly. • If you cannot read the on the back side of the monitors. NS-PMMD22 STEP 5: Adjusting the monitors and managing the cables To avoid eye strain...the screens from sagging. 2 Use the 5 × 5 Allen wrench (G) to adjust the viewing angle of the monitor arm, then secure them in . (20~40 cm) Horizontal or vertical -85° ~ 15° Yes www.insigniaproducts.com 9 Specifications Dimensions HxWxD Weight Monitor size Max load capacity Monitor support ...

User Guide
Page 10
... Buy and its sole option): (1) repair the Product with new or rebuilt parts; THIS WARRANTY GIVES YOU SPECIFIC LEGAL RIGHTS, AND YOU MAY ALSO HAVE OTHER RIGHTS, WHICH VARY FROM STATE TO STATE OR PROVINCE TO PROVINCE. This warranty does not cover: • Food, beverage, and or medicine loss/spoilage. • Customer instruction/education • Installation • Set...
... Buy and its sole option): (1) repair the Product with new or rebuilt parts; THIS WARRANTY GIVES YOU SPECIFIC LEGAL RIGHTS, AND YOU MAY ALSO HAVE OTHER RIGHTS, WHICH VARY FROM STATE TO STATE OR PROVINCE TO PROVINCE. This warranty does not cover: • Food, beverage, and or medicine loss/spoilage. • Customer instruction/education • Installation • Set...

User Guide
Page 11
V1 ENGLISH 22-0240 For product inquiries, please contact us with the information below: 1-877-467-4289 www.insigniaproducts.com INSIGNIA is a trademark of Best Buy and its affiliated companies. Distributed by Best Buy Purchasing, LLC 7601 Penn Ave South, Richfield, MN 55423 U.S.A. ©2022 Best Buy. All rights reserved.
V1 ENGLISH 22-0240 For product inquiries, please contact us with the information below: 1-877-467-4289 www.insigniaproducts.com INSIGNIA is a trademark of Best Buy and its affiliated companies. Distributed by Best Buy Purchasing, LLC 7601 Penn Ave South, Richfield, MN 55423 U.S.A. ©2022 Best Buy. All rights reserved.

