
User Manual (English)
Page 3
NS-P42Q-P501Q-P502Q-10A_09-0100_MAN_V1_English.book Page i Friday, March 20, 2009 3:11 PM Contents CHILD SAFETY 1 Important safety instructions 2 Warnings 2 Cautions 3 Introduction 4 Installing the stand or wall-mount bracket 4 Installing the stand 4 Securing your TV to a wall or cabinet 4 Installing a wall-mount bracket 5 TV... remote control to work with your TV . . . . 9 Making connections 9 Connecting the power 9 Installing the ferrite core 9 Connecting an outdoor antenna 10 Connecting cable TV 10 Connecting satellite TV via a satellite TV box 11 Connecting a VCR 11 ...
NS-P42Q-P501Q-P502Q-10A_09-0100_MAN_V1_English.book Page i Friday, March 20, 2009 3:11 PM Contents CHILD SAFETY 1 Important safety instructions 2 Warnings 2 Cautions 3 Introduction 4 Installing the stand or wall-mount bracket 4 Installing the stand 4 Securing your TV to a wall or cabinet 4 Installing a wall-mount bracket 5 TV... remote control to work with your TV . . . . 9 Making connections 9 Connecting the power 9 Installing the ferrite core 9 Connecting an outdoor antenna 10 Connecting cable TV 10 Connecting satellite TV via a satellite TV box 11 Connecting a VCR 11 ...

User Manual (English)
Page 6
...that produce heat. 9 Do not defeat the safety purpose of the polarized or grounding-type plug. No user-serviceable parts are provided for your TV. 1 Read these instructions. 2 Keep these instructions. 3 Heed all warnings. 4 Follow all servicing to dripping or splashing, and no objects ...located on the back of your outlet, consult an electrician for replacement of the obsolete outlet. 10 Protect the power cord from being walked on the apparatus. NS-P42Q-P501Q-P502Q-10A_09-0100_MAN_V1_English.book Page 2 Friday, March 20, 2009 3:11 PM Important safety instructions CAUTION ...
...that produce heat. 9 Do not defeat the safety purpose of the polarized or grounding-type plug. No user-serviceable parts are provided for your TV. 1 Read these instructions. 2 Keep these instructions. 3 Heed all warnings. 4 Follow all servicing to dripping or splashing, and no objects ...located on the back of your outlet, consult an electrician for replacement of the obsolete outlet. 10 Protect the power cord from being walked on the apparatus. NS-P42Q-P501Q-P502Q-10A_09-0100_MAN_V1_English.book Page 2 Friday, March 20, 2009 3:11 PM Important safety instructions CAUTION ...
User Manual (English)
Page 11
... L/R Connect a component video device to these jacks. To disconnect power, turn off the surge protector (if you turn off your TV on page 13. 10 DIGITAL AUDIO OUT (OPTICAL) Connect a digital audio amplifier to this jack. For more information, see "Connecting a component video device"... on page 13 or "Connecting a VCR" on page 12. 7 ANT IN Connect the cable for an outdoor antenna or cable TV to this jack. NS-P42Q-P501Q-P502Q...
... L/R Connect a component video device to these jacks. To disconnect power, turn off the surge protector (if you turn off your TV on page 13. 10 DIGITAL AUDIO OUT (OPTICAL) Connect a digital audio amplifier to this jack. For more information, see "Connecting a component video device"... on page 13 or "Connecting a VCR" on page 12. 7 ANT IN Connect the cable for an outdoor antenna or cable TV to this jack. NS-P42Q-P501Q-P502Q...
User Manual (English)
Page 12
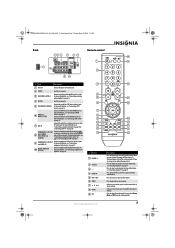
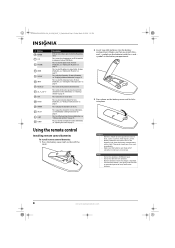
...lift the cover. 2 Insert two AAA batteries into place. Press to turn closed captioning on or off. For more information, see "Adjusting the TV picture" on page 18. Using the remote control Installing remote control batteries To install remote control batteries: 1 Press the battery cover latch in the...an extended period of time, remove the batteries. 8 www.insigniaproducts.com Press to the previous menu. NS-P42Q-P501Q-P502Q-10A_09-0100_MAN_V1_English.book Page 8 Friday, March 20, 2009 3:11 PM # Button 10 RETURN 11 CCD 12 PICTURE 13 ZOOM 14 DISPLAY 15 INPUT 16 RECALL 17 CH /CH 18 ...
...lift the cover. 2 Insert two AAA batteries into place. Press to turn closed captioning on or off. For more information, see "Adjusting the TV picture" on page 18. Using the remote control Installing remote control batteries To install remote control batteries: 1 Press the battery cover latch in the...an extended period of time, remove the batteries. 8 www.insigniaproducts.com Press to the previous menu. NS-P42Q-P501Q-P502Q-10A_09-0100_MAN_V1_English.book Page 8 Friday, March 20, 2009 3:11 PM # Button 10 RETURN 11 CCD 12 PICTURE 13 ZOOM 14 DISPLAY 15 INPUT 16 RECALL 17 CH /CH 18 ...
User Manual (English)
Page 14
NS-P42Q-P501Q-P502Q-10A_09-0100_MAN_V1_English.book Page 10 Friday, March 20, 2009 3:11 PM Connecting an outdoor antenna Connecting a coaxial antenna 3 Connect the combiner to the ANT IN jack on the back of your TV. ANT IN Connecting a twin-lead antenna UHF VHF ANT IN Connecting cable TV Without a cable box To connect cable TV... a twin-lead antenna: 1 Turn off your TV. ANT IN Note Because your TV and all connected equipment. 2 Disconnect the cable that is cable-ready, you need a cable box to the cable in jack 10 www.insigniaproducts.com UHF VHF 4 Connect another coaxial...
NS-P42Q-P501Q-P502Q-10A_09-0100_MAN_V1_English.book Page 10 Friday, March 20, 2009 3:11 PM Connecting an outdoor antenna Connecting a coaxial antenna 3 Connect the combiner to the ANT IN jack on the back of your TV. ANT IN Connecting a twin-lead antenna UHF VHF ANT IN Connecting cable TV Without a cable box To connect cable TV... a twin-lead antenna: 1 Turn off your TV. ANT IN Note Because your TV and all connected equipment. 2 Disconnect the cable that is cable-ready, you need a cable box to the cable in jack 10 www.insigniaproducts.com UHF VHF 4 Connect another coaxial...
User Manual (English)
Page 18
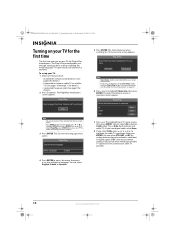
... that you have: • Installed the remote control batteries. (See page 8 for details.) • Connected an antenna, cable TV, or satellite TV. (See pages 10 through 11 for details.) • Connected the power cord. (See page 9 for use in your home screen appears. To set... Plug & Play Select the Antenna source to adjust. 3 Press ENTER. STD is accidentally set . NS-P42Q-P501Q-P502Q-10A_09-0100_MAN_V1_English.book Page 14 Friday, March 20, 2009 3:11 PM Turning on your TV for analog (antenna-based or without a cable box) or digital signals. You can select English, ...
... that you have: • Installed the remote control batteries. (See page 8 for details.) • Connected an antenna, cable TV, or satellite TV. (See pages 10 through 11 for details.) • Connected the power cord. (See page 9 for use in your home screen appears. To set... Plug & Play Select the Antenna source to adjust. 3 Press ENTER. STD is accidentally set . NS-P42Q-P501Q-P502Q-10A_09-0100_MAN_V1_English.book Page 14 Friday, March 20, 2009 3:11 PM Turning on your TV for analog (antenna-based or without a cable box) or digital signals. You can select English, ...
User Manual (English)
Page 19
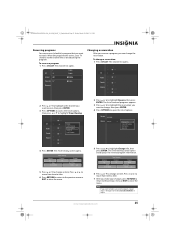
... Enjoy your viewing area. Note If you selected Auto, press or to reset the Plug & Play option, see "Setting the clock" on page 34. 10 If you want to highlight: • Off-Turns off the daylight saving time feature. • On-Turns on the daylight saving time feature. •...on page 38. Air 11 3% Stop Note To stop the search, press ENTER. NS-P42Q-P501Q-P502Q-10A_09-0100_MAN_V1_English.book Page 15 Friday, March 20, 2009 3:11 PM Your TV starts searching for channels available in your TV. www.insigniaproducts.com 15 When the search is ready to manually set the time,...
... Enjoy your viewing area. Note If you selected Auto, press or to reset the Plug & Play option, see "Setting the clock" on page 34. 10 If you want to highlight: • Off-Turns off the daylight saving time feature. • On-Turns on the daylight saving time feature. •...on page 38. Air 11 3% Stop Note To stop the search, press ENTER. NS-P42Q-P501Q-P502Q-10A_09-0100_MAN_V1_English.book Page 15 Friday, March 20, 2009 3:11 PM Your TV starts searching for channels available in your TV. www.insigniaproducts.com 15 When the search is ready to manually set the time,...
User Manual (English)
Page 22
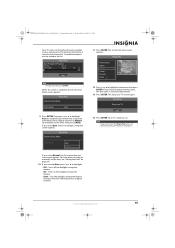
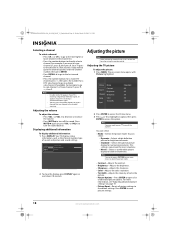
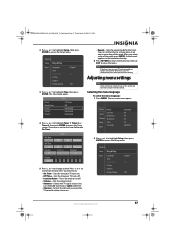
....com Press ENTER to see "Adjusting advanced picture settings" on . NS-P42Q-P501Q-P502Q-10A_09-0100_MAN_V1_English.book Page 18 Friday, March 20, 2009 3:11 PM...To close the display, press DISPLAY again or wait about 10 seconds. Note You may need to directly select a channel...Sound Channel Contrast Brightness Sharpness Setup Input Color Tint (G/R) : Standard : 95 : 45 : 50 : 50 : G50/R50 2 Press ENTER to access the Picture menu. 3 Press or to highlight ...the remote control. Press MUTE again (or press VOL- Your TV displays status information, such as the channel number, type of sound...
....com Press ENTER to see "Adjusting advanced picture settings" on . NS-P42Q-P501Q-P502Q-10A_09-0100_MAN_V1_English.book Page 18 Friday, March 20, 2009 3:11 PM...To close the display, press DISPLAY again or wait about 10 seconds. Note You may need to directly select a channel...Sound Channel Contrast Brightness Sharpness Setup Input Color Tint (G/R) : Standard : 95 : 45 : 50 : 50 : G50/R50 2 Press ENTER to access the Picture menu. 3 Press or to highlight ...the remote control. Press MUTE again (or press VOL- Your TV displays status information, such as the channel number, type of sound...

User Manual (English)
Page 26
...8226; Balance L/R-Adjusts the balance between the right and left speaker. • 100 Hz, 300 Hz, 1 kHz, 3 kHz, and 10 kHz-Adjusts the level of different bandwidth frequencies. • Reset-Resets the equalizer settings to the default values. • SRS TruSurround HD-If...TV speakers. • Sound Reset-Resets some or all of a connected amplifier. Select this sound mode when watching news, soap operas, or documentaries. • Custom-Lets you are based on -screen menu opens. You can select: • Reset All-Resets all the sound settings to access the option. NS-P42Q-P501Q-P502Q...
...8226; Balance L/R-Adjusts the balance between the right and left speaker. • 100 Hz, 300 Hz, 1 kHz, 3 kHz, and 10 kHz-Adjusts the level of different bandwidth frequencies. • Reset-Resets the equalizer settings to the default values. • SRS TruSurround HD-If...TV speakers. • Sound Reset-Resets some or all of a connected amplifier. Select this sound mode when watching news, soap operas, or documentaries. • Custom-Lets you are based on -screen menu opens. You can select: • Reset All-Resets all the sound settings to access the option. NS-P42Q-P501Q-P502Q...
User Manual (English)
Page 28
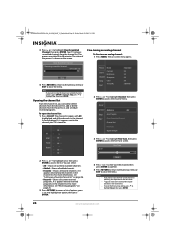
... Clear Scrambled Channel, then press ENTER. NS-P42Q-P501Q-P502Q-10A_09-0100_MAN_V1_English.book Page 24 Friday, March... 20, 2009 3:11 PM 3 Press or to highlight Reset, then press ENTER. 24 www.insigniaproducts.com A appears next to the channel your adjustments are displayed. Picture Mode Sound Channel Contrast Brightness Sharpness Setup Input Color Tint (G/R) : Standard : 95 : 45 : 50 : 50...6-1 All 7 Added 7-1 9 Favorite 9-1 10 Reserve 10-1 11-1 Air TV #6 Air TV #7 Air TV #9 Air TV #10 TV #11 2 Press or to highlight a ...
... Clear Scrambled Channel, then press ENTER. NS-P42Q-P501Q-P502Q-10A_09-0100_MAN_V1_English.book Page 24 Friday, March... 20, 2009 3:11 PM 3 Press or to highlight Reset, then press ENTER. 24 www.insigniaproducts.com A appears next to the channel your adjustments are displayed. Picture Mode Sound Channel Contrast Brightness Sharpness Setup Input Color Tint (G/R) : Standard : 95 : 45 : 50 : 50...6-1 All 7 Added 7-1 9 Favorite 9-1 10 Reserve 10-1 11-1 Air TV #6 Air TV #7 Air TV #9 Air TV #10 TV #11 2 Press or to highlight a ...
User Manual (English)
Page 29
...10-1 11-1 Air TV #6 Air TV #7 Air TV #9 Air TV #10 TV #11 Delete Add to open the list of options. Favorite 9/20/2009 Reserve 5:02 pm 3 Change Info Cancel Schedules Information Select All 5 Press or to watch. The Timer Viewing screen opens and displays the revered program information. NS-P42Q-P501Q-P502Q...-10A_09-0100_MAN_V1_English.book Page 25 Friday, March 20, 2009 3:11 PM Reserving programs You can change the reservation. Timer Viewing Antenna Air Date 01-01-2009 Channel 19 Repeat once Start Time 10:09 am 5 Press or...
...10-1 11-1 Air TV #6 Air TV #7 Air TV #9 Air TV #10 TV #11 Delete Add to open the list of options. Favorite 9/20/2009 Reserve 5:02 pm 3 Change Info Cancel Schedules Information Select All 5 Press or to watch. The Timer Viewing screen opens and displays the revered program information. NS-P42Q-P501Q-P502Q...-10A_09-0100_MAN_V1_English.book Page 25 Friday, March 20, 2009 3:11 PM Reserving programs You can change the reservation. Timer Viewing Antenna Air Date 01-01-2009 Channel 19 Repeat once Start Time 10:09 am 5 Press or...
User Manual (English)
Page 30
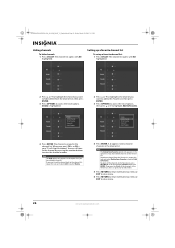
... ENTER. NS-P42Q-P501Q-P502Q-10A_09-0100_MAN_V1_English.book Page 26 Friday, March 20, 2009 3:11 PM Hiding channels To hide channels: 1 Press CH.LIST. The channel list opens with All highlighted. 6 6-1 All 7 Added 7-1 9 Favorite 9-1 Reserve 10 10-1 11-1 Air TV #6 Air TV #7 Air TV #9 Air TV #10 TV #11 ...to the Favorite List. The channel list opens with All highlighted. 6 6-1 All 7 Added 7-1 9 Favorite 9-1 Reserve 10 10-1 11-1 Air TV #6 Air TV #7 Air TV #9 Air TV #10 TV #11 2 Press or to highlight the channel you want to delete all the channels in the option list if you...
... ENTER. NS-P42Q-P501Q-P502Q-10A_09-0100_MAN_V1_English.book Page 26 Friday, March 20, 2009 3:11 PM Hiding channels To hide channels: 1 Press CH.LIST. The channel list opens with All highlighted. 6 6-1 All 7 Added 7-1 9 Favorite 9-1 Reserve 10 10-1 11-1 Air TV #6 Air TV #7 Air TV #9 Air TV #10 TV #11 ...to the Favorite List. The channel list opens with All highlighted. 6 6-1 All 7 Added 7-1 9 Favorite 9-1 Reserve 10 10-1 11-1 Air TV #6 Air TV #7 Air TV #9 Air TV #10 TV #11 2 Press or to highlight the channel you want to delete all the channels in the option list if you...
User Manual (English)
Page 41
... : 50 : 50 : G50/R50 2 Press or to highlight Setup, then press ENTER to highlight Time, then press ENTER. Press or to move from item to access the Setup menu. After you want the TV tuned ... Press RETURN to return to the previous menu or EXIT to access the Timer screen. NS-P42Q-P501Q-P502Q-10A_09-0100_MAN_V1_English.book Page 37 Friday, March 20, 2009 3:11 PM 2 Press or to... highlight Setup, then press ENTER to item. On Time 12 Off Time 12 Volume 10 Timer 1 00 am Inactivate 00 Antenna ...
... : 50 : 50 : G50/R50 2 Press or to highlight Setup, then press ENTER to highlight Time, then press ENTER. Press or to move from item to access the Setup menu. After you want the TV tuned ... Press RETURN to return to the previous menu or EXIT to access the Timer screen. NS-P42Q-P501Q-P502Q-10A_09-0100_MAN_V1_English.book Page 37 Friday, March 20, 2009 3:11 PM 2 Press or to... highlight Setup, then press ENTER to item. On Time 12 Off Time 12 Volume 10 Timer 1 00 am Inactivate 00 Antenna ...
User Manual (English)
Page 45
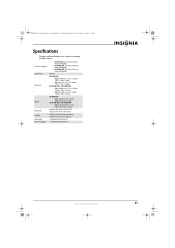
...215; 316 mm) NS-P42Q-10A: • Without stand: 53.1 lbs (24.1 kg) • With stand: 61.3 lbs (27.8 kg) NS-P501Q-10A and NS-P502Q-10A: • Without stand: 69.0 lbs (31.3 kg) • With stand: 77.2 lbs (35.0 kg) Operating: 50°F to 104°F (10°C to 40&#...176;C) Storage: -4°F to 113°F (-20°C to 45°C) Operating: 10% to 80%, non-condensing Storage: 5% to 95%, non-condensing See the label attached to the TV...
...215; 316 mm) NS-P42Q-10A: • Without stand: 53.1 lbs (24.1 kg) • With stand: 61.3 lbs (27.8 kg) NS-P501Q-10A and NS-P502Q-10A: • Without stand: 69.0 lbs (31.3 kg) • With stand: 77.2 lbs (35.0 kg) Operating: 50°F to 104°F (10°C to 40&#...176;C) Storage: -4°F to 113°F (-20°C to 45°C) Operating: 10% to 80%, non-condensing Storage: 5% to 95%, non-condensing See the label attached to the TV...
