
User Manual (English)
Page 4
NS-P42Q-P501Q-P502Q-10A_09-0100_MAN_V1_English.book Page ii Friday, March 20, 2009 3:11 PM Contents Adjusting advanced picture settings 19 Improving the image from a game console 20 Adjusting the computer image 21 Using Energy Saving mode 21 Adjusting the sound 22 Adjusting the sound 22 Changing channel settings... modes 42 Legal notices 44 Two-year limited warranty 45 ii www.insigniaproducts.com TV parental control levels 29 Setting movie levels 30 Setting Canadian TV rating levels 31 Downloading rating information 31 Using closed captioning 33 Viewing closed captioning ...
NS-P42Q-P501Q-P502Q-10A_09-0100_MAN_V1_English.book Page ii Friday, March 20, 2009 3:11 PM Contents Adjusting advanced picture settings 19 Improving the image from a game console 20 Adjusting the computer image 21 Using Energy Saving mode 21 Adjusting the sound 22 Adjusting the sound 22 Changing channel settings... modes 42 Legal notices 44 Two-year limited warranty 45 ii www.insigniaproducts.com TV parental control levels 29 Setting movie levels 30 Setting Canadian TV rating levels 31 Downloading rating information 31 Using closed captioning 33 Viewing closed captioning ...
User Manual (English)
Page 8
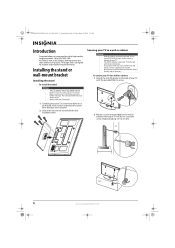
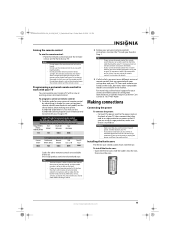
...before moving it to fall and cause serious injury. • Always store your TV upright. 1 Carefully place your TV screen face-down on your TV to the wall with the provided M4×16 screw. 2 Mount a screw ...plasma TV design and is heavy. You should use a wall anchor to your TV. • For added stability, secure your TV can cause it . NS-P42Q-P501Q-P502Q-10A_09-0100_MAN_V1_English.book Page 4 Friday, March 20, 2009 3:11 PM Introduction Congratulations on your TV will be set. Your NS-P42Q-10A, NS-P501Q-10A, or NS-P502Q-10A represents the state of a high-quality Insignia...
...before moving it to fall and cause serious injury. • Always store your TV upright. 1 Carefully place your TV screen face-down on your TV to the wall with the provided M4×16 screw. 2 Mount a screw ...plasma TV design and is heavy. You should use a wall anchor to your TV. • For added stability, secure your TV can cause it . NS-P42Q-P501Q-P502Q-10A_09-0100_MAN_V1_English.book Page 4 Friday, March 20, 2009 3:11 PM Introduction Congratulations on your TV will be set. Your NS-P42Q-10A, NS-P501Q-10A, or NS-P502Q-10A represents the state of a high-quality Insignia...
User Manual (English)
Page 11
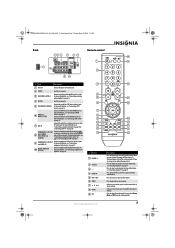
..." on . Press to change the channel. In the on page 18. You can select Stereo, Mono, or SAP (separate audio program). 7 NS-P42Q-P501Q-P502Q-10A_09-0100_MAN_V1_English.book Page 7 Friday, March 20, 2009 3:11 PM Back Remote control # Jack Description 1 Power in Connect the power cord to this... jack. 2 SERVICE Used for an outdoor antenna or cable TV to this jack. Connect a DVI device to select a sub-channel. For more information, see "Selecting a channel" on -screen menu, press to select menu items or adjust settings. Press to the HDMI IN 2 jack. Press again to ...
..." on . Press to change the channel. In the on page 18. You can select Stereo, Mono, or SAP (separate audio program). 7 NS-P42Q-P501Q-P502Q-10A_09-0100_MAN_V1_English.book Page 7 Friday, March 20, 2009 3:11 PM Back Remote control # Jack Description 1 Power in Connect the power cord to this... jack. 2 SERVICE Used for an outdoor antenna or cable TV to this jack. Connect a DVI device to select a sub-channel. For more information, see "Selecting a channel" on -screen menu, press to select menu items or adjust settings. Press to the HDMI IN 2 jack. Press again to ...
User Manual (English)
Page 12
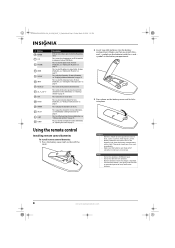
... the + and - Do not burn or incinerate. If the remote control is depleted. NS-P42Q-P501Q-P502Q-10A_09-0100_MAN_V1_English.book Page 8 Friday, March 20, 2009 3:11 PM # Button 10 RETURN...to the next or previous channel in the channel list. For more information, see "Adjusting the TV picture" on page 16. For more information, see "Displaying additional information" on page 22.... For more information, see "Viewing a favorite channel" on page 36. For more information, see "Setting a wake-up timer" on page 27. Using the remote control Installing remote control batteries To install ...
... the + and - Do not burn or incinerate. If the remote control is depleted. NS-P42Q-P501Q-P502Q-10A_09-0100_MAN_V1_English.book Page 8 Friday, March 20, 2009 3:11 PM # Button 10 RETURN...to the next or previous channel in the channel list. For more information, see "Adjusting the TV picture" on page 16. For more information, see "Displaying additional information" on page 22.... For more information, see "Viewing a favorite channel" on page 36. For more information, see "Setting a wake-up timer" on page 27. Using the remote control Installing remote control batteries To install ...
User Manual (English)
Page 13
... To connect the power: • Connect the power cord to the power jack on the back of your TV. Cautions • Make sure that matches your TV. NS-P42Q-P501Q-P502Q-10A_09-0100_MAN_V1_English.book Page 9 Friday, March 20, 2009 3:11 PM Aiming the remote control To aim the...instructions for details. 3 If all Insignia TVs manufactured after Jan. 1, 2007) Universal remote control manufacturers and models Philips PHDVD5, PH5DSS, PMDVR8, PDVR8 RCA RCU807 One for All URC-6690 Sony RM-VL600 115 135 0464 8043 Comcast M1057 0463 Set-top box manufacturers and models Dish ...
... To connect the power: • Connect the power cord to the power jack on the back of your TV. Cautions • Make sure that matches your TV. NS-P42Q-P501Q-P502Q-10A_09-0100_MAN_V1_English.book Page 9 Friday, March 20, 2009 3:11 PM Aiming the remote control To aim the...instructions for details. 3 If all Insignia TVs manufactured after Jan. 1, 2007) Universal remote control manufacturers and models Philips PHDVD5, PH5DSS, PMDVR8, PDVR8 RCA RCU807 One for All URC-6690 Sony RM-VL600 115 135 0464 8043 Comcast M1057 0463 Set-top box manufacturers and models Dish ...
User Manual (English)
Page 15
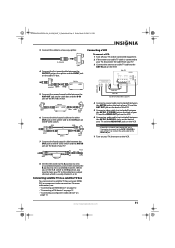
... the back of the VCR. 5 Connect a video cable (not included) between the AV IN 1 (Y/VIDEO) jack on the back of your TV. NS-P42Q-P501Q-P502Q-10A_09-0100_MAN_V1_English.book Page 11 Friday, March 20, 2009 3:11 PM 3 Connect this cable to the cable box's output channel, which is usually...Connecting a component video device" on the VCR. 8 Set the A/B switch to the A position to view unscrambled channels, and set the switch to the B position to view scrambled channels. (When you set the A/B switch to the B position, you need to tune your TV, then turn on page 13 www.insigniaproducts.com 11 ...
... the back of the VCR. 5 Connect a video cable (not included) between the AV IN 1 (Y/VIDEO) jack on the back of your TV. NS-P42Q-P501Q-P502Q-10A_09-0100_MAN_V1_English.book Page 11 Friday, March 20, 2009 3:11 PM 3 Connect this cable to the cable box's output channel, which is usually...Connecting a component video device" on the VCR. 8 Set the A/B switch to the A position to view unscrambled channels, and set the switch to the B position to view scrambled channels. (When you set the A/B switch to the B position, you need to tune your TV, then turn on page 13 www.insigniaproducts.com 11 ...
User Manual (English)
Page 18
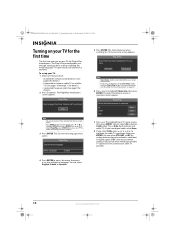
... in your cable TV provider. 14 www.insigniaproducts.com If your home. Plug & Play Menu Language, Store Demo, Channels, and Time will be set to highlight SETUP, then press ENTER. The Select the Antenna source to adjust. 3 Press ENTER. NS-P42Q-P501Q-P502Q-10A_09-0100_MAN_V1_English.book ...Page 14 Friday, March 20, 2009 3:11 PM Turning on your TV for the first time The first time...
... in your cable TV provider. 14 www.insigniaproducts.com If your home. Plug & Play Menu Language, Store Demo, Channels, and Time will be set to highlight SETUP, then press ENTER. The Select the Antenna source to adjust. 3 Press ENTER. NS-P42Q-P501Q-P502Q-10A_09-0100_MAN_V1_English.book ...Page 14 Friday, March 20, 2009 3:11 PM Turning on your TV for the first time The first time...
User Manual (English)
Page 19
NS-P42Q-P501Q-P502Q-10A_09-0100_MAN_V1_English.book Page 15 Friday, March 20, 2009 3:11 PM Your TV starts searching for channels available in your TV. Plug & Play Sets the Clock Mode. Plug & Play Sets the Clock Mode. Plug & Play Enjoy your viewing area. DTV Air : -- When the search is stored in the list. Your TV... is selected automatically. 13 Press ENTER. Cable : -- Clock Mode : AAuutoto Manual If you receive a digital channel signal, the time zone is ready to highlight a time zone, then press ENTER. The Set the time zone screen appears...
NS-P42Q-P501Q-P502Q-10A_09-0100_MAN_V1_English.book Page 15 Friday, March 20, 2009 3:11 PM Your TV starts searching for channels available in your TV. Plug & Play Sets the Clock Mode. Plug & Play Sets the Clock Mode. Plug & Play Enjoy your viewing area. DTV Air : -- When the search is stored in the list. Your TV... is selected automatically. 13 Press ENTER. Cable : -- Clock Mode : AAuutoto Manual If you receive a digital channel signal, the time zone is ready to highlight a time zone, then press ENTER. The Set the time zone screen appears...
User Manual (English)
Page 21
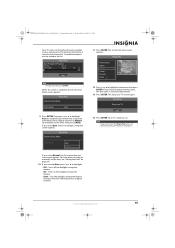
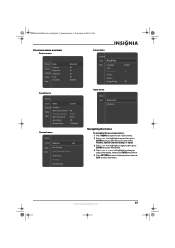
...access the option. 4 Press or , or to highlight a setting or adjust the option, then press ENTER to confirm. 5 Press RETURN to return to the previous menu or EXIT to access the menu. NS-P42Q-P501Q-P502Q-10A_09-0100_MAN_V1_English.book Page 17 Friday, March 20, 2009 3:11...Color Tint (G/R) : Standard : 95 : 45 : 50 : 50 : G50/R50 Sound menu Picture Sound Mode : Custom Channel Setup Input Equalizer SRS TruSurround HD Preferred Language Multi-Track Sound : Off : English : Stereo Auto Volume : Off Speaker Select : TV Speaker Channel menu Sound Channel Antenna : Air Setup Input...
...access the option. 4 Press or , or to highlight a setting or adjust the option, then press ENTER to confirm. 5 Press RETURN to return to the previous menu or EXIT to access the menu. NS-P42Q-P501Q-P502Q-10A_09-0100_MAN_V1_English.book Page 17 Friday, March 20, 2009 3:11...Color Tint (G/R) : Standard : 95 : 45 : 50 : 50 : G50/R50 Sound menu Picture Sound Mode : Custom Channel Setup Input Equalizer SRS TruSurround HD Preferred Language Multi-Track Sound : Off : English : Stereo Auto Volume : Off Speaker Select : TV Speaker Channel menu Sound Channel Antenna : Air Setup Input...
User Manual (English)
Page 22
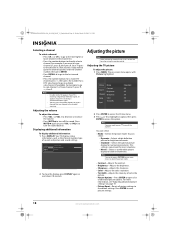
... receiving a digital high-definition signal. SD appears if your TV is receiving a standard-definition signal. Picture Mode Sound Channel Contrast Brightness Sharpness Setup Input Color Tint (G/R) : Standard : 95 : 45 : 50 : 50 : G50/R50 2 Press ENTER to access the Picture menu. 3 Press or to highlight ... the intensity of red in the picture. • Picture Options-Press ENTER to open a list of sound, and picture and sound settings. NS-P42Q-P501Q-P502Q-10A_09-0100_MAN_V1_English.book Page 18 Friday, March 20, 2009 3:11 PM Selecting a channel To select a channel: • Press CH ...
... receiving a digital high-definition signal. SD appears if your TV is receiving a standard-definition signal. Picture Mode Sound Channel Contrast Brightness Sharpness Setup Input Color Tint (G/R) : Standard : 95 : 45 : 50 : 50 : G50/R50 2 Press ENTER to access the Picture menu. 3 Press or to highlight ... the intensity of red in the picture. • Picture Options-Press ENTER to open a list of sound, and picture and sound settings. NS-P42Q-P501Q-P502Q-10A_09-0100_MAN_V1_English.book Page 18 Friday, March 20, 2009 3:11 PM Selecting a channel To select a channel: • Press CH ...
User Manual (English)
Page 23
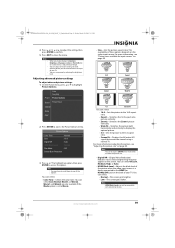
...can select Off, Low, Medium, High, or Auto. • HDMI Black Level-Adjusts the black level of the picture when the video input source is set to highlight Picture Options. NS-P42Q-P501Q-P502Q-10A_09-0100_MAN_V1_English.book Page 19 Friday, March 20, 2009 3:11 PM 4 Press or , or to adjust the... setting, then press ENTER to confirm. 5 Press EXIT to the HDMI1 or HDMI2(DVI) jack on the back of your TV. You can also press ZOOM one or more ...
...can select Off, Low, Medium, High, or Auto. • HDMI Black Level-Adjusts the black level of the picture when the video input source is set to highlight Picture Options. NS-P42Q-P501Q-P502Q-10A_09-0100_MAN_V1_English.book Page 19 Friday, March 20, 2009 3:11 PM 4 Press or , or to adjust the... setting, then press ENTER to confirm. 5 Press EXIT to the HDMI1 or HDMI2(DVI) jack on the back of your TV. You can also press ZOOM one or more ...
User Manual (English)
Page 24
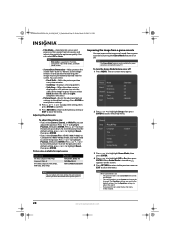
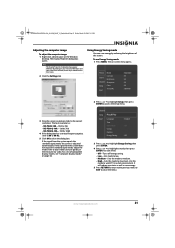
... 95 : 45 : 50 : 50 : G50/R50 2 Press or to highlight Setup, then press ENTER to the default settings. You can adjust and store settings for optimum quality. Adjusting...NS-P42Q-P501Q-P502Q-10A_09-0100_MAN_V1_English.book Page 20 Friday, March 20, 2009 3:11 PM • Film Mode-Automatically senses and processes film signals from all sources and adjusts the picture for each external device you have connected to the default settings... then press ENTER. To reset the picture to the default setting, press or to your TV. Improving the image from a game console You can select Off...
... 95 : 45 : 50 : 50 : G50/R50 2 Press or to highlight Setup, then press ENTER to the default settings. You can adjust and store settings for optimum quality. Adjusting...NS-P42Q-P501Q-P502Q-10A_09-0100_MAN_V1_English.book Page 20 Friday, March 20, 2009 3:11 PM • Film Mode-Automatically senses and processes film signals from all sources and adjusts the picture for each external device you have connected to the default settings... then press ENTER. To reset the picture to the default setting, press or to your TV. Improving the image from a game console You can select Off...
User Manual (English)
Page 25
..., the screen is : • NS-P42Q-10A-1024 x 768 • NS-P501Q-10A-1360 x 768 • NS-P502Q-10A-1920 x 1080 4 If the dialog box has a vertical frequency option, set it to 60 or 60 Hz. ... Mode Sound Channel Contrast Brightness Sharpness Setup Color Tint (G/R) Input : Standard : 95 : 45 : 50 : 50 : G50/R50 3 Drag the screen resolution slider to highlight a mode, then press ENTER. If ... system does not equal the standard signal mode, adjust the mode (refer to watch TV in most cases. 2 Click the Settings tab. Channel Setup Plug & Play Input Language Time Game Mode V-Chip Caption Energy ...
..., the screen is : • NS-P42Q-10A-1024 x 768 • NS-P501Q-10A-1360 x 768 • NS-P502Q-10A-1920 x 1080 4 If the dialog box has a vertical frequency option, set it to 60 or 60 Hz. ... Mode Sound Channel Contrast Brightness Sharpness Setup Color Tint (G/R) Input : Standard : 95 : 45 : 50 : 50 : G50/R50 3 Drag the screen resolution slider to highlight a mode, then press ENTER. If ... system does not equal the standard signal mode, adjust the mode (refer to watch TV in most cases. 2 Click the Settings tab. Channel Setup Plug & Play Input Language Time Game Mode V-Chip Caption Energy ...

User Manual (English)
Page 26
...Selects the language for a digital TV program, if multiple tracks are available. Picture Mode Sound Channel Contrast Brightness Sharpness Setup Input Color Tint (G/R) : Standard : 95 : 45 : 50 : 50 : G50/R50 2 Press or to highlight Sound, then press ENTER to default settings. Picture Sound Mode : Custom Channel...times to select the language for a digital program. • Multi-Track Sound-Selects the audio mode for the program. NS-P42Q-P501Q-P502Q-10A_09-0100_MAN_V1_English.book Page 22 Friday, March 20, 2009 3:11 PM Adjusting the sound Note Unless otherwise noted, all tasks...
...Selects the language for a digital TV program, if multiple tracks are available. Picture Mode Sound Channel Contrast Brightness Sharpness Setup Input Color Tint (G/R) : Standard : 95 : 45 : 50 : 50 : G50/R50 2 Press or to highlight Sound, then press ENTER to default settings. Picture Sound Mode : Custom Channel...times to select the language for a digital program. • Multi-Track Sound-Selects the audio mode for the program. NS-P42Q-P501Q-P502Q-10A_09-0100_MAN_V1_English.book Page 22 Friday, March 20, 2009 3:11 PM Adjusting the sound Note Unless otherwise noted, all tasks...
User Manual (English)
Page 27
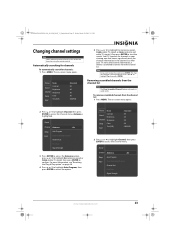
...Setup Input Color Tint (G/R) : Standard : 95 : 45 : 50 : 50 : G50/R50 2 Press or to highlight Channel, then press ENTER to highlight Yes, then press ENTER. Your TV searches for channels: 1 Press MENU. message appears. Removing scrambled ...50 : 50 : G50/R50 5 Press or to highlight Air (antenna signal), Cable (cable TV signal), or Auto (antenna and cable TV signals), then press ENTER to start the search. To remove scrambled channels from the channel list: 1 Press MENU. NS-P42Q-P501Q-P502Q-10A_09-0100_MAN_V1_English.book Page 23 Friday, March 20, 2009 3:11 PM Changing channel settings...
...Setup Input Color Tint (G/R) : Standard : 95 : 45 : 50 : 50 : G50/R50 2 Press or to highlight Channel, then press ENTER to highlight Yes, then press ENTER. Your TV searches for channels: 1 Press MENU. message appears. Removing scrambled ...50 : 50 : G50/R50 5 Press or to highlight Air (antenna signal), Cable (cable TV signal), or Auto (antenna and cable TV signals), then press ENTER to start the search. To remove scrambled channels from the channel list: 1 Press MENU. NS-P42Q-P501Q-P502Q-10A_09-0100_MAN_V1_English.book Page 23 Friday, March 20, 2009 3:11 PM Changing channel settings...
User Manual (English)
Page 28
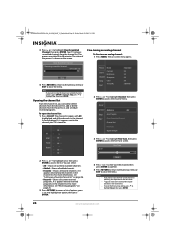
...Brightness Sharpness Setup Input Color Tint (G/R) : Standard : 95 : 45 : 50 : 50 : G50/R50 2 Press or to highlight Channel, then press ENTER to access... All 7 Added 7-1 9 Favorite 9-1 10 Reserve 10-1 11-1 Air TV #6 Air TV #7 Air TV #9 Air TV #10 TV #11 2 Press or to highlight a list, then press ENTER to the...delete channels from the channel list. To reset the fine tuning setting, press to 30 minutes. This process may take 20 to... Stop, press to highlight Clear Scrambled Channel, then press ENTER. NS-P42Q-P501Q-P502Q-10A_09-0100_MAN_V1_English.book Page 24 Friday, March 20, 2009 3:11 ...
...Brightness Sharpness Setup Input Color Tint (G/R) : Standard : 95 : 45 : 50 : 50 : G50/R50 2 Press or to highlight Channel, then press ENTER to access... All 7 Added 7-1 9 Favorite 9-1 10 Reserve 10-1 11-1 Air TV #6 Air TV #7 Air TV #9 Air TV #10 TV #11 2 Press or to highlight a list, then press ENTER to the...delete channels from the channel list. To reset the fine tuning setting, press to 30 minutes. This process may take 20 to... Stop, press to highlight Clear Scrambled Channel, then press ENTER. NS-P42Q-P501Q-P502Q-10A_09-0100_MAN_V1_English.book Page 24 Friday, March 20, 2009 3:11 ...
User Manual (English)
Page 30
... appears in the channel list. NS-P42Q-P501Q-P502Q-10A_09-0100_MAN_V1_English.book Page 26 Friday, March 20, 2009 3:11 PM Hiding channels To hide channels: 1 Press CH.LIST. The channel list opens with All highlighted. 6 6-1 All 7 Added 7-1 9 Favorite 9-1 Reserve 10 10-1 11-1 Air TV #6 Air TV #7 Air TV #9 Air TV #10 TV #11 Setting up a favorite channel list...
... appears in the channel list. NS-P42Q-P501Q-P502Q-10A_09-0100_MAN_V1_English.book Page 26 Friday, March 20, 2009 3:11 PM Hiding channels To hide channels: 1 Press CH.LIST. The channel list opens with All highlighted. 6 6-1 All 7 Added 7-1 9 Favorite 9-1 Reserve 10 10-1 11-1 Air TV #6 Air TV #7 Air TV #9 Air TV #10 TV #11 Setting up a favorite channel list...
User Manual (English)
Page 32
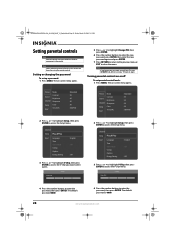
NS-P42Q-P501Q-P502Q-10A_09-0100_MAN_V1_English.book Page 28 Friday, March 20, 2009 3:11 PM Setting parental controls Note Parental controls are based on using the remote control. The on or off your TV, press MUTE, 8, 2, 4, then turn your TV back on -screen menu opens. ..., turn off To set up a password: 1 Press MENU. Picture Mode Sound Channel Contrast Brightness Sharpness Setup Input Color Tint (G/R) : Standard : 95 : 45 : 50 : 50 : G50/R50 Picture Mode Sound Channel Contrast Brightness Sharpness Setup Color Tint (G/R) Input : Standard : 95 : 45 : 50 : 50 : G50/R50 ...
NS-P42Q-P501Q-P502Q-10A_09-0100_MAN_V1_English.book Page 28 Friday, March 20, 2009 3:11 PM Setting parental controls Note Parental controls are based on using the remote control. The on or off your TV, press MUTE, 8, 2, 4, then turn your TV back on -screen menu opens. ..., turn off To set up a password: 1 Press MENU. Picture Mode Sound Channel Contrast Brightness Sharpness Setup Input Color Tint (G/R) : Standard : 95 : 45 : 50 : 50 : G50/R50 Picture Mode Sound Channel Contrast Brightness Sharpness Setup Color Tint (G/R) Input : Standard : 95 : 45 : 50 : 50 : G50/R50 ...
User Manual (English)
Page 33
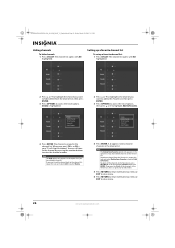
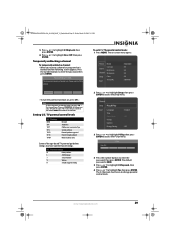
NS-P42Q-P501Q-P502Q-10A_09-0100_MAN_V1_English.book Page 29 Friday, March 20, 2009 3:11 PM 5 Press or to highlight V-Chip Lock, then press ENTER. 6 Press or to enter the password, then press ENTER. TV parental control levels: 1 Press MENU. The on to a channel or ... Sexually suggestive dialog To set U. Picture Mode Sound Channel Contrast Brightness Sharpness Setup Color Tint (G/R) Input : Standard : 95 : 45 : 50 : 50 : G50/R50 2 Press or to highlight Setup, then press ENTER to access the V-Chip menu. TV ratings NONE TV-Y TV-Y7 TV-G TV-PG TV-14 TV-MA Not rated All...
NS-P42Q-P501Q-P502Q-10A_09-0100_MAN_V1_English.book Page 29 Friday, March 20, 2009 3:11 PM 5 Press or to highlight V-Chip Lock, then press ENTER. 6 Press or to enter the password, then press ENTER. TV parental control levels: 1 Press MENU. The on to a channel or ... Sexually suggestive dialog To set U. Picture Mode Sound Channel Contrast Brightness Sharpness Setup Color Tint (G/R) Input : Standard : 95 : 45 : 50 : 50 : G50/R50 2 Press or to highlight Setup, then press ENTER to access the V-Chip menu. TV ratings NONE TV-Y TV-Y7 TV-G TV-PG TV-14 TV-MA Not rated All...
User Manual (English)
Page 34
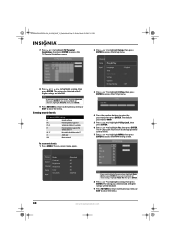
NS-P42Q-P501Q-P502Q-10A_09-0100_MAN_V1_English.book Page 30 Friday, March 20, 2009 3:11 PM 7 Press or to highlight TV Parental Guidelines, then press ENTER to access the MPAA Rating screen. Setting movie levels U.S. The V-Chip Lock must be blocked. 9 Press RETURN to return to the ...Sound Channel Contrast Brightness Sharpness Setup Color Tint (G/R) Input : Standard : 95 : 45 : 50 : 50 : G50/R50 2 Press or to highlight Setup, then press ENTER to highlight a rating, then press ENTER. TV Parental Guidelines Allow All Block All 8 Press or , or to access the Setup menu.
NS-P42Q-P501Q-P502Q-10A_09-0100_MAN_V1_English.book Page 30 Friday, March 20, 2009 3:11 PM 7 Press or to highlight TV Parental Guidelines, then press ENTER to access the MPAA Rating screen. Setting movie levels U.S. The V-Chip Lock must be blocked. 9 Press RETURN to return to the ...Sound Channel Contrast Brightness Sharpness Setup Color Tint (G/R) Input : Standard : 95 : 45 : 50 : 50 : G50/R50 2 Press or to highlight Setup, then press ENTER to highlight a rating, then press ENTER. TV Parental Guidelines Allow All Block All 8 Press or , or to access the Setup menu.