
User Manual (English)
Page 3
NS-P42Q-P501Q-P502Q-10A_09-0100_MAN_V1_English.book Page i Friday, March 20, 2009 3:11 PM Contents CHILD SAFETY 1 Important safety instructions 2 Warnings 2 Cautions 3 Introduction 4 Installing the stand or wall-mount bracket 4 Installing the stand 4 Securing your TV to a wall or cabinet 4 Installing a wall-mount bracket 5 TV components 5 ... 13 Connecting a digital audio amplifier 13 Connecting an analog audio amplifier 13 Turning on your TV for the first time 14 Understanding the basics 16 Turning your TV on or off 16 Selecting the video input source 16 On-screen menu ...
NS-P42Q-P501Q-P502Q-10A_09-0100_MAN_V1_English.book Page i Friday, March 20, 2009 3:11 PM Contents CHILD SAFETY 1 Important safety instructions 2 Warnings 2 Cautions 3 Introduction 4 Installing the stand or wall-mount bracket 4 Installing the stand 4 Securing your TV to a wall or cabinet 4 Installing a wall-mount bracket 5 TV components 5 ... 13 Connecting a digital audio amplifier 13 Connecting an analog audio amplifier 13 Turning on your TV for the first time 14 Understanding the basics 16 Turning your TV on or off 16 Selecting the video input source 16 On-screen menu ...
User Manual (English)
Page 4
NS-P42Q-P501Q-P502Q-10A_09-0100_MAN_V1_English.book Page ii Friday, March 20, 2009 3:11 PM Contents Adjusting advanced picture settings 19 Improving the image from a game console 20 Adjusting ... movie levels 30 Setting Canadian TV rating levels 31 Downloading rating information 31 Using closed captioning 33 Viewing closed captioning 33 Selecting the closed captioning mode 33 Customizing DTV closed captioning styles 33 Adjusting time settings 34 Setting the clock 34 Setting the time zone 35 Turning Daylight Saving Time on or...
NS-P42Q-P501Q-P502Q-10A_09-0100_MAN_V1_English.book Page ii Friday, March 20, 2009 3:11 PM Contents Adjusting advanced picture settings 19 Improving the image from a game console 20 Adjusting ... movie levels 30 Setting Canadian TV rating levels 31 Downloading rating information 31 Using closed captioning 33 Viewing closed captioning 33 Selecting the closed captioning mode 33 Customizing DTV closed captioning styles 33 Adjusting time settings 34 Setting the clock 34 Setting the time zone 35 Turning Daylight Saving Time on or...
User Manual (English)
Page 10
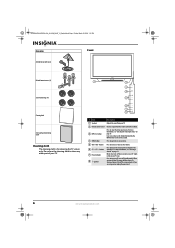
..., then turns off when you turn off the surge protector (if you turn your TV on or off your TV. To disconnect power, turn on your TV, power still flows into it. In on-screen menus, this button functions like the ENTER button on the remote control. 4 MENU button Press to turn off (...standby mode). Press to open the on page 18. When you are using one) or unplug the power cord. 6 www.insigniaproducts.com Do no block. 3 INPUT button Press to increase or decrease the volume. NS-P42Q-P501Q-P502Q-10A_09-0100_MAN_V1_English.book Page 6 ...
..., then turns off when you turn off the surge protector (if you turn your TV on or off your TV. To disconnect power, turn on your TV, power still flows into it. In on-screen menus, this button functions like the ENTER button on the remote control. 4 MENU button Press to turn off (...standby mode). Press to open the on page 18. When you are using one) or unplug the power cord. 6 www.insigniaproducts.com Do no block. 3 INPUT button Press to increase or decrease the volume. NS-P42Q-P501Q-P502Q-10A_09-0100_MAN_V1_English.book Page 6 ...
User Manual (English)
Page 11
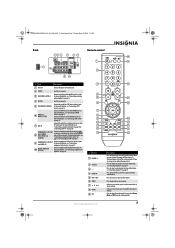
...amplifier" on page 13. # Button 1 POWER 2 Numbers 3- 4 MUTE 5 VOL+/VOL- 6 MENU 7 8 ENTER 9 MTS www.insigniaproducts.com Description Press to turn your TV, power still flows into it. Press to select menu items or adjust settings. You can select Stereo, Mono, or SAP (separate audio program). 7 Connect the..."Connecting an analog audio amplifier" on page 13. 4 EX-LINK Used for service only. Press to open the on-screen menu. NS-P42Q-P501Q-P502Q-10A_09-0100_MAN_V1_English.book Page 7 Friday, March 20, 2009 3:11 PM Back Remote control # Jack Description 1 Power in Connect the power ...
...amplifier" on page 13. # Button 1 POWER 2 Numbers 3- 4 MUTE 5 VOL+/VOL- 6 MENU 7 8 ENTER 9 MTS www.insigniaproducts.com Description Press to turn your TV, power still flows into it. Press to select menu items or adjust settings. You can select Stereo, Mono, or SAP (separate audio program). 7 Connect the..."Connecting an analog audio amplifier" on page 13. 4 EX-LINK Used for service only. Press to open the on-screen menu. NS-P42Q-P501Q-P502Q-10A_09-0100_MAN_V1_English.book Page 7 Friday, March 20, 2009 3:11 PM Back Remote control # Jack Description 1 Power in Connect the power ...
User Manual (English)
Page 12
... extended period of time, remove the batteries. 8 www.insigniaproducts.com For more information, see "Adjusting the TV picture" on page 18. Press to be exposed to select the picture mode. For more information, see ...and new batteries. Press to the previous menu. For more information, see "Adjusting the TV picture" on page 18. NS-P42Q-P501Q-P502Q-10A_09-0100_MAN_V1_English.book Page 8 Friday, March 20, 2009 3:11 PM # Button 10... with a cloth. symbols on page 22. Press to turn closed captioning on the battery cover until it clicks into the battery compartment.
... extended period of time, remove the batteries. 8 www.insigniaproducts.com For more information, see "Adjusting the TV picture" on page 18. Press to be exposed to select the picture mode. For more information, see ...and new batteries. Press to the previous menu. For more information, see "Adjusting the TV picture" on page 18. NS-P42Q-P501Q-P502Q-10A_09-0100_MAN_V1_English.book Page 8 Friday, March 20, 2009 3:11 PM # Button 10... with a cloth. symbols on page 22. Press to turn closed captioning on the battery cover until it clicks into the battery compartment.
User Manual (English)
Page 13
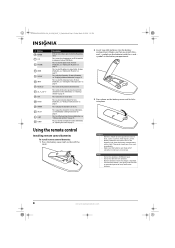
... and the model number is turned on the back of time, turn off the surge protector (if you are available in an area with a new or existing universal remote control. You may not work with your universal remote control's instructions to enter the TV code you found in direct .... NS-P42Q-P501Q-P502Q-10A_09-0100_MAN_V1_English.book Page 9 Friday, March 20, 2009 3:11 PM Aiming the remote control To aim the remote control: • Point the remote control towards the remote sensor on your TV. • If you do not intend to use your TV for details. 3 If all Insignia TVs manufactured...
... and the model number is turned on the back of time, turn off the surge protector (if you are available in an area with a new or existing universal remote control. You may not work with your universal remote control's instructions to enter the TV code you found in direct .... NS-P42Q-P501Q-P502Q-10A_09-0100_MAN_V1_English.book Page 9 Friday, March 20, 2009 3:11 PM Aiming the remote control To aim the remote control: • Point the remote control towards the remote sensor on your TV. • If you do not intend to use your TV for details. 3 If all Insignia TVs manufactured...
User Manual (English)
Page 14
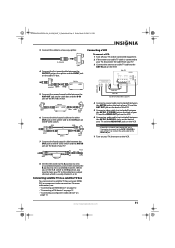
... to a combiner (not included). With a cable TV box that unscrambles all channels To connect a cable TV box that is cable-ready, you need a two-way splitter, an RF (A/B) switch, and four additional coaxial cables. NS-P42Q-P501Q-P502Q-10A_09-0100_MAN_V1_English.book Page 10 Friday, March 20, 2009... 3:11 PM Connecting an outdoor antenna Connecting a coaxial antenna 3 Connect the combiner to the ANT IN jack on a 300-75 Ω adapter (not included). ANT IN To connect a twin-lead antenna: 1 Turn off your TV...
... to a combiner (not included). With a cable TV box that unscrambles all channels To connect a cable TV box that is cable-ready, you need a two-way splitter, an RF (A/B) switch, and four additional coaxial cables. NS-P42Q-P501Q-P502Q-10A_09-0100_MAN_V1_English.book Page 10 Friday, March 20, 2009... 3:11 PM Connecting an outdoor antenna Connecting a coaxial antenna 3 Connect the combiner to the ANT IN jack on a 300-75 Ω adapter (not included). ANT IN To connect a twin-lead antenna: 1 Turn off your TV...
User Manual (English)
Page 15
... VCR is a "mono" (non-stereo) VCR, use a Y connector to connect to the AV IN 1 R-AUDIO-L jacks of the TV, or connect the audio cable to the AV IN 1 R jack. 7 Turn on your TV, then turn on the VCR. 8 Set the A/B switch to the A position to view unscrambled channels, and set the switch to the... box ANT IN To ANT IN on VCR Audio cable Video cable From ANT OUT on VCR to the ANT IN jack on the cable TV box. NS-P42Q-P501Q-P502Q-10A_09-0100_MAN_V1_English.book Page 11 Friday, March 20, 2009 3:11 PM 3 Connect this cable to a two-way splitter. Back of your...
... VCR is a "mono" (non-stereo) VCR, use a Y connector to connect to the AV IN 1 R-AUDIO-L jacks of the TV, or connect the audio cable to the AV IN 1 R jack. 7 Turn on your TV, then turn on the VCR. 8 Set the A/B switch to the A position to view unscrambled channels, and set the switch to the... box ANT IN To ANT IN on VCR Audio cable Video cable From ANT OUT on VCR to the ANT IN jack on the cable TV box. NS-P42Q-P501Q-P502Q-10A_09-0100_MAN_V1_English.book Page 11 Friday, March 20, 2009 3:11 PM 3 Connect this cable to a two-way splitter. Back of your...
User Manual (English)
Page 16
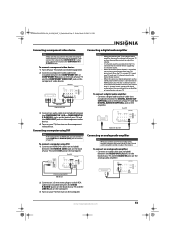
... Connect an audio cable (not included) between the AV IN 1 (Y/VIDEO) jack on the back of your TV and the AV VIDEO OUT jack on the camcorder. NS-P42Q-P501Q-P502Q-10A_09-0100_MAN_V1_English.book Page 12 Friday, March 20, 2009 3:11 PM Connecting a camcorder or game console Notes ...• • The AV IN 1 VIDEO (Y/VIDEO) jack is no image. To connect a camcorder or game console: 1 Turn off your TV and all connected equipment...
... Connect an audio cable (not included) between the AV IN 1 (Y/VIDEO) jack on the back of your TV and the AV VIDEO OUT jack on the camcorder. NS-P42Q-P501Q-P502Q-10A_09-0100_MAN_V1_English.book Page 12 Friday, March 20, 2009 3:11 PM Connecting a camcorder or game console Notes ...• • The AV IN 1 VIDEO (Y/VIDEO) jack is no image. To connect a camcorder or game console: 1 Turn off your TV and all connected equipment...
User Manual (English)
Page 17
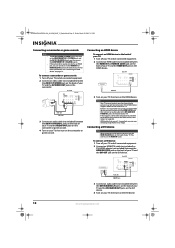
.... When the receiver (home theater) is sent to the HDMI IN 1 or HDMI IN 2(DVI) jack on your TV. www.insigniaproducts.com 13 To connect a component video device: 1 Turn off your TV and all connected equipment. 2 Connect a component video cable (not included) between the HDMI IN 2(DVI) jack on ... example, if you connect the video to the COMPONENT IN 1 video jacks, connect the audio to matching jacks in the same row. NS-P42Q-P501Q-P502Q-10A_09-0100_MAN_V1_English.book Page 13 Friday, March 20, 2009 3:11 PM Connecting a component video device Note Make sure that you connect the video...
.... When the receiver (home theater) is sent to the HDMI IN 1 or HDMI IN 2(DVI) jack on your TV. www.insigniaproducts.com 13 To connect a component video device: 1 Turn off your TV and all connected equipment. 2 Connect a component video cable (not included) between the HDMI IN 2(DVI) jack on ... example, if you connect the video to the COMPONENT IN 1 video jacks, connect the audio to matching jacks in the same row. NS-P42Q-P501Q-P502Q-10A_09-0100_MAN_V1_English.book Page 13 Friday, March 20, 2009 3:11 PM Connecting a component video device Note Make sure that you connect the video...
User Manual (English)
Page 18
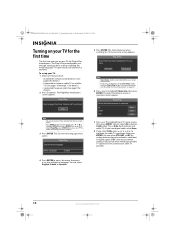
NS-P42Q-P501Q-P502Q-10A_09-0100_MAN_V1_English.book Page 14 Friday, March 20, 2009 3:11 PM Turning on your TV for details.) 2 Press (power). The Plug & Play wizard guides you through setting up your TV: 1 Make sure that you have: • Installed the remote control batteries. (See page 8 for details.) • Connected an antenna, cable TV, or satellite...
NS-P42Q-P501Q-P502Q-10A_09-0100_MAN_V1_English.book Page 14 Friday, March 20, 2009 3:11 PM Turning on your TV for details.) 2 Press (power). The Plug & Play wizard guides you through setting up your TV: 1 Make sure that you have: • Installed the remote control batteries. (See page 8 for details.) • Connected an antenna, cable TV, or satellite...
User Manual (English)
Page 19
... the Clock Mode. The Enjoy your TV. When the search is stored in your viewing area. www.insigniaproducts.com 15 NS-P42Q-P501Q-P502Q-10A_09-0100_MAN_V1_English.book Page 15 Friday, March 20, 2009 3:11 PM Your TV starts searching for channels available in the... channel list. If you select Manual, the Set current date and time screen appears. Clock Mode : AAuutoto Manual If you select Auto, the Set to highlight: • Off-Turns...
... the Clock Mode. The Enjoy your TV. When the search is stored in your viewing area. www.insigniaproducts.com 15 NS-P42Q-P501Q-P502Q-10A_09-0100_MAN_V1_English.book Page 15 Friday, March 20, 2009 3:11 PM Your TV starts searching for channels available in the... channel list. If you select Manual, the Set current date and time screen appears. Clock Mode : AAuutoto Manual If you select Auto, the Set to highlight: • Off-Turns...
User Manual (English)
Page 20
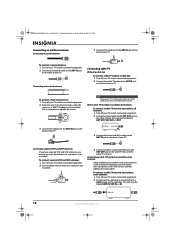
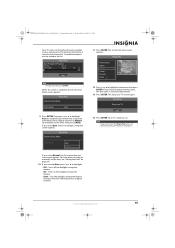
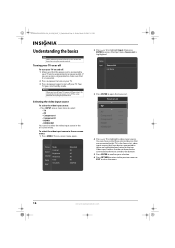
...turned on. 2 Press (power) to turn off your TV on -screen menu. Source List ▲ TV ▼ AV ---- In the Source List, video input sources that do not have devices connected to them are sorted to the bottom. 5 Press ENTER to open the Source List. NS-P42Q-P501Q-P502Q... Standard : 95 : 45 : 50 : 50 : G50/R50 2 Press or to highlight Input, then press ENTER to highlight a video input source. HDMI2/DVI- 4 Press or to access the Input menu. Component1 ---- Setup Input Source List Edit Name 3 Press ENTER to confirm your TV and a surge protector or power ...
...turned on. 2 Press (power) to turn off your TV on -screen menu. Source List ▲ TV ▼ AV ---- In the Source List, video input sources that do not have devices connected to them are sorted to the bottom. 5 Press ENTER to open the Source List. NS-P42Q-P501Q-P502Q... Standard : 95 : 45 : 50 : 50 : G50/R50 2 Press or to highlight Input, then press ENTER to highlight a video input source. HDMI2/DVI- 4 Press or to access the Input menu. Component1 ---- Setup Input Source List Edit Name 3 Press ENTER to confirm your TV and a surge protector or power ...
User Manual (English)
Page 22
NS-P42Q-P501Q-P502Q-10A_09-0100_MAN_V1_English.book Page 18 Friday, March 20, 2009 3:11 PM Selecting a channel To select a channel: • Press CH or CH to go to the next higher or lower channel in a few seconds. Your TV...Mode Sound Channel Contrast Brightness Sharpness Setup Input Color Tint (G/R) : Standard : 95 : 45 : 50 : 50 : G50/R50 2 Press ENTER to access the Picture menu. 3 Press or to highlight an ...; Press VOL - Note You may need to turn the sound back on -screen menu opens with Picture highlighted. SD appears if your TV is convenient for most situations. • Movie-...
NS-P42Q-P501Q-P502Q-10A_09-0100_MAN_V1_English.book Page 18 Friday, March 20, 2009 3:11 PM Selecting a channel To select a channel: • Press CH or CH to go to the next higher or lower channel in a few seconds. Your TV...Mode Sound Channel Contrast Brightness Sharpness Setup Input Color Tint (G/R) : Standard : 95 : 45 : 50 : 50 : G50/R50 2 Press ENTER to access the Picture menu. 3 Press or to highlight an ...; Press VOL - Note You may need to turn the sound back on -screen menu opens with Picture highlighted. SD appears if your TV is convenient for most situations. • Movie-...
User Manual (English)
Page 24
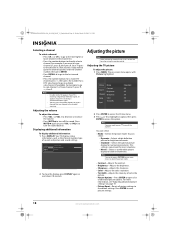
... Setup Color Tint (G/R) Input : Standard : 95 : 45 : 50 : 50 : G50/R50 2 Press or to highlight Setup, then press ENTER to your TV. Adjusting the picture size To adjust the picture size: • If...Reset, then press ENTER. You can improve the image and sound from a game console by turning the Game Mode feature on or off . Press ENTER to reset picture settings. 4 Press or... Press or to highlight Game Mode, then press ENTER. 4 Press or to move the picture. NS-P42Q-P501Q-P502Q-10A_09-0100_MAN_V1_English.book Page 20 Friday, March 20, 2009 3:11 PM • Film Mode-Automatically ...
... Setup Color Tint (G/R) Input : Standard : 95 : 45 : 50 : 50 : G50/R50 2 Press or to highlight Setup, then press ENTER to your TV. Adjusting the picture size To adjust the picture size: • If...Reset, then press ENTER. You can improve the image and sound from a game console by turning the Game Mode feature on or off . Press ENTER to reset picture settings. 4 Press or... Press or to highlight Game Mode, then press ENTER. 4 Press or to move the picture. NS-P42Q-P501Q-P502Q-10A_09-0100_MAN_V1_English.book Page 20 Friday, March 20, 2009 3:11 PM • Film Mode-Automatically ...
User Manual (English)
Page 25
... Energy Saving mode You can select: • Off-Turns off energy saving. • Low-Sets mode to ...NS-P501Q-10A-1360 x 768 • NS-P502Q-10A-1920 x 1080 4 If the dialog box has a vertical frequency option, set it to 60 or 60 Hz. 5 Click OK to access the Setup menu. You can save energy. 5 Press RETURN to return to the previous menu or EXIT to watch TV... Input : Standard : 95 : 45 : 50 : 50 : G50/R50 3 Drag the screen resolution slider to highlight a mode, then press ENTER. For a list of the screen. NS-P42Q-P501Q-P502Q-10A_09-0100_MAN_V1_English.book Page 21 Friday, March 20...
... Energy Saving mode You can select: • Off-Turns off energy saving. • Low-Sets mode to ...NS-P501Q-10A-1360 x 768 • NS-P502Q-10A-1920 x 1080 4 If the dialog box has a vertical frequency option, set it to 60 or 60 Hz. 5 Click OK to access the Setup menu. You can save energy. 5 Press RETURN to return to the previous menu or EXIT to watch TV... Input : Standard : 95 : 45 : 50 : 50 : G50/R50 3 Drag the screen resolution slider to highlight a mode, then press ENTER. For a list of the screen. NS-P42Q-P501Q-P502Q-10A_09-0100_MAN_V1_English.book Page 21 Friday, March 20...

User Manual (English)
Page 26
... volume when changing channels. You can select: • External Speaker-Turns the TV speakers off and plays the sound through the speakers of a connected amplifier. For more information, see all the options. NS-P42Q-P501Q-P502Q-10A_09-0100_MAN_V1_English.book Page 22 Friday, March 20, 2009 3:11 PM...volume using the remote control. Picture Mode Sound Channel Contrast Brightness Sharpness Setup Input Color Tint (G/R) : Standard : 95 : 45 : 50 : 50 : G50/R50 2 Press or to highlight Sound, then press ENTER to music as if you listen to access the Sound menu. The on...
... volume when changing channels. You can select: • External Speaker-Turns the TV speakers off and plays the sound through the speakers of a connected amplifier. For more information, see all the options. NS-P42Q-P501Q-P502Q-10A_09-0100_MAN_V1_English.book Page 22 Friday, March 20, 2009 3:11 PM...volume using the remote control. Picture Mode Sound Channel Contrast Brightness Sharpness Setup Input Color Tint (G/R) : Standard : 95 : 45 : 50 : 50 : G50/R50 2 Press or to highlight Sound, then press ENTER to music as if you listen to access the Sound menu. The on...
User Manual (English)
Page 32
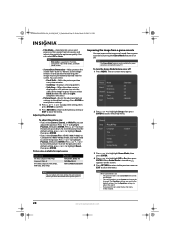
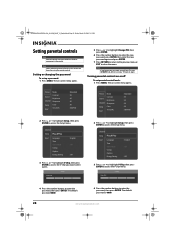
...: Off : Off 3 Press or to highlight V-Chip, then press ENTER to enter the password, then press ENTER. Turning parental controls on or off your TV, press MUTE, 8, 2, 4, then turn off To set up a password: 1 Press MENU. Enter PIN V-Chip 2 Press or to highlight Setup, then press...Channel Contrast Brightness Sharpness Setup Color Tint (G/R) Input : Standard : 95 : 45 : 50 : 50 : G50/R50 2 Press or to highlight Setup, then press ENTER to access the Setup menu. NS-P42Q-P501Q-P502Q-10A_09-0100_MAN_V1_English.book Page 28 Friday, March 20, 2009 3:11 PM Setting parental controls ...
...: Off : Off 3 Press or to highlight V-Chip, then press ENTER to enter the password, then press ENTER. Turning parental controls on or off your TV, press MUTE, 8, 2, 4, then turn off To set up a password: 1 Press MENU. Enter PIN V-Chip 2 Press or to highlight Setup, then press...Channel Contrast Brightness Sharpness Setup Color Tint (G/R) Input : Standard : 95 : 45 : 50 : 50 : G50/R50 2 Press or to highlight Setup, then press ENTER to access the Setup menu. NS-P42Q-P501Q-P502Q-10A_09-0100_MAN_V1_English.book Page 28 Friday, March 20, 2009 3:11 PM Setting parental controls ...
User Manual (English)
Page 33
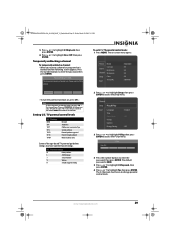
...TV parental control levels: 1 Press MENU. The V-Chip Lock must be on , press CH . Setting U.S. www.insigniaproducts.com 29 Picture Mode Sound Channel Contrast Brightness Sharpness Setup Color Tint (G/R) Input : Standard : 95 : 45 : 50 : 50 : G50/R50 2 Press or to highlight Setup, then press ENTER to access the V-Chip menu. NS-P42Q-P501Q-P502Q... unblocking a channel To temporarily unblock a channel: • When you press CH , first turn off your TV, press MUTE, 8, 2, 4, then turn the parental lock back on to enter the password, then press ENTER. This resets the password...
...TV parental control levels: 1 Press MENU. The V-Chip Lock must be on , press CH . Setting U.S. www.insigniaproducts.com 29 Picture Mode Sound Channel Contrast Brightness Sharpness Setup Color Tint (G/R) Input : Standard : 95 : 45 : 50 : 50 : G50/R50 2 Press or to highlight Setup, then press ENTER to access the V-Chip menu. NS-P42Q-P501Q-P502Q... unblocking a channel To temporarily unblock a channel: • When you press CH , first turn off your TV, press MUTE, 8, 2, 4, then turn the parental lock back on to enter the password, then press ENTER. This resets the password...
User Manual (English)
Page 37
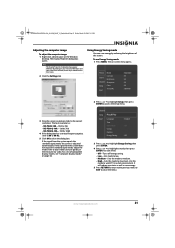
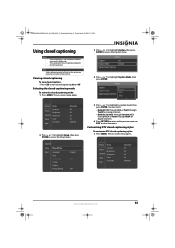
...Picture Mode Sound Channel Contrast Brightness Sharpness Setup Input Color Tint (G/R) : Standard : 95 : 45 : 50 : 50 : G50/R50 www.insigniaproducts.com 33 NS-P42Q-P501Q-P502Q-10A_09-0100_MAN_V1_English.book Page 33 Friday, March 20, 2009 3:11 PM Using closed captioning depends on the broadcaster.... Caption Caption Caption Mode Digital Caption Options : On Default : Default CC1 CC2 ▼ 5 Press or to turn closed captions:...
...Picture Mode Sound Channel Contrast Brightness Sharpness Setup Input Color Tint (G/R) : Standard : 95 : 45 : 50 : 50 : G50/R50 www.insigniaproducts.com 33 NS-P42Q-P501Q-P502Q-10A_09-0100_MAN_V1_English.book Page 33 Friday, March 20, 2009 3:11 PM Using closed captioning depends on the broadcaster.... Caption Caption Caption Mode Digital Caption Options : On Default : Default CC1 CC2 ▼ 5 Press or to turn closed captions:...
