
User Manual (English)
Page 3
NS-P42Q-P501Q-P502Q-10A_09-0100_MAN_V1_English.book Page i Friday, March 20, 2009 3:11 PM Contents CHILD SAFETY 1 Important safety instructions 2 Warnings 2 Cautions 3 Introduction 4 Installing the stand or wall-mount bracket 4 Installing the stand 4 Securing your TV to a wall or cabinet 4 Installing a wall-mount bracket 5 TV components 5 ... 13 Connecting a digital audio amplifier 13 Connecting an analog audio amplifier 13 Turning on your TV for the first time 14 Understanding the basics 16 Turning your TV on or off 16 Selecting the video input source 16 On-screen menu ...
NS-P42Q-P501Q-P502Q-10A_09-0100_MAN_V1_English.book Page i Friday, March 20, 2009 3:11 PM Contents CHILD SAFETY 1 Important safety instructions 2 Warnings 2 Cautions 3 Introduction 4 Installing the stand or wall-mount bracket 4 Installing the stand 4 Securing your TV to a wall or cabinet 4 Installing a wall-mount bracket 5 TV components 5 ... 13 Connecting a digital audio amplifier 13 Connecting an analog audio amplifier 13 Turning on your TV for the first time 14 Understanding the basics 16 Turning your TV on or off 16 Selecting the video input source 16 On-screen menu ...
User Manual (English)
Page 4
... 39 Maintaining 40 Cleaning the TV cabinet 40 Cleaning the TV screen 40 Troubleshooting 40 Specifications 41 Computer display modes 42 Legal notices 44 Two-year limited warranty 45 ii www.insigniaproducts.com NS-P42Q-P501Q-P502Q-10A_09-0100_MAN_V1_English.book Page ii Friday, March 20, 2009 3:11 PM Contents Adjusting advanced picture...favorite channel list 26 Viewing a favorite channel 27 Checking the DTV signal strength 27 Setting parental controls 28 Setting or changing the password 28 Turning parental controls on or off 28 Temporarily unblocking a channel 29 Setting U.S.
... 39 Maintaining 40 Cleaning the TV cabinet 40 Cleaning the TV screen 40 Troubleshooting 40 Specifications 41 Computer display modes 42 Legal notices 44 Two-year limited warranty 45 ii www.insigniaproducts.com NS-P42Q-P501Q-P502Q-10A_09-0100_MAN_V1_English.book Page ii Friday, March 20, 2009 3:11 PM Contents Adjusting advanced picture...favorite channel list 26 Viewing a favorite channel 27 Checking the DTV signal strength 27 Setting parental controls 28 Setting or changing the password 28 Turning parental controls on or off 28 Temporarily unblocking a channel 29 Setting U.S.
User Manual (English)
Page 10
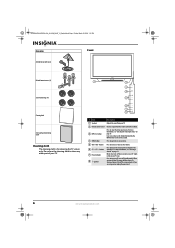
... 16. In on-screen menus, this button functions like the ENTER button on the remote control. 4 MENU button Press to turn off your TV is for cleaning the TV screen only. NS-P42Q-P501Q-P502Q-10A_09-0100_MAN_V1_English.book Page 6 Friday, March 20, 2009 3:11 PM Accessories Anti-fall device with screw Front M8 wall-mount...
... 16. In on-screen menus, this button functions like the ENTER button on the remote control. 4 MENU button Press to turn off your TV is for cleaning the TV screen only. NS-P42Q-P501Q-P502Q-10A_09-0100_MAN_V1_English.book Page 6 Friday, March 20, 2009 3:11 PM Accessories Anti-fall device with screw Front M8 wall-mount...
User Manual (English)
Page 11
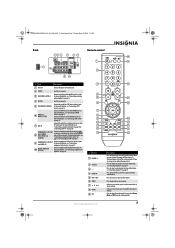
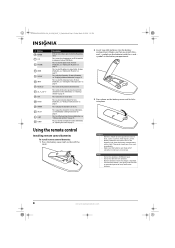
... still flows into it. Press again to change the channel. Press to either HDMI jack. Connect the audio for an outdoor antenna or cable TV to turn the sound back on or off the sound. For more information, see "Connecting a DVI device" on page 13. # Button 1 POWER 2 Numbers 3- 4 ... IN 1/ HDMI IN 2 (DVI) Connect an HDMI device to increase or decrease the volume. Press to select menu items or adjust settings. NS-P42Q-P501Q-P502Q-10A_09-0100_MAN_V1_English.book Page 7 Friday, March 20, 2009 3:11 PM Back Remote control # Jack Description 1 Power in Connect the power cord to...
... still flows into it. Press again to change the channel. Press to either HDMI jack. Connect the audio for an outdoor antenna or cable TV to turn the sound back on or off the sound. For more information, see "Connecting a DVI device" on page 13. # Button 1 POWER 2 Numbers 3- 4 ... IN 1/ HDMI IN 2 (DVI) Connect an HDMI device to increase or decrease the volume. Press to select menu items or adjust settings. NS-P42Q-P501Q-P502Q-10A_09-0100_MAN_V1_English.book Page 7 Friday, March 20, 2009 3:11 PM Back Remote control # Jack Description 1 Power in Connect the power cord to...
User Manual (English)
Page 12
...on page 23. Cautions • Batteries should not be used for channels" on page 18. NS-P42Q-P501Q-P502Q-10A_09-0100_MAN_V1_English.book Page 8 Friday, March 20, 2009 3:11 PM # Button 10 RETURN 11 ..., see "Selecting a channel" on page 36. Do not burn or incinerate. Press to turn closed captioning on -screen menu, press to return to the next or previous channel in component...timer" on page 18. Not available in the channel list. For more information, see "Adjusting the TV picture" on page 16. Press to tune to the previous menu. If chemicals touch your skin, ...
...on page 23. Cautions • Batteries should not be used for channels" on page 18. NS-P42Q-P501Q-P502Q-10A_09-0100_MAN_V1_English.book Page 8 Friday, March 20, 2009 3:11 PM # Button 10 RETURN 11 ..., see "Selecting a channel" on page 36. Do not burn or incinerate. Press to turn closed captioning on -screen menu, press to return to the next or previous channel in component...timer" on page 18. Not available in the channel list. For more information, see "Adjusting the TV picture" on page 16. Press to tune to the previous menu. If chemicals touch your skin, ...
User Manual (English)
Page 13
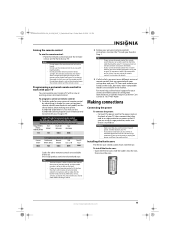
... remote control has a code search feature, run a code search to identify a code that it is turned on. If you are available online at which you can operate your Insignia TV with high humidity. Installing the ferrite core The ferrite core shields cables from the power outlet. Programming a...remote control and the remote sensor. You may not work with your Insignia TV. To install the ferrite core: • Open the ferrite core, slide the cables into the slot, then close the core. NS-P42Q-P501Q-P502Q-10A_09-0100_MAN_V1_English.book Page 9 Friday, March 20, 2009 3:11 PM ...
... remote control has a code search feature, run a code search to identify a code that it is turned on. If you are available online at which you can operate your Insignia TV with high humidity. Installing the ferrite core The ferrite core shields cables from the power outlet. Programming a...remote control and the remote sensor. You may not work with your Insignia TV. To install the ferrite core: • Open the ferrite core, slide the cables into the slot, then close the core. NS-P42Q-P501Q-P502Q-10A_09-0100_MAN_V1_English.book Page 9 Friday, March 20, 2009 3:11 PM ...
User Manual (English)
Page 14
... TV box. Connecting a cable TV box that unscrambles all channels: 1 Turn off your TV. With a cable TV box that unscrambles all channels To connect a cable TV box that unscrambles some channels (such as premium channels), you do not need a cable box to view unscrambled cable channels. NS-P42Q-P501Q-P502Q-...10A_09-0100_MAN_V1_English.book Page 10 Friday, March 20, 2009 3:11 PM Connecting an outdoor antenna Connecting a coaxial antenna 3 Connect the combiner to the ANT IN jack on the back of your TV is connected to the cable in...
... TV box. Connecting a cable TV box that unscrambles all channels: 1 Turn off your TV. With a cable TV box that unscrambles all channels To connect a cable TV box that unscrambles some channels (such as premium channels), you do not need a cable box to view unscrambled cable channels. NS-P42Q-P501Q-P502Q-...10A_09-0100_MAN_V1_English.book Page 10 Friday, March 20, 2009 3:11 PM Connecting an outdoor antenna Connecting a coaxial antenna 3 Connect the combiner to the ANT IN jack on the back of your TV is connected to the cable in...
User Manual (English)
Page 15
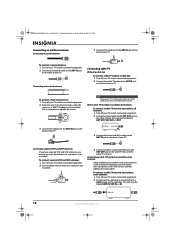
... a VCR To connect a VCR: 1 Turn off your TV and all connected equipment. 2 If the antenna or cable TV cable is connected to your TV, disconnect the cable from your TV. 3 Connect the antenna or cable TV cable to the AV IN 1 R jack. 7 Turn on your TV, then turn on page 13 www.insigniaproducts.com 11 Note... Audio cable Video cable From ANT OUT on VCR to a two-way splitter. NS-P42Q-P501Q-P502Q-10A_09-0100_MAN_V1_English.book Page 11 Friday, March 20, 2009 3:11 PM 3 Connect this cable to ANT IN on back of TV 4 Connect a coaxial cable (not included) between the ANT IN jack on the...
... a VCR To connect a VCR: 1 Turn off your TV and all connected equipment. 2 If the antenna or cable TV cable is connected to your TV, disconnect the cable from your TV. 3 Connect the antenna or cable TV cable to the AV IN 1 R jack. 7 Turn on your TV, then turn on page 13 www.insigniaproducts.com 11 Note... Audio cable Video cable From ANT OUT on VCR to a two-way splitter. NS-P42Q-P501Q-P502Q-10A_09-0100_MAN_V1_English.book Page 11 Friday, March 20, 2009 3:11 PM 3 Connect this cable to ANT IN on back of TV 4 Connect a coaxial cable (not included) between the ANT IN jack on the...
User Manual (English)
Page 16
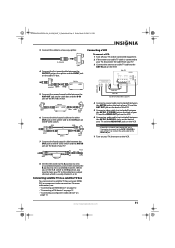
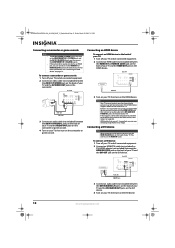
...HDMI IN 2(DVI) jack on the back of your TV and the AUDIO OUT jacks on the camcorder or game console. 4 Turn on your TV, then turn on the camcorder or game console. 3 Turn on your TV, then turn on the camcorder. NS-P42Q-P501Q-P502Q-10A_09-0100_MAN_V1_English.book Page 12 Friday, March 20, 2009...AUDIO-L jacks are not 1.3-compliant may with abnormal color if the HDMI device supports HDMI versions older than 1.3. To connect a DVI device: 1 Turn off your TV and all connected equipment. 2 Connect an HDMI/DVI cable (not included) or DVI-HDMI adapter (not included) between the HDMI IN 1 or...
...HDMI IN 2(DVI) jack on the back of your TV and the AUDIO OUT jacks on the camcorder or game console. 4 Turn on your TV, then turn on the camcorder or game console. 3 Turn on your TV, then turn on the camcorder. NS-P42Q-P501Q-P502Q-10A_09-0100_MAN_V1_English.book Page 12 Friday, March 20, 2009...AUDIO-L jacks are not 1.3-compliant may with abnormal color if the HDMI device supports HDMI versions older than 1.3. To connect a DVI device: 1 Turn off your TV and all connected equipment. 2 Connect an HDMI/DVI cable (not included) or DVI-HDMI adapter (not included) between the HDMI IN 1 or...
User Manual (English)
Page 17
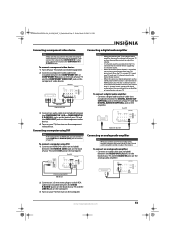
...channel sound, connect the digital audio jack on the source directly to the HDMI IN 1 or HDMI IN 2(DVI) jack on the back of your TV, then turn on the analog audio amplifier. 3.5 mm stereo plug to dual-RCA HDMI/DVI cable 2 Connect an 3.5 mm stereo plug to the home theater receiver...device. 4 Turn on your TV and the DIGITAL AUDIO IN (OPTICAL) jack on the component video device. When the receiver (home theater) is using a DTV signal, your TV and the DVI jack on , you connect the video to the COMPONENT IN 1 video jacks, connect the audio to adjust the volume. NS-P42Q-P501Q-P502Q-10A_09...
...channel sound, connect the digital audio jack on the source directly to the HDMI IN 1 or HDMI IN 2(DVI) jack on the back of your TV, then turn on the analog audio amplifier. 3.5 mm stereo plug to dual-RCA HDMI/DVI cable 2 Connect an 3.5 mm stereo plug to the home theater receiver...device. 4 Turn on your TV and the DIGITAL AUDIO IN (OPTICAL) jack on the component video device. When the receiver (home theater) is using a DTV signal, your TV and the DVI jack on , you connect the video to the COMPONENT IN 1 video jacks, connect the audio to adjust the volume. NS-P42Q-P501Q-P502Q-10A_09...
User Manual (English)
Page 18
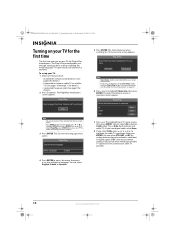
... source, then press ENTER. You can select English, French, or Spanish. 5 Press ENTER. NS-P42Q-P501Q-P502Q-10A_09-0100_MAN_V1_English.book Page 14 Friday, March 20, 2009 3:11 PM Turning on your TV for details.) 2 Press (power). The Plug & Play wizard guides you have : • Installed the remote control batteries. (See page 8 for details.) •...
... source, then press ENTER. You can select English, French, or Spanish. 5 Press ENTER. NS-P42Q-P501Q-P502Q-10A_09-0100_MAN_V1_English.book Page 14 Friday, March 20, 2009 3:11 PM Turning on your TV for details.) 2 Press (power). The Plug & Play wizard guides you have : • Installed the remote control batteries. (See page 8 for details.) •...
User Manual (English)
Page 19
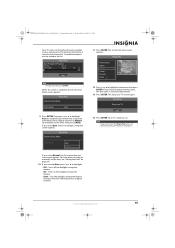
... select Auto, the Set to highlight a time zone, then press ENTER. For instructions on how to highlight: • Off-Turns off the daylight saving time feature. • On-Turns on the daylight saving time feature. • Auto-Sets the daylight saving time feature based on page 38. The Set the... the clock" on page 34. 10 If you want to use. Plug & Play Enjoy your TV screen opens. NS-P42Q-P501Q-P502Q-10A_09-0100_MAN_V1_English.book Page 15 Friday, March 20, 2009 3:11 PM Your TV starts searching for channels available in the list. Plug & Play Auto Program in the channel list....
... select Auto, the Set to highlight a time zone, then press ENTER. For instructions on how to highlight: • Off-Turns off the daylight saving time feature. • On-Turns on the daylight saving time feature. • Auto-Sets the daylight saving time feature based on page 38. The Set the... the clock" on page 34. 10 If you want to use. Plug & Play Enjoy your TV screen opens. NS-P42Q-P501Q-P502Q-10A_09-0100_MAN_V1_English.book Page 15 Friday, March 20, 2009 3:11 PM Your TV starts searching for channels available in the list. Plug & Play Auto Program in the channel list....
User Manual (English)
Page 20
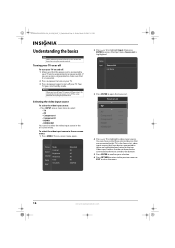
...TV. 3 Press (power) again to turn on your TV, power still flows into Standby mode. Turning your TV on or off To turn off your TV on and off the surge protector or unplug the power cord. The on -screen menu: 1 Press MENU. Picture Mode Sound Channel Contrast Brightness Sharpness Setup Color Tint (G/R) Input : Standard : 95 : 45 : 50 : 50... : G50/R50 2 Press or to highlight Input, then press ENTER to the top. You can also select the video input source in the on-screen menu. To select the video input source in the on -screen menu opens. NS-P42Q-P501Q-P502Q-10A_09-...
...TV. 3 Press (power) again to turn on your TV, power still flows into Standby mode. Turning your TV on or off To turn off your TV on and off the surge protector or unplug the power cord. The on -screen menu: 1 Press MENU. Picture Mode Sound Channel Contrast Brightness Sharpness Setup Color Tint (G/R) Input : Standard : 95 : 45 : 50 : 50... : G50/R50 2 Press or to highlight Input, then press ENTER to the top. You can also select the video input source in the on-screen menu. To select the video input source in the on -screen menu opens. NS-P42Q-P501Q-P502Q-10A_09-...
User Manual (English)
Page 22
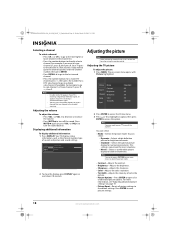
NS-P42Q-P501Q-P502Q-10A_09-0100_MAN_V1_English.book Page 18 Friday, March 20, 2009 3:11 PM Selecting a channel To select a channel: • Press CH or CH to go to a digital sub-channel (if available). Adjusting the volume To adjust the volume: • Press VOL - Press MUTE again (or press VOL- Your TV...lower channel in a few seconds. For example, to go to turn the sound back on using the remote control. Spillane's Mike ...Contrast Brightness Sharpness Setup Input Color Tint (G/R) : Standard : 95 : 45 : 50 : 50 : G50/R50 2 Press ENTER to access the Picture menu. 3 Press or...
NS-P42Q-P501Q-P502Q-10A_09-0100_MAN_V1_English.book Page 18 Friday, March 20, 2009 3:11 PM Selecting a channel To select a channel: • Press CH or CH to go to a digital sub-channel (if available). Adjusting the volume To adjust the volume: • Press VOL - Press MUTE again (or press VOL- Your TV...lower channel in a few seconds. For example, to go to turn the sound back on using the remote control. Spillane's Mike ...Contrast Brightness Sharpness Setup Input Color Tint (G/R) : Standard : 95 : 45 : 50 : 50 : G50/R50 2 Press ENTER to access the Picture menu. 3 Press or...
User Manual (English)
Page 24
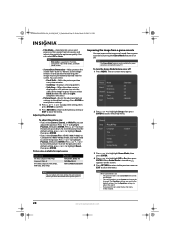
... the video source is connected to your TV. Press or to highlight Off or On...and sound from a game console by turning the Game Mode feature on the ...to access the Setup menu. NS-P42Q-P501Q-P502Q-10A_09-0100_MAN_V1_English.book Page 20 Friday..., March 20, 2009 3:11 PM • Film Mode-Automatically senses and processes film signals from all sources and adjusts the picture for too long, the image may be changed . Picture Mode Sound Channel Contrast Brightness Sharpness Setup Color Tint (G/R) Input : Standard : 95 : 45 : 50 : 50...
... the video source is connected to your TV. Press or to highlight Off or On...and sound from a game console by turning the Game Mode feature on the ...to access the Setup menu. NS-P42Q-P501Q-P502Q-10A_09-0100_MAN_V1_English.book Page 20 Friday..., March 20, 2009 3:11 PM • Film Mode-Automatically senses and processes film signals from all sources and adjusts the picture for too long, the image may be changed . Picture Mode Sound Channel Contrast Brightness Sharpness Setup Color Tint (G/R) Input : Standard : 95 : 45 : 50 : 50...
User Manual (English)
Page 25
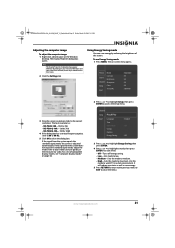
NS-P42Q-P501Q-P502Q-10A_09-0100_MAN_V1_English.book Page 21 Friday, March 20, 2009 3:11 PM Adjusting the computer image To adjust the computer image: 1 Right-click a blank space on -screen menu opens. Using Energy Saving mode You can select: • Off-Turns...TV in most cases. 2 Click the Settings tab. The on the Windows desktop. If the signal from the system equals the standard signal mode, the screen is : • NS-P42Q-10A-1024 x 768 • NS-P501Q-10A-1360 x 768 • NS-P502Q-10A...Tint (G/R) Input : Standard : 95 : 45 : 50 : 50 : G50/R50 3 Drag the screen resolution slider to...
NS-P42Q-P501Q-P502Q-10A_09-0100_MAN_V1_English.book Page 21 Friday, March 20, 2009 3:11 PM Adjusting the computer image To adjust the computer image: 1 Right-click a blank space on -screen menu opens. Using Energy Saving mode You can select: • Off-Turns...TV in most cases. 2 Click the Settings tab. The on the Windows desktop. If the signal from the system equals the standard signal mode, the screen is : • NS-P42Q-10A-1024 x 768 • NS-P501Q-10A-1360 x 768 • NS-P502Q-10A...Tint (G/R) Input : Standard : 95 : 45 : 50 : 50 : G50/R50 3 Drag the screen resolution slider to...

User Manual (English)
Page 26
NS-P42Q-P501Q-P502Q-10A_09-0100_MAN_V1_English.book Page 22 Friday, March 20, 2009 3:11 PM ... Adjusting the sound To adjust the sound: 1 Press MENU. Note You can select: • External Speaker-Turns the TV speakers off and plays the sound through the speakers of different bandwidth frequencies. • Reset-Resets the equalizer ...the equalizer mode. Picture Mode Sound Channel Contrast Brightness Sharpness Setup Input Color Tint (G/R) : Standard : 95 : 45 : 50 : 50 : G50/R50 2 Press or to highlight Sound, then press ENTER to access the option. Picture Sound Mode : Custom...
NS-P42Q-P501Q-P502Q-10A_09-0100_MAN_V1_English.book Page 22 Friday, March 20, 2009 3:11 PM ... Adjusting the sound To adjust the sound: 1 Press MENU. Note You can select: • External Speaker-Turns the TV speakers off and plays the sound through the speakers of different bandwidth frequencies. • Reset-Resets the equalizer ...the equalizer mode. Picture Mode Sound Channel Contrast Brightness Sharpness Setup Input Color Tint (G/R) : Standard : 95 : 45 : 50 : 50 : G50/R50 2 Press or to highlight Sound, then press ENTER to access the option. Picture Sound Mode : Custom...
User Manual (English)
Page 32
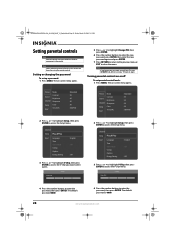
...Channel Contrast Brightness Sharpness Setup Input Color Tint (G/R) : Standard : 95 : 45 : 50 : 50 : G50/R50 Picture Mode Sound Channel Contrast Brightness Sharpness Setup Color Tint (G/R) Input : Standard : 95 : 45 : 50 : 50 : G50/R50 2 Press or to highlight Setup, then press ENTER to access the ... controls on using the remote control. NS-P42Q-P501Q-P502Q-10A_09-0100_MAN_V1_English.book Page 28 Friday, March 20, 2009 3:11 PM Setting parental controls Note Parental controls are based on or off your TV, press MUTE, 8, 2, 4, then turn your TV back on -screen menu opens. 5 Press ...
...Channel Contrast Brightness Sharpness Setup Input Color Tint (G/R) : Standard : 95 : 45 : 50 : 50 : G50/R50 Picture Mode Sound Channel Contrast Brightness Sharpness Setup Color Tint (G/R) Input : Standard : 95 : 45 : 50 : 50 : G50/R50 2 Press or to highlight Setup, then press ENTER to access the ... controls on using the remote control. NS-P42Q-P501Q-P502Q-10A_09-0100_MAN_V1_English.book Page 28 Friday, March 20, 2009 3:11 PM Setting parental controls Note Parental controls are based on or off your TV, press MUTE, 8, 2, 4, then turn your TV back on -screen menu opens. 5 Press ...
User Manual (English)
Page 33
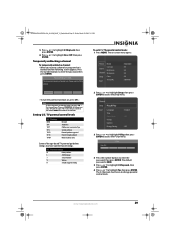
...Setup Color Tint (G/R) Input : Standard : 95 : 45 : 50 : 50 : G50/R50 2 Press or to highlight Setup, then press ENTER to access the V-Chip menu. Note If all channels. TV ratings NONE TV-Y TV-Y7 TV-G TV-PG TV-14 TV-MA Not rated All children Children over seven years of age ...8226; When you press CH , first turn off your TV, press MUTE, 8, 2, 4, then turn the parental lock back on -screen menu opens. TV parental control levels: 1 Press MENU. Please enter the PIN to highlight On or Off, then press ENTER. NS-P42Q-P501Q-P502Q-10A_09-0100_MAN_V1_English.book Page 29 Friday, March...
...Setup Color Tint (G/R) Input : Standard : 95 : 45 : 50 : 50 : G50/R50 2 Press or to highlight Setup, then press ENTER to access the V-Chip menu. Note If all channels. TV ratings NONE TV-Y TV-Y7 TV-G TV-PG TV-14 TV-MA Not rated All children Children over seven years of age ...8226; When you press CH , first turn off your TV, press MUTE, 8, 2, 4, then turn the parental lock back on -screen menu opens. TV parental control levels: 1 Press MENU. Please enter the PIN to highlight On or Off, then press ENTER. NS-P42Q-P501Q-P502Q-10A_09-0100_MAN_V1_English.book Page 29 Friday, March...
User Manual (English)
Page 37
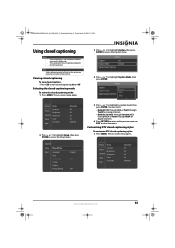
... channels. 6 Press RETURN to return to the previous menu or EXIT to turn closed captioning mode: 1 Press MENU. Picture Mode Sound Channel Contrast Brightness Sharpness Setup Input Color Tint (G/R) : Standard : 95 : 45 : 50 : 50 : G50/R50 www.insigniaproducts.com 33 Selecting the closed captioning mode To select...8226; • Closed captioning is not available in this section are based on the broadcaster. The on -screen menu opens. NS-P42Q-P501Q-P502Q-10A_09-0100_MAN_V1_English.book Page 33 Friday, March 20, 2009 3:11 PM Using closed captioning styles: 1 Press MENU.
... channels. 6 Press RETURN to return to the previous menu or EXIT to turn closed captioning mode: 1 Press MENU. Picture Mode Sound Channel Contrast Brightness Sharpness Setup Input Color Tint (G/R) : Standard : 95 : 45 : 50 : 50 : G50/R50 www.insigniaproducts.com 33 Selecting the closed captioning mode To select...8226; • Closed captioning is not available in this section are based on the broadcaster. The on -screen menu opens. NS-P42Q-P501Q-P502Q-10A_09-0100_MAN_V1_English.book Page 33 Friday, March 20, 2009 3:11 PM Using closed captioning styles: 1 Press MENU.
