User Manual (English)
Page 3
...3 Non-active pixels 3 Installing the stand or a wall-mount bracket 4 Installing the stand (NS-LDVD26Q-10A 4 Installing the stand (NS-LDVD32Q-10A 4 Attaching a wall-mount bracket (NS-LDVD26Q-10A 5 Attaching a wall-mount bracket (NS-LDVD32Q-10A 6 TV components 6 Package contents 6 Front 6 Back 7 Remote Control 8 Using the remote control 9 ...standard sound system 15 Connecting a digital sound system 15 Connecting a TV 16 Turning on your TV for the first time 16 Understanding the basics 17 Turning your TV/DVD combo on and off 17 Selecting the video input mode 17 Selecting ...
...3 Non-active pixels 3 Installing the stand or a wall-mount bracket 4 Installing the stand (NS-LDVD26Q-10A 4 Installing the stand (NS-LDVD32Q-10A 4 Attaching a wall-mount bracket (NS-LDVD26Q-10A 5 Attaching a wall-mount bracket (NS-LDVD32Q-10A 6 TV components 6 Package contents 6 Front 6 Back 7 Remote Control 8 Using the remote control 9 ...standard sound system 15 Connecting a digital sound system 15 Connecting a TV 16 Turning on your TV for the first time 16 Understanding the basics 17 Turning your TV/DVD combo on and off 17 Selecting the video input mode 17 Selecting ...

User Manual (English)
Page 10
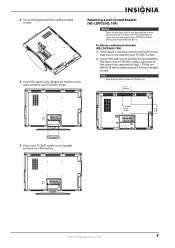
... (NS-LDVD26Q-10A) If you plan to use your TV/DVD combo in an upright position on a flat surface. Installing the stand (NS-LDVD32Q-10A) If you plan to use your TV/DVD combo in an upright position on a flat surface, you need to install the stand. To install the stand (NS-LDVD32Q-10A): 1 Place a towel or cushion on a flat surface, then lay your TV/DVD combo...
... (NS-LDVD26Q-10A) If you plan to use your TV/DVD combo in an upright position on a flat surface. Installing the stand (NS-LDVD32Q-10A) If you plan to use your TV/DVD combo in an upright position on a flat surface, you need to install the stand. To install the stand (NS-LDVD32Q-10A): 1 Place a towel or cushion on a flat surface, then lay your TV/DVD combo...
User Manual (English)
Page 11
Note Save the four extra screws for use . 3.937" (100 mm) 3.937" (100 mm) 5 Place your TV/DVD combo in length) screws. To reduce the risk of damage or injury, do so. These are M4*16 (4 mm in diameter and 16 mm in...) to do not wall-mount your TV/DVD combo unless you removed in Step 1. To attach a wall-mount bracket (NS-LDVD26Q-10A): 1 If the stand is installed, remove the eight screws that the cover goes inside of your TV/DVD combo using four of your TV/DVD combo. Attaching a wall-mount bracket (NS-LDVD26Q-10A) Warning These instructions are qualified to ...
Note Save the four extra screws for use . 3.937" (100 mm) 3.937" (100 mm) 5 Place your TV/DVD combo in length) screws. To reduce the risk of damage or injury, do so. These are M4*16 (4 mm in diameter and 16 mm in...) to do not wall-mount your TV/DVD combo unless you removed in Step 1. To attach a wall-mount bracket (NS-LDVD26Q-10A): 1 If the stand is installed, remove the eight screws that the cover goes inside of your TV/DVD combo using four of your TV/DVD combo. Attaching a wall-mount bracket (NS-LDVD26Q-10A) Warning These instructions are qualified to ...
User Manual (English)
Page 12
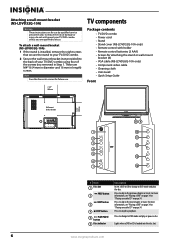
... for future use. 7.878" 200 mm TV components Package contents • TV/DVD combo • Power cord • Stand • Stand cover (NS-LDVD32Q-10A only) • Remote control with holder • Remote control batteries (2 AAA) • Screws for use by qualified service personnel only. For more information, see "Playing a DVD" on page 34 or "Playing an audio...
... for future use. 7.878" 200 mm TV components Package contents • TV/DVD combo • Power cord • Stand • Stand cover (NS-LDVD32Q-10A only) • Remote control with holder • Remote control batteries (2 AAA) • Screws for use by qualified service personnel only. For more information, see "Playing a DVD" on page 34 or "Playing an audio...
User Manual (English)
Page 13
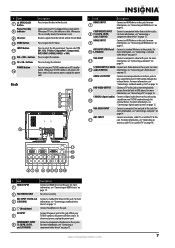
...INPUT 6 (Y, CB/PB, CR/PR, and L/R AUDIO) Description Connect an HDMI device to turn your TV/DVD combo is red. For more information, see "Connecting a standard video device" on page 11. When your TV/DVD combo on page 12. For more information, see "Connecting a component video device" on or off , power still... flows into a power outlet. Lights when your TV/DVD combo through the external device. Do not block. 10 MENU button Press to adjust the volume. 13 CH+/CH- POWER button 14 Press to...
...INPUT 6 (Y, CB/PB, CR/PR, and L/R AUDIO) Description Connect an HDMI device to turn your TV/DVD combo is red. For more information, see "Connecting a standard video device" on page 11. When your TV/DVD combo on page 12. For more information, see "Connecting a component video device" on or off , power still... flows into a power outlet. Lights when your TV/DVD combo through the external device. Do not block. 10 MENU button Press to adjust the volume. 13 CH+/CH- POWER button 14 Press to...

User Manual (English)
Page 14
... 12 13 OK/ENTER 14 / / 15 STOP 16 DVD/TITLE 17 18 DVD/MENU REPEAT 19 AUDIO 20 21 (eject) INPUT 22 ZOOM 23 CH /CH 24 25 RECALL FAVORITE 26 27 INFO PICTURE 28 29 AUDIO 30 31 EXIT 32 SETUP 33 A-B 34 SLOW 35 RETURN 36 SUBTITLE Description Press to display... page 35. Press to change the subtitle language. Press to stop disc playback. Press to create a playback loop for a disc. When your TV/DVD combo on or off . You can select Vivid, Standard, Sports, Theater, Energy Savings, or Custom. For more information, see "Creating a playback loop" on page 34. Press ...
... 12 13 OK/ENTER 14 / / 15 STOP 16 DVD/TITLE 17 18 DVD/MENU REPEAT 19 AUDIO 20 21 (eject) INPUT 22 ZOOM 23 CH /CH 24 25 RECALL FAVORITE 26 27 INFO PICTURE 28 29 AUDIO 30 31 EXIT 32 SETUP 33 A-B 34 SLOW 35 RETURN 36 SUBTITLE Description Press to display... page 35. Press to change the subtitle language. Press to stop disc playback. Press to create a playback loop for a disc. When your TV/DVD combo on or off . You can select Vivid, Standard, Sports, Theater, Energy Savings, or Custom. For more information, see "Creating a playback loop" on page 34. Press ...
User Manual (English)
Page 15
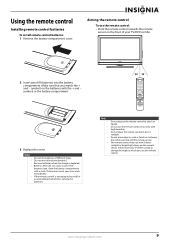
...depleted. Do not use the remote control. The remote control may not work if direct sunlight or bright light shines on the front of your TV/DVD combo. 2 Insert two AAA batteries into the battery compartment. www.insigniaproducts.com 9 symbols in direct sunlight. Either move your skin, wash immediately....: 1 Remove the battery compartment cover. Notes • Do not mix batteries of time, remove the batteries. 30° 30° TV DVD INPUT 1 2 3 4 5 6 7 8 9 ZOOM 0 + VOL MTS/SAP CH RECALL CCD GUIDE FAVORITE INFO V MENU AUDIO PICTU T RE OK ENTER STOP...
...depleted. Do not use the remote control. The remote control may not work if direct sunlight or bright light shines on the front of your TV/DVD combo. 2 Insert two AAA batteries into the battery compartment. www.insigniaproducts.com 9 symbols in direct sunlight. Either move your skin, wash immediately....: 1 Remove the battery compartment cover. Notes • Do not mix batteries of time, remove the batteries. 30° 30° TV DVD INPUT 1 2 3 4 5 6 7 8 9 ZOOM 0 + VOL MTS/SAP CH RECALL CCD GUIDE FAVORITE INFO V MENU AUDIO PICTU T RE OK ENTER STOP...
User Manual (English)
Page 16
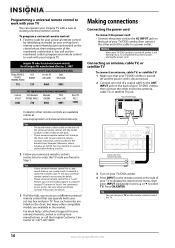
... COAXIAL Y CB/PB CR/PR R AUDIO L L R AUDIO L L OUTPUT COMPONENT2 INPUT R S-VIDEO INPUT R DVD VIDEO Antenna, cable TV, or satellite TV connection 3 Turn on your TV/DVD combo. 4 Press INPUT on the charts below, then making note of the numbered code below it using the Insignia TV remote to "teach" the commands one end of the universal remote control...
... COAXIAL Y CB/PB CR/PR R AUDIO L L R AUDIO L L OUTPUT COMPONENT2 INPUT R S-VIDEO INPUT R DVD VIDEO Antenna, cable TV, or satellite TV connection 3 Turn on your TV/DVD combo. 4 Press INPUT on the charts below, then making note of the numbered code below it using the Insignia TV remote to "teach" the commands one end of the universal remote control...
User Manual (English)
Page 17
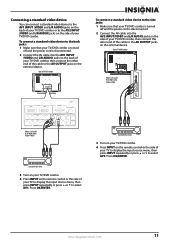
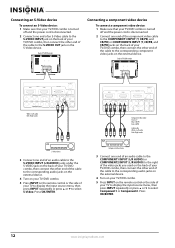
...INPUT FOR SERVICE ONLY VIDEO L AUDIO R AV2 INPUT Standard video device 3 Turn on your TV/DVD combo. 4 Press INPUT on the remote control or the side of your TV/DVD combo, then connect the other end of TV/DVD combo ~ 120V 60Hz AC INPUT HDMI1 INPUT HDMI2 VGA INPUT ANT. www.insigniaproducts.com 11 Back ...of the cable to select AV1. To connect a standard video device to the back jacks: 1 Make sure that your TV/DVD combo is turned off and the power cord is disconnected. 2 Connect the AV cable into the AV1 INPUT (VIDEO and L/R AUDIO) jacks on the...
...INPUT FOR SERVICE ONLY VIDEO L AUDIO R AV2 INPUT Standard video device 3 Turn on your TV/DVD combo. 4 Press INPUT on the remote control or the side of your TV/DVD combo, then connect the other end of TV/DVD combo ~ 120V 60Hz AC INPUT HDMI1 INPUT HDMI2 VGA INPUT ANT. www.insigniaproducts.com 11 Back ...of the cable to select AV1. To connect a standard video device to the back jacks: 1 Make sure that your TV/DVD combo is turned off and the power cord is disconnected. 2 Connect the AV cable into the AV1 INPUT (VIDEO and L/R AUDIO) jacks on the...
User Manual (English)
Page 18
...and the power cord is disconnected. 2 Connect one end of an S-Video cable to the S-VIDEO INPUT jack on the back of your TV/DVD combo, then connect the other end of the cable to the corresponding component video jacks on the external device. Connecting an S-Video device To connect... an S-Video device: 1 Make sure that your TV/DVD combo is turned off and the power cord is disconnected. 2 Connect one end of the component video cable to the COMPONENT1 INPUT (Y, CB/PB, ...
...and the power cord is disconnected. 2 Connect one end of an S-Video cable to the S-VIDEO INPUT jack on the back of your TV/DVD combo, then connect the other end of the cable to the corresponding component video jacks on the external device. Connecting an S-Video device To connect... an S-Video device: 1 Make sure that your TV/DVD combo is turned off and the power cord is disconnected. 2 Connect one end of the component video cable to the COMPONENT1 INPUT (Y, CB/PB, ...
User Manual (English)
Page 19
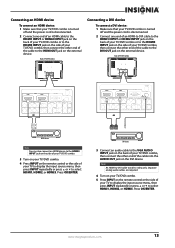
... or to the HDMI OUT jack on the remote control or the side of the cable to select HDMI1, HDMI2, or HDMI3. Back of your TV/DVD combo. 5 Press INPUT on the external device. INPUT COMPONENT1 INPUT Y CB/PB CR/PR R AUDIO L C AUDI Y CB/PB CR/PR R AUDIO L AV1 INPUT AUDIO VIDEO AUDIO... input source menu, then press INPUT repeatedly or press or to the HDMI3 INPUT jack on the side of your TV/DVD combo. 3 Turn on your TV/DVD combo. 4 Press INPUT on the back of your TV/DVD combo is turned off and the power cord is disconnected. 2 Connect one end of an HDMI-to DVI cable to the...
... or to the HDMI OUT jack on the remote control or the side of the cable to select HDMI1, HDMI2, or HDMI3. Back of your TV/DVD combo. 5 Press INPUT on the external device. INPUT COMPONENT1 INPUT Y CB/PB CR/PR R AUDIO L C AUDI Y CB/PB CR/PR R AUDIO L AV1 INPUT AUDIO VIDEO AUDIO... input source menu, then press INPUT repeatedly or press or to the HDMI3 INPUT jack on the side of your TV/DVD combo. 3 Turn on your TV/DVD combo. 4 Press INPUT on the back of your TV/DVD combo is turned off and the power cord is disconnected. 2 Connect one end of an HDMI-to DVI cable to the...
User Manual (English)
Page 20
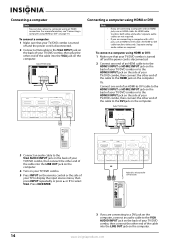
...the cable into the LINE OUT jack on the computer. 4 Turn on your TV/DVD combo, then connect the other end of your TV/DVD combo. 5 Press INPUT on the computer. 14 www.insigniaproducts.com To connect a computer: 1 Make sure that your TV/DVD combo is turned off and the power cord is disconnected. 2 Connect a VGA ... cable is disconnected. 2 Connect one end of an HDMI-to-DVI cable to the HDMI1 INPUT or HDMI2 INPUT jack on the back of your TV/DVD combo or to -DVI cable transfers video only. Connecting a computer Note You can also connect a computer using HDMI or DVI Note • •...
...the cable into the LINE OUT jack on the computer. 4 Turn on your TV/DVD combo, then connect the other end of your TV/DVD combo. 5 Press INPUT on the computer. 14 www.insigniaproducts.com To connect a computer: 1 Make sure that your TV/DVD combo is turned off and the power cord is disconnected. 2 Connect a VGA ... cable is disconnected. 2 Connect one end of an HDMI-to-DVI cable to the HDMI1 INPUT or HDMI2 INPUT jack on the back of your TV/DVD combo or to -DVI cable transfers video only. Connecting a computer Note You can also connect a computer using HDMI or DVI Note • •...
User Manual (English)
Page 21
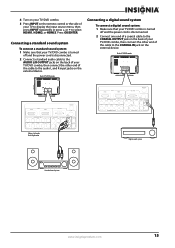
... turned off and the power cord is disconnected. 2 Connect one end of a coaxial cable to the COAXIAL OUTPUT jack on the back of your TV/DVD combo, then connect the other end of the cable to the audio L and R input jacks on the external device. Press OK/ENTER. INPUT AUDIO COMPONENT1 ... source menu, then press INPUT repeatedly or press or to select HDMI1, HDMI2, or HDMI3. 4 Turn on your TV/DVD combo. 5 Press INPUT on the remote control or the side of your TV/DVD combo, then connect the other end of the cable to the COAXIAL IN jack on the external device. INPUT AUDIO COMPONENT1...
... turned off and the power cord is disconnected. 2 Connect one end of a coaxial cable to the COAXIAL OUTPUT jack on the back of your TV/DVD combo, then connect the other end of the cable to the audio L and R input jacks on the external device. Press OK/ENTER. INPUT AUDIO COMPONENT1 ... source menu, then press INPUT repeatedly or press or to select HDMI1, HDMI2, or HDMI3. 4 Turn on your TV/DVD combo. 5 Press INPUT on the remote control or the side of your TV/DVD combo, then connect the other end of the cable to the COAXIAL IN jack on the external device. INPUT AUDIO COMPONENT1...
User Manual (English)
Page 22
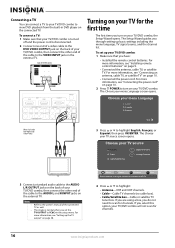
... Red=Right audio Yellow=Video 3 Press or to YCbCr in DVD player on the back of your TV/DVD combo, then connect the other end of the connected TV as well. The Choose your TV/DVD combo, the Setup Wizard opens. Choose your TV/DVD combo: 1 Make sure that your TV/DVD combo is turned off and the power cord is normal when you...
... Red=Right audio Yellow=Video 3 Press or to YCbCr in DVD player on the back of your TV/DVD combo, then connect the other end of the connected TV as well. The Choose your TV/DVD combo, the Setup Wizard opens. Choose your TV/DVD combo: 1 Make sure that your TV/DVD combo is turned off and the power cord is normal when you...
User Manual (English)
Page 23
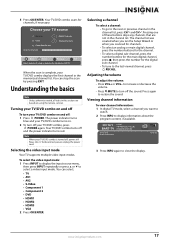
... / NL 3 Press INFO again to the next or previous channel in the memorized channel list. Choose your TV/DVD combo turns on. 2 To turn off : 1 Press POWER. Turning your TV/DVD combo on and off To turn off and the power indicator turns red. Selecting a channel To select a channel: • To go to... power still flows into it. Pressing one of these buttons skips any channels that are not in this section are based on and off your TV/DVD combo on using an antenna for channels, if necessary. Adjusting the volume To adjust the volume: • Press VOL+ or VOL- Viewing channel ...
... / NL 3 Press INFO again to the next or previous channel in the memorized channel list. Choose your TV/DVD combo turns on. 2 To turn off : 1 Press POWER. Turning your TV/DVD combo on and off To turn off and the power indicator turns red. Selecting a channel To select a channel: • To go to... power still flows into it. Pressing one of these buttons skips any channels that are not in this section are based on and off your TV/DVD combo on using an antenna for channels, if necessary. Adjusting the volume To adjust the volume: • Press VOL+ or VOL- Viewing channel ...

User Manual (English)
Page 24
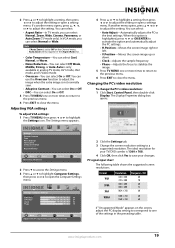
... to highlight a setting, then press or to affect picture quality. Note If you adjust Brightness, Contrast, Color, Tint, or Sharpness, your TV/DVD combo automatically changes the Picture Mode to close the menu. You can select Vivid, Standard, Sports, Theater, Energy Savings, or Custom. • ...Sharpness-Adjusts the sharpness. • Advanced Video-For more times to return to the previous menu. 5 Press EXIT to Custom. 4 Press TV MENU one or more information, see 'Adjusting advanced video settings" on page 18. EXIT Exit Picture • Advanced Video Aspect Ratio Color...
... to highlight a setting, then press or to affect picture quality. Note If you adjust Brightness, Contrast, Color, Tint, or Sharpness, your TV/DVD combo automatically changes the Picture Mode to close the menu. You can select Vivid, Standard, Sports, Theater, Energy Savings, or Custom. • ...Sharpness-Adjusts the sharpness. • Advanced Video-For more times to return to the previous menu. 5 Press EXIT to Custom. 4 Press TV MENU one or more information, see 'Adjusting advanced video settings" on page 18. EXIT Exit Picture • Advanced Video Aspect Ratio Color...
User Manual (English)
Page 25
...Exit 2 Press to access the Settings menu. 3 Press or to highlight Computer Settings, then press or to the best settings. The ideal resolution for your TV/DVD combo is not normally seen. • Adaptive Contrast-You can select On or Off. • DRC-You can select On or Off. You can select: ... Display. EXIT Exit 2 Click the Settings tab. 3 Change the screen resolution setting to Factory Picture Audio Channel Settings Move OK Select ENTER Set various TV options. You can use the Overscan function to adjust the image when the extra image is 1360 × 768. 4 Click OK, then click Yes...
...Exit 2 Press to access the Settings menu. 3 Press or to highlight Computer Settings, then press or to the best settings. The ideal resolution for your TV/DVD combo is not normally seen. • Adaptive Contrast-You can select On or Off. • DRC-You can select On or Off. You can select: ... Display. EXIT Exit 2 Click the Settings tab. 3 Change the screen resolution setting to Factory Picture Audio Channel Settings Move OK Select ENTER Set various TV options. You can use the Overscan function to adjust the image when the extra image is 1360 × 768. 4 Click OK, then click Yes...
User Manual (English)
Page 26
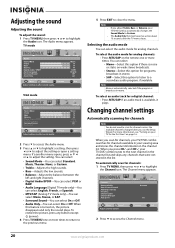
...Select this option if there is available, it plays. The Audio Only function becomes active about 10 seconds after you scan for channels, your TV/DVD combo automatically changes the Sound Mode to highlight the Channel icon. You can select: • Mono-Select this option to listen to a secondary...on weak stereo broadcasts. • Stereo-Select this feature is broadcast in the list. When you adjust Treble, Bass, or Balance, your TV/DVD combo searches for analog channels. To restore the picture, press any channels that were not stored in mono. EXIT Exit 2 Press to access the...
...Select this option if there is available, it plays. The Audio Only function becomes active about 10 seconds after you scan for channels, your TV/DVD combo automatically changes the Sound Mode to highlight the Channel icon. You can select: • Mono-Select this option to listen to a secondary...on weak stereo broadcasts. • Stereo-Select this feature is broadcast in the list. When you adjust Treble, Bass, or Balance, your TV/DVD combo searches for analog channels. To restore the picture, press any channels that were not stored in mono. EXIT Exit 2 Press to access the...
User Manual (English)
Page 27
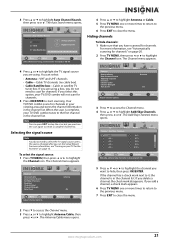
... press OK/ENTER. If you are using an antenna for channels" on page 20. 2 Press TV MENU, then press or to start scanning. If you are using. Your TV/DVD combo scans for channels in your TV/DVD combo will not scan for channels. When the scan is in the channel list. Selecting the signal source... Note You do not need to select the TV signal source unless the source changed after you do ...
... press OK/ENTER. If you are using an antenna for channels" on page 20. 2 Press TV MENU, then press or to start scanning. If you are using. Your TV/DVD combo scans for channels in your TV/DVD combo will not scan for channels. When the scan is in the channel list. Selecting the signal source... Note You do not need to select the TV signal source unless the source changed after you do ...
User Manual (English)
Page 38
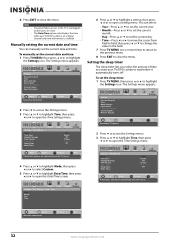
... amount of time you want your TV/DVD combo is on a digital channel and ... Channel Settings Move OK Select ENTER Set various TV options. Picture Audio Settings • Time Settings...Set various TV options. To set the current date and time: 1 Press TV MENU, ...Automatic, options are automatically set by TV source. 4 Press or to highlight ... only displays the time when your TV/DVD combo to wait before it automatically turns ...the value in the field. 7 Press TV MENU one or more times to return ...TV is unplugged, all the times are automatically set by TV source. 6 Press EXIT to close...
... amount of time you want your TV/DVD combo is on a digital channel and ... Channel Settings Move OK Select ENTER Set various TV options. Picture Audio Settings • Time Settings...Set various TV options. To set the current date and time: 1 Press TV MENU, ...Automatic, options are automatically set by TV source. 4 Press or to highlight ... only displays the time when your TV/DVD combo to wait before it automatically turns ...the value in the field. 7 Press TV MENU one or more times to return ...TV is unplugged, all the times are automatically set by TV source. 6 Press EXIT to close...


