
User Manual (English)
Page 8
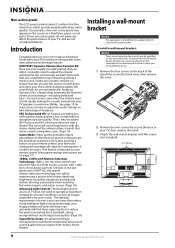
... a theater-like surround-sound experience, with the clearer dialog and the enhanced bass sounds that movie viewers and games crave. (Page 19) Game Mode: Video games generally require adjustments to the television picture settings to get the maximum experience. Audyssey Dynamic EQ is a feature ...blurring, particularly when watching fast-motion sports and action scenes. (Page 18) Advanced Light Control: The backlight used in your Insignia Advanced Series television can automatically find these opportunities to adjust the volume: wishing that the commercials wouldn't blare and that automatically...
... a theater-like surround-sound experience, with the clearer dialog and the enhanced bass sounds that movie viewers and games crave. (Page 19) Game Mode: Video games generally require adjustments to the television picture settings to get the maximum experience. Audyssey Dynamic EQ is a feature ...blurring, particularly when watching fast-motion sports and action scenes. (Page 18) Advanced Light Control: The backlight used in your Insignia Advanced Series television can automatically find these opportunities to adjust the volume: wishing that the commercials wouldn't blare and that automatically...
User Manual (English)
Page 9
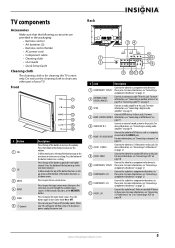
...digital audio amplifier" on or off , power still flows into it. Connect the audio for an S-Video or standard AV device to turn Game mode On or Off. Connect the video for a component video device to open the input source menu, then press the arrow keys to the ...8226; User Guide • Quick Setup Guide Cleaning cloth The cleaning cloth is off (standby mode). Do not use the cleaning cloth to display the Game mode status. Front 1 2 3 4 GAME 5 6 # Button 1 VOL 2 CH 3 MENU 4 INPUT 5 GAME 6 (power) Description Press the top of the button to increase the volume. Press the ...
...digital audio amplifier" on or off , power still flows into it. Connect the audio for an S-Video or standard AV device to turn Game mode On or Off. Connect the video for a component video device to open the input source menu, then press the arrow keys to the ...8226; User Guide • Quick Setup Guide Cleaning cloth The cleaning cloth is off (standby mode). Do not use the cleaning cloth to display the Game mode status. Front 1 2 3 4 GAME 5 6 # Button 1 VOL 2 CH 3 MENU 4 INPUT 5 GAME 6 (power) Description Press the top of the button to increase the volume. Press the ...
User Manual (English)
Page 11
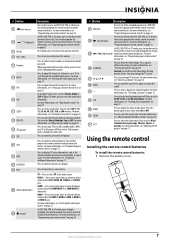
...the video image for Audyssey Dynamic Volume. For more information, see "Programming your remote control" on page 16. 34 CCD Press to turn Game mode On or Off. 36 ZOOM Press to control connected devices. COMP-Press one or more information, see "Selecting a channel" on page 33.... closed captioning on page 17. For more information, see "Selecting the video input source" on page 17. Press this button again to display the Game mode status. You can select Vivid, Standard, Energy Savings, Theater, Sports, or Custom. You can select Heavy, Medium, Low, or Off. For more...
...the video image for Audyssey Dynamic Volume. For more information, see "Programming your remote control" on page 16. 34 CCD Press to turn Game mode On or Off. 36 ZOOM Press to control connected devices. COMP-Press one or more information, see "Selecting a channel" on page 33.... closed captioning on page 17. For more information, see "Selecting the video input source" on page 17. Press this button again to display the Game mode status. You can select Vivid, Standard, Energy Savings, Theater, Sports, or Custom. You can select Heavy, Medium, Low, or Off. For more...
User Manual (English)
Page 15
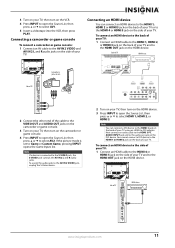
... 2, or HDMI 3 jack on the back of your TV using an HDMI-to-DVI adapter. If the picture mode is connected to the S-VIDEO jack, the S-VIDEO jack controls the AV IN 2 L and R audio jacks.... R audio jacks on the side of the cable to the VIDEO OUT and AUDIO OUT jacks on the camcorder or game console. 3 Turn on your TV, then turn on the VCR. 4 Press INPUT to open the Source List, ...Insert a videotape into the VCR, then press PLAY. 3 Turn on your TV, then turn on the camcorder or game console. 4 Press INPUT to open the Source List, then press or to select AV2. To assign the audio jacks...
... 2, or HDMI 3 jack on the back of your TV using an HDMI-to-DVI adapter. If the picture mode is connected to the S-VIDEO jack, the S-VIDEO jack controls the AV IN 2 L and R audio jacks.... R audio jacks on the side of the cable to the VIDEO OUT and AUDIO OUT jacks on the camcorder or game console. 3 Turn on your TV, then turn on the VCR. 4 Press INPUT to open the Source List, ...Insert a videotape into the VCR, then press PLAY. 3 Turn on your TV, then turn on the camcorder or game console. 4 Press INPUT to open the Source List, then press or to select AV2. To assign the audio jacks...
User Manual (English)
Page 19
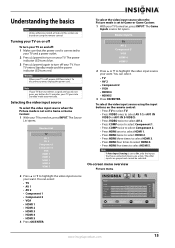
...your TV on or off To turn your TV on and off: 1 Make sure that have connected devices are active. The Game Inputs source list opens. Your TV enters Standby mode and the power indicator LED turns red. Warning When your want . Source List TV AV 1 AV 2 Component 1 Component 2...4 • HDMI 5 3 Press OK/ENTER. On-screen menu overview Picture menu Picture Mode Brightness Contrast Color Tint Sharpness PICTURE AUDIO CHANNELS SETTINGS Vivid 42 45 54 0 +5 MOVE OK ENTER SELECT Adjust settings to Game or Game Custom: 1 With your TV. Note If your TV does not detect a signal and ...
...your TV on or off To turn your TV on and off: 1 Make sure that have connected devices are active. The Game Inputs source list opens. Your TV enters Standby mode and the power indicator LED turns red. Warning When your want . Source List TV AV 1 AV 2 Component 1 Component 2...4 • HDMI 5 3 Press OK/ENTER. On-screen menu overview Picture menu Picture Mode Brightness Contrast Color Tint Sharpness PICTURE AUDIO CHANNELS SETTINGS Vivid 42 45 54 0 +5 MOVE OK ENTER SELECT Adjust settings to Game or Game Custom: 1 With your TV. Note If your TV does not detect a signal and ...
User Manual (English)
Page 21
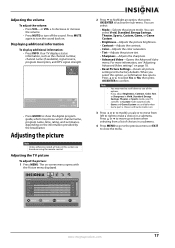
... Sharpness-Adjusts the sharpness. • Advanced Video-Opens the Advanced Video menu. If you select this section are available when Game port is chosen and Game mode is on page 18. • Reset Picture Settings-Resets all the options. www.insigniaproducts.com 17 Adjusting the picture Note Unless... otherwise noted, all tasks in Vivid, Standard, Energy Savings, Theater, or Sports mode, your TV switches to turn the sound ...
... Sharpness-Adjusts the sharpness. • Advanced Video-Opens the Advanced Video menu. If you select this section are available when Game port is chosen and Game mode is on page 18. • Reset Picture Settings-Resets all the options. www.insigniaproducts.com 17 Adjusting the picture Note Unless... otherwise noted, all tasks in Vivid, Standard, Energy Savings, Theater, or Sports mode, your TV switches to turn the sound ...
User Manual (English)
Page 22
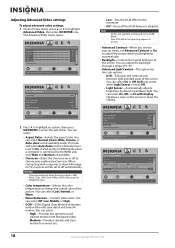
... • Overscan --Select the Overscan on TV, overscan will be set Advanced Contrast to On to choose your preferred picture size. In VGA mode or HDMI mode when a computer is set ot Off. • Light Sensor-Automatically adjusts brightness by HDMI/DVI input. • Color temperature-Selects the color... and clear motion for normal use. • Low-Sets the DCM effect to show full image on or off in case ghosting appears in GAME Mode. Warning Overscan work only when the input signal is disabled. You can select Cool, Normal, or Warm. • Noise Reduction-Controls video noise...
... • Overscan --Select the Overscan on TV, overscan will be set Advanced Contrast to On to choose your preferred picture size. In VGA mode or HDMI mode when a computer is set ot Off. • Light Sensor-Automatically adjusts brightness by HDMI/DVI input. • Color temperature-Selects the color... and clear motion for normal use. • Low-Sets the DCM effect to show full image on or off in case ghosting appears in GAME Mode. Warning Overscan work only when the input signal is disabled. You can select Cool, Normal, or Warm. • Noise Reduction-Controls video noise...
User Manual (English)
Page 35
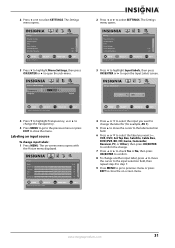
Picture Mode Brightness Contrast Color Tint Sharpness PICTURE AUDIO CHANNELS SETTINGS Vivid 42 45 54 0 +5 MOVE OK ENTER SELECT Adjust settings to affect picture quality MENU PREVIOUS ... to the label selection field. 6 Press or to select the label you want (-, VCR, DVD, Set Top Box, Satellite, Cable Box, DVD/PVR, BD, HD, Game, Camcorder, Receiver, PC, or Other), then press OK/ENTER to confirm the change. 7 Press or to check Yes or No, then press OK/ENTER to...
Picture Mode Brightness Contrast Color Tint Sharpness PICTURE AUDIO CHANNELS SETTINGS Vivid 42 45 54 0 +5 MOVE OK ENTER SELECT Adjust settings to affect picture quality MENU PREVIOUS ... to the label selection field. 6 Press or to select the label you want (-, VCR, DVD, Set Top Box, Satellite, Cable Box, DVD/PVR, BD, HD, Game, Camcorder, Receiver, PC, or Other), then press OK/ENTER to confirm the change. 7 Press or to check Yes or No, then press OK/ENTER to...
User Manual (English)
Page 54
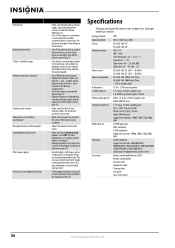
... remote sensor on the front of your TV. • Do not display a still image, such as a logo, game, or computer image, for an extended period of time. A-8 ~ A-1, A ~ I Super band - Turn off ...AAA, BBB Ultra band - 65 ~ 94, 100 ~ 135 NS-L42X-10A: AC 120 V ~ 50/60 Hz NS-L46X-10A: AC 120 V ~ 50/60 Hz NS-L42X-10A: 220 W with TV on NS-L46X-10A: 300 W with the + and - Problem Poor picture Horizontal ...specifications are connected correctly and securely. • Make sure that you have selected the correct VGA mode on your warranty. • A few bright or dark dots on an LCD screen is set...
... remote sensor on the front of your TV. • Do not display a still image, such as a logo, game, or computer image, for an extended period of time. A-8 ~ A-1, A ~ I Super band - Turn off ...AAA, BBB Ultra band - 65 ~ 94, 100 ~ 135 NS-L42X-10A: AC 120 V ~ 50/60 Hz NS-L46X-10A: AC 120 V ~ 50/60 Hz NS-L42X-10A: 220 W with TV on NS-L46X-10A: 300 W with the + and - Problem Poor picture Horizontal ...specifications are connected correctly and securely. • Make sure that you have selected the correct VGA mode on your warranty. • A few bright or dark dots on an LCD screen is set...


