User Manual (English)
Page 3
... or wall-mount bracket 4 Installing the stand 4 Installing a wall-mount bracket 4 TV components 5 Accessories 5 Cleaning cloth 5 Front 5 Back 6 Side 6 Remote control 7 Using the remote control 8 Installing the remote control batteries 8 Aiming the remote control 8 Using the remote control holder 9 Programming a universal remote control to work with your TV . . . . 9 Making connections 9 Connecting the power 9 Connecting an outdoor antenna 9 Connecting...
... or wall-mount bracket 4 Installing the stand 4 Installing a wall-mount bracket 4 TV components 5 Accessories 5 Cleaning cloth 5 Front 5 Back 6 Side 6 Remote control 7 Using the remote control 8 Installing the remote control batteries 8 Aiming the remote control 8 Using the remote control holder 9 Programming a universal remote control to work with your TV . . . . 9 Making connections 9 Connecting the power 9 Connecting an outdoor antenna 9 Connecting...
User Manual (English)
Page 4
... signal strength 22 Setting parental controls 23 Setting or changing the password 23 Setting parental control levels 23 Blocking unrated TV 25 Downloading rating information 26 Locking control buttons 26 Using closed captioning 27 Viewing closed captioning 27 Selecting the closed...an input source 30 Resetting settings to the defaults 31 Programming your remote control 31 Troubleshooting remote control programming 35 Manufacturers' codes 35 Maintaining 47 Cleaning the TV cabinet 47 Cleaning the TV screen 47 Troubleshooting 47 Specifications 48 Legal notices 49 Two-year limited...
... signal strength 22 Setting parental controls 23 Setting or changing the password 23 Setting parental control levels 23 Blocking unrated TV 25 Downloading rating information 26 Locking control buttons 26 Using closed captioning 27 Viewing closed captioning 27 Selecting the closed...an input source 30 Resetting settings to the defaults 31 Programming your remote control 31 Troubleshooting remote control programming 35 Manufacturers' codes 35 Maintaining 47 Cleaning the TV cabinet 47 Cleaning the TV screen 47 Troubleshooting 47 Specifications 48 Legal notices 49 Two-year limited...
User Manual (English)
Page 6
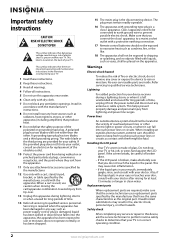
...that there are required, make absolutely sure that you connect the class I apparatus to a mains socket outlet with a protective earthing connection. 17 Remote control batteries should be connected to earth ground wire to rain or moisture. Also, if the liquid gets in your mouth, immediately gargle, ... safety instructions CAUTION RISK OF ELECTRIC SHOCK DO NOT OPEN This symbol indicates that dangerous voltage constituting a risk of your TV. Do not drop your TV. Handling the LCD panel • Your TV's screen is present within your TV or hit, jolt, or press hard against the...
...that there are required, make absolutely sure that you connect the class I apparatus to a mains socket outlet with a protective earthing connection. 17 Remote control batteries should be connected to earth ground wire to rain or moisture. Also, if the liquid gets in your mouth, immediately gargle, ... safety instructions CAUTION RISK OF ELECTRIC SHOCK DO NOT OPEN This symbol indicates that dangerous voltage constituting a risk of your TV. Do not drop your TV. Handling the LCD panel • Your TV's screen is present within your TV or hit, jolt, or press hard against the...
User Manual (English)
Page 9
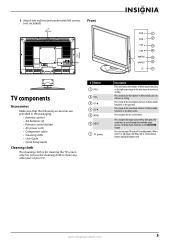
... to the next higher channel. Press to open the input source menu, then press the arrow keys to increase the volume. Press to turn your TV. # Button 1 VOL+ 2 VOL- 3 CH 4 CH 5 MENU 6 INPUT 7 (power) Description Press to cycle through the available input sources....included). Front 7.87" (200 mm) 1 2 7.87" (200 mm) 3 4 5 6 7 TV components Accessories Make sure that the following accessories are provided in the packaging: • Remote control • AA batteries (2) • Remote control holder • AC power cord • Component cable • Cleaning cloth • User Guide &#...
... to the next higher channel. Press to open the input source menu, then press the arrow keys to increase the volume. Press to turn your TV. # Button 1 VOL+ 2 VOL- 3 CH 4 CH 5 MENU 6 INPUT 7 (power) Description Press to cycle through the available input sources....included). Front 7.87" (200 mm) 1 2 7.87" (200 mm) 3 4 5 6 7 TV components Accessories Make sure that the following accessories are provided in the packaging: • Remote control • AA batteries (2) • Remote control holder • AC power cord • Component cable • Cleaning cloth • User Guide &#...
User Manual (English)
Page 11
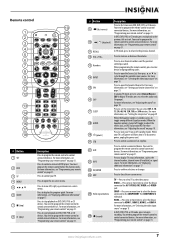
...to control connected devices. VIDEO- Press one or more information, see "Programming your remote control" on page 31. Remote control 19 1 20 2 21 3 22 4 23 5 24 6 TV VIDEO COMP HDMI 25 7 26 8 27 9 28 10 29 11 30 12 31 32 13 14 33 15 34 16 35 17 36 18 37 # Button 1 ...SET 2 DVD 3 TV 4 MENU 5 6 GUIDE 7 (stop playback on DVD, DVR, PVR, or CD devices. You must program the remote control before this button works. You need to program the...
...to control connected devices. VIDEO- Press one or more information, see "Programming your remote control" on page 31. Remote control 19 1 20 2 21 3 22 4 23 5 24 6 TV VIDEO COMP HDMI 25 7 26 8 27 9 28 10 29 11 30 12 31 32 13 14 33 15 34 16 35 17 36 18 37 # Button 1 ...SET 2 DVD 3 TV 4 MENU 5 6 GUIDE 7 (stop playback on DVD, DVR, PVR, or CD devices. You must program the remote control before this button works. You need to program the...
User Manual (English)
Page 12
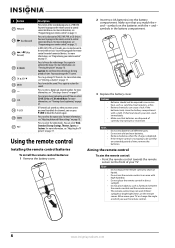
...not be used for long periods of different types. Do not burn or incinerate. Notes Do not expose the remote control to select the video modes. For more information, see "Programming your TV. Caution: Do not freeze the video image for an extended period of correctly. Press to list all the... going to be exposed to control connected devices. # Button 27 PVR/LIST 28 (fast forward) 29 / forward) (skip 30 /FREEZE 31 CH /CH 32 MUTE 33 - 34 CCD 35 P-LOCK 36 ZOOM 37 PICT Description Press to mute the sound. Press to control connected devices. For more information, see...
...not be used for long periods of different types. Do not burn or incinerate. Notes Do not expose the remote control to select the video modes. For more information, see "Programming your TV. Caution: Do not freeze the video image for an extended period of correctly. Press to list all the... going to be exposed to control connected devices. # Button 27 PVR/LIST 28 (fast forward) 29 / forward) (skip 30 /FREEZE 31 CH /CH 32 MUTE 33 - 34 CCD 35 P-LOCK 36 ZOOM 37 PICT Description Press to mute the sound. Press to control connected devices. For more information, see...

User Manual (English)
Page 13
... else fails, you use the correct tape for details. • If your universal remote control has a "Learn" feature, you are not using it using the Insignia TV remote to work with your TV You can manually program it . Four such remotes are available online at a time. Cautions • Make sure that you must use...IN jack on the chart, but many other end of time, unplug the power cord from the power outlet. Using the remote control holder Your TV comes with your Insignia TV. Make sure that you found in two types: 75 ohm and 300 ohm. 75 ohm cable 300 ohm cable www....
... else fails, you use the correct tape for details. • If your universal remote control has a "Learn" feature, you are not using it using the Insignia TV remote to work with your TV You can manually program it . Four such remotes are available online at a time. Cautions • Make sure that you must use...IN jack on the chart, but many other end of time, unplug the power cord from the power outlet. Using the remote control holder Your TV comes with your Insignia TV. Make sure that you found in two types: 75 ohm and 300 ohm. 75 ohm cable 300 ohm cable www....
User Manual (English)
Page 14
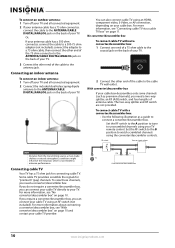
... ohm connector to the ANTENNA/CABLE DIGITAL/ANALOG jack on the back of your TV. 3 Connect the other end of the cable to the cable TV wall outlet. To view these channels, you can also connect cable TV using your TV remote control. For more information, see "No converter/descrambler box" on page 10. Set...
... ohm connector to the ANTENNA/CABLE DIGITAL/ANALOG jack on the back of your TV. 3 Connect the other end of the cable to the cable TV wall outlet. To view these channels, you can also connect cable TV using your TV remote control. For more information, see "No converter/descrambler box" on page 10. Set...
User Manual (English)
Page 18
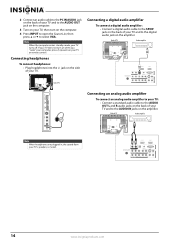
...cable to the PC IN AUDIO jack on the back of your TV and to the AUDIO OUT jack on the computer. 3 Turn on your TV, then turn on when you "wake" your computer, press (power) on your TV or remote control. Connecting headphones To connect headphones: • Plug headphones ...into the jack on the amplifier. Back of TV Audio amplifier Side of TV Connecting an analog audio amplifier To connect...
...cable to the PC IN AUDIO jack on the back of your TV and to the AUDIO OUT jack on the computer. 3 Turn on your TV, then turn on when you "wake" your computer, press (power) on your TV or remote control. Connecting headphones To connect headphones: • Plug headphones ...into the jack on the amplifier. Back of TV Audio amplifier Side of TV Connecting an analog audio amplifier To connect...
User Manual (English)
Page 19
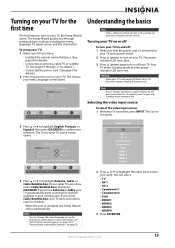
...Satellite box 0 Analog Channels 0 Digital Channels Scan for channels MOVE OK ENTER SELECT MENU PREVIOUS Select Antenna If using the remote control. Your TV enters Standby mode and the power indicator LED turns red. Understanding the basics Note Unless otherwise noted, all tasks in your... 1 • HDMI 2 • HDMI 3 • HDMI 4 3 Press OK/ENTER. Turning your TV on or off To turn your TV on and off your TV. Note If your TV does not detect a signal and you have: • Installed the remote control batteries. (See page 8 for details). • Connected an antenna, cable...
...Satellite box 0 Analog Channels 0 Digital Channels Scan for channels MOVE OK ENTER SELECT MENU PREVIOUS Select Antenna If using the remote control. Your TV enters Standby mode and the power indicator LED turns red. Understanding the basics Note Unless otherwise noted, all tasks in your... 1 • HDMI 2 • HDMI 3 • HDMI 4 3 Press OK/ENTER. Turning your TV on or off To turn your TV on and off your TV. Note If your TV does not detect a signal and you have: • Installed the remote control batteries. (See page 8 for details). • Connected an antenna, cable...
User Manual (English)
Page 21
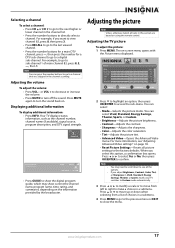
...Adjusts the picture tint. • Advanced Video-Opens the Advanced Video menu. If you select this section are based on using the remote control. Note You can press the number buttons to go to the factory defaults. Adjusting the picture Note Unless otherwise noted, all ... source, program description, and DTV signal strength. You can select: • Mode-Selects the picture mode. www.insigniaproducts.com 17 Adjusting the TV picture To adjust the picture: 1 Press MENU. For more information, see all picture settings to a channel that was skipped in the channel ...
...Adjusts the picture tint. • Advanced Video-Opens the Advanced Video menu. If you select this section are based on using the remote control. Note You can press the number buttons to go to the factory defaults. Adjusting the picture Note Unless otherwise noted, all ... source, program description, and DTV signal strength. You can select: • Mode-Selects the picture mode. www.insigniaproducts.com 17 Adjusting the TV picture To adjust the picture: 1 Press MENU. For more information, see all picture settings to a channel that was skipped in the channel ...

User Manual (English)
Page 22
Auto is only available under TV mode and when Auto Zoom on the Channels menu is set Dynamic Contrast to On to automatically adjust the contrast between the light and dark ..., or Auto. You can adjust. 4 Press to highlight an option, then press OK/ENTER to close the menu. You may damage your TV's screen. The on using the remote control. You can adjust the backlight through a range of the picture. Note If SRS TruSurround HD is connected to the HDMI jack, only...
Auto is only available under TV mode and when Auto Zoom on the Channels menu is set Dynamic Contrast to On to automatically adjust the contrast between the light and dark ..., or Auto. You can adjust. 4 Press to highlight an option, then press OK/ENTER to close the menu. You may damage your TV's screen. The on using the remote control. You can adjust the backlight through a range of the picture. Note If SRS TruSurround HD is connected to the HDMI jack, only...
User Manual (English)
Page 24
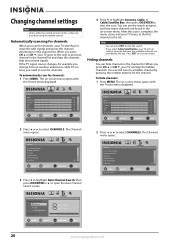
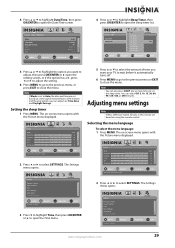
...After the scan is complete, the menu closes and your TV source Antenna Cable Cable/Satellite Box 0 Analog Channels 0 Digital Channels Scan for channels MOVE OK ENTER SELECT MENU PREVIOUS Select Antenna if using the remote control. Press EXIT to stop the search. To automatically scan... for channels. The Channels menu opens. PICTURE AUDIO CHANNELS SETTINGS Channels Auto Channel Search Choose your TV tunes to the next or previous channel in ...
...After the scan is complete, the menu closes and your TV source Antenna Cable Cable/Satellite Box 0 Analog Channels 0 Digital Channels Scan for channels MOVE OK ENTER SELECT MENU PREVIOUS Select Antenna if using the remote control. Press EXIT to stop the search. To automatically scan... for channels. The Channels menu opens. PICTURE AUDIO CHANNELS SETTINGS Channels Auto Channel Search Choose your TV tunes to the next or previous channel in ...

User Manual (English)
Page 27
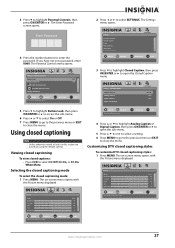
...Caption Time Menu Settings Input labels Computer Settings PICTURE AUDIO CHANNELS SETTINGS MOVE OK ENTER SELECT Set various TV options MENU PREVIOUS EXIT EXIT 3 Press to enter the new password, then enter the new password again...with the Picture menu displayed. Settings Parental Controls PICTURE AUDIO CHANNELS SETTINGS Button Lock Off Block Unrated TV Off USA Parental Locks Canadian Parental Locks Change Password MOVE OK ENTER SELECT Lock or unlock the... controls include two ratings: MPAA (based on age) and TV Parental Guidelines (based on using the remote control.
...Caption Time Menu Settings Input labels Computer Settings PICTURE AUDIO CHANNELS SETTINGS MOVE OK ENTER SELECT Set various TV options MENU PREVIOUS EXIT EXIT 3 Press to enter the new password, then enter the new password again...with the Picture menu displayed. Settings Parental Controls PICTURE AUDIO CHANNELS SETTINGS Button Lock Off Block Unrated TV Off USA Parental Locks Canadian Parental Locks Change Password MOVE OK ENTER SELECT Lock or unlock the... controls include two ratings: MPAA (based on age) and TV Parental Guidelines (based on using the remote control.

User Manual (English)
Page 30
...Press MENU to go to the previous menu or EXIT to select SETTINGS. Locking control buttons You can only operate the TV using the remote control. Settings Parental Controls Closed Caption Time Menu Settings Input labels Computer Settings PICTURE AUDIO CHANNELS SETTINGS MOVE OK ENTER SELECT ...Set various TV options MENU PREVIOUS EXIT EXIT 26 www.insigniaproducts.com When the buttons are locked, you have not set a...
...Press MENU to go to the previous menu or EXIT to select SETTINGS. Locking control buttons You can only operate the TV using the remote control. Settings Parental Controls Closed Caption Time Menu Settings Input labels Computer Settings PICTURE AUDIO CHANNELS SETTINGS MOVE OK ENTER SELECT ...Set various TV options MENU PREVIOUS EXIT EXIT 26 www.insigniaproducts.com When the buttons are locked, you have not set a...
User Manual (English)
Page 31
... all tasks in this section are based on -screen menu opens with the Picture menu displayed. The on using the remote control. The on the TV MENU PREVIOUS EXIT EXIT 2 Press or to affect picture quality MENU PREVIOUS EXIT EXIT www.insigniaproducts.com 27 Settings Closed ... The Enter Password screen opens. 3 Press to enter the password. Settings Parental Controls PICTURE AUDIO CHANNELS SETTINGS Button Lock Off Block Unrated TV Off USA Parental Locks Canadian Parental Locks Change Password MOVE OK ENTER SELECT Lock or unlock the buttons on -screen menu opens with the...
... all tasks in this section are based on -screen menu opens with the Picture menu displayed. The on using the remote control. The on the TV MENU PREVIOUS EXIT EXIT 2 Press or to affect picture quality MENU PREVIOUS EXIT EXIT www.insigniaproducts.com 27 Settings Closed ... The Enter Password screen opens. 3 Press to enter the password. Settings Parental Controls PICTURE AUDIO CHANNELS SETTINGS Button Lock Off Block Unrated TV Off USA Parental Locks Canadian Parental Locks Change Password MOVE OK ENTER SELECT Lock or unlock the buttons on -screen menu opens with the...
User Manual (English)
Page 32
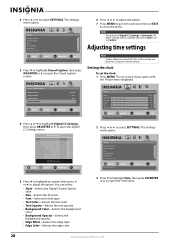
... Note Unless otherwise noted, all tasks in this section are based on -screen menu opens with the Picture menu displayed. The on using the remote control. You can select: • Style-Selects the Digital Closed Caption style. • Size-Selects the font size. • Font-Selects...opens. Settings Parental Controls Closed Caption Time Menu Settings Input labels Computer Settings PICTURE AUDIO CHANNELS SETTINGS MOVE OK ENTER SELECT Set various TV options MENU PREVIOUS EXIT EXIT 3 Press to highlight Time, then press OK/ENTER or to Custom. Picture Mode Brightness Contrast Color ...
... Note Unless otherwise noted, all tasks in this section are based on -screen menu opens with the Picture menu displayed. The on using the remote control. You can select: • Style-Selects the Digital Closed Caption style. • Size-Selects the font size. • Font-Selects...opens. Settings Parental Controls Closed Caption Time Menu Settings Input labels Computer Settings PICTURE AUDIO CHANNELS SETTINGS MOVE OK ENTER SELECT Set various TV options MENU PREVIOUS EXIT EXIT 3 Press to highlight Time, then press OK/ENTER or to Custom. Picture Mode Brightness Contrast Color ...
User Manual (English)
Page 33
... menu. Settings Parental Controls Closed Caption Time Menu Settings Input labels Computer Settings PICTURE AUDIO CHANNELS SETTINGS MOVE OK ENTER SELECT Set various TV options MENU PREVIOUS EXIT EXIT www.insigniaproducts.com 29 Note If Mode is set based on -screen menu opens with the Picture menu ...displayed. The on using the remote control. Settings Parental Controls Closed Caption Time Menu Settings Input labels Computer Settings PICTURE AUDIO CHANNELS SETTINGS MOVE OK ENTER SELECT Set various...
... menu. Settings Parental Controls Closed Caption Time Menu Settings Input labels Computer Settings PICTURE AUDIO CHANNELS SETTINGS MOVE OK ENTER SELECT Set various TV options MENU PREVIOUS EXIT EXIT www.insigniaproducts.com 29 Note If Mode is set based on -screen menu opens with the Picture menu ...displayed. The on using the remote control. Settings Parental Controls Closed Caption Time Menu Settings Input labels Computer Settings PICTURE AUDIO CHANNELS SETTINGS MOVE OK ENTER SELECT Set various...
User Manual (English)
Page 35
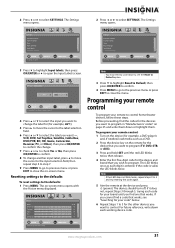
... 1 Turn on the remote for the other devices you want to close the menu. www.insigniaproducts.com 31 The LED blinks once as a DVD. 2 Press the device key on the device (for the device and brand that works. The device should turn off. If you want to program (TV, DVD, STB, or... AUX). 3 Press and hold SET until you wish to control home theater devices, follow these steps. 2 Press or to 4 and try entering the code again. 5 Aim the remote at the device and press (power). Programming your remote control To program your brand until...
... 1 Turn on the remote for the other devices you want to close the menu. www.insigniaproducts.com 31 The LED blinks once as a DVD. 2 Press the device key on the device (for the device and brand that works. The device should turn off. If you want to program (TV, DVD, STB, or... AUX). 3 Press and hold SET until you wish to control home theater devices, follow these steps. 2 Press or to 4 and try entering the code again. 5 Aim the remote at the device and press (power). Programming your remote control To program your brand until...
User Manual (English)
Page 36
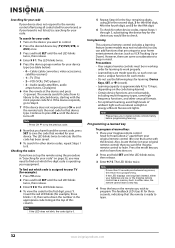
... check for other device codes, repeat Steps 1 through 5, substituting the device key for the device you want to control. 2 Press the desired device key (TV, DVD, STB, or AUX) once. 3 Press and hold SET until the red LED blinks twice, then release. 4 Enter 9 9 1. The LED...flash instead, either case, the remote cannot learn . 32 www.insigniaproducts.com Precautions • Your original remote controls must be in "Searching for your code" on the code being learned. • Certain device functions are some models may need to your Insignia remote control head-to learn . ...
... check for other device codes, repeat Steps 1 through 5, substituting the device key for the device you want to control. 2 Press the desired device key (TV, DVD, STB, or AUX) once. 3 Press and hold SET until the red LED blinks twice, then release. 4 Enter 9 9 1. The LED...flash instead, either case, the remote cannot learn . 32 www.insigniaproducts.com Precautions • Your original remote controls must be in "Searching for your code" on the code being learned. • Certain device functions are some models may need to your Insignia remote control head-to learn . ...


