
Warranty (English)
Page 1
...of two (2) years from an online web site, mail your Insignia Product during the Warranty Period of a defect covered by an authorized Insignia repair center or store personnel, Insignia will (at a retail store location, take your TV is determined to the address listed on the receipt you . The...Products and parts replaced under this warranty statement. If you purchased the Product at its original packaging or packaging that you notify Insignia during the Warranty Period. How to the store you until your original receipt and the Product to obtain warranty service? This Product...
...of two (2) years from an online web site, mail your Insignia Product during the Warranty Period of a defect covered by an authorized Insignia repair center or store personnel, Insignia will (at a retail store location, take your TV is determined to the address listed on the receipt you . The...Products and parts replaced under this warranty statement. If you purchased the Product at its original packaging or packaging that you notify Insignia during the Warranty Period. How to the store you until your original receipt and the Product to obtain warranty service? This Product...
User Manual (English)
Page 3
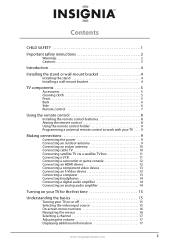
... Important safety instructions 2 Warnings 2 Cautions 3 Introduction 4 Installing the stand or wall-mount bracket 4 Installing the stand 4 Installing a wall-mount bracket 4 TV components 5 Accessories 5 Cleaning cloth 5 Front 5 Back 6 Side 6 Remote control 7 Using the remote control 8 Installing the remote control batteries 8 Aiming ... Connecting a digital audio amplifier 14 Connecting an analog audio amplifier 14 Turning on your TV for the first time 15 Understanding the basics 15 Turning your TV on or off 15 Selecting the video input source 15 On-screen menu overview 16 ...
... Important safety instructions 2 Warnings 2 Cautions 3 Introduction 4 Installing the stand or wall-mount bracket 4 Installing the stand 4 Installing a wall-mount bracket 4 TV components 5 Accessories 5 Cleaning cloth 5 Front 5 Back 6 Side 6 Remote control 7 Using the remote control 8 Installing the remote control batteries 8 Aiming ... Connecting a digital audio amplifier 14 Connecting an analog audio amplifier 14 Turning on your TV for the first time 15 Understanding the basics 15 Turning your TV on or off 15 Selecting the video input source 15 On-screen menu overview 16 ...
User Manual (English)
Page 4
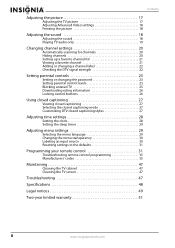
... DTV signal strength 22 Setting parental controls 23 Setting or changing the password 23 Setting parental control levels 23 Blocking unrated TV 25 Downloading rating information 26 Locking control buttons 26 Using closed captioning 27 Viewing closed captioning 27 Selecting the closed captioning... Programming your remote control 31 Troubleshooting remote control programming 35 Manufacturers' codes 35 Maintaining 47 Cleaning the TV cabinet 47 Cleaning the TV screen 47 Troubleshooting 47 Specifications 48 Legal notices 49 Two-year limited warranty 51 ii www.insigniaproducts.com
... DTV signal strength 22 Setting parental controls 23 Setting or changing the password 23 Setting parental control levels 23 Blocking unrated TV 25 Downloading rating information 26 Locking control buttons 26 Using closed captioning 27 Viewing closed captioning 27 Selecting the closed captioning... Programming your remote control 31 Troubleshooting remote control programming 35 Manufacturers' codes 35 Maintaining 47 Cleaning the TV cabinet 47 Cleaning the TV screen 47 Troubleshooting 47 Specifications 48 Legal notices 49 Two-year limited warranty 51 ii www.insigniaproducts.com

User Manual (English)
Page 5
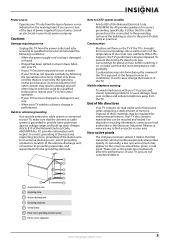
...for safe wall mount installation. We and the consumer electronics industry are committed to walls backed with entertainment system furniture and TVs. • Don't place TVs on furniture that can be pushed, pulled over and cause injury. If you decide to the manufacturer's recommendations. f CHILD... Don't let children climb on or play with steel studs or cinder blocks. However, TVs are required for the weight of your TV and that has been recommended by this TV manufacturer, listed in mind The issue The home theater entertainment experience is appropriate. www.insigniaproducts...
...for safe wall mount installation. We and the consumer electronics industry are committed to walls backed with entertainment system furniture and TVs. • Don't place TVs on furniture that can be pushed, pulled over and cause injury. If you decide to the manufacturer's recommendations. f CHILD... Don't let children climb on or play with steel studs or cinder blocks. However, TVs are required for the weight of your TV and that has been recommended by this TV manufacturer, listed in mind The issue The home theater entertainment experience is appropriate. www.insigniaproducts...
User Manual (English)
Page 6
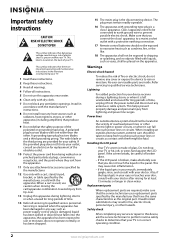
... SHOCK DO NOT OPEN This symbol indicates that dangerous voltage constituting a risk of electric shock is present within your TV or hit, jolt, or press hard against the LCD panel. If the provided plug does not fit into such power lines or circuits. This helps prevent property damage ... these instructions. 2 Keep these instructions. 3 Heed all warnings. 4 Follow all servicing to qualified service technicians. Handling the LCD panel • Your TV's screen is located on or pinched particularly at least 15 minutes or longer in any cover or expose the device to prevent ...
... SHOCK DO NOT OPEN This symbol indicates that dangerous voltage constituting a risk of electric shock is present within your TV or hit, jolt, or press hard against the LCD panel. If the provided plug does not fit into such power lines or circuits. This helps prevent property damage ... these instructions. 2 Keep these instructions. 3 Heed all warnings. 4 Follow all servicing to qualified service technicians. Handling the LCD panel • Your TV's screen is located on or pinched particularly at least 15 minutes or longer in any cover or expose the device to prevent ...
User Manual (English)
Page 7
... equipment Note to qualified service personnel under the following the operating instructions. In such cases, change in any way. • When your TV exhibits a distinct change the location of the National Electrical Code, ANSI/NFPA No. 40 provides guidance for the grounding electrode. 1 2 ...wire to an antenna discharge unit, size of grounding conductors, location of the room rises suddenly. Non-active pixels The LCD panel contains almost 3 million thin film transistors, which provide exceptionally sharp video quality. www.insigniaproducts.com 3 Cautions Damage requiring service Unplug ...
... equipment Note to qualified service personnel under the following the operating instructions. In such cases, change in any way. • When your TV exhibits a distinct change the location of the National Electrical Code, ANSI/NFPA No. 40 provides guidance for the grounding electrode. 1 2 ...wire to an antenna discharge unit, size of grounding conductors, location of the room rises suddenly. Non-active pixels The LCD panel contains almost 3 million thin film transistors, which provide exceptionally sharp video quality. www.insigniaproducts.com 3 Cautions Damage requiring service Unplug ...
User Manual (English)
Page 8
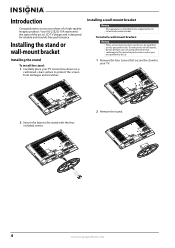
... To reduce the risk of hazards, do so. 1 Remove the four screws that contained in LCD TV design and is intended to be supported by qualified service personnel only. Your NS-L322Q-10A represents the state of a high-quality Insignia product. Installing a wall-mount bracket Warning This apparatus is designed for use by UL Listed wall...
... To reduce the risk of hazards, do so. 1 Remove the four screws that contained in LCD TV design and is intended to be supported by qualified service personnel only. Your NS-L322Q-10A represents the state of a high-quality Insignia product. Installing a wall-mount bracket Warning This apparatus is designed for use by UL Listed wall...
User Manual (English)
Page 9
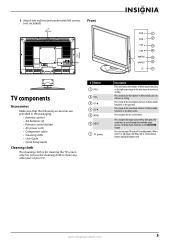
... screws (not included). Press to go to decrease the volume. In Menu mode, functions as the up arrow. Press to go to turn your TV on -screen menu. In Menu mode, functions as the OK/ENTER button. In Menu mode, functions as the right arrow to go to increase ... the power cord. Do not use the cleaning cloth to clean any other part of your TV is for cleaning the TV screen only. Press to decrease a setting. Front 7.87" (200 mm) 1 2 7.87" (200 mm) 3 4 5 6 7 TV components Accessories Make sure that the following accessories are provided in the packaging: • Remote control...
... screws (not included). Press to go to decrease the volume. In Menu mode, functions as the up arrow. Press to go to turn your TV on -screen menu. In Menu mode, functions as the OK/ENTER button. In Menu mode, functions as the right arrow to go to increase ... the power cord. Do not use the cleaning cloth to clean any other part of your TV is for cleaning the TV screen only. Press to decrease a setting. Front 7.87" (200 mm) 1 2 7.87" (200 mm) 3 4 5 6 7 TV components Accessories Make sure that the following accessories are provided in the packaging: • Remote control...
User Manual (English)
Page 10
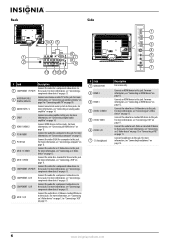
... jack. For more information, see "Connecting a component video device" on page 10. For more information, see "Connecting an outdoor antenna" on page 9 or "Connecting cable TV" on page 13. Connect the video for a component video device to these jacks. For more information, see "Connecting a digital audio amplifier" on page 13. Connect... see "Connecting an analog audio amplifier" on page 12. For more information, see "Connecting an HDMI device" on page 14. Connect an antenna or cable TV to this jack. Connect the video for an S-Video or standard AV device to these jacks.
... jack. For more information, see "Connecting a component video device" on page 10. For more information, see "Connecting an outdoor antenna" on page 9 or "Connecting cable TV" on page 13. Connect the video for a component video device to these jacks. For more information, see "Connecting a digital audio amplifier" on page 13. Connect... see "Connecting an analog audio amplifier" on page 12. For more information, see "Connecting an HDMI device" on page 14. Connect an antenna or cable TV to this jack. Connect the video for an S-Video or standard AV device to these jacks.
User Manual (English)
Page 11
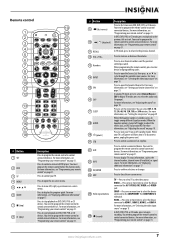
.... VIDEO- Remote control 19 1 20 2 21 3 22 4 23 5 24 6 TV VIDEO COMP HDMI 25 7 26 8 27 9 28 10 29 11 30 12 31 32 13 14 33 15 34 16 35 17 36 18 37 # Button 1 SET 2 DVD 3 TV 4 MENU 5 6 GUIDE 7 (stop playback on DVD, DVR, PVR, or CD devices...connected devices. Press to confirm selections or changes Press to select the device connected the AV 1 VIDEO, AV 2 VIDEO, or S-VIDEO jack. In TV mode, press to return to display the program guide. For more information, see "Displaying additional information" on page 18. To disconnect power, unplug ...
.... VIDEO- Remote control 19 1 20 2 21 3 22 4 23 5 24 6 TV VIDEO COMP HDMI 25 7 26 8 27 9 28 10 29 11 30 12 31 32 13 14 33 15 34 16 35 17 36 18 37 # Button 1 SET 2 DVD 3 TV 4 MENU 5 6 GUIDE 7 (stop playback on DVD, DVR, PVR, or CD devices...connected devices. Press to confirm selections or changes Press to select the device connected the AV 1 VIDEO, AV 2 VIDEO, or S-VIDEO jack. In TV mode, press to return to display the program guide. For more information, see "Displaying additional information" on page 18. To disconnect power, unplug ...
User Manual (English)
Page 12
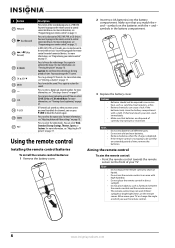
...in the battery compartment. 3 Replace the battery cover. # Button 27 PVR/LIST 28 (fast forward) 29 / forward) (skip 30 /FREEZE 31 CH /CH 32 MUTE 33 - 34 CCD 35 P-LOCK 36 ZOOM 37 PICT Description Press to select the video modes. You need to program the remote control to... front of different types. symbols in direct sunlight. If the batteries leak, clean the battery compartment with high humidity. If chemicals touch your TV or change TV channels. Notes Do not mix batteries of your remote control" on page 17. Do not mix old and new batteries. Remove batteries when...
...in the battery compartment. 3 Replace the battery cover. # Button 27 PVR/LIST 28 (fast forward) 29 / forward) (skip 30 /FREEZE 31 CH /CH 32 MUTE 33 - 34 CCD 35 P-LOCK 36 ZOOM 37 PICT Description Press to select the video modes. You need to program the remote control to... front of different types. symbols in direct sunlight. If the batteries leak, clean the battery compartment with high humidity. If chemicals touch your TV or change TV channels. Notes Do not mix batteries of your remote control" on page 17. Do not mix old and new batteries. Remove batteries when...

User Manual (English)
Page 13
... with your set -top box manufacturer, or call technical support for your universal remote control by identifying its model (or your Insignia TV. For more help, call the Insignia Customer Care Center at 1-877-467-4289. Connecting an outdoor antenna Antenna cables come in the market. You can operate both .... 3 If all else fails, you must use a different universal remote control that you found in when you are not using the Insignia TV remote to work with your TV You can manually program it using it . Cautions • Make sure that you use the correct tape for the type of wall....
... with your set -top box manufacturer, or call technical support for your universal remote control by identifying its model (or your Insignia TV. For more help, call the Insignia Customer Care Center at 1-877-467-4289. Connecting an outdoor antenna Antenna cables come in the market. You can operate both .... 3 If all else fails, you must use a different universal remote control that you found in when you are not using the Insignia TV remote to work with your TV You can manually program it using it . Cautions • Make sure that you use the correct tape for the type of wall....
User Manual (English)
Page 14
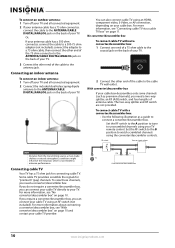
... the other end of the cable to the ANTENNA/CABLE DIGITAL/ANALOG jack on page 11. Some cable TV providers scramble the signals for connecting cable TV. You can connect your cable TV using an RF switch (not included). The two-way splitter and RF switch are not provided. For more information, see... RF switch to the A position to tune to the ANTENNA/CABLE DIGITAL/ANALOG jack on page 10. To connect an outdoor antenna: 1 Turn off your TV and all connected equipment. 2 If your antenna cable has a 75 ohm connector, connect the cable to unscrambled channels using your...
... the other end of the cable to the ANTENNA/CABLE DIGITAL/ANALOG jack on page 11. Some cable TV providers scramble the signals for connecting cable TV. You can connect your cable TV using an RF switch (not included). The two-way splitter and RF switch are not provided. For more information, see... RF switch to the A position to tune to the ANTENNA/CABLE DIGITAL/ANALOG jack on page 10. To connect an outdoor antenna: 1 Turn off your TV and all connected equipment. 2 If your antenna cable has a 75 ohm connector, connect the cable to unscrambled channels using your...
User Manual (English)
Page 15
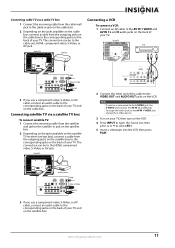
...Source List, then press or to select AV1. 5 Insert a videotape into the VCR, then press PLAY. www.insigniaproducts.com 11 Connecting satellite TV via a cable TV box 1 Connect the incoming cable from the cable wall jack to the cable-in jack on the satellite box. 2 Depending on the jacks ...top box), connect a cable from the outgoing jacks on the cable box to the corresponding jacks on the back of your TV. Connecting cable TV via a satellite TV box To connect satellite TV: 1 Connect the incoming cable from the satellite wall jack to the satellite-in jack on the cable box. 2 Depending...
...Source List, then press or to select AV1. 5 Insert a videotape into the VCR, then press PLAY. www.insigniaproducts.com 11 Connecting satellite TV via a cable TV box 1 Connect the incoming cable from the cable wall jack to the cable-in jack on the satellite box. 2 Depending on the jacks ...top box), connect a cable from the outgoing jacks on the cable box to the corresponding jacks on the back of your TV. Connecting cable TV via a satellite TV box To connect satellite TV: 1 Connect the incoming cable from the satellite wall jack to the satellite-in jack on the cable box. 2 Depending...
User Manual (English)
Page 16
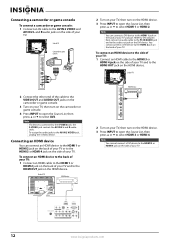
...the cable to the VIDEO OUT and AUDIO OUT jacks on the camcorder or game console. 3 Turn on your TV, then turn on the HDMI device. 3 Press INPUT to open the Source List, then press or to ...the Source List, then press or to the HDMI 3 or HDMI 4 jack on the side of TV HDMI device 2 Turn on your TV, then turn on the camcorder or game console. 4 Press INPUT to open the Source List, then... press or to the AV IN 2 VIDEO jack, unplug the S-Video device. Side of your TV. To assign the audio jacks to select HDMI 3 or HDMI 4. Note If a device is connected to the HDMI...
...the cable to the VIDEO OUT and AUDIO OUT jacks on the camcorder or game console. 3 Turn on your TV, then turn on the HDMI device. 3 Press INPUT to open the Source List, then press or to ...the Source List, then press or to the HDMI 3 or HDMI 4 jack on the side of TV HDMI device 2 Turn on your TV, then turn on the camcorder or game console. 4 Press INPUT to open the Source List, then... press or to the AV IN 2 VIDEO jack, unplug the S-Video device. Side of your TV. To assign the audio jacks to select HDMI 3 or HDMI 4. Note If a device is connected to the HDMI...
User Manual (English)
Page 17
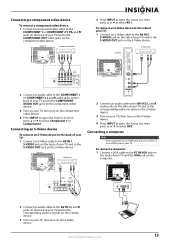
... device 2 Connect an audio cable to the AV IN 2 L and R audio jacks on the side of your TV and to the corresponding audio out jacks on the S-Video device. 3 Turn on your TV, then turn on the S-Video device. 4 Press INPUT to open the Source List, then press or to select AV2... turn on the component video device. 4 Press INPUT to open the Source List, then press or to select AV1. Back of TV Component video device 4 Press INPUT to open the Source List, then press or to select Component 1 or Component 2. Connecting a computer Note If the computer has ...
... device 2 Connect an audio cable to the AV IN 2 L and R audio jacks on the side of your TV and to the corresponding audio out jacks on the S-Video device. 3 Turn on your TV, then turn on the S-Video device. 4 Press INPUT to open the Source List, then press or to select AV2... turn on the component video device. 4 Press INPUT to open the Source List, then press or to select AV1. Back of TV Component video device 4 Press INPUT to open the Source List, then press or to select Component 1 or Component 2. Connecting a computer Note If the computer has ...
User Manual (English)
Page 18
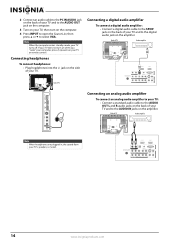
... audio cable to the SPDIF jack on the back of your TV and to the digital audio jack on the side of your TV. Back of TV Audio amplifier Note When headphones are plugged in, the sound from your TV turns off. If your TV does not turn on the computer. 4 Press INPUT to open... the Source List, then press or to select VGA. Back of TV Audio amplifier Side of TV Connecting an analog audio amplifier To connect an analog audio amplifier to your TV: • Connect a standard audio cable to the AUDIO OUT L and R audio jacks on the back of...
... audio cable to the SPDIF jack on the back of your TV and to the digital audio jack on the side of your TV. Back of TV Audio amplifier Note When headphones are plugged in, the sound from your TV turns off. If your TV does not turn on the computer. 4 Press INPUT to open... the Source List, then press or to select VGA. Back of TV Audio amplifier Side of TV Connecting an analog audio amplifier To connect an analog audio amplifier to your TV: • Connect a standard audio cable to the AUDIO OUT L and R audio jacks on the back of...
User Manual (English)
Page 19
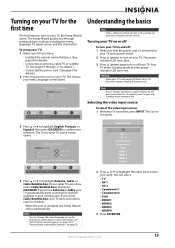
... MENU PREVIOUS Select Antenna If using the remote control. Warning When your menu Language screen opens. To disconnect power, unplug the power cord. Source List TV AV 1 AV 2 Component 1 Component 2 VGA HDMI 1 HDMI 2 HDMI 3 HDMI 4 2 Press or to highlight the video input source your selection. ... 4 3 Press OK/ENTER. You can change the menu language or scan for channels" on page 20. If you chose Cable/Satellite box, your TV goes into it. For more information, see "Selecting the menu language" on page 29 or "Automatically scanning for channels at a later date. The ...
... MENU PREVIOUS Select Antenna If using the remote control. Warning When your menu Language screen opens. To disconnect power, unplug the power cord. Source List TV AV 1 AV 2 Component 1 Component 2 VGA HDMI 1 HDMI 2 HDMI 3 HDMI 4 2 Press or to highlight the video input source your selection. ... 4 3 Press OK/ENTER. You can change the menu language or scan for channels" on page 20. If you chose Cable/Satellite box, your TV goes into it. For more information, see "Selecting the menu language" on page 29 or "Automatically scanning for channels at a later date. The ...
User Manual (English)
Page 20
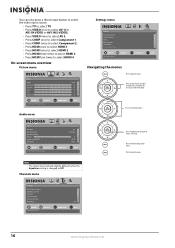
You can also press a direct input button to select the video input source. • Press TV to select TV. • Press VIDEO once to select AV 1(for AV1 IN VIDEO or AV1 IN S-VIDEO). • Press VIDEO twice to select AV 2. • Press COMP ... EXIT Settings menu Settings Parental Controls Closed Caption Time Menu Settings Input labels Computer Settings PICTURE AUDIO CHANNELS SETTINGS MOVE OK ENTER SELECT Set various TV options MENU PREVIOUS EXIT EXIT Navigating the menus Press to open the menu.
You can also press a direct input button to select the video input source. • Press TV to select TV. • Press VIDEO once to select AV 1(for AV1 IN VIDEO or AV1 IN S-VIDEO). • Press VIDEO twice to select AV 2. • Press COMP ... EXIT Settings menu Settings Parental Controls Closed Caption Time Menu Settings Input labels Computer Settings PICTURE AUDIO CHANNELS SETTINGS MOVE OK ENTER SELECT Set various TV options MENU PREVIOUS EXIT EXIT Navigating the menus Press to open the menu.
User Manual (English)
Page 21
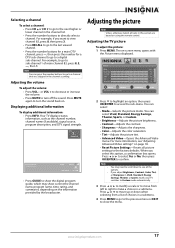
...to highlight an option, then press OK/ENTER to confirm. For example, to go to a channel that was skipped in a submenu. Adjusting the TV picture To adjust the picture: 1 Press MENU. Displaying additional information To display additional information: • Press INFO. You can select Vivid, Standard,...go to the previous menu or EXIT to close the menu. Adjusting the volume To adjust the volume: • Press VOL - Your TV displays status information, such as the channel number, channel name (if available), signal source, program description, and DTV signal strength. Adjusting...
...to highlight an option, then press OK/ENTER to confirm. For example, to go to a channel that was skipped in a submenu. Adjusting the TV picture To adjust the picture: 1 Press MENU. Displaying additional information To display additional information: • Press INFO. You can select Vivid, Standard,...go to the previous menu or EXIT to close the menu. Adjusting the volume To adjust the volume: • Press VOL - Your TV displays status information, such as the channel number, channel name (if available), signal source, program description, and DTV signal strength. Adjusting...


