FAQs (English)
Page 1
... programming my universal remote, what code is often visible on the front of the universal remote control, and the model number is needed? Use the following table to your universal remote control's instructions and try codes for other universal remotes are available online at: NS-L19Q-10A: http://insigniaproducts.com/products/televisions/NS-L19Q10A.html FAQs Insignia FY10 LCD TVs (NS-L19Q-10A, NS-L19W1Q-10A, NS-L22Q-10A, NS-L26Q-10A, NS-L32Q-10A, NS-L37Q-10A, NS-L42Q-10A) July 29, 2010 Setup ...1 Image/Picture Issues 5 Hardware Issues 8 Channel Issues ...8 General...
... programming my universal remote, what code is often visible on the front of the universal remote control, and the model number is needed? Use the following table to your universal remote control's instructions and try codes for other universal remotes are available online at: NS-L19Q-10A: http://insigniaproducts.com/products/televisions/NS-L19Q10A.html FAQs Insignia FY10 LCD TVs (NS-L19Q-10A, NS-L19W1Q-10A, NS-L22Q-10A, NS-L26Q-10A, NS-L32Q-10A, NS-L37Q-10A, NS-L42Q-10A) July 29, 2010 Setup ...1 Image/Picture Issues 5 Hardware Issues 8 Channel Issues ...8 General...
FAQs (English)
Page 2
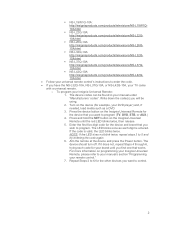
... program. Repeat Steps 2 to 6 for example, your DVD player) and, if needed, load media such as each code for the device and brand that you find one that you have the NS-L32Q-10A, NS-L37Q-10A, or NS-L42Q-10A, your TV came with a universal remote. Turn on the Insignia Universal Remote for the device that works. The LED blinks once as a DVD. 3. NS-L19W1Q-10A: http://insigniaproducts.com/products/televisions/NS-L19W1Q10A.html NS-L22Q-10A...
... program. Repeat Steps 2 to 6 for example, your DVD player) and, if needed, load media such as each code for the device and brand that you find one that you have the NS-L32Q-10A, NS-L37Q-10A, or NS-L42Q-10A, your TV came with a universal remote. Turn on the Insignia Universal Remote for the device that works. The LED blinks once as a DVD. 3. NS-L19W1Q-10A: http://insigniaproducts.com/products/televisions/NS-L19W1Q10A.html NS-L22Q-10A...
FAQs (English)
Page 4
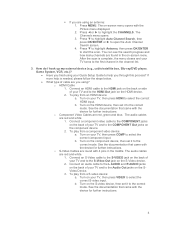
... correct mode. After the scan is needed, please follow the steps below. What type of your TV and to highlight the CHANNELS. o S-Video Cables are red and white. 1. See the documentation that came with the device for further instructions. The Channels menu opens. 3. How do I hook up my external device (e.g., cable/satellite box, Blu-ray/DVD player, Game System, VCR, etc.)? Have you through this process? Turn on the HDMI...
... correct mode. After the scan is needed, please follow the steps below. What type of your TV and to highlight the CHANNELS. o S-Video Cables are red and white. 1. See the documentation that came with the device for further instructions. The Channels menu opens. 3. How do I hook up my external device (e.g., cable/satellite box, Blu-ray/DVD player, Game System, VCR, etc.)? Have you through this process? Turn on the HDMI...

FAQs (English)
Page 5
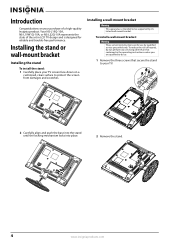
...-installed on a cushioned, clean surface to the stand with the device for further instructions. 4. Carefully align and push the base into the stand until the locking mechanism locks into place. NS-L26Q-10A, NS-L32Q-10A o To attach your stand: 1. My picture is not filling the screen. o Check the signal strength of the screen. 6. How do I have a yellow video cable, and red and white audio cables. 1. I attach my stand? NS-L19Q-10A, NS-L19W1Q-10A, NS-L22Q-10A...
...-installed on a cushioned, clean surface to the stand with the device for further instructions. 4. Carefully align and push the base into the stand until the locking mechanism locks into place. NS-L26Q-10A, NS-L32Q-10A o To attach your stand: 1. My picture is not filling the screen. o Check the signal strength of the screen. 6. How do I have a yellow video cable, and red and white audio cables. 1. I attach my stand? NS-L19Q-10A, NS-L19W1Q-10A, NS-L22Q-10A...
FAQs (English)
Page 8
... receiving the error message "No Signal". Press INPUT and make sure have selected the correct input for the device or service you are using a cable or satellite box you must use . Are you using a cable/satellite box, cable connected directly to the TV. on my remote. Make sure the TV is not working at all (i.e., will not turn on your TV. Try plugging the TV into the battery compartment. Channel Issues...
... receiving the error message "No Signal". Press INPUT and make sure have selected the correct input for the device or service you are using a cable or satellite box you must use . Are you using a cable/satellite box, cable connected directly to the TV. on my remote. Make sure the TV is not working at all (i.e., will not turn on your TV. Try plugging the TV into the battery compartment. Channel Issues...
User Manual (English)
Page 3
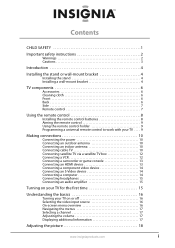
...4 Installing the stand 4 Installing a wall-mount bracket 4 TV components 6 Accessories 6 Cleaning cloth 6 Front 6 Back 6 Side 7 Remote control 7 Using the remote control 8 Installing the remote control batteries 8 Aiming the remote control 9 Using the remote control holder 9 Programming a universal remote control to work with your TV . . . . 9 Making connections 10 Connecting the power 10 Connecting an outdoor antenna 10 Connecting an indoor antenna 10 Connecting cable TV 10 Connecting satellite TV via a satellite TV box 12 Connecting a VCR 12 Connecting a camcorder or game...
...4 Installing the stand 4 Installing a wall-mount bracket 4 TV components 6 Accessories 6 Cleaning cloth 6 Front 6 Back 6 Side 7 Remote control 7 Using the remote control 8 Installing the remote control batteries 8 Aiming the remote control 9 Using the remote control holder 9 Programming a universal remote control to work with your TV . . . . 9 Making connections 10 Connecting the power 10 Connecting an outdoor antenna 10 Connecting an indoor antenna 10 Connecting cable TV 10 Connecting satellite TV via a satellite TV box 12 Connecting a VCR 12 Connecting a camcorder or game...
User Manual (English)
Page 4
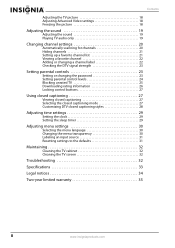
... Video settings 18 Freezing the picture 18 Adjusting the sound 19 Adjusting the sound 19 Playing TV audio only 19 Changing channel settings 20 Automatically scanning for channels 20 Hiding channels 21 Setting up a favorite channel list 21 Viewing a favorite channel 22 Adding or changing a channel label 22 Checking the DTV signal strength 23 Setting parental controls 23 Setting or changing the password 23 Setting parental control levels 24 Blocking unrated TV 25 Downloading rating information 26 Locking control buttons 27 Using closed captioning 27 Viewing closed captioning...
... Video settings 18 Freezing the picture 18 Adjusting the sound 19 Adjusting the sound 19 Playing TV audio only 19 Changing channel settings 20 Automatically scanning for channels 20 Hiding channels 21 Setting up a favorite channel list 21 Viewing a favorite channel 22 Adding or changing a channel label 22 Checking the DTV signal strength 23 Setting parental controls 23 Setting or changing the password 23 Setting parental control levels 24 Blocking unrated TV 25 Downloading rating information 26 Locking control buttons 27 Using closed captioning 27 Viewing closed captioning...
User Manual (English)
Page 6
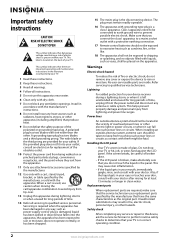
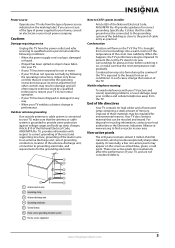
... has been damaged in the panel. Replacement parts When replacement parts are inside. A grounding type plug has two blades and a third grounding prong. Power lines An outside antenna system, extreme care should be exposed to dripping or splashing, and no objects filled with a cart, stand, tripod, bracket, or table specified by the manufacturer that you connect the class I apparatus need to determine that there...
... has been damaged in the panel. Replacement parts When replacement parts are inside. A grounding type plug has two blades and a third grounding prong. Power lines An outside antenna system, extreme care should be exposed to dripping or splashing, and no objects filled with a cart, stand, tripod, bracket, or table specified by the manufacturer that you connect the class I apparatus need to determine that there...
User Manual (English)
Page 7
... the operating instructions because incorrect adjustment of other controls may be connected to the grounding system of the building as close to the point of cable entry as a fixed blue, green, or red point. In such cases, change in its normal operation. • If your TV has been dropped or damaged in any way. • When your TV exhibits a distinct change the location of the TV. Specifically, it...
... the operating instructions because incorrect adjustment of other controls may be connected to the grounding system of the building as close to the point of cable entry as a fixed blue, green, or red point. In such cases, change in its normal operation. • If your TV has been dropped or damaged in any way. • When your TV exhibits a distinct change the location of the TV. Specifically, it...
User Manual (English)
Page 8
... NS-L22Q-10A represents the state of a high-quality Insignia product. To reduce the risk of hazards, do so. 1 Remove the three screws that secure the stand to your purchase of the art in the operating instructions unless you are for reliable and trouble-free performance. To install a wall-mount bracket: Warning These servicing instructions are qualified to do not perform any servicing other than that contained in LCD TV...
... NS-L22Q-10A represents the state of a high-quality Insignia product. To reduce the risk of hazards, do so. 1 Remove the three screws that secure the stand to your purchase of the art in the operating instructions unless you are for reliable and trouble-free performance. To install a wall-mount bracket: Warning These servicing instructions are qualified to do not perform any servicing other than that contained in LCD TV...
User Manual (English)
Page 10
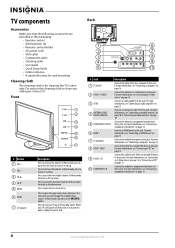
...; Remote control holder • AC power cord • VGA cable • Component cable • Cleaning cloth • User Guide • Quick Setup Guide • Indoor antenna • 4 stand-off screws for wall mounting Cleaning cloth The cleaning cloth is off, power still flows into it. Press to go to cycle through the available input sources. In Menu mode, press to the next lower channel. Press to clean any other part of your TV. Connect an HDMI device...
...; Remote control holder • AC power cord • VGA cable • Component cable • Cleaning cloth • User Guide • Quick Setup Guide • Indoor antenna • 4 stand-off screws for wall mounting Cleaning cloth The cleaning cloth is off, power still flows into it. Press to go to cycle through the available input sources. In Menu mode, press to the next lower channel. Press to clean any other part of your TV. Connect an HDMI device...

User Manual (English)
Page 12
... to increase or decrease the volume. # Button 7- 8 VOL+/VOL- 9 MUTE 10 MENU 11 12 OK/ENTER 13 INPUT 14 TV 15 VIDEO 16 FREEZE 17 CCD 18 PICT 19 ZOOM 20 RECALL 21 CH /CH 22 GUIDE 23 EXIT 24 INFO 25 HDMI 26 COMP 8 Description Press to an HDMI 1 or HDMI 2 jack. For more times to select the device connected to enter a digital sub-channel number.
... to increase or decrease the volume. # Button 7- 8 VOL+/VOL- 9 MUTE 10 MENU 11 12 OK/ENTER 13 INPUT 14 TV 15 VIDEO 16 FREEZE 17 CCD 18 PICT 19 ZOOM 20 RECALL 21 CH /CH 22 GUIDE 23 EXIT 24 INFO 25 HDMI 26 COMP 8 Description Press to an HDMI 1 or HDMI 2 jack. For more times to select the device connected to enter a digital sub-channel number.
User Manual (English)
Page 19
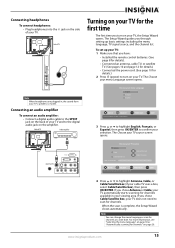
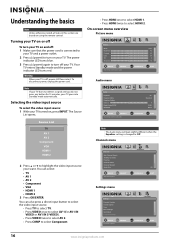
...; Installed the remote control batteries. (See page 8 for details). • Connected an antenna, cable TV, or satellite TV. (See pages 10 and page 12 for details.) • Connected the power cord. (See page 10 for details.) 2 Press (power) to turn on your TV does not need to the digital audio jack on the amplifier. Back of your selection. To set up basic settings including the menu language, TV signal source, and the channel list. Choose...
...; Installed the remote control batteries. (See page 8 for details). • Connected an antenna, cable TV, or satellite TV. (See pages 10 and page 12 for details.) • Connected the power cord. (See page 10 for details.) 2 Press (power) to turn on your TV does not need to the digital audio jack on the amplifier. Back of your selection. To set up basic settings including the menu language, TV signal source, and the channel list. Choose...
User Manual (English)
Page 20
... SELECT Adjust settings to affect sound quality MENU PREVIOUS EXIT EXIT Note The Audio menu will look slightly different when the Equalizer setting is connected to your TV and a power outlet. 2 Press (power) to turn off : 1 Make sure that the power cord is changed to select HDMI 2. Channels menu Channels Auto Channel Search Add/Skip Channels Favorites Channel Labels Channel Strength Audio Only PICTURE AUDIO CHANNELS SETTINGS Off MOVE OK ENTER SELECT Adjust channel options MENU PREVIOUS EXIT EXIT Settings menu Settings Parental Controls Closed Caption Time Menu Settings Input...
... SELECT Adjust settings to affect sound quality MENU PREVIOUS EXIT EXIT Note The Audio menu will look slightly different when the Equalizer setting is connected to your TV and a power outlet. 2 Press (power) to turn off : 1 Make sure that the power cord is changed to select HDMI 2. Channels menu Channels Auto Channel Search Add/Skip Channels Favorites Channel Labels Channel Strength Audio Only PICTURE AUDIO CHANNELS SETTINGS Off MOVE OK ENTER SELECT Adjust channel options MENU PREVIOUS EXIT EXIT Settings menu Settings Parental Controls Closed Caption Time Menu Settings Input...

User Manual (English)
Page 22
... between the light and dark areas of the picture. The Advanced Video menu opens. Auto is only available under TV mode and when Auto Zoom on using the remote control. You may need to scroll down when selecting from left to right to move up or down to see "Adjusting Advanced Video settings" on -screen menu opens with the Picture menu displayed. For more information, see all picture settings to close the menu. You...
... between the light and dark areas of the picture. The Advanced Video menu opens. Auto is only available under TV mode and when Auto Zoom on using the remote control. You may need to scroll down when selecting from left to right to move up or down to see "Adjusting Advanced Video settings" on -screen menu opens with the Picture menu displayed. For more information, see all picture settings to close the menu. You...
User Manual (English)
Page 23
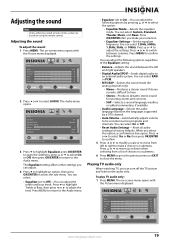
.... • Reset Audio Settings- Press MENU to the Audio menu. To play TV audio only: 1 Press MENU. Press to highlight Treble or Bass, then press or to adjust the settings. You can adjust the treble and bass levels. Press or to adjust the level. You can adjust the following options by a DTV channel. • Auto Volume-Automatically adjusts volume to be consistent across programs and channels. Picture Mode Brightness Contrast Color Tint Sharpness PICTURE AUDIO CHANNELS SETTINGS Vivid 42...
.... • Reset Audio Settings- Press MENU to the Audio menu. To play TV audio only: 1 Press MENU. Press to highlight Treble or Bass, then press or to adjust the settings. You can adjust the treble and bass levels. Press or to adjust the level. You can adjust the following options by a DTV channel. • Auto Volume-Automatically adjusts volume to be consistent across programs and channels. Picture Mode Brightness Contrast Color Tint Sharpness PICTURE AUDIO CHANNELS SETTINGS Vivid 42...
User Manual (English)
Page 27
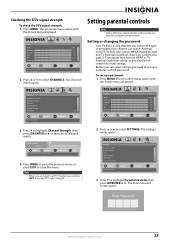
...tuned to close the menu. Parental controls include two ratings: MPAA (based on age) and TV Parental Guidelines (based on -screen menu opens with the Picture menu displayed. Settings Parental Controls Closed Caption Time Menu Settings Input labels Computer Settings PICTURE AUDIO CHANNELS SETTINGS MOVE OK ENTER SELECT Set various TV options MENU PREVIOUS EXIT EXIT 3 Press to select SETTINGS. Note When you are based on -screen menu opens with the Picture menu displayed. Channel Strength CH 7-3 Now 0% 0 MOVE OK ENTER SELECT Display signal strength of programs your children...
...tuned to close the menu. Parental controls include two ratings: MPAA (based on age) and TV Parental Guidelines (based on -screen menu opens with the Picture menu displayed. Settings Parental Controls Closed Caption Time Menu Settings Input labels Computer Settings PICTURE AUDIO CHANNELS SETTINGS MOVE OK ENTER SELECT Set various TV options MENU PREVIOUS EXIT EXIT 3 Press to select SETTINGS. Note When you are based on -screen menu opens with the Picture menu displayed. Channel Strength CH 7-3 Now 0% 0 MOVE OK ENTER SELECT Display signal strength of programs your children...

User Manual (English)
Page 36
... the antenna is turned on the batteries align with the remote control signal. Your TV works best in and turn on your TV and a power outlet. • Unplug the power cord, wait 60 seconds, then plug the cord back in temperatures that the room is connected while another electrical device, such as high-rise buildings or hills. Problem No power No picture Good picture but no sound Good sound but poor color Poor picture...
... the antenna is turned on the batteries align with the remote control signal. Your TV works best in and turn on your TV and a power outlet. • Unplug the power cord, wait 60 seconds, then plug the cord back in temperatures that the room is connected while another electrical device, such as high-rise buildings or hills. Problem No power No picture Good picture but no sound Good sound but poor color Poor picture...
User Manual (English)
Page 37
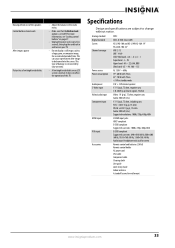
... 22": 70 W with TV on an LCD screen is set to Off. Analog standard Digital standard Screen Channel coverage Power source Power consumption Audio power S-Video input Video/audio input Component input HDMI input VGA input Accessories NTSC ATSC, 8-VSB, Clear-QAM NS-L19Q-10A and NS-L19W1Q-10A: 19" NS-L22Q-10A: 22" VHF: 2-13 UHF: 14-69 CATV: Mid band - For more information, see "Locking control buttons" on page 27. • Unplug the power cord, wait a few seconds, then plug the cord back in and turn on your warranty...
... 22": 70 W with TV on an LCD screen is set to Off. Analog standard Digital standard Screen Channel coverage Power source Power consumption Audio power S-Video input Video/audio input Component input HDMI input VGA input Accessories NTSC ATSC, 8-VSB, Clear-QAM NS-L19Q-10A and NS-L19W1Q-10A: 19" NS-L22Q-10A: 22" VHF: 2-13 UHF: 14-69 CATV: Mid band - For more information, see "Locking control buttons" on page 27. • Unplug the power cord, wait a few seconds, then plug the cord back in and turn on your warranty...
User Manual (English)
Page 39
... their respective owners. Registered in -home warranty service for lengthy periods (burn-in the United States. If service of the product in its sole option): (1) repair the Product with a screen 30 inches or larger, call 1-888-BESTBUY. Contact Insignia: For customer service please call , an Insignia television (size and features to Insignia television consumers residing in ). This warranty is or with all labor and parts charges.
... their respective owners. Registered in -home warranty service for lengthy periods (burn-in the United States. If service of the product in its sole option): (1) repair the Product with a screen 30 inches or larger, call 1-888-BESTBUY. Contact Insignia: For customer service please call , an Insignia television (size and features to Insignia television consumers residing in ). This warranty is or with all labor and parts charges.


