
User Manual (English)
Page 1
User Guide 19", 19" White, and 22" LCD TV NS-L19Q-10A/NS-L19W1Q-10A/NS-L22Q-10A
User Guide 19", 19" White, and 22" LCD TV NS-L19Q-10A/NS-L19W1Q-10A/NS-L22Q-10A
User Manual (English)
Page 4
...19 Adjusting the sound 19 Playing TV audio only 19 Changing channel settings 20 Automatically scanning for channels 20 Hiding channels 21 Setting up a favorite channel list 21 Viewing a favorite channel 22 Adding or changing a channel label 22 Checking the DTV signal strength 23... Setting parental controls 23 Setting or changing the password 23 Setting parental control levels 24 Blocking unrated TV 25 Downloading rating information 26 Locking control ...
...19 Adjusting the sound 19 Playing TV audio only 19 Changing channel settings 20 Automatically scanning for channels 20 Hiding channels 21 Setting up a favorite channel list 21 Viewing a favorite channel 22 Adding or changing a channel label 22 Checking the DTV signal strength 23... Setting parental controls 23 Setting or changing the password 23 Setting parental control levels 24 Blocking unrated TV 25 Downloading rating information 26 Locking control ...
User Manual (English)
Page 11
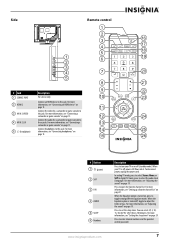
... select Stereo, Mono, or SAP. You can select Off, 5, 10, 15, 30, 60, 90, 120, 180, or 240 minutes. In analog TV mode, press to set the sleep timer. For more information, see "Setting the sleep timer" on page 19. To disconnect power, unplug the power cord...or game console to this jack. Side Remote control 1 2 3 16 4 17 5 18 1 6 19 2 3 4 7 20 5 8 21 # Jack 1 SERVICE PORT Description For service only. 9 22 10 23 Connect an HDMI device to open the favorite channel list. For more information, see "Connecting an HDMI device" on page 13. 5 (headphone) Connect...
... select Stereo, Mono, or SAP. You can select Off, 5, 10, 15, 30, 60, 90, 120, 180, or 240 minutes. In analog TV mode, press to set the sleep timer. For more information, see "Setting the sleep timer" on page 19. To disconnect power, unplug the power cord...or game console to this jack. Side Remote control 1 2 3 16 4 17 5 18 1 6 19 2 3 4 7 20 5 8 21 # Jack 1 SERVICE PORT Description For service only. 9 22 10 23 Connect an HDMI device to open the favorite channel list. For more information, see "Connecting an HDMI device" on page 13. 5 (headphone) Connect...

User Manual (English)
Page 12
...11 12 OK/ENTER 13 INPUT 14 TV 15 VIDEO 16 FREEZE 17 CCD 18 PICT 19 ZOOM 20 RECALL 21 CH /CH 22 GUIDE 23 EXIT 24 INFO 25 HDMI ...26 COMP 8 Description Press to move left, right, up the Source List, then press or to restore the sound. Press the arrows to enter a digital sub-channel number. For more information, see "Selecting the video input source" on -screen menu. Press to change TV...or down in the battery compartment. 3 Replace the battery cover. Press to display TV status information, such as the channel number, channel name (if available), or ...
...11 12 OK/ENTER 13 INPUT 14 TV 15 VIDEO 16 FREEZE 17 CCD 18 PICT 19 ZOOM 20 RECALL 21 CH /CH 22 GUIDE 23 EXIT 24 INFO 25 HDMI ...26 COMP 8 Description Press to move left, right, up the Source List, then press or to restore the sound. Press the arrows to enter a digital sub-channel number. For more information, see "Selecting the video input source" on -screen menu. Press to change TV...or down in the battery compartment. 3 Replace the battery cover. Press to display TV status information, such as the channel number, channel name (if available), or ...
User Manual (English)
Page 26
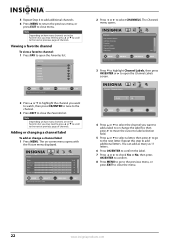
... to open the Favorites list. 5 Repeat Step 4 to add additional channels. 6 Press MENU to return the previous menu, or press EXIT to close the menu. 22 www.insigniaproducts.com Picture Mode Brightness Contrast Color Tint Sharpness PICTURE AUDIO CHANNELS SETTINGS Vivid 42 45 54 0 +5 MOVE OK ENTER SELECT Adjust settings to...
... to open the Favorites list. 5 Repeat Step 4 to add additional channels. 6 Press MENU to return the previous menu, or press EXIT to close the menu. 22 www.insigniaproducts.com Picture Mode Brightness Contrast Color Tint Sharpness PICTURE AUDIO CHANNELS SETTINGS Vivid 42 45 54 0 +5 MOVE OK ENTER SELECT Adjust settings to...
User Manual (English)
Page 37
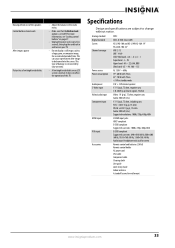
...-10A and NS-L19W1Q-10A: 19" NS-L22Q-10A: 22" VHF: 2-13 UHF: 14-69 CATV: Mid band - AA ~ ZZ, AAA, BBB Ultra band - 65 ~ 94, 100 ~ 135 AC 120 V ~ 60 Hz 19": 60 W with TV on 22": 70 W with TV on your warranty. • A few bright or dark dots Solution • Adjust the balance in the Audio menu. •... the speakers Control buttons do not work After images appear Picture has a few bright or dark dots on an LCD screen is normal. This type of damage is not covered by your TV. • Do not display a still image, such as a logo, game, or computer image, for an extended period of ...
...-10A and NS-L19W1Q-10A: 19" NS-L22Q-10A: 22" VHF: 2-13 UHF: 14-69 CATV: Mid band - AA ~ ZZ, AAA, BBB Ultra band - 65 ~ 94, 100 ~ 135 AC 120 V ~ 60 Hz 19": 60 W with TV on 22": 70 W with TV on your warranty. • A few bright or dark dots Solution • Adjust the balance in the Audio menu. •... the speakers Control buttons do not work After images appear Picture has a few bright or dark dots on an LCD screen is normal. This type of damage is not covered by your TV. • Do not display a still image, such as a logo, game, or computer image, for an extended period of ...