Insignia NS-HWG1965 Support and Manuals
Get Help and Manuals for this Insignia item
View All Support Options Below
Free Insignia NS-HWG1965 manuals!
Problems with Insignia NS-HWG1965?
Ask a Question
Free Insignia NS-HWG1965 manuals!
Problems with Insignia NS-HWG1965?
Ask a Question
Most Recent Insignia NS-HWG1965 Questions

How Do I Attach Doors?
The door hinges slip off of the side mounts.
The door hinges slip off of the side mounts.
(Posted by caroleheidary 2 years ago)
Popular Insignia NS-HWG1965 Manual Pages
User Guide - Page 1
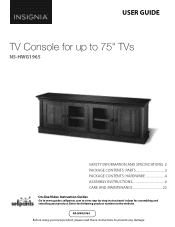
...TV Console for assembling and installing your new product, please read these instructions to view step-by-step instructional videos for up to 75" TVs
NS-HWG1965
SAFETY INFORMATION AND SPECIFICATIONS..2 PACKAGE CONTENTS: PARTS 3 PACKAGE CONTENTS: HARDWARE 4 ASSEMBLY INSTRUCTIONS 6 CARE AND MAINTENANCE 22
On-line Video Instruction Guides
Go to www.guides.sellpoints.com to prevent any damage...
User Guide - Page 2

... in instability, which may result in . (41.5 cm)
2
www.insigniaproducts.com See instructions for use with a product weighing no more than 135 lbs. (61.2 kg) and ... 31 cm) TV stand weight: 101.2 lbs. (46 kg)
(16655.i1nc. NS-HWG1965
SAFETY INFORMATION AND SPECIFICATIONS
CAUTION: The console's top work surface is designed for more details.
Keep these items away from young children!
User Guide - Page 4

...necessary to assemble your new TV stand. Label
Hardware
N
Wood dowel M8 x 30 mm
26
X
Knob
NS-HWG1965
Qty. 4
P
Cam pin
22
Y
Knob bolt
4
Q
Cam lock
22
Z
Corner
connector
2
...screw
T
M3.5 x 15 mm
22
DD
U
Door stopper
2
EE
V
Cam lock cover
6
FF
Shelf support
W
8
GG
Stopper
2
Glue
1
Bumper
4
Large cam lock
cover
4
Touch-up pen
1
Tipping restraint ...
User Guide - Page 6
You'll need:
P (22)
Phillips screwdriver
6
www.insigniaproducts.com NS-HWG1965
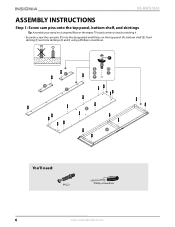
ASSEMBLY INSTRUCTIONS
Step 1: Screw cam pins onto the top panel, bottom shelf, and skirtings
Tip: Assemble your stand on a carpeted floor or the empty TV stand carton ...
User Guide - Page 8
Make sure that the cam screw holes face inward.
You'll need:
N (2)
Q (2)
CC (1)
Phillips screwdriver
8
www.insigniaproducts.com NS-HWG1965
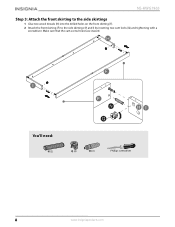
Step 3: Attach the front skirting to the side skirtings
1 Glue two wood dowels (N) into the drilled holes on the front skirting (F). 2 Attach the front skirting (F) ...
User Guide - Page 10
AA
You'll need:
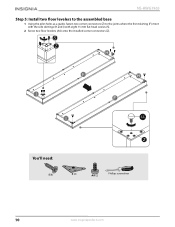
S (8)
Z (2)
AA (2)
Phillips screwdriver
10
www.insigniaproducts.com NS-HWG1965
Step 5: Install two floor levelers to the assembled base
1 Using the pilot holes as a guide, fasten two corner connectors (Z) to the joints where the front skirting (F) meet with the side skirtings (H and I) with eight 15 mm flat head screws (S).
2 Screw ...
User Guide - Page 11
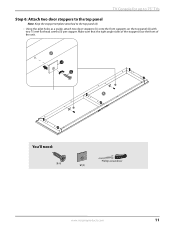
... door stoppers to the top panel
Note: Keep the stopper template attached to the top panel (A). • Using the pilot holes as a guide, attach two door stoppers (U) onto the front supports on the top panel (A) with
two 15 mm flat head screws (S) per stopper. You'll need:
S (4)
Phillips screwdriver U (2)
www.insigniaproducts.com...
User Guide - Page 12
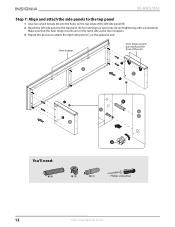
... panel (C) on the same side as the door stoppers. 3 Repeat this process to the top panel (A) by inserting two cam locks (Q) and tightening with a screwdriver. NS-HWG1965
Step 7: Align and attach the side panels to the top panel
1 Glue two wood dowels (N) into the holes on the top edge of the unit...
User Guide - Page 14
Hinges
Leveling feet
You'll need:
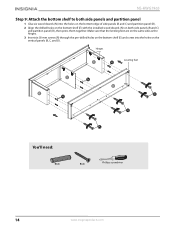
N (6)
R (6)
Phillips screwdriver
14
www.insigniaproducts.com NS-HWG1965
Step 9: Attach the bottom shelf to both side panels and partition panel
1 Glue six wood dowels (N) into the holes... side panels (B and C) and partition panel (D). 2 Align the drilled holes on the bottom shelf (E) with the installed wood dowels (N) on the vertical panels (B, C, and D).
User Guide - Page 16
EE
You'll need:
V (6)
EE (4)
W (8)
16
www.insigniaproducts.com
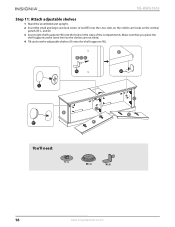
Make sure that you place the
shelf supports at the same level so the shelves are not tilted. 4 Tilt and rest the adjustable shelves (K) onto the shelf supports (W). NS-HWG1965
Step 11: Attach adjustable shelves
1 Stand the assembled unit upright. 2 Insert the small and large cam...
User Guide - Page 18

DD DD
You'll need:
DD (4)
18
www.insigniaproducts.com NS-HWG1965
Step 13: Attach the bumpers to the door stoppers
• Peel two bumpers (DD) from the bumper card and attach one to each door stopper (U) where it will contact the door (L).
User Guide - Page 20
NS-HWG1965
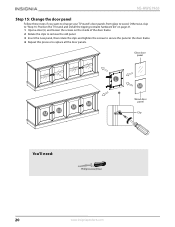
Step 15: Change the door panel
Follow these steps if you want to change your TV stand's door panels from glass to replace all the door panels. Otherwise, skip to "Step 16: Position the TV stand and install the tipping restraint hardware kit" on page 21. 1 Open a door (L) and loosen the screws on...
User Guide - Page 22
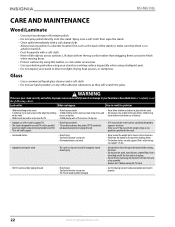
... tipping restraint hardware provided and install it to reach a toy or other abrasive substances as they will scratch the glass. Improper use a TV that there is designed for the stand.
• Overloaded shelves.
• Risk of furniture polish. • Do not spray polish directly onto the stand. NS-HWG1965
CARE AND MAINTENANCE
Wood...
User Guide - Page 23
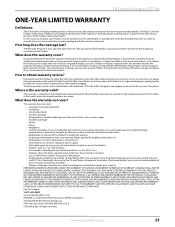
...repair the Product with new or rebuilt parts; What does the warranty not cover?
What does this warranty to apply, your Insignia Product during the Warranty Period. If service of Products or parts...not cover: • Customer instruction/education • Installation • Set up adjustments • Cosmetic ... warranty service?
THIS WARRANTY GIVES YOU SPECIFIC LEGAL RIGHTS, AND ...
User Guide - Page 24

All rights reserved. V3 ENG 20-0057 1-877-467-4289 (U.S. Distributed by Best Buy Purchasing, LLC 7601 Penn Ave South, Richfield, MN 55423 U.S.A. ©2020 Best Buy.
Registered in some countries. and Canada) or 01-800-926-3000 (Mexico) www.insigniaproducts.com
INSIGNIA is a trademark of Best Buy and its affiliated companies.
Insignia NS-HWG1965 Reviews
We have not received any reviews for Insignia yet.