User Manual
Page 1
NS-HTVMF0C For wood-stud, solid concrete wall, or concrete block installations Safety information and specifications . . . . . 2 Tools needed 3 Package contents 3 Installation instructions 5 Before using your new product, please read these instructions to prevent any damage. INSTALLATION GUIDE FIXED-POSITION WALL MOUNT FOR TVs 40-70 in.
NS-HTVMF0C For wood-stud, solid concrete wall, or concrete block installations Safety information and specifications . . . . . 2 Tools needed 3 Package contents 3 Installation instructions 5 Before using your new product, please read these instructions to prevent any damage. INSTALLATION GUIDE FIXED-POSITION WALL MOUNT FOR TVs 40-70 in.
User Manual
Page 2
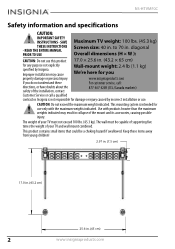
... hazard if swallowed. This product contains small items that could be capable of supporting five times the weight of your TV and wall mount combined. to 70 in . (65 cm) 2 www.insigniaproducts.com CAUTION: Do not exceed the maximum weight indicated. READ...use this product for damage or injury caused by Insignia. Keep these directions, or have doubts about the safety of the mount and its accessories, causing possible injury. NS-HTVMF0C Safety information and specifications CAUTION: IMPORTANT SAFETY INSTRUCTIONS - Insignia is intended for you www.insigniaproducts.com If ...
... hazard if swallowed. This product contains small items that could be capable of supporting five times the weight of your TV and wall mount combined. to 70 in . (65 cm) 2 www.insigniaproducts.com CAUTION: Do not exceed the maximum weight indicated. READ...use this product for damage or injury caused by Insignia. Keep these directions, or have doubts about the safety of the mount and its accessories, causing possible injury. NS-HTVMF0C Safety information and specifications CAUTION: IMPORTANT SAFETY INSTRUCTIONS - Insignia is intended for you www.insigniaproducts.com If ...
User Manual
Page 3
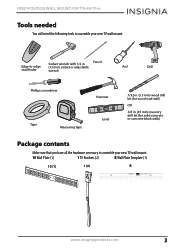
... the following tools to assemble your new TV wall mount: 10 Wall Plate (1) 1 TV Brackets (2) R Wall Plate Template (1) 10 (1) 1 (2) R www.insigniaproducts.com 3 FIXED-POSITION WALL MOUNT FOR TVs 40-70 in . (10 mm) masonry drill bit (for solid concrete or concrete block walls) Package contents Make sure that you have all... the hardware necessary to assemble your new TV wall mount: ardware Edge-to-edge stud finder Socket wrench with 1/2 in. (13 mm) socket or...
... the following tools to assemble your new TV wall mount: 10 Wall Plate (1) 1 TV Brackets (2) R Wall Plate Template (1) 10 (1) 1 (2) R www.insigniaproducts.com 3 FIXED-POSITION WALL MOUNT FOR TVs 40-70 in . (10 mm) masonry drill bit (for solid concrete or concrete block walls) Package contents Make sure that you have all... the hardware necessary to assemble your new TV wall mount: ardware Edge-to-edge stud finder Socket wrench with 1/2 in. (13 mm) socket or...
User Manual
Page 5
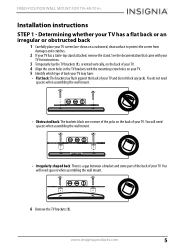
...; Flat back: The brackets lay flush against the back of your TV and do not need spacers when assembling the wall mount. • Irregularly-shaped back: There is a gap between a bracket and some part of the back of your ...TV. You do not block any jacks. You will need spacers when assembling the wall mount. • Obstructed back: The brackets block one or more of the jacks on the back of your TV. FIXED...-POSITION WALL MOUNT FOR TVs 40-70 in the TV brackets with your TV for instructions. 3 Temporarily lay the...
...; Flat back: The brackets lay flush against the back of your TV and do not need spacers when assembling the wall mount. • Irregularly-shaped back: There is a gap between a bracket and some part of the back of your ...TV. You do not block any jacks. You will need spacers when assembling the wall mount. • Obstructed back: The brackets block one or more of the jacks on the back of your TV. FIXED...-POSITION WALL MOUNT FOR TVs 40-70 in the TV brackets with your TV for instructions. 3 Temporarily lay the...
User Manual
Page 7
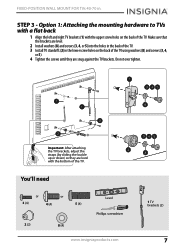
STEP 3 - Option 1: Attaching the mounting hardware to TVs with a flat back 1 Align the left and right TV brackets (1) with the bottom of the TV. Important: After attaching the TV brackets, ... the TV. 3 Install TV standoffs (2) in . Do not over tighten. You'll need or or 3 (4) 4 (4) 5 (4) 2 (2) 8 (4) Level Phillips screwdriver www.insigniaproducts.com 1 TV brackets (2) 7 FIXED-POSITION WALL MOUNT FOR TVs 40-70 in the lower screw holes on the back of the TV.
STEP 3 - Option 1: Attaching the mounting hardware to TVs with a flat back 1 Align the left and right TV brackets (1) with the bottom of the TV. Important: After attaching the TV brackets, ... the TV. 3 Install TV standoffs (2) in . Do not over tighten. You'll need or or 3 (4) 4 (4) 5 (4) 2 (2) 8 (4) Level Phillips screwdriver www.insigniaproducts.com 1 TV brackets (2) 7 FIXED-POSITION WALL MOUNT FOR TVs 40-70 in the lower screw holes on the back of the TV.
User Manual
Page 9
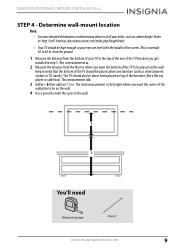
This is the height where you want the center of the wall plate to be on the wall. Determine wall-mount location Note: • For more detailed information on determining where to drill your holes, visit our online height-finder at: http://mf1.bestbuy.selectionassistant.com/... mark this spot on top of the furniture (like a Blu-ray player or cable box). Keep in . This is b. 3 Add a + b then subtract 1.5 in . FIXED-POSITION WALL MOUNT FOR TVs 40-70 in mind that the bottom of the TV should also be above any furniture (such as entertainment centers or TV stands...
This is the height where you want the center of the wall plate to be on the wall. Determine wall-mount location Note: • For more detailed information on determining where to drill your holes, visit our online height-finder at: http://mf1.bestbuy.selectionassistant.com/... mark this spot on top of the furniture (like a Blu-ray player or cable box). Keep in . This is b. 3 Add a + b then subtract 1.5 in . FIXED-POSITION WALL MOUNT FOR TVs 40-70 in mind that the bottom of the TV should also be above any furniture (such as entertainment centers or TV stands...
User Manual
Page 10
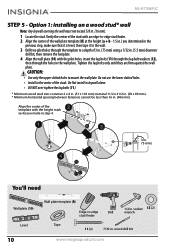
.... CAUTION: • Use only the upper slotted holes to edge Drill stud finder 1/2 in . 75 mm) You'll need Wall plate (10) Level 10 Wall plate template (R) Edge-to mount the wall plate. NS-HTVMF0C STEP 5 - Do not use the lower slotted holes. • Install in . (16 mm). 1 Locate the stud. Align ...the center of the template with the height mark (a+b) you determined in the previous step, make sure that it is level, then tape it to the wall. 3 Drill...
.... CAUTION: • Use only the upper slotted holes to edge Drill stud finder 1/2 in . 75 mm) You'll need Wall plate (10) Level 10 Wall plate template (R) Edge-to mount the wall plate. NS-HTVMF0C STEP 5 - Do not use the lower slotted holes. • Install in . (16 mm). 1 Locate the stud. Align ...the center of the template with the height mark (a+b) you determined in the previous step, make sure that it is level, then tape it to the wall. 3 Drill...
User Manual
Page 11
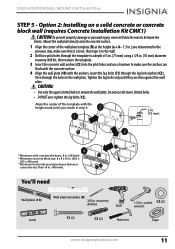
.... socket C2 (2) wrench C1 (2) C3 (2) Hammer Tape www.insigniaproducts.com 11 Option 2: Installing on a solid concrete or concrete block wall (requires Concrete Installation Kit CMK1) CAUTION:To prevent property damage or personal injury, never drill into the pilot holes and use the lower ...sure the anchors are firm against the wall plate. You'll need C3 C1 C2 Wall plate (10) Level Wall plate template (R) 3/8 in . FIXED-POSITION WALL MOUNT FOR TVs 40-70 in . (406 mm). Do not use a hammer to mount the wall plate. Mount the wall plate directly onto the concrete surface....
.... socket C2 (2) wrench C1 (2) C3 (2) Hammer Tape www.insigniaproducts.com 11 Option 2: Installing on a solid concrete or concrete block wall (requires Concrete Installation Kit CMK1) CAUTION:To prevent property damage or personal injury, never drill into the pilot holes and use the lower ...sure the anchors are firm against the wall plate. You'll need C3 C1 C2 Wall plate (10) Level Wall plate template (R) 3/8 in . FIXED-POSITION WALL MOUNT FOR TVs 40-70 in . (406 mm). Do not use a hammer to mount the wall plate. Mount the wall plate directly onto the concrete surface....
User Manual
Page 12
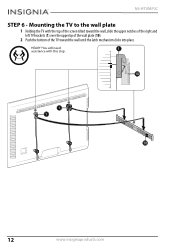
You will need assistance with the top of the screen tilted toward the wall, slide the upper notches of the right and left TV brackets (1) over the upper lip of the wall plate (10). 2 Push the bottom of the TV toward the wall until the latch mechanism clicks into place. NS-HTVMF0C STEP 6 - HEAVY! Mounting the TV to the wall plate 1 Holding the TV with this step. 12 www.insigniaproducts.com
You will need assistance with the top of the screen tilted toward the wall, slide the upper notches of the right and left TV brackets (1) over the upper lip of the wall plate (10). 2 Push the bottom of the TV toward the wall until the latch mechanism clicks into place. NS-HTVMF0C STEP 6 - HEAVY! Mounting the TV to the wall plate 1 Holding the TV with this step. 12 www.insigniaproducts.com

User Manual
Page 13
HEAVY! You will need assistance with this step. www.insigniaproducts.com 13 Removing the TV from the wall plate • Pull down and hold both release straps, then pull the bottom of the TV away from the wall and lift the assembly off the wall plate. FIXED-POSITION WALL MOUNT FOR TVs 40-70 in.
HEAVY! You will need assistance with this step. www.insigniaproducts.com 13 Removing the TV from the wall plate • Pull down and hold both release straps, then pull the bottom of the TV away from the wall and lift the assembly off the wall plate. FIXED-POSITION WALL MOUNT FOR TVs 40-70 in.
User Manual
Page 15
...LEGAL RIGHTS, AND YOU MAY ALSO HAVE OTHER RIGHTS, WHICH VARY FROM STATE TO STATE OR PROVINCE TO PROVINCE. Made in . FIXED-POSITION WALL MOUNT FOR TVs 40-70 in China www.insigniaproducts.com 15 AA, AAA, C etc.) • Products where the factory applied serial number has... panels containing up to three (3) pixel failures (dots that may not function normally.) • Failures or Damage caused by any person not authorized by Insignia to service the Product • Products sold "as power surges • Accidental damage • Misuse • Abuse • Negligence • Commercial...
...LEGAL RIGHTS, AND YOU MAY ALSO HAVE OTHER RIGHTS, WHICH VARY FROM STATE TO STATE OR PROVINCE TO PROVINCE. Made in . FIXED-POSITION WALL MOUNT FOR TVs 40-70 in China www.insigniaproducts.com 15 AA, AAA, C etc.) • Products where the factory applied serial number has... panels containing up to three (3) pixel failures (dots that may not function normally.) • Failures or Damage caused by any person not authorized by Insignia to service the Product • Products sold "as power surges • Accidental damage • Misuse • Abuse • Negligence • Commercial...
