User Guide
Page 1
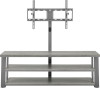
ASSEMBLY GUIDE 3-in-1 TV Stand NS-HFTVS3N175 Before using your new product, please read these instructions to prevent any damage.
ASSEMBLY GUIDE 3-in-1 TV Stand NS-HFTVS3N175 Before using your new product, please read these instructions to prevent any damage.

User Guide
Page 2
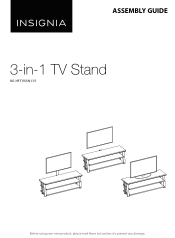
Contents IMPORTANT SAFEGUARDS 3 Features 4 Dimensions...4 Package contents 5 Parts ...5 Hardware...6 Tools needed 7 Assembling your stand 8 Mounting the TV using the swivel configuration 16 Mounting the TV using the wall-mount configuration 26 Mounting the TV using the tabletop configuration 33 Maintaining your TV stand 37 Specifications 37 ONE-YEAR LIMITED WARRANTY 38 2 www.insigniaproducts.com
Contents IMPORTANT SAFEGUARDS 3 Features 4 Dimensions...4 Package contents 5 Parts ...5 Hardware...6 Tools needed 7 Assembling your stand 8 Mounting the TV using the swivel configuration 16 Mounting the TV using the wall-mount configuration 26 Mounting the TV using the tabletop configuration 33 Maintaining your TV stand 37 Specifications 37 ONE-YEAR LIMITED WARRANTY 38 2 www.insigniaproducts.com
User Guide
Page 3
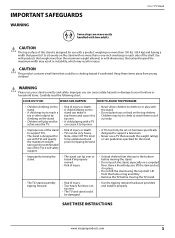
...• Use the tipping restraint hardware provided and install it properly. SAVE THESE INSTRUCTIONS www.insigniaproducts.com 3 Lift from the frame or leg assembly. • Remove the TV before moving the stand. • Do not push the stand, especially on a carpeted floor. Keep ...specifically designed to support a television. • Never use can cause it to tip over . • The TV and stand could be set it in place. • Do not lift the stand using the top shelf. LOOK OUT FOR: WHAT CAN HAPPEN: HOW TO AVOID THE PROBLEM: • Children climbing on the stand...
...• Use the tipping restraint hardware provided and install it properly. SAVE THESE INSTRUCTIONS www.insigniaproducts.com 3 Lift from the frame or leg assembly. • Remove the TV before moving the stand. • Do not push the stand, especially on a carpeted floor. Keep ...specifically designed to support a television. • Never use can cause it to tip over . • The TV and stand could be set it in place. • Do not lift the stand using the top shelf. LOOK OUT FOR: WHAT CAN HAPPEN: HOW TO AVOID THE PROBLEM: • Children climbing on the stand...
User Guide
Page 4
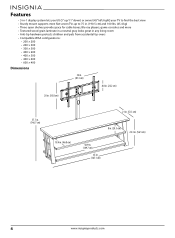
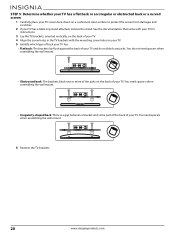
...45° left/right) your TV to find the best view • Sturdy mount supports most flat screen TVs up to 75 in. (190.5 cm) and 100 lbs. (45.4 kg) • Three open shelves provide space for cable boxes, Blu-ray players, game consoles and more • Textured wood grain laminate in ...-tip hardware protects children and pets from accidental tip-overs • Compatible VESA configurations: • 200 × 200 • 200 × 300 • 300 × 300 • 400 × 200 • 400 × 300 • 400 × 400 • 600 × 400 Dimensions 32 in. (81.3 cm) 8.8 in. (22.2 cm)...
...45° left/right) your TV to find the best view • Sturdy mount supports most flat screen TVs up to 75 in. (190.5 cm) and 100 lbs. (45.4 kg) • Three open shelves provide space for cable boxes, Blu-ray players, game consoles and more • Textured wood grain laminate in ...-tip hardware protects children and pets from accidental tip-overs • Compatible VESA configurations: • 200 × 200 • 200 × 300 • 300 × 300 • 400 × 200 • 400 × 300 • 400 × 400 • 600 × 400 Dimensions 32 in. (81.3 cm) 8.8 in. (22.2 cm)...

User Guide
Page 8
...panel to the spine You need: A Top shelf frame (1) F Spine assembly (1) P Bolt 1 3/4" (2) W 4 mm hex key (1) 1 Align the top shelf frame (A) at a 90° angle to avoid scratching it. Note: Do not fully tighten all bolts until you finish assembling all of the parts. This will make the assembly... finish assembling all of the parts. Assembling your stand Tip: Assemble your stand upright. 2 Insert two 1 3/4" bolts (P) through the drilled holes on the frame (A), then screw them into the holes on a carpeted floor or the empty TV stand carton to the spine assembly (F). ...
...panel to the spine You need: A Top shelf frame (1) F Spine assembly (1) P Bolt 1 3/4" (2) W 4 mm hex key (1) 1 Align the top shelf frame (A) at a 90° angle to avoid scratching it. Note: Do not fully tighten all bolts until you finish assembling all of the parts. This will make the assembly... finish assembling all of the parts. Assembling your stand Tip: Assemble your stand upright. 2 Insert two 1 3/4" bolts (P) through the drilled holes on the frame (A), then screw them into the holes on a carpeted floor or the empty TV stand carton to the spine assembly (F). ...

User Guide
Page 15
...-1 TV Stand N 1" bolt (2) Q Lock washer (2) R Flat washer (2) W Hex key 4 mm (1) 1 Follow the steps in STEP 6: Attach the right side frame to the top panel on page 13 to attach the left side frame (D) to Mounting the TV using the tabletop configuration on page 26. • For table top assembly, go to the top shelf frame (A). 2 Stand the assembled frame...
...-1 TV Stand N 1" bolt (2) Q Lock washer (2) R Flat washer (2) W Hex key 4 mm (1) 1 Follow the steps in STEP 6: Attach the right side frame to the top panel on page 13 to attach the left side frame (D) to Mounting the TV using the tabletop configuration on page 26. • For table top assembly, go to the top shelf frame (A). 2 Stand the assembled frame...

User Guide
Page 16
... mounting frame point in the same direction. 2 Place a flat washer (R), then a lock washer (Q) over each of the mounting holes on the back of the swivel bracket (H). 3 Insert a 1/2" bolt (L) through the washers and into each of the mounting frame (I ). 4 Tighten the bolts with the 4 mm hex key (W). Mounting the TV using the swivel configuration Note: If you are wall-mounting...
... mounting frame point in the same direction. 2 Place a flat washer (R), then a lock washer (Q) over each of the mounting holes on the back of the swivel bracket (H). 3 Insert a 1/2" bolt (L) through the washers and into each of the mounting frame (I ). 4 Tighten the bolts with the 4 mm hex key (W). Mounting the TV using the swivel configuration Note: If you are wall-mounting...

User Guide
Page 19
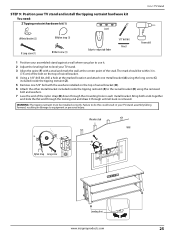
.... After you determine which size bolt to use , go to use , try one of the four Vesa mounting holes on the back of the bolts in the hole at all, but make sure that the bolt size you choose is not too loose. M4 hardware assembly: • M4 × 12 mm bolts (AA) top screw holes • M4... × 20 mm bolts (HH) top screw holes • M8 x 40 mm bolts (II) or M8 × 50 mm bolts (JJ) bottom screw holes • M8 lock washers (NN) • M6/M8 flat washers (RR) • Large spacers (OO) www.insigniaproducts.com 19 3-in-1 TV Stand STEP 4: Select the correct bolts, washers, ...
.... After you determine which size bolt to use , go to use , try one of the four Vesa mounting holes on the back of the bolts in the hole at all, but make sure that the bolt size you choose is not too loose. M4 hardware assembly: • M4 × 12 mm bolts (AA) top screw holes • M4... × 20 mm bolts (HH) top screw holes • M8 x 40 mm bolts (II) or M8 × 50 mm bolts (JJ) bottom screw holes • M8 lock washers (NN) • M6/M8 flat washers (RR) • Large spacers (OO) www.insigniaproducts.com 19 3-in-1 TV Stand STEP 4: Select the correct bolts, washers, ...
User Guide
Page 20
... between a bracket and some part of the back of your TV. You need spacers when assembling the wall mount. 6 Remove the TV brackets. 20 www.insigniaproducts.com You do not block any jacks. See the documentation that came with your TV for instructions. 3 Lay the TV brackets, oriented vertically, on the back of your TV. 4 Align the screw holes in...
... between a bracket and some part of the back of your TV. You need spacers when assembling the wall mount. 6 Remove the TV brackets. 20 www.insigniaproducts.com You do not block any jacks. See the documentation that came with your TV for instructions. 3 Lay the TV brackets, oriented vertically, on the back of your TV. 4 Align the screw holes in...

User Guide
Page 21
Note: Lean the TV up against the TV brackets using a Phillips screwdriver. Mounting brackets on a TV with the TV brackets. Make sure that the TV brackets are snug against a wall or other and that the hooks face the bottom of your TV. DO NOT over tighten. This may cause permanent damage...or QQ Flat washer M4/M5 (4) RR Flat washer M6/M8 (4) 3-in-1 TV Stand J TV bracket (2) Phillips screwdriver Level 1 Insert the selected bolts through the washers and correct mounting holes on the TV brackets (J), then finger tighten them into the threaded holes on the glass. DO NOT place the...
Note: Lean the TV up against the TV brackets using a Phillips screwdriver. Mounting brackets on a TV with the TV brackets. Make sure that the TV brackets are snug against a wall or other and that the hooks face the bottom of your TV. DO NOT over tighten. This may cause permanent damage...or QQ Flat washer M4/M5 (4) RR Flat washer M6/M8 (4) 3-in-1 TV Stand J TV bracket (2) Phillips screwdriver Level 1 Insert the selected bolts through the washers and correct mounting holes on the TV brackets (J), then finger tighten them into the threaded holes on the glass. DO NOT place the...

User Guide
Page 22
Note: Lean the TV up against a wall or other and that the TV brackets are snug against the TV brackets using a Phillips screwdriver. BB or DD or ...centered and level with each other solid surface when attaching with an irregularly shaped or obstructed back or a curved screen TV You need: Bolts and Washers or or or BB M4 × 30 mm bolt (4) DD M5... M4/M5 (4) RR Flat washer M6/M8 (4) J TV bracket (2) Phillips screwdriver Level 1 Insert the selected bolts through the washers and correct mounting holes on the TV brackets (J), then finger tighten them into the threaded holes on the...
Note: Lean the TV up against a wall or other and that the TV brackets are snug against the TV brackets using a Phillips screwdriver. BB or DD or ...centered and level with each other solid surface when attaching with an irregularly shaped or obstructed back or a curved screen TV You need: Bolts and Washers or or or BB M4 × 30 mm bolt (4) DD M5... M4/M5 (4) RR Flat washer M6/M8 (4) J TV bracket (2) Phillips screwdriver Level 1 Insert the selected bolts through the washers and correct mounting holes on the TV brackets (J), then finger tighten them into the threaded holes on the...
User Guide
Page 23
...Stand Phillips screwdriver 1 With the help of another adult, lift the TV up to tighten the safety bolt on the bottom hooks. STEP 7: Attach the TV to the mounting frame on the swivel bracket Note: If you are wall-mounting the TV, go to Mounting the TV using a Phillips screwdriver to the mounting frame (I). 2 Set the hooks on TV brackets... (J) over the mounting frame (I), then lower the...
...Stand Phillips screwdriver 1 With the help of another adult, lift the TV up to tighten the safety bolt on the bottom hooks. STEP 7: Attach the TV to the mounting frame on the swivel bracket Note: If you are wall-mounting the TV, go to Mounting the TV using a Phillips screwdriver to the mounting frame (I). 2 Set the hooks on TV brackets... (J) over the mounting frame (I), then lower the...
User Guide
Page 25
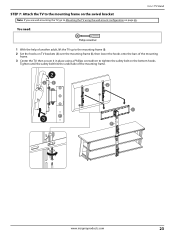
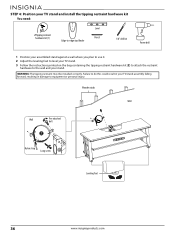
... need: Z Tipping restraint hardware kit (1) Level 3-in-1 TV Stand A Metal bracket (2) C Long screw (1) B Nylon strap (1) D Short screw (1) Edge-to-edge stud finder 1/8" drill bit Pencil Power drill 1 Position your assembled stand against a wall where you plan to use it through the mounting hole in your TV stand. 3 Align the spine (F) with the washers installed on the top of swivel bracket. 4 Using a 1/8" drill bit, drill a hole...
... need: Z Tipping restraint hardware kit (1) Level 3-in-1 TV Stand A Metal bracket (2) C Long screw (1) B Nylon strap (1) D Short screw (1) Edge-to-edge stud finder 1/8" drill bit Pencil Power drill 1 Position your assembled stand against a wall where you plan to use it through the mounting hole in your TV stand. 3 Align the spine (F) with the washers installed on the top of swivel bracket. 4 Using a 1/8" drill bit, drill a hole...

User Guide
Page 30
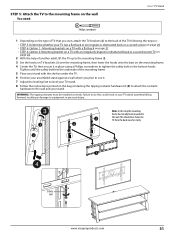
... mm) 30 www.insigniaproducts.com CAUTION: Make sure that the mounting frame is level, then mark the four mounting holes on the wall. Remove the mounting frame. CAUTION: Never locate the mounting holes into each of the mounting frame screw holes, then insert a lag bolt (S) and tighten. 6 ... wrench 7/16"masonry drill bit Pencil Power drill 1 Place the mounting frame (I) against the wall where you intend to a depth of 2.5" (64 mm) using a hammer. 4 Align the mounting frame over the concrete anchors. 5 Place a washer (U) over one of the screw holes using a drill with a 7/16" masonry...
... mm) 30 www.insigniaproducts.com CAUTION: Make sure that the mounting frame is level, then mark the four mounting holes on the wall. Remove the mounting frame. CAUTION: Never locate the mounting holes into each of the mounting frame screw holes, then insert a lag bolt (S) and tighten. 6 ... wrench 7/16"masonry drill bit Pencil Power drill 1 Place the mounting frame (I) against the wall where you intend to a depth of 2.5" (64 mm) using a hammer. 4 Align the mounting frame over the concrete anchors. 5 Place a washer (U) over one of the screw holes using a drill with a 7/16" masonry...
User Guide
Page 31
... mounting frame (I). 3 Set the hooks on TV brackets (J) over the mounting frame, then lower the hooks onto the bars on page 20 • STEP 6: Option 1 - Note: In this could result in your TV/stand assembly falling forward, resulting in : • STEP 5: Determine whether your assembled stand against a wall where you own, attach the TV brackets (J) to equipment or personal injury. Mounting brackets...
... mounting frame (I). 3 Set the hooks on TV brackets (J) over the mounting frame, then lower the hooks onto the bars on page 20 • STEP 6: Option 1 - Note: In this could result in your TV/stand assembly falling forward, resulting in : • STEP 5: Determine whether your assembled stand against a wall where you own, attach the TV brackets (J) to equipment or personal injury. Mounting brackets...

User Guide
Page 33
www.insigniaproducts.com 33 Mounting the TV using the tabletop configuration STEP 1: Remove the upper spine You need: 3-in-1 TV Stand W 4 mm hex key (1) • Unscrew the four bolts and the washers on the spine assembly (F), then remove the upper spine from the spine assembly.
www.insigniaproducts.com 33 Mounting the TV using the tabletop configuration STEP 1: Remove the upper spine You need: 3-in-1 TV Stand W 4 mm hex key (1) • Unscrew the four bolts and the washers on the spine assembly (F), then remove the upper spine from the spine assembly.
User Guide
Page 36
... 36 www.insigniaproducts.com STEP 4: Position your TV stand and install the tipping restraint hardware kit You need: Z Tipping restraint hardware kit (1) Level Pencil Edge-to-edge stud finder 1/8" drill bit Power drill 1 Position your assembled stand against a wall where you plan to use it. 2 Adjust the leveling feet to level your stand. Failure to do this could result in your...
... 36 www.insigniaproducts.com STEP 4: Position your TV stand and install the tipping restraint hardware kit You need: Z Tipping restraint hardware kit (1) Level Pencil Edge-to-edge stud finder 1/8" drill bit Power drill 1 Position your assembled stand against a wall where you plan to use it. 2 Adjust the leveling feet to level your stand. Failure to do this could result in your...
User Guide
Page 37
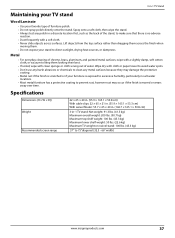
...cloth. • Never slide objects across the finish when moving them across surfaces. Specifications Dimensions (H × W × D)) Weight Recommended screen range 22 × 65 × 20 in. (55.9 × 165...stand: Net weight: 91.3 lbs. (41.5 kg) Maximum overall weight: 200 lbs. (90.7 kg) Maximum top shelf weight: 100 lbs. (45.3 kg) Maximum lower shelf weight: 50 lbs. (22.6 kg) Maximum TV weight on swivel stand...TV Stand Maintaining your TV stand Wood/Laminate • Use your stand to direct sunlight, drying heat sources, or dampness. Spray onto a soft cloth, then wipe the stand. &#...
...cloth. • Never slide objects across the finish when moving them across surfaces. Specifications Dimensions (H × W × D)) Weight Recommended screen range 22 × 65 × 20 in. (55.9 × 165...stand: Net weight: 91.3 lbs. (41.5 kg) Maximum overall weight: 200 lbs. (90.7 kg) Maximum top shelf weight: 100 lbs. (45.3 kg) Maximum lower shelf weight: 50 lbs. (22.6 kg) Maximum TV weight on swivel stand...TV Stand Maintaining your TV stand Wood/Laminate • Use your stand to direct sunlight, drying heat sources, or dampness. Spray onto a soft cloth, then wipe the stand. &#...

User Guide
Page 38
... Insignia repair center or store personnel, Insignia will (at no charge with this warranty statement. This warranty does not cover: • Customer instruction/education • Installation • Set up adjustments ...panel damaged by static (non-moving) images applied for lengthy periods (burn-in the country where the original purchase was made. Contact Insignia: 1-877-467-4289 www.insigniaproducts.com INSIGNIA is the warranty valid? Your purchase date is " or "with new or rebuilt parts; or (2) replace the Product at its affiliated companies. *Distributed by Insignia to service...
... Insignia repair center or store personnel, Insignia will (at no charge with this warranty statement. This warranty does not cover: • Customer instruction/education • Installation • Set up adjustments ...panel damaged by static (non-moving) images applied for lengthy periods (burn-in the country where the original purchase was made. Contact Insignia: 1-877-467-4289 www.insigniaproducts.com INSIGNIA is the warranty valid? Your purchase date is " or "with new or rebuilt parts; or (2) replace the Product at its affiliated companies. *Distributed by Insignia to service...

Warranty
Page 1
... service, in the country where the original purchase was made. Products and parts replaced under this warranty cover? Call agents may not function normally.) • Failures or Damage caused by any Best Buy store. This warranty does not cover: • Food loss/spoilage due to failure of refrigerator or freezer • Customer instruction/education • Installation • Set...
... service, in the country where the original purchase was made. Products and parts replaced under this warranty cover? Call agents may not function normally.) • Failures or Damage caused by any Best Buy store. This warranty does not cover: • Food loss/spoilage due to failure of refrigerator or freezer • Customer instruction/education • Installation • Set...

