
Product Dimensions
Page 1
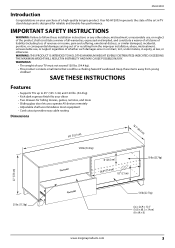
NS HF2003 TV STAND DIMENSIONS: B HEIGHT: 22 in. 55.8 cm Leest position Doors closed A WIDTH: 60 in. 152.4 cm Doors closed D DEPTH: 18.5 in. 46.9 cm
NS HF2003 TV STAND DIMENSIONS: B HEIGHT: 22 in. 55.8 cm Leest position Doors closed A WIDTH: 60 in. 152.4 cm Doors closed D DEPTH: 18.5 in. 46.9 cm

User Guide
Page 1
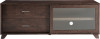
ASSEMBLY GUIDE 60" Espresso TV Stand NS-HF2003 Before using your new product, please read these instructions to prevent any damage.
ASSEMBLY GUIDE 60" Espresso TV Stand NS-HF2003 Before using your new product, please read these instructions to prevent any damage.

User Guide
Page 2
... 22 2 www.insigniaproducts.com Attach the trim to the shelf 14 STEP 8 - Contents Introduction 3 IMPORTANT SAFETY INSTRUCTIONS 3 Features 3 Dimensions...3 Tools needed 4 Package contents 4 Stand parts ...4 Stand hardware 5 Anti-tip safety kit 5 Pre-assembled hardware 5 Installation tips 6 Installing dowels 6 Installing cam locks and cam screws 6 Assembly instructions 7 STEP 1 - Attach the feet 11 STEP 5 - Assemble the left side and middle panels 9 STEP 3 - Attach the right side and bottom...
... 22 2 www.insigniaproducts.com Attach the trim to the shelf 14 STEP 8 - Contents Introduction 3 IMPORTANT SAFETY INSTRUCTIONS 3 Features 3 Dimensions...3 Tools needed 4 Package contents 4 Stand parts ...4 Stand hardware 5 Anti-tip safety kit 5 Pre-assembled hardware 5 Installation tips 6 Installing dowels 6 Installing cam locks and cam screws 6 Assembly instructions 7 STEP 1 - Attach the feet 11 STEP 5 - Assemble the left side and middle panels 9 STEP 3 - Attach the right side and bottom...
User Guide
Page 3
...-quality Insignia product. NS-HF2003 Introduction Congratulations on your décor • Two drawers for reliable and trouble-free performance. WARNINGS: • The weight of the art in equity, at law, or otherwise. Keep these installation instructions or any other abuse, mistreatment, unreasonable use , or neglect regardless of whether such damages arise in contract, tort, under statute, in TV stand...
...-quality Insignia product. NS-HF2003 Introduction Congratulations on your décor • Two drawers for reliable and trouble-free performance. WARNINGS: • The weight of the art in equity, at law, or otherwise. Keep these installation instructions or any other abuse, mistreatment, unreasonable use , or neglect regardless of whether such damages arise in contract, tort, under statute, in TV stand...

User Guide
Page 4
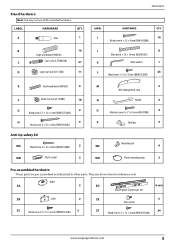
... panel (2) 12 Adjustable shelf (1) 13 Back drawer panel (2) 14 Left drawer panel (2) 16 Bottom drawer panel (2) 17 Bottom drawer support (2) 18 Front drawer panel (2) 19 Door (1) Top 4 www.insigniaproducts.com Tools needed You need the following tools to assemble your new TV stand: Phillips screwdriver Flathead screwdriver 60" Espresso TV Stand Rubber mallet Package contents Make sure that you have all the parts...
... panel (2) 12 Adjustable shelf (1) 13 Back drawer panel (2) 14 Left drawer panel (2) 16 Bottom drawer panel (2) 17 Bottom drawer support (2) 18 Front drawer panel (2) 19 Door (1) Top 4 www.insigniaproducts.com Tools needed You need the following tools to assemble your new TV stand: Phillips screwdriver Flathead screwdriver 60" Espresso TV Stand Rubber mallet Package contents Make sure that you have all the parts...
User Guide
Page 5
... per set) 4 sets ZB Latch 2 ZE 5 Floor leveler ZC Wood screw 3.5 × 12 × 6 mm (FHWS35126BL) 16 ZF 24 Wood screw 3.5 × 12 × 6 mm (RHWS35126BL) www.insigniaproducts.com 5 Stand hardware Note: You may not use all the included hardware. LABEL HARDWARE QTY. A Glue 1 B 16 Large wood dowel (WD830) C Cam screw (CSST8833BL) 21 D Large cam lock (CL1512BL) 11 NS-HF2003...
... per set) 4 sets ZB Latch 2 ZE 5 Floor leveler ZC Wood screw 3.5 × 12 × 6 mm (FHWS35126BL) 16 ZF 24 Wood screw 3.5 × 12 × 6 mm (RHWS35126BL) www.insigniaproducts.com 5 Stand hardware Note: You may not use all the included hardware. LABEL HARDWARE QTY. A Glue 1 B 16 Large wood dowel (WD830) C Cam screw (CSST8833BL) 21 D Large cam lock (CL1512BL) 11 NS-HF2003...

User Guide
Page 6
...of glue (A) in the cam lock. CAUTIONS: • Do not use glue with a damp cloth. OR 1/3 Installing cam locks and cam screws One end of the dowel (B or E) into the hole. 60" Espresso TV Stand Installation tips Installing dowels CAUTION: Make sure that the open end in the cam lock ... lock (D or F). 1 Screw the threaded end of a cam screw (C) into a cam lock hole. OR 4 Use a flat blade screwdriver to tighten the cam locks. • Do not over-tighten the cam locks. 6 www.insigniaproducts.com The glue helps stabilize your TV stand and keeps it from the connected panel.
...of glue (A) in the cam lock. CAUTIONS: • Do not use glue with a damp cloth. OR 1/3 Installing cam locks and cam screws One end of the dowel (B or E) into the hole. 60" Espresso TV Stand Installation tips Installing dowels CAUTION: Make sure that the open end in the cam lock ... lock (D or F). 1 Screw the threaded end of a cam screw (C) into a cam lock hole. OR 4 Use a flat blade screwdriver to tighten the cam locks. • Do not over-tighten the cam locks. 6 www.insigniaproducts.com The glue helps stabilize your TV stand and keeps it from the connected panel.
User Guide
Page 7
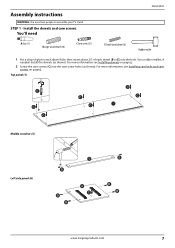
... more information see Installing cam locks and cam screws on page 6. 2 Screw the cam screws (C) into the hole. Top panel (1) Middle crossbar (5) Left side panel (6) www.insigniaproducts.com 7 Install the dowels and cam screws. Use a rubber mallet, if needed. You'll need two people to assemble your TV stand. For more information, see Installing dowels on page 6. Assembly instructions WARNING: You need NS-HF2003 A Glue (1) B Large...
... more information see Installing cam locks and cam screws on page 6. 2 Screw the cam screws (C) into the hole. Top panel (1) Middle crossbar (5) Left side panel (6) www.insigniaproducts.com 7 Install the dowels and cam screws. Use a rubber mallet, if needed. You'll need two people to assemble your TV stand. For more information, see Installing dowels on page 6. Assembly instructions WARNING: You need NS-HF2003 A Glue (1) B Large...
User Guide
Page 9
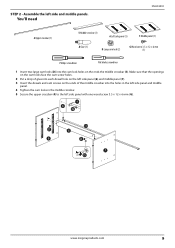
...- You'll need NS-HF2003 4 Upper crossbar (1) 5 Middle crossbar (1) 6 Left side panel (1) 7 Middle panel (1) A Glue (1) D Large cam lock (2) G Wood screw 3.5 × 12 × 6 mm (1) Phillips screwdriver Flat blade screwdriver 1 Insert two large cam locks (D) into the holes in the left side panel and middle panel. 4 Tighten the ...crossbar. 5 Secure the upper crossbar (4) to the left side panel with one wood screw 3.5 × 12 × 6 mm (G). Assemble the left side panel (6) and middle panel (7). 3 Insert the dowels and cam screws on the ends of glue into each dowel hole on the...
...- You'll need NS-HF2003 4 Upper crossbar (1) 5 Middle crossbar (1) 6 Left side panel (1) 7 Middle panel (1) A Glue (1) D Large cam lock (2) G Wood screw 3.5 × 12 × 6 mm (1) Phillips screwdriver Flat blade screwdriver 1 Insert two large cam locks (D) into the holes in the left side panel and middle panel. 4 Tighten the ...crossbar. 5 Secure the upper crossbar (4) to the left side panel with one wood screw 3.5 × 12 × 6 mm (G). Assemble the left side panel (6) and middle panel (7). 3 Insert the dowels and cam screws on the ends of glue into each dowel hole on the...

User Guide
Page 11
... You'll need NS-HF2003 9 Side foot (4) 10 Middle foot (1) J Allen bolt 6 × 50 × 10 mm (8) K Allen wrench (1) 1 Carefully turn your stand. www.insigniaproducts.com 11 Tighten the screws with the holes on its side with the bottom panel (2) facing you. 2 Screw the middle foot ...(10) into the hole in the center of the bottom panel. 3 Align the four side feet (9) with the...
... You'll need NS-HF2003 9 Side foot (4) 10 Middle foot (1) J Allen bolt 6 × 50 × 10 mm (8) K Allen wrench (1) 1 Carefully turn your stand. www.insigniaproducts.com 11 Tighten the screws with the holes on its side with the bottom panel (2) facing you. 2 Screw the middle foot ...(10) into the hole in the center of the bottom panel. 3 Align the four side feet (9) with the...
User Guide
Page 13
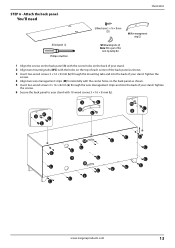
You'll need NS-HF2003 3 Back panel (1) Phillips screwdriver L Wood screw 3 × 16 × 8 mm (23) M Wire management strip (2) WC Mounting tabs (2) Note: WC is part of the Anti-Tip Safety Kit 1 Align the screws on the back panel (3) with the screw holes on the back of your stand. 2 Align two mounting tabs (WC) with the holes on the back panel as shown. 3 Insert...
You'll need NS-HF2003 3 Back panel (1) Phillips screwdriver L Wood screw 3 × 16 × 8 mm (23) M Wire management strip (2) WC Mounting tabs (2) Note: WC is part of the Anti-Tip Safety Kit 1 Align the screws on the back panel (3) with the screw holes on the back of your stand. 2 Align two mounting tabs (WC) with the holes on the back panel as shown. 3 Insert...

User Guide
Page 14
Make sure that the openings on the cam locks face the cam screw holes. 2 Put a drop of glue in the three dowel holes on the front trim (11). 3 Press the shelf and trim together, then tighten the cam locks. Top 14 www.insigniaproducts.com You'll need Top 60" Espresso TV Stand 11 Front trim (1) 12 Adjustable shelf (1) A Glue (1) D Large cam lock (3) Flat blade screwdriver 1 With the adjustable shelf (12) face down, insert three cam locks (D). STEP 7 - Attach the trim to the shelf.
Make sure that the openings on the cam locks face the cam screw holes. 2 Put a drop of glue in the three dowel holes on the front trim (11). 3 Press the shelf and trim together, then tighten the cam locks. Top 14 www.insigniaproducts.com You'll need Top 60" Espresso TV Stand 11 Front trim (1) 12 Adjustable shelf (1) A Glue (1) D Large cam lock (3) Flat blade screwdriver 1 With the adjustable shelf (12) face down, insert three cam locks (D). STEP 7 - Attach the trim to the shelf.

User Guide
Page 15
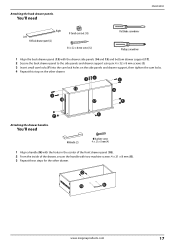
... need 18 Front drawer panel (2) 14 Left drawer panel 15 Right drawer panel (2) (2) 17 Bottom drawer support (2) NS-HF2003 A Glue (1) 1 Place the drawer front (18) face down. 2 Put a drop of glue in the back edge of front panel. Assemble the drawers. www.insigniaproducts.com 15 Assembling the sides, drawer support, and front panels. Attaching the bottom drawer panel. You'll need 16...
... need 18 Front drawer panel (2) 14 Left drawer panel 15 Right drawer panel (2) (2) 17 Bottom drawer support (2) NS-HF2003 A Glue (1) 1 Place the drawer front (18) face down. 2 Put a drop of glue in the back edge of front panel. Assemble the drawers. www.insigniaproducts.com 15 Assembling the sides, drawer support, and front panels. Attaching the bottom drawer panel. You'll need 16...
User Guide
Page 17
... back drawer panel to the side panels and drawer support using six 4 × 32 × 8 mm screws (I). 3 Insert small cam locks (F) into the cam lock holes on the side panels and drawer support, then tighten the cam locks. 4 Repeat this step on the other drawer. Attaching the back drawer panels. Attaching the drawer handles. You'll need NS-HF2003 Right...
... back drawer panel to the side panels and drawer support using six 4 × 32 × 8 mm screws (I). 3 Insert small cam locks (F) into the cam lock holes on the side panels and drawer support, then tighten the cam locks. 4 Repeat this step on the other drawer. Attaching the back drawer panels. Attaching the drawer handles. You'll need NS-HF2003 Right...

User Guide
Page 18
Removing the drawers • Pull the drawer out until you can see or feel the black nylon clips on the ball bearing plates, then at the same time, push the right clip down, the left and right drawer side panels to the front of your stand. Inserting the drawers 1 Slide the ...ball bearing plates on the drawers with the ball bearing plates, then slide the drawers into your stand. Nylon clip Front Front Nylon clip 18 www.insigniaproducts.com 60" Espresso TV Stand STEP 9 - Insert the drawers and shelf. ...
Removing the drawers • Pull the drawer out until you can see or feel the black nylon clips on the ball bearing plates, then at the same time, push the right clip down, the left and right drawer side panels to the front of your stand. Inserting the drawers 1 Slide the ...ball bearing plates on the drawers with the ball bearing plates, then slide the drawers into your stand. Nylon clip Front Front Nylon clip 18 www.insigniaproducts.com 60" Espresso TV Stand STEP 9 - Insert the drawers and shelf. ...
User Guide
Page 19
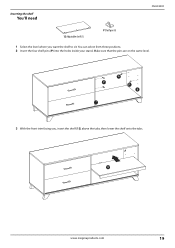
Make sure that the pins are on the same level. 3 With the front trim facing you want the shelf to sit. Inserting the shelf You'll need NS-HF2003 12 Adjustable shelf (1) P Shelf pin (4) 1 Select the level where you , insert the shelf (12) above the tabs, then lower the shelf onto the tabs. www.insigniaproducts.com 19 You can select from three positions. 2 Insert the four shelf pins (P) into the holes inside your stand.
Make sure that the pins are on the same level. 3 With the front trim facing you want the shelf to sit. Inserting the shelf You'll need NS-HF2003 12 Adjustable shelf (1) P Shelf pin (4) 1 Select the level where you , insert the shelf (12) above the tabs, then lower the shelf onto the tabs. www.insigniaproducts.com 19 You can select from three positions. 2 Insert the four shelf pins (P) into the holes inside your stand.

User Guide
Page 20
...), then push the latch sliders into the groove on the bottom panel (2). 2 Make sure that the door slides freely. Clean your stand with a damp cloth, then wipe it dry. If the door does not slide freely, loosen the screws in the center of the door (19) into the locked position...pre-installed. STEP 10 - BACK VIEW Locked You're done! Test the door movement again. Attach the door. Unlocked BACK VIEW 20 www.insigniaproducts.com ZA Roller ZB Latch 1 Put the pre-assembled rollers (ZA) on the bottom of the rollers, turn the rollers clockwise slightly, then tighten the screws....
...), then push the latch sliders into the groove on the bottom panel (2). 2 Make sure that the door slides freely. Clean your stand with a damp cloth, then wipe it dry. If the door does not slide freely, loosen the screws in the center of the door (19) into the locked position...pre-installed. STEP 10 - BACK VIEW Locked You're done! Test the door movement again. Attach the door. Unlocked BACK VIEW 20 www.insigniaproducts.com ZA Roller ZB Latch 1 Put the pre-assembled rollers (ZA) on the bottom of the rollers, turn the rollers clockwise slightly, then tighten the screws....
User Guide
Page 21
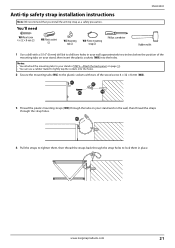
...lightly tap the sockets into the holes. You'll need WA Wood screw 4 × 32 × 8 mm (2) WB Plastic socket (2) WC Mounting tab (2) WD Plastic mounting strap (2) Phillips screwdriver NS-HF2003 Rubber mallet 1 Use a drill with a 5/16" (8 mm) drill bit to drill two holes in your wall approximately two inches below the position of the mounting tabs on your stand... stand and on your stand in place. Attach the back panel. Notes: • You attached the mounting tabs to lock them in STEP 6 - Anti-tip safety strap installation instructions Note: We recommend that you install...
...lightly tap the sockets into the holes. You'll need WA Wood screw 4 × 32 × 8 mm (2) WB Plastic socket (2) WC Mounting tab (2) WD Plastic mounting strap (2) Phillips screwdriver NS-HF2003 Rubber mallet 1 Use a drill with a 5/16" (8 mm) drill bit to drill two holes in your wall approximately two inches below the position of the mounting tabs on your stand... stand and on your stand in place. Attach the back panel. Notes: • You attached the mounting tabs to lock them in STEP 6 - Anti-tip safety strap installation instructions Note: We recommend that you install...

User Guide
Page 22
.... If you purchased the Product from the date of your Insignia Product during the Warranty Period. This warranty does not cover: • Food loss/spoilage due to failure of refrigerator or freezer • Customer instruction/education • Installation • Set up to five (5) pixel failures throughout the display. (Pixel based displays may contain a limited number of pixels...
.... If you purchased the Product from the date of your Insignia Product during the Warranty Period. This warranty does not cover: • Food loss/spoilage due to failure of refrigerator or freezer • Customer instruction/education • Installation • Set up to five (5) pixel failures throughout the display. (Pixel based displays may contain a limited number of pixels...
Warranty Sheet
Page 1
... defective by an authorized Insignia repair center or store personnel, Insignia will (at no charge with new or rebuilt parts; or (2) replace the Product at its sole option): (1) repair the Product with new or rebuilt comparable products or parts. How to obtain warranty service? Where is packaged with this warranty cover? This warranty is a trademark of Best Buy and its original...
... defective by an authorized Insignia repair center or store personnel, Insignia will (at no charge with new or rebuilt parts; or (2) replace the Product at its sole option): (1) repair the Product with new or rebuilt comparable products or parts. How to obtain warranty service? Where is packaged with this warranty cover? This warranty is a trademark of Best Buy and its original...

