
User Guide
Page 2
INSIGNIA 19 Introduction Congratulations on your shelf system 9 Selecting the sound source 9 Adjusting the volume 9 Selecting the sound equalization 10 Using the ...-free performance. 2 www.insigniaproducts.com Your NS-HAIOR18/NS-HAIOR18-C represents the state of a high-quality Insignia product. Contents Introduction 2 Safety information 3 Features 4 Package contents 5 Front view 5 Back view 5 Remote control 6 Setting up your shelf system 7 Turning on your shelf system 7 Connecting the FM antenna 8 Setting the clock 8 Adjusting the display brightness 8 Inserting remote...
INSIGNIA 19 Introduction Congratulations on your shelf system 9 Selecting the sound source 9 Adjusting the volume 9 Selecting the sound equalization 10 Using the ...-free performance. 2 www.insigniaproducts.com Your NS-HAIOR18/NS-HAIOR18-C represents the state of a high-quality Insignia product. Contents Introduction 2 Safety information 3 Features 4 Package contents 5 Front view 5 Back view 5 Remote control 6 Setting up your shelf system 7 Turning on your shelf system 7 Connecting the FM antenna 8 Setting the clock 8 Adjusting the display brightness 8 Inserting remote...
User Guide
Page 8
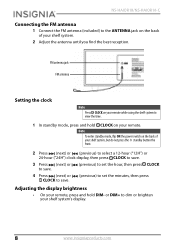
...previous) to select a 12-hour ("12H") or 24-hour ("24H") clock display, then press CLOCK to save. 3 Press (next) or (previous) to set the hour, then press CLOCK to save. 4 Press (next) or CLOCK to save. (previous) to set the minutes, then press Adjusting the display brightness • On your remote,... jack FM antenna Setting the clock Note Press CLOCK on your remote while using the shelf system to view the time. 1 In standby mode, press and hold CLOCK on the back of your shelf system. 2 Adjust the antenna until you find the best reception. NS-HAIOR18/NS-HAIOR18-C Connecting the FM...
...previous) to select a 12-hour ("12H") or 24-hour ("24H") clock display, then press CLOCK to save. 3 Press (next) or (previous) to set the hour, then press CLOCK to save. 4 Press (next) or CLOCK to save. (previous) to set the minutes, then press Adjusting the display brightness • On your remote,... jack FM antenna Setting the clock Note Press CLOCK on your remote while using the shelf system to view the time. 1 In standby mode, press and hold CLOCK on the back of your shelf system. 2 Adjust the antenna until you find the best reception. NS-HAIOR18/NS-HAIOR18-C Connecting the FM...
Quick Setup Guide
Page 1
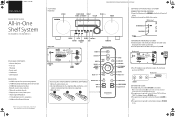
...into the compartment. Final folded size: 143.9 × 279.4 mm. Front view STANDBY SETTING THE CLOCK 1 In standby mode, press and hold CLOCK on your remote. Back panel IC ID:10485A-HAIOR18 CAN ICES-3(B)/NMB-3(B) 3 Press (standby) on your shelf system or remote. INSTALLING THE REMOTE...or (next) to set the hour, then press CLOCK to save . FEATURES Front view SPEAKER Flat size (W×H): 431.8 × 279.4 mm.; PRESET -/10 - NS-HAIOR18_16-1139_QSG_V1_EN.ai 1 2/24/2017 10:49:11 AM QUICK SETUP GUIDE All-in-One Shelf System NS-HAIOR18 / NS-HAIOR18-C PACKAGE CONTENTS • All-...
...into the compartment. Final folded size: 143.9 × 279.4 mm. Front view STANDBY SETTING THE CLOCK 1 In standby mode, press and hold CLOCK on your remote. Back panel IC ID:10485A-HAIOR18 CAN ICES-3(B)/NMB-3(B) 3 Press (standby) on your shelf system or remote. INSTALLING THE REMOTE...or (next) to set the hour, then press CLOCK to save . FEATURES Front view SPEAKER Flat size (W×H): 431.8 × 279.4 mm.; PRESET -/10 - NS-HAIOR18_16-1139_QSG_V1_EN.ai 1 2/24/2017 10:49:11 AM QUICK SETUP GUIDE All-in-One Shelf System NS-HAIOR18 / NS-HAIOR18-C PACKAGE CONTENTS • All-...
