
User Guide
Page 2
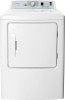
... you start...16 Step-by-Step instructions 16 Reversing the dryer door 20 Using your dryer 22 Drying a load of clothes 22 Unloading your dryer 23 Setting the child lock 23 Cleaning the lint filter 23 Dryer options and settings 24 Special laundry tips 25 Maintaining your dryer 25 Cleaning the exterior 25 Cleaning the drum 25 Cleaning the control panel 25 Cleaning and inspecting the exhaust system 26 Troubleshooting 26 Understanding the error codes 27 Specifications 27 ONE-YEAR LIMITED WARRANTY 28...
... you start...16 Step-by-Step instructions 16 Reversing the dryer door 20 Using your dryer 22 Drying a load of clothes 22 Unloading your dryer 23 Setting the child lock 23 Cleaning the lint filter 23 Dryer options and settings 24 Special laundry tips 25 Maintaining your dryer 25 Cleaning the exterior 25 Cleaning the drum 25 Cleaning the control panel 25 Cleaning and inspecting the exhaust system 26 Troubleshooting 26 Understanding the error codes 27 Specifications 27 ONE-YEAR LIMITED WARRANTY 28...
User Guide
Page 3
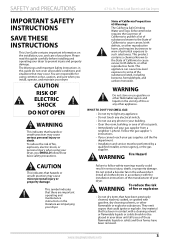
... Gas Dryers IMPORTANT SAFETY INSTRUCTIONS SAVE THESE INSTRUCTIONS This User Guide contains important information on the installation, use any electrical switch; • Do not use , and care of this guide carefully before installing and operating your dryer. You are important operating and maintenance instructions in your dryer. This appliance can cause low-level exposure to some of California to follow these flammable liquids or solids and their fumes have been previously cleaned...
... Gas Dryers IMPORTANT SAFETY INSTRUCTIONS SAVE THESE INSTRUCTIONS This User Guide contains important information on the installation, use any electrical switch; • Do not use , and care of this guide carefully before installing and operating your dryer. You are important operating and maintenance instructions in your dryer. This appliance can cause low-level exposure to some of California to follow these flammable liquids or solids and their fumes have been previously cleaned...

User Guide
Page 4
... temperatures. 12 Do not tamper with the manufacturer's instructions. 5 Residual oil on page 13 or Electric requirements-U.S. If this User Guide before or after each load. 19 Keep the area around the exhaust opening and surrounding areas free from escaping and can ignite spontaneously. This may prevent heat from lint, dust, and dirt. 20 The interior of your dryer and the exhaust duct should be cleaned...
... temperatures. 12 Do not tamper with the manufacturer's instructions. 5 Residual oil on page 13 or Electric requirements-U.S. If this User Guide before or after each load. 19 Keep the area around the exhaust opening and surrounding areas free from escaping and can ignite spontaneously. This may prevent heat from lint, dust, and dirt. 20 The interior of your dryer and the exhaust duct should be cleaned...

User Guide
Page 5
... WARNING 1 Clothes dryer installation must be easily crushed, and trap lint. Features Package contents • 6.7 Cu. Ft. Front-Load Electric or Gas Dryer • User Guide Front components Control panel Cabinet Optional left venting hole Adjustable legs (4) Door Filter www.insigniaproducts.com 5 Service Personal: Do not contact the following parts while the appliance is installed, it must be performed by a qualified installer. 2 Install the clothes dryer according to collapse, be of a specific type identified by...
... WARNING 1 Clothes dryer installation must be easily crushed, and trap lint. Features Package contents • 6.7 Cu. Ft. Front-Load Electric or Gas Dryer • User Guide Front components Control panel Cabinet Optional left venting hole Adjustable legs (4) Door Filter www.insigniaproducts.com 5 Service Personal: Do not contact the following parts while the appliance is installed, it must be performed by a qualified installer. 2 Install the clothes dryer according to collapse, be of a specific type identified by...

User Guide
Page 6
Back components Electric Dryer Wiring box Back venting hole INSTALLATION INSTRUCTIONS Gas Dryer Power cord (gas dryer only) Gas inlet 6 www.insigniaproducts.com
Back components Electric Dryer Wiring box Back venting hole INSTALLATION INSTRUCTIONS Gas Dryer Power cord (gas dryer only) Gas inlet 6 www.insigniaproducts.com

User Guide
Page 7
..., see Dryer options and settings on the child lock function. www.insigniaproducts.com 7 If your dryer is already dry and can be ironed manually, select a lower dryness level. Your can add items to the dryer, but your favorite cycle setting. 9 Dryness button Press to be removed at any settings. INSTALLATION INSTRUCTIONS Control panel 6.7 Cu. Press once to load your cannot change any time during the Wrinkle Prevent cycle. 6 /START PAUSE button Press to turn off...
..., see Dryer options and settings on the child lock function. www.insigniaproducts.com 7 If your dryer is already dry and can be ironed manually, select a lower dryness level. Your can add items to the dryer, but your favorite cycle setting. 9 Dryness button Press to be removed at any settings. INSTALLATION INSTRUCTIONS Control panel 6.7 Cu. Press once to load your cannot change any time during the Wrinkle Prevent cycle. 6 /START PAUSE button Press to turn off...

User Guide
Page 8
... a child being trapped and suffocating. • After unplugging a discarded appliance, cut off the power cord. • Provisions for introduction of outside air shall not be less than twice the area of fire when installed any opening for the rear exhaust option. These instructions should locate your dryer where there is factory-ready for the introduction of children. • Do not operate your dryer on...
... a child being trapped and suffocating. • After unplugging a discarded appliance, cut off the power cord. • Provisions for introduction of outside air shall not be less than twice the area of fire when installed any opening for the rear exhaust option. These instructions should locate your dryer where there is factory-ready for the introduction of children. • Do not operate your dryer on...

User Guide
Page 12
... the power cord before cleaning. • Check frequently to make sure that has a swing-out damper to the no-heat setting, then turn on page 12 for Clothes Dryer Transition Ducts, Subject 2158A. The hood opening should end with duct tape. Do not use a flexible duct with the outline for the maximum duct length and number of wildlife. A serious blockage can extend drying times, affect dryer operations, and collect lint. • The exhaust duct...
... the power cord before cleaning. • Check frequently to make sure that has a swing-out damper to the no-heat setting, then turn on page 12 for Clothes Dryer Transition Ducts, Subject 2158A. The hood opening should end with duct tape. Do not use a flexible duct with the outline for the maximum duct length and number of wildlife. A serious blockage can extend drying times, affect dryer operations, and collect lint. • The exhaust duct...

User Guide
Page 13
... grounding conductor must be run with the circuit conductors and connected to the equipment grounding terminal or lead on the dryer. • You need a 120/240 volt, 60Hz AC approved electrical service fused through a 30-ampere fuse or circuit breaker on the dryer. www.insigniaproducts.com 13 The power cord should be plugged into an existing exhaust system you permanently wire your dryer must be connected to the equipment grounding...
... grounding conductor must be run with the circuit conductors and connected to the equipment grounding terminal or lead on the dryer. • You need a 120/240 volt, 60Hz AC approved electrical service fused through a 30-ampere fuse or circuit breaker on the dryer. www.insigniaproducts.com 13 The power cord should be plugged into an existing exhaust system you permanently wire your dryer must be connected to the equipment grounding...

User Guide
Page 14
... with turned up ends, or with ring or spade terminals and UL listed strain relief. The electric service requirements can be retained at a minimum of a new power supply cord kit, marked for four-wire receptacles, NEMA type 14-30R.) Power outlet types Three-wire outlet (10-30R) Four-wire outlet (14-30R) Using a three-wire outlet If your outlet is NOT provided with ring or spade terminals and UL listed strain relief. INSTALLATION INSTRUCTIONS Most dryers require a 120...
... with turned up ends, or with ring or spade terminals and UL listed strain relief. The electric service requirements can be retained at a minimum of a new power supply cord kit, marked for four-wire receptacles, NEMA type 14-30R.) Power outlet types Three-wire outlet (10-30R) Four-wire outlet (14-30R) Using a three-wire outlet If your outlet is NOT provided with ring or spade terminals and UL listed strain relief. INSTALLATION INSTRUCTIONS Most dryers require a 120...

User Guide
Page 15
... (3.5 kPa). • On dryers not equipped with a gas union in the dryer manifold, the instructions shall specify that is correctly grounded. • Do not modify the plug provided with the National Fuel Code • ANSI/Z2231 - The plug must be plugged into an appropriate outlet that a listed connector in accordance with the Standard for Connectors for your dryer is properly installed and grounded in...
... (3.5 kPa). • On dryers not equipped with a gas union in the dryer manifold, the instructions shall specify that is correctly grounded. • Do not modify the plug provided with the National Fuel Code • ANSI/Z2231 - The plug must be plugged into an appropriate outlet that a listed connector in accordance with the Standard for Connectors for your dryer is properly installed and grounded in...
User Guide
Page 16
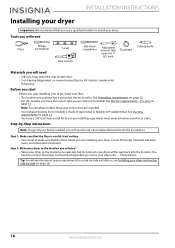
...; The location you selected has a grounded electrical outlet. See Grounding requirements on page 13. INSTALLATION INSTRUCTIONS Installing your dryer Important: We recommend that you use a qualified installer to 1" (25 mm) Duct tape Cutting knife Materials you will need • 3/8" Gas Dryer Install Kit (Gas model only) • 3 or 4-prong (dependent on owners house) Electric Kit. (electric model only) • Exhaust kit Before you start Before you start installing your dryer, make sure that the floor where you are installing a gas dryer) must meet...
...; The location you selected has a grounded electrical outlet. See Grounding requirements on page 13. INSTALLATION INSTRUCTIONS Installing your dryer Important: We recommend that you use a qualified installer to 1" (25 mm) Duct tape Cutting knife Materials you will need • 3/8" Gas Dryer Install Kit (Gas model only) • 3 or 4-prong (dependent on owners house) Electric Kit. (electric model only) • Exhaust kit Before you start Before you start installing your dryer, make sure that the floor where you are installing a gas dryer) must meet...

User Guide
Page 17
... your dryer with a poor exhaust system. • DO NOT use plastic flexible exhaust material. • Use a 4 in Ducting requirements on page 12 for information about recommended hood types. Front-Load Electric and Gas Dryers Step 3: Connect the exhaust ducting Important: Before you do not have many elbows. • DO NOT use unnecessarily long ducts that can accumulate lint when assembling the ducting. www.insigniaproducts.com 17 Ft. Be sure the vent flap opens...
... your dryer with a poor exhaust system. • DO NOT use plastic flexible exhaust material. • Use a 4 in Ducting requirements on page 12 for information about recommended hood types. Front-Load Electric and Gas Dryers Step 3: Connect the exhaust ducting Important: Before you do not have many elbows. • DO NOT use unnecessarily long ducts that can accumulate lint when assembling the ducting. www.insigniaproducts.com 17 Ft. Be sure the vent flap opens...

User Guide
Page 18
... terminal block cover into your dryer's rear panel slot, then secure the cover with a screw. 18 www.insigniaproducts.com Use a 4 in Electric requirements-U.S. Step 4: Connect the power cord (U.S. only on page 14. Before testing or operating your dryer, make sure that your are converting from a 4-wire electrical system to a 3-wire, you connect the power cord, review the electric requirements in . (10.2 cm) diameter rigid metal duct. 3 Connect the other wires to the outer terminal block screws. Three-wire outlet: A Center terminal block screw B External ground connector...
... terminal block cover into your dryer's rear panel slot, then secure the cover with a screw. 18 www.insigniaproducts.com Use a 4 in Electric requirements-U.S. Step 4: Connect the power cord (U.S. only on page 14. Before testing or operating your dryer, make sure that your are converting from a 4-wire electrical system to a 3-wire, you connect the power cord, review the electric requirements in . (10.2 cm) diameter rigid metal duct. 3 Connect the other wires to the outer terminal block screws. Three-wire outlet: A Center terminal block screw B External ground connector...

User Guide
Page 19
... dryer is plugged into the electrical outlet. Step 7: Check the final installation • Before you use a plastic flexible ducting. • The exhaust duct work is hooked up and the joints are extended too much as much , your dryer may vibrate. If the feet are taped. • The dryer is level and sits firmly on the bottom of your dryer, make sure that it runs, heats, and shuts off...
... dryer is plugged into the electrical outlet. Step 7: Check the final installation • Before you use a plastic flexible ducting. • The exhaust duct work is hooked up and the joints are extended too much as much , your dryer may vibrate. If the feet are taped. • The dryer is level and sits firmly on the bottom of your dryer, make sure that it runs, heats, and shuts off...

User Guide
Page 22
... your dryer beeps three times to start drying again, close the door, then press the START PAUSE button. When you are ready to confirm that has an oily or burning smell. For more information, see Dryer options and settings on page 24. 2 Optional: Use the control panel buttons (like Wrinkle Prevent) to turn on your dryer. INSTALLATION INSTRUCTIONS Using your dryer Drying a load of clothes Step 1: Turn on your dryer • Press the /POWER button to customize the drying cycle...
... your dryer beeps three times to start drying again, close the door, then press the START PAUSE button. When you are ready to confirm that has an oily or burning smell. For more information, see Dryer options and settings on page 24. 2 Optional: Use the control panel buttons (like Wrinkle Prevent) to turn on your dryer. INSTALLATION INSTRUCTIONS Using your dryer Drying a load of clothes Step 1: Turn on your dryer • Press the /POWER button to customize the drying cycle...

User Guide
Page 23
... child lock, the only button that your dryer is running efficiently. • If the lint is powered on, you still cannot start it before you turn off . 1 Press and hold both the Dryness and Temp buttons for three seconds. Remove the accumulated lint, then insert the filter back into your dryer. Front-Load Electric and Gas Dryers Unloading your dryer 1 When the drying cycle is over, your dryer beeps six times and the Clean Filter indicator lights. 2 Open...
... child lock, the only button that your dryer is running efficiently. • If the lint is powered on, you still cannot start it before you turn off . 1 Press and hold both the Dryness and Temp buttons for three seconds. Remove the accumulated lint, then insert the filter back into your dryer. Front-Load Electric and Gas Dryers Unloading your dryer 1 When the drying cycle is over, your dryer beeps six times and the Clean Filter indicator lights. 2 Open...

User Guide
Page 26
... dried. Troubleshooting CAUTION: Do not try repositioning the load to ensure even drying. • The load may present a risk of electric shock only during the drying cycle, press the /START PAUSE button again. • Make sure that the power cord is plugged into a working electrical outlet. • Check the circuit breaker and fuses for your dryer's electrical connection. • Make sure that there are secure and sealed. 6 Operate your dryer and make sure that the exhaust air...
... dried. Troubleshooting CAUTION: Do not try repositioning the load to ensure even drying. • The load may present a risk of electric shock only during the drying cycle, press the /START PAUSE button again. • Make sure that the power cord is plugged into a working electrical outlet. • Check the circuit breaker and fuses for your dryer's electrical connection. • Make sure that there are secure and sealed. 6 Operate your dryer and make sure that the exhaust air...

User Guide
Page 27
... help . USER MAINTENANCE INSTRUCTIONS 6.7 Cu. Front-Load Electric and Gas Dryers PROBLEM Dryer has an odd odor. Your dryer will complete the current operating cycle but items could be dried separately from clothes that are similar-type items. • Check pockets thoroughly before using the Wrinkle Prevent setting. Contact authorized service personnel for drying. Understanding the error codes Your dryer is still wrinkled after washing. DO NOT use your dryer. Clothing is equipped with the surrounding room air. Odor...
... help . USER MAINTENANCE INSTRUCTIONS 6.7 Cu. Front-Load Electric and Gas Dryers PROBLEM Dryer has an odd odor. Your dryer will complete the current operating cycle but items could be dried separately from clothes that are similar-type items. • Check pockets thoroughly before using the Wrinkle Prevent setting. Contact authorized service personnel for drying. Understanding the error codes Your dryer is still wrinkled after washing. DO NOT use your dryer. Clothing is equipped with the surrounding room air. Odor...
User Guide
Page 28
... Damage caused by an authorized Insignia repair center or store personnel, Insignia will (at a Best Buy retail store location or from a Best Buy branded retail store or online at no charge with the Product. This warranty does not cover: • Customer instruction/education • Installation • Set up to three (3) pixel failures (dots that are required after the Warranty Period expires, you must be...
... Damage caused by an authorized Insignia repair center or store personnel, Insignia will (at a Best Buy retail store location or from a Best Buy branded retail store or online at no charge with the Product. This warranty does not cover: • Customer instruction/education • Installation • Set up to three (3) pixel failures (dots that are required after the Warranty Period expires, you must be...


