
User Guide
Page 1
USER GUIDE 30-, 50-, or 70-Pint White Dehumidifier NS-DH30WH9-C / NS-DH50WH9 / NS-DH70WH9 / NS-DH50WH9-C / NS-DH70WH9-C Before using your new product, please read these instructions to prevent any damage.
USER GUIDE 30-, 50-, or 70-Pint White Dehumidifier NS-DH30WH9-C / NS-DH50WH9 / NS-DH70WH9 / NS-DH50WH9-C / NS-DH70WH9-C Before using your new product, please read these instructions to prevent any damage.

User Guide
Page 2
... SAFETY INSTRUCTIONS 3 Features 5 Package contents 5 Front ...5 Back...5 Control Panel ...6 Using your dehumidifier 7 Setting the humidity level 7 Setting the Power On and Power Off timers 7 Removing collected water with the bucket 7 Removing collected water with continuous draining 7 Maintaining your dehumidifier 8 Before maintaining your dehumidifier 8 Cleaning the grill and case 8 Cleaning the bucket 8 Cleaning the air filter 8 Storing your dehumidifier 8 Understanding the LED display codes 9 Troubleshooting 9 Specifications 10 ONE-YEAR LIMITED WARRANTY 11...
... SAFETY INSTRUCTIONS 3 Features 5 Package contents 5 Front ...5 Back...5 Control Panel ...6 Using your dehumidifier 7 Setting the humidity level 7 Setting the Power On and Power Off timers 7 Removing collected water with the bucket 7 Removing collected water with continuous draining 7 Maintaining your dehumidifier 8 Before maintaining your dehumidifier 8 Cleaning the grill and case 8 Cleaning the bucket 8 Cleaning the air filter 8 Storing your dehumidifier 8 Understanding the LED display codes 9 Troubleshooting 9 Specifications 10 ONE-YEAR LIMITED WARRANTY 11...

User Guide
Page 3
... . The wide blade or the third prong are important operating and maintenance instructions in the literature accompanying your dehumidifier in an electric shock. 18 Unplug the power cord by holding the plug, never by pulling the cord. 19 Turn off your dehumidifier before unplugging it . 7 Clean only with the manufacturer's instructions. 9 Do not install your dehumidifier. NS-DH30WH9-C / NS-DH50WH9 / NS-DH70WH9 / NS-DH50WH9-C / NS-DH70WH9-C 30-, 50...
... . The wide blade or the third prong are important operating and maintenance instructions in the literature accompanying your dehumidifier in an electric shock. 18 Unplug the power cord by holding the plug, never by pulling the cord. 19 Turn off your dehumidifier before unplugging it . 7 Clean only with the manufacturer's instructions. 9 Do not install your dehumidifier. NS-DH30WH9-C / NS-DH50WH9 / NS-DH70WH9 / NS-DH50WH9-C / NS-DH70WH9-C 30-, 50...
User Guide
Page 4
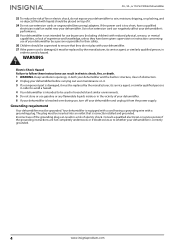
...these instructions can result in electric shock, fire, or death. 1 WARNING-Keep ventilation openings, in both your dehumidifier and the built-in structure, clear of obstruction. 2 Unplug your dehumidifier before carrying out user maintenance on top of your dehumidifier and unplug it from the power supply.... be supervised to ensure that is correctly installed and grounded. If the power cord is too short, have been given supervision or instruction concerning use of it. 24 Do not use , turn off your dehumidifier by the manufacturer, its service agent, or similarly qualified person, in...
...these instructions can result in electric shock, fire, or death. 1 WARNING-Keep ventilation openings, in both your dehumidifier and the built-in structure, clear of obstruction. 2 Unplug your dehumidifier before carrying out user maintenance on top of your dehumidifier and unplug it from the power supply.... be supervised to ensure that is correctly installed and grounded. If the power cord is too short, have been given supervision or instruction concerning use of it. 24 Do not use , turn off your dehumidifier by the manufacturer, its service agent, or similarly qualified person, in...

User Guide
Page 5
NS-DH30WH9-C / NS-DH50WH9 / NS-DH70WH9 / NS-DH50WH9-C / NS-DH70WH9-C Features Package contents • White dehumidifier • Power cord storage bracket (found in the water bucket) • User Guide Front Control panel Panel Back Water bucket Water level window Water level indicator float Caster Handle (both sides) Air intake (behind the air filter) Air filter Continuous drain hose outlet Power cord Air outlet Power cord storage bracket www.insigniaproducts.com 5
NS-DH30WH9-C / NS-DH50WH9 / NS-DH70WH9 / NS-DH50WH9-C / NS-DH70WH9-C Features Package contents • White dehumidifier • Power cord storage bracket (found in the water bucket) • User Guide Front Control panel Panel Back Water bucket Water level window Water level indicator float Caster Handle (both sides) Air intake (behind the air filter) Air filter Continuous drain hose outlet Power cord Air outlet Power cord storage bracket www.insigniaproducts.com 5

User Guide
Page 6
... to clean the filter. The compressor turns off the LED indicator. Press to select either Turbo or normal fan speed. Control Panel 30-, 50-, or 70-Pint White Dehumidifier # FEATURES 1 Full 2 Defrost 3 Continuous (Cont.) 4 Turbo 5 Timer 6 LED display 7 Power 8 Filter Reset 9 ± buttons FUNCTION Lights up when the auto defrost function is running. Press to high for maximum moisture removal. Press to turn off...
... to clean the filter. The compressor turns off the LED indicator. Press to select either Turbo or normal fan speed. Control Panel 30-, 50-, or 70-Pint White Dehumidifier # FEATURES 1 Full 2 Defrost 3 Continuous (Cont.) 4 Turbo 5 Timer 6 LED display 7 Power 8 Filter Reset 9 ± buttons FUNCTION Lights up when the auto defrost function is running. Press to high for maximum moisture removal. Press to turn off...

User Guide
Page 7
... the drain hose (not included) onto the drain outlet. 2 Direct the hose towards a floor drain. After you reach 10, the ± buttons increment by 1 hour up to the desired humidity level. Using your dehumidifier 1 Plug your dehumidifier's power plug into your dehumidifier on the side with the bucket 1 When the bucket full indicator lights, remove the bucket from draining.
... the drain hose (not included) onto the drain outlet. 2 Direct the hose towards a floor drain. After you reach 10, the ± buttons increment by 1 hour up to the desired humidity level. Using your dehumidifier 1 Plug your dehumidifier's power plug into your dehumidifier on the side with the bucket 1 When the bucket full indicator lights, remove the bucket from draining.
User Guide
Page 8
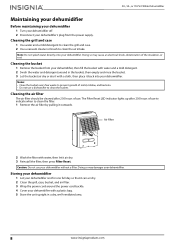
... not splash water directly onto your dehumidifier. Cleaning the air filter The air filter should be cleaned after 250 hours of use to indicate when to clean the air intake. The Filter Reset LED indicator lights up after 250 hours of use . Cleaning the bucket 1 Remove the bucket from the power supply. Doing so may cause an electrical shock, deterioration of mold, mildew, and bacteria. • Do not use your dehumidifier's plug from...
... not splash water directly onto your dehumidifier. Cleaning the air filter The air filter should be cleaned after 250 hours of use to indicate when to clean the air intake. The Filter Reset LED indicator lights up after 250 hours of use . Cleaning the bucket 1 Remove the bucket from the power supply. Doing so may cause an electrical shock, deterioration of mold, mildew, and bacteria. • Do not use your dehumidifier's plug from...

User Guide
Page 9
... reached your set humidity level. • Check the house fuse/circuit breaker box. • Make sure that you are using the water bucket, make sure that the air filter is removed or not in the correct position. Understanding the LED display codes CODE AS ES P2 Eb MEANING Humidity sensor error. If the error persists, contact Customer Service. If the error persists, contact Customer Service. This code only displays...
... reached your set humidity level. • Check the house fuse/circuit breaker box. • Make sure that you are using the water bucket, make sure that the air filter is removed or not in the correct position. Understanding the LED display codes CODE AS ES P2 Eb MEANING Humidity sensor error. If the error persists, contact Customer Service. If the error persists, contact Customer Service. This code only displays...
User Guide
Page 11
... obtain warranty service? If you own your purchase of your Insignia Product during the Warranty Period. AA, AAA, C etc.) • Products where the factory applied serial number has been altered or removed • Loss or Theft of this product or any part of Best Buy and its sole option): (1) repair the Product with new or rebuilt comparable products or parts. For this warranty statement. Products and parts replaced under this warranty...
... obtain warranty service? If you own your purchase of your Insignia Product during the Warranty Period. AA, AAA, C etc.) • Products where the factory applied serial number has been altered or removed • Loss or Theft of this product or any part of Best Buy and its sole option): (1) repair the Product with new or rebuilt comparable products or parts. For this warranty statement. Products and parts replaced under this warranty...
User Guide
Page 12
Distributed by Best Buy Purchasing, LLC 7601 Penn Ave South, Richfield, MN 55423 U.S.A. ©2019 Best Buy. All rights reserved. Made in China V3 ENGLISH 19-0116 For product inquiries, please contact us with the information below: 1-877-467-4289 www.insigniaproducts.com INSIGNIA is a trademark of Best Buy and its affiliated companies.
Distributed by Best Buy Purchasing, LLC 7601 Penn Ave South, Richfield, MN 55423 U.S.A. ©2019 Best Buy. All rights reserved. Made in China V3 ENGLISH 19-0116 For product inquiries, please contact us with the information below: 1-877-467-4289 www.insigniaproducts.com INSIGNIA is a trademark of Best Buy and its affiliated companies.
