User Manual (English)
Page 1
User Guide 3.5" Connected GPS NS-CNV10
User Guide 3.5" Connected GPS NS-CNV10

User Manual (English)
Page 3
... on the road and to help you on your way. www.insignia-products.com 1 a car navigation device that makes an enjoyable experience out of driving anywhere. NS-CNV10 Insignia NS-CNV10 3.5" Connected GPS Contents Congratulations on your new Insignia GPS. . 1 Safety information 3 Features 5 Setting up your GPS 9 Using your GPS 16 Home screen 18 Main menu 19 Following traffic incident alerts...
... on the road and to help you on your way. www.insignia-products.com 1 a car navigation device that makes an enjoyable experience out of driving anywhere. NS-CNV10 Insignia NS-CNV10 3.5" Connected GPS Contents Congratulations on your new Insignia GPS. . 1 Safety information 3 Features 5 Setting up your GPS 9 Using your GPS 16 Home screen 18 Main menu 19 Following traffic incident alerts...

User Manual (English)
Page 4
The Insignia GPS is included with the purchase of this device. If it recognizes that ...traffic information available. This will be available on your device and gives you power on www.bestbuy.com. 2 www.insignia-products.com Search and browse: Can search locations on any device. After this device One year of data connectivity service... the most up to choose an alternate route. Insignia reserves the right, at your destination. Services included with the option to 4 times per year. NS-CNV10 Many of the features of the Insignia GPS are and along your route. These will be ...
The Insignia GPS is included with the purchase of this device. If it recognizes that ...traffic information available. This will be available on your device and gives you power on www.bestbuy.com. 2 www.insignia-products.com Search and browse: Can search locations on any device. After this device One year of data connectivity service... the most up to choose an alternate route. Insignia reserves the right, at your destination. Services included with the option to 4 times per year. NS-CNV10 Many of the features of the Insignia GPS are and along your route. These will be ...

User Manual (English)
Page 5
... USB port on the side of your GPS will not be used for a long time, disconnect the plug from the outlet. If you have been made. NS-CNV10 Note Customers must renew their subscription within 1 year after the expiration of this device. www.insignia-products.com 3 Safety information Caution To... reduce the risk of electric shock and of damaging this GPS device, do not remove the back cover of...
... USB port on the side of your GPS will not be used for a long time, disconnect the plug from the outlet. If you have been made. NS-CNV10 Note Customers must renew their subscription within 1 year after the expiration of this device. www.insignia-products.com 3 Safety information Caution To... reduce the risk of electric shock and of damaging this GPS device, do not remove the back cover of...

User Manual (English)
Page 7
... power-supply cord or plug is designed to use the unit for any way, such as a navigational aid. Features Included 3.5" GPS unit AC adapter Car adapter USB cable www.insignia-products.com 5 NS-CNV10 12) Unplug this apparatus during lightning storms or when unused for aircraft navigation. Servicing is required when the apparatus has...
... power-supply cord or plug is designed to use the unit for any way, such as a navigational aid. Features Included 3.5" GPS unit AC adapter Car adapter USB cable www.insignia-products.com 5 NS-CNV10 12) Unplug this apparatus during lightning storms or when unused for aircraft navigation. Servicing is required when the apparatus has...

User Manual (English)
Page 8
Press for three seconds to receive real-time messages and display them on or off. Do not remove. 6 www.insignia-products.com • Mounting bracket • Mounting cradle • Touch pen • User Guide • SD memory card • SIM card Side panel NS-CNV10 1 2 6 3 4 7 5 # Component Description 1 Power button Press for one second to enter or exit standby mode. 2 Volume control Turn to adjust the volume of the speaker. 3 SIM card slot Contains a SIM card designed to turn the GPS on the LCD screen.
Press for three seconds to receive real-time messages and display them on or off. Do not remove. 6 www.insignia-products.com • Mounting bracket • Mounting cradle • Touch pen • User Guide • SD memory card • SIM card Side panel NS-CNV10 1 2 6 3 4 7 5 # Component Description 1 Power button Press for one second to enter or exit standby mode. 2 Volume control Turn to adjust the volume of the speaker. 3 SIM card slot Contains a SIM card designed to turn the GPS on the LCD screen.

User Manual (English)
Page 9
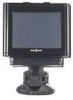
NS-CNV10 # Component Description 4 USB port Plug the AC or car adapter into this port to power or charge the GPS. 5 LCD screen Displays GPS information. 6 Battery charge Turns red when the battery is charging and indicator turns green when the battery is fully charged. 7 SD card slot Contains an SD card which includes the software for the normal operation of your GPS. www.insignia-products.com 7 Do not remove.
NS-CNV10 # Component Description 4 USB port Plug the AC or car adapter into this port to power or charge the GPS. 5 LCD screen Displays GPS information. 6 Battery charge Turns red when the battery is charging and indicator turns green when the battery is fully charged. 7 SD card slot Contains an SD card which includes the software for the normal operation of your GPS. www.insignia-products.com 7 Do not remove.
User Manual (English)
Page 10
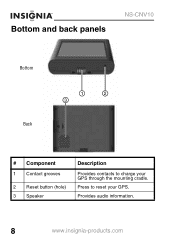
Bottom and back panels NS-CNV10 Bottom Back 1 2 3 # Component Description 1 Contact grooves Provides contacts to charge your GPS through the mounting cradle. 2 Reset button (hole) Press to reset your GPS. 3 Speaker Provides audio information. 8 www.insignia-products.com
Bottom and back panels NS-CNV10 Bottom Back 1 2 3 # Component Description 1 Contact grooves Provides contacts to charge your GPS through the mounting cradle. 2 Reset button (hole) Press to reset your GPS. 3 Speaker Provides audio information. 8 www.insignia-products.com

User Manual (English)
Page 11
... bracket. 3 Lift the suction fastener, place the assembly on the desired location, then press down the fastener (3) to secure it to the surface. www.insignia-products.com 9 NS-CNV10 Setting up your GPS Mounting your GPS in a car When you can use your GPS in a car, you use the supplied mounting accessories (mounting bracket and cradle).
... bracket. 3 Lift the suction fastener, place the assembly on the desired location, then press down the fastener (3) to secure it to the surface. www.insignia-products.com 9 NS-CNV10 Setting up your GPS Mounting your GPS in a car When you can use your GPS in a car, you use the supplied mounting accessories (mounting bracket and cradle).

User Manual (English)
Page 12
Make sure that your GPS in a position that impairs the driver's view of the road. Attention California and Minnesota drivers: California Vehicle Code Section 26708 and Minnesota Statute 2005, Section 169.71 prohibit suction mounts on car windshields, side, or rear windows, as they can obstruct the driver's clear view. 10 www.insignia-products.com Warning You must not mount your car's airbags are not obstructed by the GPS. NS-CNV10 4 Rotate the knob (4) to adjust the unit to the proper position.
Make sure that your GPS in a position that impairs the driver's view of the road. Attention California and Minnesota drivers: California Vehicle Code Section 26708 and Minnesota Statute 2005, Section 169.71 prohibit suction mounts on car windshields, side, or rear windows, as they can obstruct the driver's clear view. 10 www.insignia-products.com Warning You must not mount your car's airbags are not obstructed by the GPS. NS-CNV10 4 Rotate the knob (4) to adjust the unit to the proper position.

User Manual (English)
Page 13
NS-CNV10 Connecting the power Connecting the mounting cradle To connect the mounting cradle: 1 Plug the USB connector on the car adapter into the USB port on the back of the car adapter into the 12 V cigarette lighter socket. Caution Disconnect the GPS from the car adapter when you can also charge your GPS...you start your computer. In addition to prevent damage from a possible power surge. www.insignia-products.com 11 Mounting cradle with an AC adapter), plugging it into your GPS and the mounting cradle are connected correctly. Note Make sure that your car's cigarette ...
NS-CNV10 Connecting the power Connecting the mounting cradle To connect the mounting cradle: 1 Plug the USB connector on the car adapter into the USB port on the back of the car adapter into the 12 V cigarette lighter socket. Caution Disconnect the GPS from the car adapter when you can also charge your GPS...you start your computer. In addition to prevent damage from a possible power surge. www.insignia-products.com 11 Mounting cradle with an AC adapter), plugging it into your GPS and the mounting cradle are connected correctly. Note Make sure that your car's cigarette ...

User Manual (English)
Page 14
NS-CNV10 Connecting the AC adapter To connect the AC adapter: 1 Plug the USB connector on the AC adapter into a grounded AC power outlet. Notes Make sure that you use the AC adapter than when the GPS is brighter when you turn off your GPS. 100/240 V AC 2 Plug the AC plug into the USB port on battery power. 12 www.insignia-products.com The LCD screen is on the right side of your GPS before unplugging it.
NS-CNV10 Connecting the AC adapter To connect the AC adapter: 1 Plug the USB connector on the AC adapter into a grounded AC power outlet. Notes Make sure that you use the AC adapter than when the GPS is brighter when you turn off your GPS. 100/240 V AC 2 Plug the AC plug into the USB port on battery power. 12 www.insignia-products.com The LCD screen is on the right side of your GPS before unplugging it.

User Manual (English)
Page 15
www.insignia-products.com 13 Car cigarette lighter socket 2 Plug the other end of the car adapter into the USB port on the car adapter into the 12 V cigarette lighter socket. Caution Disconnect the GPS from the car adapter when you start your GPS. NS-CNV10 Connecting the car adapter To connect the car adapter: 1 Plug the USB connector on the right side of your car to prevent damage from a possible power surge.
www.insignia-products.com 13 Car cigarette lighter socket 2 Plug the other end of the car adapter into the USB port on the car adapter into the 12 V cigarette lighter socket. Caution Disconnect the GPS from the car adapter when you start your GPS. NS-CNV10 Connecting the car adapter To connect the car adapter: 1 Plug the USB connector on the right side of your car to prevent damage from a possible power surge.
User Manual (English)
Page 16
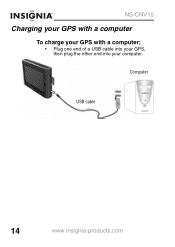
Computer USB cable 14 www.insignia-products.com NS-CNV10 Charging your GPS with a computer To charge your GPS with a computer: • Plug one end of a USB cable into your GPS, then plug the other end into your computer.
Computer USB cable 14 www.insignia-products.com NS-CNV10 Charging your GPS with a computer To charge your GPS with a computer: • Plug one end of a USB cable into your GPS, then plug the other end into your computer.
User Manual (English)
Page 17
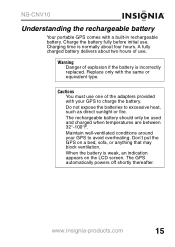
A fully charged battery delivers about four hours. www.insignia-products.com 15 Charging time is normally about two hours of use. Do not expose the batteries to avoid overheating. NS-CNV10 Understanding the rechargeable battery Your portable GPS comes with the same or equivalent type. Replace only with a built-in rechargeable battery. Maintain well-ventilated...
A fully charged battery delivers about four hours. www.insignia-products.com 15 Charging time is normally about two hours of use. Do not expose the batteries to avoid overheating. NS-CNV10 Understanding the rechargeable battery Your portable GPS comes with the same or equivalent type. Replace only with a built-in rechargeable battery. Maintain well-ventilated...
User Manual (English)
Page 18
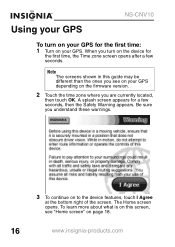
... learn more about what is on this guide may be different than the ones you are currently located, then touch OK. NS-CNV10 Using your GPS To turn on the device for a few seconds. A splash screen appears for the first time, the Time zone screen opens after a few seconds, then the ...Safety Warning appears. The Home screen opens. When you turn on your GPS for the first time: 1 Turn on your GPS depending on the firmware version. 2 Touch the time zone where you see "Home screen" on page 18. 16 www.insignia-products.com Note The screens shown in this screen, see on to...
... learn more about what is on this guide may be different than the ones you are currently located, then touch OK. NS-CNV10 Using your GPS To turn on the device for a few seconds. A splash screen appears for the first time, the Time zone screen opens after a few seconds, then the ...Safety Warning appears. The Home screen opens. When you turn on your GPS for the first time: 1 Turn on your GPS depending on the firmware version. 2 Touch the time zone where you see "Home screen" on page 18. 16 www.insignia-products.com Note The screens shown in this screen, see on to...

User Manual (English)
Page 19
www.insignia-products.com 17 If you are not sure of the available options and would like technical assistance, contact Insignia technical support. NS-CNV10 From the Home screen, you can do the following: • To see where you are , touch Map. • To find a route to a place of interest, touch Go to learn about the GPS settings and configurations, see "Setting up your device preferences, touch the Settings icon in the top right corner of the screen. If you would like to ... 4 To set your preferences" on page 48.
www.insignia-products.com 17 If you are not sure of the available options and would like technical assistance, contact Insignia technical support. NS-CNV10 From the Home screen, you can do the following: • To see where you are , touch Map. • To find a route to a place of interest, touch Go to learn about the GPS settings and configurations, see "Setting up your device preferences, touch the Settings icon in the top right corner of the screen. If you would like to ... 4 To set your preferences" on page 48.

User Manual (English)
Page 20
Home screen Wireless network strength Battery charge GPS signal active NS-CNV10 Go to Settings and Preferences Go to Main Menu View current map location 18 www.insignia-products.com
Home screen Wireless network strength Battery charge GPS signal active NS-CNV10 Go to Settings and Preferences Go to Main Menu View current map location 18 www.insignia-products.com

User Manual (English)
Page 22
The GPS icon on the Home screen. NS-CNV10 • Navigate to an Address when you have saved as restaurants, theaters, and public services. • Get directions from your location to .. Creating a route to ... the home page shows the signal is in clear view of interest such as Favorites. • Review your current GPS location. The Main menu opens. 20 www.insignia-products.com Make sure that your GPS is active . To create a route to an address: 1 Touch Go to places you enter it or an intersection...
The GPS icon on the Home screen. NS-CNV10 • Navigate to an Address when you have saved as restaurants, theaters, and public services. • Get directions from your location to .. Creating a route to ... the home page shows the signal is in clear view of interest such as Favorites. • Review your current GPS location. The Main menu opens. 20 www.insignia-products.com Make sure that your GPS is active . To create a route to an address: 1 Touch Go to places you enter it or an intersection...
User Manual (English)
Page 23
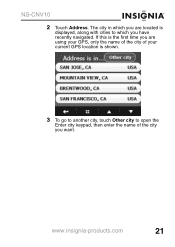
www.insignia-products.com 21 NS-CNV10 2 Touch Address. If this is the first time you are located is shown. 3 To go to another city, touch Other city to which you want. The city in which you are using your GPS, only the name of the city of your current GPS location is displayed, along with cities to open the Enter city keypad, then enter the name of the city you have recently navigated.
www.insignia-products.com 21 NS-CNV10 2 Touch Address. If this is the first time you are located is shown. 3 To go to another city, touch Other city to which you want. The city in which you are using your GPS, only the name of the city of your current GPS location is displayed, along with cities to open the Enter city keypad, then enter the name of the city you have recently navigated.


