

User Manual (English)
Page 3
... 32 Setting parental controls 32 Setting or changing the password 32 Locking control buttons 33 Blocking unrated TV 34 Setting parental control levels 35 Downloading rating information 36 Using closed captioning 37 Turning closed captioning on or off 37 Selecting the analog closed captioning mode 38 Customizing digital closed captioning styles 38 Adjusting time settings 39 Setting the clock 39 Setting the sleep timer 40 Adjusting menu settings 41 Selecting the menu language 41 Turning the Input Sensor on or off 41 Labeling an input source 42 Restoring settings to the defaults...
... 32 Setting parental controls 32 Setting or changing the password 32 Locking control buttons 33 Blocking unrated TV 34 Setting parental control levels 35 Downloading rating information 36 Using closed captioning 37 Turning closed captioning on or off 37 Selecting the analog closed captioning mode 38 Customizing digital closed captioning styles 38 Adjusting time settings 39 Setting the clock 39 Setting the sleep timer 40 Adjusting menu settings 41 Selecting the menu language 41 Turning the Input Sensor on or off 41 Labeling an input source 42 Restoring settings to the defaults...

User Manual (English)
Page 5
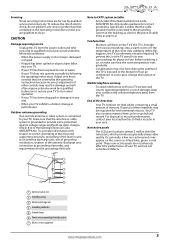
..., speakers, chests, or carts may fall over , or knocked down. • Make sure that you route all cords and cables so that the wall where you are required for proper use your flat panel display As you enjoy your TV, always remember: • One size of wall mount does not fit all instructions supplied by curious children. Wall mounting If you decide to safely wall mount your...
..., speakers, chests, or carts may fall over , or knocked down. • Make sure that you route all cords and cables so that the wall where you are required for proper use your flat panel display As you enjoy your TV, always remember: • One size of wall mount does not fit all instructions supplied by curious children. Wall mounting If you decide to safely wall mount your...
User Manual (English)
Page 7
... switching it states that are covered by following conditions: • When the power supply cord or plug is grounded to the breeze from the TV. Disposal of the room rises suddenly. Article 810 of the National Electrical Code, ANSI/NFPA No. 70, provides information with your TV picture and sound, operating problems, or even damage, keep your TV exhibits a distinct change...
... switching it states that are covered by following conditions: • When the power supply cord or plug is grounded to the breeze from the TV. Disposal of the room rises suddenly. Article 810 of the National Electrical Code, ANSI/NFPA No. 70, provides information with your TV picture and sound, operating problems, or even damage, keep your TV exhibits a distinct change...

User Manual (English)
Page 9
... selections. For more information, see "Selecting a channel" on . To completely disconnect power, unplug the power cord. See the instructions that came with the wall-mount bracket for screw lengths. • The mounting holes on the back of your TV take type M6 screws. 16.58 in. (400 mm) TV components Package contents • 46" LED TV • Remote control and batteries (2 AAA) • Power cord • Stand base and screws (4) • Stand cover • Quick Setup Guide...
... selections. For more information, see "Selecting a channel" on . To completely disconnect power, unplug the power cord. See the instructions that came with the wall-mount bracket for screw lengths. • The mounting holes on the back of your TV take type M6 screws. 16.58 in. (400 mm) TV components Package contents • 46" LED TV • Remote control and batteries (2 AAA) • Power cord • Stand base and screws (4) • Stand cover • Quick Setup Guide...

User Manual (English)
Page 11
... as the channel number, channel name (if available), or signal source. Press to the HDMI 1/DVI or HDMI 2/ARC jack. Press to set the sleep timer. For more times to select the device connected to change TV channels. Press to select the video input source, then press ENTER. In TV mode, press to return to the COMPONENT/AV Y/VIDEO, PB, and PR jacks or the COMPONENT/AV Y/VIDEO jack. Warning: When your TV on the remote control to close the...
... as the channel number, channel name (if available), or signal source. Press to the HDMI 1/DVI or HDMI 2/ARC jack. Press to set the sleep timer. For more times to select the device connected to change TV channels. Press to select the video input source, then press ENTER. In TV mode, press to return to the COMPONENT/AV Y/VIDEO, PB, and PR jacks or the COMPONENT/AV Y/VIDEO jack. Warning: When your TV on the remote control to close the...
User Manual (English)
Page 14
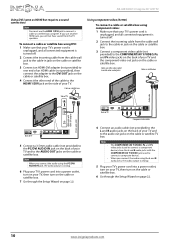
... the AUDIO OUT jacks on the cable or satellite box. NS-46E340A13 Insignia 46" LED TV Using DVI (same as HDMI but requires a sound connection) Note You must use another HDMI jack, you will not hear sound from the TV speakers. Cable or satellite box Using component video (better) To connect a cable or satellite box using DVI. If you use the HDMI 1/DVI jack to connect a cable or satellite box using component video: 1 Make sure that your TV's power cord is unplugged, and all connected equipment is analog. 6 Plug your TV's power cord into a power outlet, turn...
... the AUDIO OUT jacks on the cable or satellite box. NS-46E340A13 Insignia 46" LED TV Using DVI (same as HDMI but requires a sound connection) Note You must use another HDMI jack, you will not hear sound from the TV speakers. Cable or satellite box Using component video (better) To connect a cable or satellite box using DVI. If you use the HDMI 1/DVI jack to connect a cable or satellite box using component video: 1 Make sure that your TV's power cord is unplugged, and all connected equipment is analog. 6 Plug your TV's power cord into a power outlet, turn...
User Manual (English)
Page 16
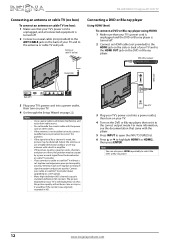
... 3 Plug your TV's power cord into a power outlet, then turn on your TV. 4 Go through the Setup Wizard on others, the problem may need to install a set -top box. NS-46E340A13 Insignia 46" LED TV Connecting an antenna or cable TV (no box) To connect an antenna or cable TV (no box) Connecting a DVD or Blu-ray player Using HDMI (best) To connect a DVD or Blu-ray player using HDMI: 1 Make sure that your TV's power cord is unplugged and the DVD or Blu-ray player is turned off . 2 Connect...
... 3 Plug your TV's power cord into a power outlet, then turn on your TV. 4 Go through the Setup Wizard on others, the problem may need to install a set -top box. NS-46E340A13 Insignia 46" LED TV Connecting an antenna or cable TV (no box) To connect an antenna or cable TV (no box) Connecting a DVD or Blu-ray player Using HDMI (best) To connect a DVD or Blu-ray player using HDMI: 1 Make sure that your TV's power cord is unplugged and the DVD or Blu-ray player is turned off . 2 Connect...

User Manual (English)
Page 27
... on -screen menu. Insignia 46" LED TV Settings menu (TV mode) Settings Parental Controls Closed Caption Time Menu Language Auto Input Sensing Input Labels INlink Computer Settings System Info Reset to Default Picture Audio Channels Settings Photos English On Move Set various TV options OK ENTER Select MENU Previous EXIT Exit Photos menu (USB mode) Photos Photos Menu Picture Audio Channels Settings Photos Move OK ENTER Select MENU Previous View files from a USB flash drive that is connected to the TV EXIT Exit Navigating the menus Press MENU to open the favorite channel list...
... on -screen menu. Insignia 46" LED TV Settings menu (TV mode) Settings Parental Controls Closed Caption Time Menu Language Auto Input Sensing Input Labels INlink Computer Settings System Info Reset to Default Picture Audio Channels Settings Photos English On Move Set various TV options OK ENTER Select MENU Previous EXIT Exit Photos menu (USB mode) Photos Photos Menu Picture Audio Channels Settings Photos Move OK ENTER Select MENU Previous View files from a USB flash drive that is connected to the TV EXIT Exit Navigating the menus Press MENU to open the favorite channel list...

User Manual (English)
Page 41
... sound is 0000. Picture Settings-Closed Caption Caption Control Analog Caption Digital Caption Digital CC Settings Audio Channels Settings Photos CC Off CC1 CS1 MOVE OK ENTER SELECT Adjust Closed Captioning settings MENU PREVIOUS EXIT EXIT 4 Press S or T to enter the four-digit password. A menu opens. 5 Press S or T to highlight Reset RRT5, then press ENTER. Picture Settings-Parental Controls Audio Channels Settings Photos Enter Password Using closed captioning Turning closed captioning on or off : 1 Press MENU. Picture Picture Mode Brightness Contrast Color Advanced Video...
... sound is 0000. Picture Settings-Closed Caption Caption Control Analog Caption Digital Caption Digital CC Settings Audio Channels Settings Photos CC Off CC1 CS1 MOVE OK ENTER SELECT Adjust Closed Captioning settings MENU PREVIOUS EXIT EXIT 4 Press S or T to enter the four-digit password. A menu opens. 5 Press S or T to highlight Reset RRT5, then press ENTER. Picture Settings-Parental Controls Audio Channels Settings Photos Enter Password Using closed captioning Turning closed captioning on or off : 1 Press MENU. Picture Picture Mode Brightness Contrast Color Advanced Video...

User Manual (English)
Page 43
... S or T to highlight Digital CC Settings, then press ENTER. Settings Parental Controls Closed Caption Time Menu Language Auto Input Sensing Input Labels INlink Computer Settings System Info Reset to Default Picture Audio Channels Settings Photos English On Move OK ENTER Select Set Date/Time and Sleep Timer MENU Previous EXIT Exit 3 Press S or T to highlight Settings, then press T or ENTER. The Settings menu opens. Settings-Time Date / Time Sleep Timer Picture Audio Channels Settings Photos Off Move OK ENTER Select MENU Previous Adjust the date and time to highlight an option...
... S or T to highlight Digital CC Settings, then press ENTER. Settings Parental Controls Closed Caption Time Menu Language Auto Input Sensing Input Labels INlink Computer Settings System Info Reset to Default Picture Audio Channels Settings Photos English On Move OK ENTER Select Set Date/Time and Sleep Timer MENU Previous EXIT Exit 3 Press S or T to highlight Settings, then press T or ENTER. The Settings menu opens. Settings-Time Date / Time Sleep Timer Picture Audio Channels Settings Photos Off Move OK ENTER Select MENU Previous Adjust the date and time to highlight an option...
User Manual (English)
Page 55
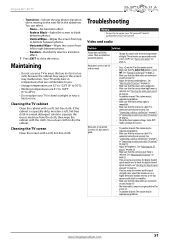
... power cord is plugged in direct sunlight or near a heat source. The station may be experiencing problems. • Make sure that are black bars around the picture. • Change the aspect ratio. Video and audio Problem Solution Picture does not fill the screen. If the cabinet is low, adjust the antenna or use your TV. • The video cable(s) you are using may be experiencing problems. www.insigniaproducts.com 51 Your TV works best...
... power cord is plugged in direct sunlight or near a heat source. The station may be experiencing problems. • Make sure that are black bars around the picture. • Change the aspect ratio. Video and audio Problem Solution Picture does not fill the screen. If the cabinet is low, adjust the antenna or use your TV. • The video cable(s) you are using may be experiencing problems. www.insigniaproducts.com 51 Your TV works best...
User Manual (English)
Page 56
... burned into the screen. Sound is causing interference. To check the digital channel signal strength, see "Checking the digital signal strength" on page 12. • If you have headphones connected. Try turning off one device at a time to be caused by your TV. After you are using may need to install a set . See "Connecting a cable or satellite box" on page 9 or "Connecting an antenna or cable TV (no box)" on page 32...
... burned into the screen. Sound is causing interference. To check the digital channel signal strength, see "Checking the digital signal strength" on page 12. • If you have headphones connected. Try turning off one device at a time to be caused by your TV. After you are using may need to install a set . See "Connecting a cable or satellite box" on page 9 or "Connecting an antenna or cable TV (no box)" on page 32...
User Manual (English)
Page 57
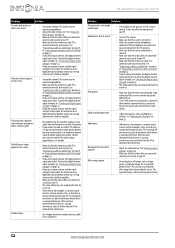
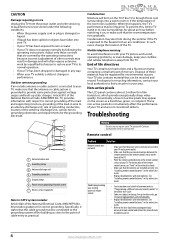
Insignia 46" LED TV Remote control Problem Solution Remote control does not work . Problem Solution One or more channels do not work . • Make sure that the power cord is correctly connected to your TV and a power outlet. • Make sure that there are no channels. Control buttons do not display. The channel may have selected the correct input for example, a surround sound receiver, external speakers, fans, or hair dryers) may be low. See "Setting the sleep timer" on...
Insignia 46" LED TV Remote control Problem Solution Remote control does not work . Problem Solution One or more channels do not work . • Make sure that the power cord is correctly connected to your TV and a power outlet. • Make sure that there are no channels. Control buttons do not display. The channel may have selected the correct input for example, a surround sound receiver, external speakers, fans, or hair dryers) may be low. See "Setting the sleep timer" on...
User Manual (English)
Page 58
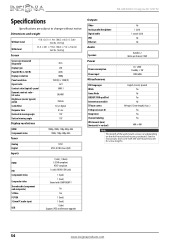
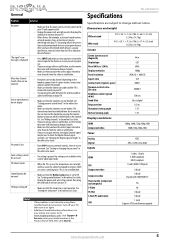
...1080i, 720p, 480p, 480i Analog Digital Inputs NTSC ATSC, 8-VSB, Clear-QAM HDMI DVI Component video Composite video Shared audio (component and composite) S-Video PC/VGA 3.5mm PC audio input USB 1 (side), 1 (back) E-EDID compliant HDCP compliant 1 (side) (HDMI 1/DVI jack) 1 (back) 1 (back) Shared with COMPONENT Y Yes No 1 (back) 1 (back) 1 (side) Supports JPEG and firmware upgrade Outputs Video Analog audio/headphone Digital audio WiFi Ethernet Audio No 1 (side) 1 coaxial (side) No No Speakers Power Number: 2 Watts per channel: 10W Power consumption Power input Miscellaneous On: 120W...
...1080i, 720p, 480p, 480i Analog Digital Inputs NTSC ATSC, 8-VSB, Clear-QAM HDMI DVI Component video Composite video Shared audio (component and composite) S-Video PC/VGA 3.5mm PC audio input USB 1 (side), 1 (back) E-EDID compliant HDCP compliant 1 (side) (HDMI 1/DVI jack) 1 (back) 1 (back) Shared with COMPONENT Y Yes No 1 (back) 1 (back) 1 (side) Supports JPEG and firmware upgrade Outputs Video Analog audio/headphone Digital audio WiFi Ethernet Audio No 1 (side) 1 coaxial (side) No No Speakers Power Number: 2 Watts per channel: 10W Power consumption Power input Miscellaneous On: 120W...
Quick Setup Guide (English)
Page 2
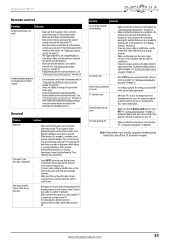
... you connect the AV receiver's HDMI OUT jack to the TV? symbols on -screen menu. Note: Auto is only available when Auto Zoom in the box but is a trademark of the remote control to ll the screen. ZOOM Changes how the picture displays on the screen size and the TV program. RECALL Returns to your User Guide is connected. PICTURE Selects the video mode. If you connect the cable box to your TV's power cord to the previous channel. Universal remote controls One...
... you connect the AV receiver's HDMI OUT jack to the TV? symbols on -screen menu. Note: Auto is only available when Auto Zoom in the box but is a trademark of the remote control to ll the screen. ZOOM Changes how the picture displays on the screen size and the TV program. RECALL Returns to your User Guide is connected. PICTURE Selects the video mode. If you connect the cable box to your TV's power cord to the previous channel. Universal remote controls One...

Important Information (English)
Page 3
... the LCD panel is made of glass. Replacement parts When replacement parts are inside. NS-46E340A13 WARNING Electric shock hazard To reduce the risk of the polarized or grounding-type plug. Unauthorized substitutions may cause skin inflammation. • If the liquid gets in fire, electric shock, personal injury, or other than the other apparatus (including amplifiers) that the service technician uses replacement parts specified...
... the LCD panel is made of glass. Replacement parts When replacement parts are inside. NS-46E340A13 WARNING Electric shock hazard To reduce the risk of the polarized or grounding-type plug. Unauthorized substitutions may cause skin inflammation. • If the liquid gets in fire, electric shock, personal injury, or other than the other apparatus (including amplifiers) that the service technician uses replacement parts specified...
Important Information (English)
Page 4
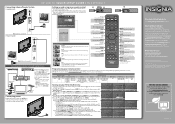
... information with your TV picture and sound, operating problems, or even damage, keep your existing universal remote control • See instructions and a table of the room rises suddenly. In such cases, change the location of the National Electrical Code, ANSI/NFPA No. 40 provides guidance for the grounding electrode. 1 2 3 4 5 7 6 1 Antenna lead-in the online User Guide. • Make sure that the cable ground must be...
... information with your TV picture and sound, operating problems, or even damage, keep your existing universal remote control • See instructions and a table of the room rises suddenly. In such cases, change the location of the National Electrical Code, ANSI/NFPA No. 40 provides guidance for the grounding electrode. 1 2 3 4 5 7 6 1 Antenna lead-in the online User Guide. • Make sure that the cable ground must be...
Important Information (English)
Page 5
....4 kg) Screen size measured diagonally Display type Panel 60 Hz vs.120 Hz Display resolution Panel resolution Aspect ratio Contrast ratio (typical)-panel Dynamic contrast ratio- See "Locking control buttons" in the online User Guide. • Unplug the power cord, wait a few seconds, then plug the cord back in and turn on your TV. • Make sure that the sleep timer is not turned on again. Notes • • If the problem is not solved by pressing the number buttons or...
....4 kg) Screen size measured diagonally Display type Panel 60 Hz vs.120 Hz Display resolution Panel resolution Aspect ratio Contrast ratio (typical)-panel Dynamic contrast ratio- See "Locking control buttons" in the online User Guide. • Unplug the power cord, wait a few seconds, then plug the cord back in and turn on your TV. • Make sure that the sleep timer is not turned on again. Notes • • If the problem is not solved by pressing the number buttons or...

Important Information (English)
Page 6
Outputs Video Analog audio/headphone Digital audio WiFi Ethernet Audio No 1 (side) 1 coaxial (side) No No Speakers Power Number: 2 Watts per channel: 10W Power consumption Power input Miscellaneous On: 120W Standby:
Outputs Video Analog audio/headphone Digital audio WiFi Ethernet Audio No 1 (side) 1 coaxial (side) No No Speakers Power Number: 2 Watts per channel: 10W Power consumption Power input Miscellaneous On: 120W Standby:
Information Brochure (English)
Page 2
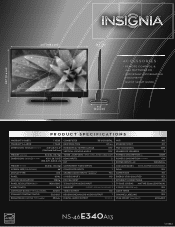
... 3D Y/C DIGITAL RESPONSE TIME 8.5 ms HORIZONTAL VIEWING ANGLE 178° VERTICAL VIEWING ANGLE 178° TUNER -SUPPORTS: NTSC, ATSC, 8-VSB, CLEAR-QAM HDMI INPUTS 2 DVI 1 COMPONENT VIDEO INPUTS 1 COMPOSITE INPUTS SHARED AUDIO INPUTS COMPONENT & COMPOSITE S-VIDEO INPUTS 1 YES NO PC/VGA INPUT 1 3.5mm PC/DVI AUDIO INPUT 1 USB PORT SUPPORTS JPEG AND FW UPGRADES 1 VIDEO OUTPUT NO HEADPHONE/ANALOG AUDIO OUTPUT 1 DIGITAL AUDIO OUTPUT 1 COAXIAL WIFI NO ETHERNET PORT NO WATTS/CHANNEL 10W NUMBER OF SPEAKERS 2 POWER CONSUMPTION ON 120W POWER CONSUMPTION IN...
... 3D Y/C DIGITAL RESPONSE TIME 8.5 ms HORIZONTAL VIEWING ANGLE 178° VERTICAL VIEWING ANGLE 178° TUNER -SUPPORTS: NTSC, ATSC, 8-VSB, CLEAR-QAM HDMI INPUTS 2 DVI 1 COMPONENT VIDEO INPUTS 1 COMPOSITE INPUTS SHARED AUDIO INPUTS COMPONENT & COMPOSITE S-VIDEO INPUTS 1 YES NO PC/VGA INPUT 1 3.5mm PC/DVI AUDIO INPUT 1 USB PORT SUPPORTS JPEG AND FW UPGRADES 1 VIDEO OUTPUT NO HEADPHONE/ANALOG AUDIO OUTPUT 1 DIGITAL AUDIO OUTPUT 1 COAXIAL WIFI NO ETHERNET PORT NO WATTS/CHANNEL 10W NUMBER OF SPEAKERS 2 POWER CONSUMPTION ON 120W POWER CONSUMPTION IN...


