
Quick Setup Guide (English)
Page 2
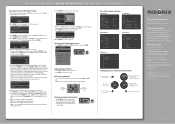
... number directly using time information from a digital channel. 9 Press ENTER. de R.L. All rights reserved. INSIGNIA is a trademark of the OSD. The Select Language of sound, and picture and sound settings. STD... press ENTER. Source List ▲ TV ▼ AV ---- Need additional help? Plug & Play Newfoundland Atlantic Eastern Central Mountain Pacific ▼ 10 Press ...) will be satisfactory in the list. 42"/50" PLASMA HDTV I QUICK SETUP GUIDE I NS-42P650A11/NS-50P650A11 Turning on your TV for details. Air Cable Auto Start Start Start 6 If you...
... number directly using time information from a digital channel. 9 Press ENTER. de R.L. All rights reserved. INSIGNIA is a trademark of the OSD. The Select Language of sound, and picture and sound settings. STD... press ENTER. Source List ▲ TV ▼ AV ---- Need additional help? Plug & Play Newfoundland Atlantic Eastern Central Mountain Pacific ▼ 10 Press ...) will be satisfactory in the list. 42"/50" PLASMA HDTV I QUICK SETUP GUIDE I NS-42P650A11/NS-50P650A11 Turning on your TV for details. Air Cable Auto Start Start Start 6 If you...
User Manual (English)
Page 14
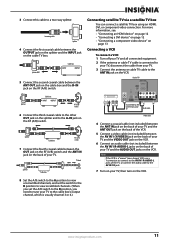
... TV box using an HDMI, DVI, or component video connection. Note If the VCR is a "mono" (non-stereo) VCR, use a Y connector to connect to the AV IN 1 R-AUDIO-L jacks of your TV to ANT IN on back of TV Audio cable Video cable 4 Connect a coaxial cable (not included) between the ANT... jack on the back of your TV and the ANT OUT jack on the back of the VCR. 5 Connect a video cable (not included) between the AV IN 1 (Y/VIDEO) jack on the back of your TV and the VIDEO OUT jack on the VCR. 6 Connect an audio cable (not included) between the...
... TV box using an HDMI, DVI, or component video connection. Note If the VCR is a "mono" (non-stereo) VCR, use a Y connector to connect to the AV IN 1 R-AUDIO-L jacks of your TV to ANT IN on back of TV Audio cable Video cable 4 Connect a coaxial cable (not included) between the ANT... jack on the back of your TV and the ANT OUT jack on the back of the VCR. 5 Connect a video cable (not included) between the AV IN 1 (Y/VIDEO) jack on the back of your TV and the VIDEO OUT jack on the VCR. 6 Connect an audio cable (not included) between the...

User Manual (English)
Page 15
... on the back of your TV. If this happens, contact the company that are the same as the COMPONENT IN 1 (Y/VIDEO) jack, and the AV IN 1 R-AUDIO-L jacks are not 1.3-compliant may with abnormal color if the HDMI device supports HDMI versions older than 1.3. For more information, see "Connecting...console. 3 Turn on your TV and the HDMI OUT jack on the back of your TV. Connecting a camcorder or game console Notes • • The AV IN 1 VIDEO (Y/VIDEO) jack is no image. To connect a camcorder or game console: 1 Turn off your TV and all connected equipment. 2 Connect an...
... on the back of your TV. If this happens, contact the company that are the same as the COMPONENT IN 1 (Y/VIDEO) jack, and the AV IN 1 R-AUDIO-L jacks are not 1.3-compliant may with abnormal color if the HDMI device supports HDMI versions older than 1.3. For more information, see "Connecting...console. 3 Turn on your TV and the HDMI OUT jack on the back of your TV. Connecting a camcorder or game console Notes • • The AV IN 1 VIDEO (Y/VIDEO) jack is no image. To connect a camcorder or game console: 1 Turn off your TV and all connected equipment. 2 Connect an...
User Manual (English)
Page 18
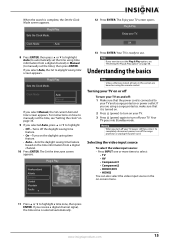
... that it . Selecting the video input source To select the video input source: • Press INPUT one or more times to select: • TV • AV • Component1 • Component2 • HDMI1/DVI • HDMI2 You can also select the video input source in this section are using a surge protector, make...
... that it . Selecting the video input source To select the video input source: • Press INPUT one or more times to select: • TV • AV • Component1 • Component2 • HDMI1/DVI • HDMI2 You can also select the video input source in this section are using a surge protector, make...
User Manual (English)
Page 19
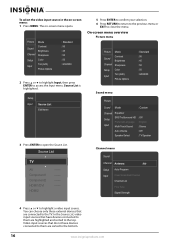
The on -screen menu: 1 Press MENU. Source List is highlighted. Source List ▲ TV ▼ AV ---- HDMI1/DVI ---- In the Source List, video input sources that are connected to the TV. Component1 ---- Channel menu Sound Channel Antenna : Air Setup Input Auto ...
The on -screen menu: 1 Press MENU. Source List is highlighted. Source List ▲ TV ▼ AV ---- HDMI1/DVI ---- In the Source List, video input sources that are connected to the TV. Component1 ---- Channel menu Sound Channel Antenna : Air Setup Input Auto ...
User Manual (English)
Page 41
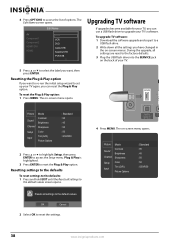
...: 1 Press MENU. OK Cancel 2 Select OK to access the list of your TV, you have changed in the on the back of options. Edit Name AV Component1 Component2 HDMI1/DVI HDMI2 ---VCR DVD Cable STB Satellite STB PVR STB Upgrading TV software If upgrades become available for your TV. 5 Press or...
...: 1 Press MENU. OK Cancel 2 Select OK to access the list of your TV, you have changed in the on the back of options. Edit Name AV Component1 Component2 HDMI1/DVI HDMI2 ---VCR DVD Cable STB Satellite STB PVR STB Upgrading TV software If upgrades become available for your TV. 5 Press or...

