
Quick Setup Guide (English)
Page 2
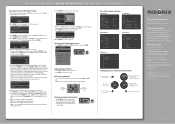
.... HDMI1 ---- See your TV. de R.L. Av. 42"/50" PLASMA HDTV I QUICK SETUP GUIDE I NS-42P650A11/NS-50P650A11 Turning on your TV for the rst time 1 Connect the power cord, then press (power) to turn o the sound. Plug & Play Select the Antenna source to highlight a source , then press ENTER. ... Parcial de Desarrollo Santa Fe, Delegación Cuajimalpa, Distrito Federal, México 05349 RFC#BBI0802114Q2 © 2010 BBY Solutions, Inc. INSIGNIA is a trademark of the OSD screen opens. ENGLISH 09-11571 If you do not know which type of the OSD. The Set the...
.... HDMI1 ---- See your TV. de R.L. Av. 42"/50" PLASMA HDTV I QUICK SETUP GUIDE I NS-42P650A11/NS-50P650A11 Turning on your TV for the rst time 1 Connect the power cord, then press (power) to turn o the sound. Plug & Play Select the Antenna source to highlight a source , then press ENTER. ... Parcial de Desarrollo Santa Fe, Delegación Cuajimalpa, Distrito Federal, México 05349 RFC#BBI0802114Q2 © 2010 BBY Solutions, Inc. INSIGNIA is a trademark of the OSD screen opens. ENGLISH 09-11571 If you do not know which type of the OSD. The Set the...
User Manual (English)
Page 2
... video device 13 Connecting a computer using DVI 13 Connecting a digital audio amplifier 13 Connecting an analog audio amplifier 13 Turning on your TV for the first time 14 Understanding the basics 16 Turning your TV on or off 16 Selecting the video input source 16 On-screen menu overview 17 Navigating the...
... video device 13 Connecting a computer using DVI 13 Connecting a digital audio amplifier 13 Connecting an analog audio amplifier 13 Turning on your TV for the first time 14 Understanding the basics 16 Turning your TV on or off 16 Selecting the video input source 16 On-screen menu overview 17 Navigating the...
User Manual (English)
Page 3
... closed captioning mode 33 Customizing DTV closed captioning styles 33 Adjusting time settings 34 Setting the clock 34 Setting the time zone 35 Turning Daylight Saving Time on or off 36 Setting the sleep timer 36 Setting a wake-up a favorite channel list 26 Viewing a ...favorite channel 27 Checking the DTV signal strength 27 Setting parental controls 28 Setting or changing the password 28 Turning parental controls on or off 28 Temporarily unblocking a channel 29 Setting U.S. Contents Improving the image from a game console 20 Adjusting the ...
... closed captioning mode 33 Customizing DTV closed captioning styles 33 Adjusting time settings 34 Setting the clock 34 Setting the time zone 35 Turning Daylight Saving Time on or off 36 Setting the sleep timer 36 Setting a wake-up a favorite channel list 26 Viewing a ...favorite channel 27 Checking the DTV signal strength 27 Setting parental controls 28 Setting or changing the password 28 Turning parental controls on or off 28 Temporarily unblocking a channel 29 Setting U.S. Contents Improving the image from a game console 20 Adjusting the ...
User Manual (English)
Page 9
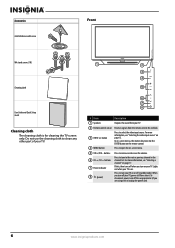
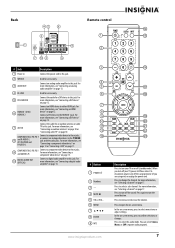
...the volume. For more information, see "Selecting a channel" on page 15. For more information, see "Selecting the video input source" on page 17. Blinks, then turns off (standby mode). buttons 6 CH /CH buttons 7 Power indicator 8 (power) Press to the next or previous channel in the channel list. Lights red when ... functions like the ENTER button on or off when you are using one) or unplug the power cord. 6 www.insigniaproducts.com To disconnect power, turn off your TV is for cleaning the TV screen only. Do not use the cleaning cloth to open the on . When you...
...the volume. For more information, see "Selecting a channel" on page 15. For more information, see "Selecting the video input source" on page 17. Blinks, then turns off (standby mode). buttons 6 CH /CH buttons 7 Power indicator 8 (power) Press to the next or previous channel in the channel list. Lights red when ... functions like the ENTER button on or off when you are using one) or unplug the power cord. 6 www.insigniaproducts.com To disconnect power, turn off your TV is for cleaning the TV screen only. Do not use the cleaning cloth to open the on . When you...
User Manual (English)
Page 10
... a component video device to these jacks, or connect an analog video device to the Y/VIDEO jack and the audio jacks. To disconnect power, turn off the sound. Press to increase or decrease the volume. For more information, see "Connecting a component video device" on page 13 or "...digital audio amplifier" on page 13. # Button 1 POWER 2 Numbers 3- 4 MUTE 5 VOL+/VOL- 6 MENU 7 8 ENTER 9 MTS www.insigniaproducts.com Description Press to turn the sound back on page 17. Press to this jack. Press to open the on page 17. For more information, see "Connecting a DVI device" on...
... a component video device to these jacks, or connect an analog video device to the Y/VIDEO jack and the audio jacks. To disconnect power, turn off the sound. Press to increase or decrease the volume. For more information, see "Connecting a component video device" on page 13 or "...digital audio amplifier" on page 13. # Button 1 POWER 2 Numbers 3- 4 MUTE 5 VOL+/VOL- 6 MENU 7 8 ENTER 9 MTS www.insigniaproducts.com Description Press to turn the sound back on page 17. Press to this jack. Press to open the on page 17. For more information, see "Connecting a DVI device" on...
User Manual (English)
Page 11
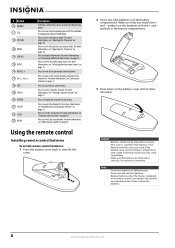
Press to select the video input source. Press to turn closed captioning on or off. Press to tune to open the channel list. Press to the previously viewed channel. Make sure that batteries are disposed ...
Press to select the video input source. Press to turn closed captioning on or off. Press to tune to open the channel list. Press to the previously viewed channel. Make sure that batteries are disposed ...

User Manual (English)
Page 12
... remote control: 1 Find the code for your universal remote control's instructions and try several codes before finding a match. 2 Follow your Insignia TV with a new or existing universal remote control. Installing the ferrite core The ferrite core shields cables from the power outlet. The remote...not intend to use your TV for an extended period of time, turn off the surge protector (if you must use the correct type of your universal remote control's instructions for details. 3 If all Insignia TVs manufactured after Jan. 1, 2007) Universal remote control manufacturers and ...
... remote control: 1 Find the code for your universal remote control's instructions and try several codes before finding a match. 2 Follow your Insignia TV with a new or existing universal remote control. Installing the ferrite core The ferrite core shields cables from the power outlet. The remote...not intend to use your TV for an extended period of time, turn off the surge protector (if you must use the correct type of your universal remote control's instructions for details. 3 If all Insignia TVs manufactured after Jan. 1, 2007) Universal remote control manufacturers and ...
User Manual (English)
Page 13
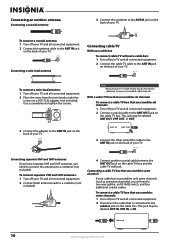
... channels (such as premium channels), you do not need to connect the antennas to a combiner (not included). To connect separate VHF and UHF antennas: 1 Turn off your TV and all connected equipment. 2 Connect the antenna cable to the ANT IN jack on the back of your TV and all connected... wires from the twin leads under the screws on a 300-75 Ω adapter (not included). To connect a cable TV box that unscrambles all channels: 1 Turn off your TV. This jack may be labeled ANT IN, VHF IN, or IN. Connecting an outdoor antenna Connecting a coaxial antenna 3 Connect the combiner to...
... channels (such as premium channels), you do not need to connect the antennas to a combiner (not included). To connect separate VHF and UHF antennas: 1 Turn off your TV and all connected equipment. 2 Connect the antenna cable to the ANT IN jack on the back of your TV and all connected... wires from the twin leads under the screws on a 300-75 Ω adapter (not included). To connect a cable TV box that unscrambles all channels: 1 Turn off your TV. This jack may be labeled ANT IN, VHF IN, or IN. Connecting an outdoor antenna Connecting a coaxial antenna 3 Connect the combiner to...
User Manual (English)
Page 14
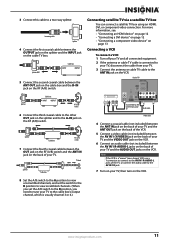
... use a Y connector to connect to the AV IN 1 R-AUDIO-L jacks of the TV, or connect the audio cable to the AV IN 1 R jack. 7 Turn on your TV, then turn on the VCR. 8 Set the A/B switch to the A position to view unscrambled channels, and set the switch to the B position to view scrambled... OUTPUT 5 Connect the second coaxial cable between the OUTPUT jack on the splitter and the INPUT jack on page 13 Connecting a VCR To connect a VCR: 1 Turn off your TV and all connected equipment. 2 If the antenna or cable TV cable is usually channel 3 or 4.) www.insigniaproducts.com 11 Splitter Cable box...
... use a Y connector to connect to the AV IN 1 R-AUDIO-L jacks of the TV, or connect the audio cable to the AV IN 1 R jack. 7 Turn on your TV, then turn on the VCR. 8 Set the A/B switch to the A position to view unscrambled channels, and set the switch to the B position to view scrambled... OUTPUT 5 Connect the second coaxial cable between the OUTPUT jack on the splitter and the INPUT jack on page 13 Connecting a VCR To connect a VCR: 1 Turn off your TV and all connected equipment. 2 If the antenna or cable TV cable is usually channel 3 or 4.) www.insigniaproducts.com 11 Splitter Cable box...

User Manual (English)
Page 15
... the DVI device. 12 www.insigniaproducts.com Connecting a DVI device Note When connecting a DVI device, you can connect it to the back of your TV: 1 Turn off your TV and all connected equipment. 2 Connect an HDMI cable (not included) between the DVI AUDIO IN jacks on the back of your TV... cable Video cable 3 Connect an audio cable (not included) between the HDMI IN 1 (DVI) jack on the back of your TV. To connect a DVI device: 1 Turn off your TV and all connected equipment. 2 Connect an HDMI/DVI cable (not included) or DVI-HDMI adapter (not included) between the AV IN 1 R-AUDIO...
... the DVI device. 12 www.insigniaproducts.com Connecting a DVI device Note When connecting a DVI device, you can connect it to the back of your TV: 1 Turn off your TV and all connected equipment. 2 Connect an HDMI cable (not included) between the DVI AUDIO IN jacks on the back of your TV... cable Video cable 3 Connect an audio cable (not included) between the HDMI IN 1 (DVI) jack on the back of your TV. To connect a DVI device: 1 Turn off your TV and all connected equipment. 2 Connect an HDMI/DVI cable (not included) or DVI-HDMI adapter (not included) between the AV IN 1 R-AUDIO...

User Manual (English)
Page 16
...IN 2 jacks on the back of TV Digital audio optical cable Connecting an analog audio amplifier Note When you connect your TV, then turn on the amplifier. Connecting a component video device Note Make sure that you connect the video and audio to the home theater receiver. ... the component video device. When the TV is sent to adjust the volume. Audio cable www.insigniaproducts.com 13 To connect a component video device: 1 Turn off your TV and all connected equipment. 2 Connect a component video cable (not included) between the COMPONENT IN 1 L/R or COMPONENT IN 2 R-AUDIO...
...IN 2 jacks on the back of TV Digital audio optical cable Connecting an analog audio amplifier Note When you connect your TV, then turn on the amplifier. Connecting a component video device Note Make sure that you connect the video and audio to the home theater receiver. ... the component video device. When the TV is sent to adjust the volume. Audio cable www.insigniaproducts.com 13 To connect a component video device: 1 Turn off your TV and all connected equipment. 2 Connect a component video cable (not included) between the COMPONENT IN 1 L/R or COMPONENT IN 2 R-AUDIO...
User Manual (English)
Page 17
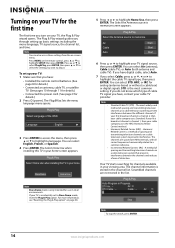
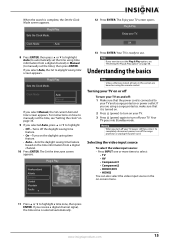
..., or Spanish. 4 Press ENTER. The most common setting. Incremental Related Carriers (IRC) - A method of spacing and transmitting television channels on a cable television system that you turn on your TV, the Plug & Play wizard opens. You can also access these settings from the on-screen menu.... Turning on your TV for the first time The first time you have: • Installed the remote control batteries. (See page 8 for details.) • Connected an ...
..., or Spanish. 4 Press ENTER. The most common setting. Incremental Related Carriers (IRC) - A method of spacing and transmitting television channels on a cable television system that you turn on your TV, the Plug & Play wizard opens. You can also access these settings from the on-screen menu.... Turning on your TV for the first time The first time you have: • Installed the remote control batteries. (See page 8 for details.) • Connected an ...
User Manual (English)
Page 18
... press or to highlight Auto (to automatically set the time, see "Resetting the Plug & Play option" on and off your TV. 3 Press (power) again to turn off the surge protector or unplug the power cord. The Set the time zone screen appears. Your TV goes into it is complete, the Set... are using a surge protector, make sure that the power cord is connected to your TV on or off the daylight saving time feature. • On-Turns on the daylight saving time feature. • Auto-Sets the daylight saving time feature based on -screen menu. 11 Press or to highlight a time zone...
... press or to highlight Auto (to automatically set the time, see "Resetting the Plug & Play option" on and off your TV. 3 Press (power) again to turn off the surge protector or unplug the power cord. The Set the time zone screen appears. Your TV goes into it is complete, the Set... are using a surge protector, make sure that the power cord is connected to your TV on or off the daylight saving time feature. • On-Turns on the daylight saving time feature. • Auto-Sets the daylight saving time feature based on -screen menu. 11 Press or to highlight a time zone...
User Manual (English)
Page 20
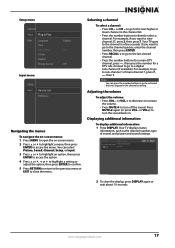
... menu or EXIT to the channel in the channel scanning. or VOL+) to view channel 27, press 2, then press 7. For example, if you want to turn off the sound. Press MUTE again (or press VOL- Displaying additional information To display additional information: 1 Press DISPLAY. TV #1 Fri, Dec 19 2:05 am...select a channel: • Press CH or CH to go to access the menu. or VOL + to decrease or increase the volume. • Press MUTE to turn the sound back on -screen menu. 2 Press or to highlight a menu, then press ENTER to a channel that was skipped in a few seconds. Adjusting the ...
... menu or EXIT to the channel in the channel scanning. or VOL+) to view channel 27, press 2, then press 7. For example, if you want to turn off the sound. Press MUTE again (or press VOL- Displaying additional information To display additional information: 1 Press DISPLAY. TV #1 Fri, Dec 19 2:05 am...select a channel: • Press CH or CH to go to access the menu. or VOL + to decrease or increase the volume. • Press MUTE to turn the sound back on -screen menu. 2 Press or to highlight a menu, then press ENTER to a channel that was skipped in a few seconds. Adjusting the ...
User Manual (English)
Page 21
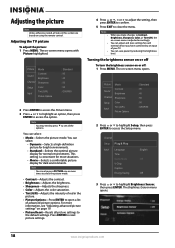
The on or off To turn the brightness sensor on -screen menu opens with Picture highlighted. Picture Mode Sound Channel Contrast Brightness Sharpness Setup Input Color Tint (G/R) Picture Options : Standard : 95 : ... : G50/R50 2 Press ENTER to access the Picture menu. 3 Press or to highlight an option, then press ENTER to highlight Brightness Sensor, then press ENTER. Turning the brightness sensor on or off : 1 Press MENU. Channel Setup Plug & Play Input Language Time Game Mode V-Chip Caption Energy Saving : English : Off : Off 3 Press...
The on or off To turn the brightness sensor on -screen menu opens with Picture highlighted. Picture Mode Sound Channel Contrast Brightness Sharpness Setup Input Color Tint (G/R) Picture Options : Standard : 95 : ... : G50/R50 2 Press ENTER to access the Picture menu. 3 Press or to highlight an option, then press ENTER to highlight Brightness Sensor, then press ENTER. Turning the brightness sensor on or off : 1 Press MENU. Channel Setup Plug & Play Input Language Time Game Mode V-Chip Caption Energy Saving : English : Off : Off 3 Press...

User Manual (English)
Page 23
... 16:9, Wide Fit, 4:3 16:9, 4:3, Wide Fit, Screen Fit Notes You can adjust the position. You can improve the image and sound from a game console by turning the Game Mode feature on or off . Press or to the default settings. Improving the image from a game console You can select Dark (darkens the... picture mode is set to Standard and cannot be changed . • The sound mode is set to highlight Off or On, then press ENTER. To turn the Game Mode feature on or off : 1 Press MENU. Channel Setup Plug & Play Input Language Time Game Mode V-Chip Caption Energy Saving : English : Off ...
... 16:9, Wide Fit, 4:3 16:9, 4:3, Wide Fit, Screen Fit Notes You can adjust the position. You can improve the image and sound from a game console by turning the Game Mode feature on or off . Press or to the default settings. Improving the image from a game console You can select Dark (darkens the... picture mode is set to Standard and cannot be changed . • The sound mode is set to highlight Off or On, then press ENTER. To turn the Game Mode feature on or off : 1 Press MENU. Channel Setup Plug & Play Input Language Time Game Mode V-Chip Caption Energy Saving : English : Off ...
User Manual (English)
Page 24
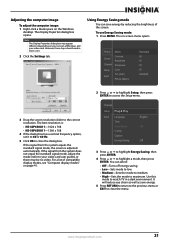
Using Energy Saving mode You can select: • Off-Turns off energy saving. • Low-Sets mode to low. • Medium-Sets the mode to medium. • High-Sets the mode to the correct resolution. ..., adjust the mode (refer to access the Setup menu. If the signal from the system equals the standard signal mode, the screen is : • NS-42P650A11-1024 x 768 • NS-50P650A11-1360 x 768 4 If the dialog box has a vertical frequency option, set it to 60 or 60 Hz. 5 Click OK to close the...
Using Energy Saving mode You can select: • Off-Turns off energy saving. • Low-Sets mode to low. • Medium-Sets the mode to medium. • High-Sets the mode to the correct resolution. ..., adjust the mode (refer to access the Setup menu. If the signal from the system equals the standard signal mode, the screen is : • NS-42P650A11-1024 x 768 • NS-50P650A11-1360 x 768 4 If the dialog box has a vertical frequency option, set it to 60 or 60 Hz. 5 Click OK to close the...
User Manual (English)
Page 25
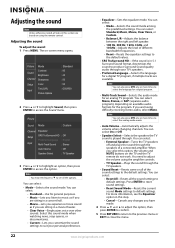
... the TV sound is in 5.1 Surround Sound format, downmixes the sound to close the menu. 22 www.insigniaproducts.com You can select: • External Speaker-Turns the TV speakers off and plays the sound through your personal preferences. • Equalizer-Sets the equalizer mode. Select this sound mode when watching news...
... the TV sound is in 5.1 Surround Sound format, downmixes the sound to close the menu. 22 www.insigniaproducts.com You can select: • External Speaker-Turns the TV speakers off and plays the sound through your personal preferences. • Equalizer-Sets the equalizer mode. Select this sound mode when watching news...

User Manual (English)
Page 31
... to access the V-Chip password screen opens. Enter PIN V-Chip 2 Press or to highlight Setup, then press ENTER to enter the password, then press ENTER. Turning parental controls on -screen menu opens. Picture Mode Sound Channel Contrast Brightness Sharpness Setup Color Tint (G/R) Input Picture Options : Standard : 95 : 45 : 50 : 50 : G50...
... to access the V-Chip password screen opens. Enter PIN V-Chip 2 Press or to highlight Setup, then press ENTER to enter the password, then press ENTER. Turning parental controls on -screen menu opens. Picture Mode Sound Channel Contrast Brightness Sharpness Setup Color Tint (G/R) Input Picture Options : Standard : 95 : 45 : 50 : 50 : G50...
User Manual (English)
Page 35
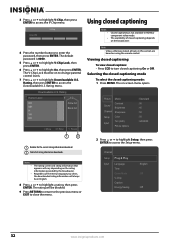
Viewing closed captioning To view closed captions: • Press CCD to highlight a rating, then press ENTER. The rating will be in English. 8 Press or to turn closed captioning Notes • • Closed captioning is 0000. 5 Press or to highlight V-Chip Lock, then press ENTER. 6 Press or to access the Setup menu. ...
Viewing closed captioning To view closed captions: • Press CCD to highlight a rating, then press ENTER. The rating will be in English. 8 Press or to turn closed captioning Notes • • Closed captioning is 0000. 5 Press or to highlight V-Chip Lock, then press ENTER. 6 Press or to access the Setup menu. ...


