
Quick Setup Guide (English)
Page 1
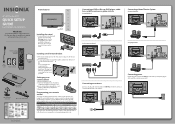
...cable (not included) to the back of your TV using four M8 screws. Front features 42"/50" Plasma HDTV QUICK SETUP GUIDE NS-42P650A11/NS-50P650A11 Thank You for purchasing this product for years to the back of your TV using the two screws provided. Installing a wall-mount... the battery compartment. 3 Replace the cover. Use 2 or more people to the screen. Programming your remote control To program an existing universal remote control to work with your universal Insignia remote control to the stand with the + and - Warning- Connecting power Plug the AC power cord into ...
...cable (not included) to the back of your TV using four M8 screws. Front features 42"/50" Plasma HDTV QUICK SETUP GUIDE NS-42P650A11/NS-50P650A11 Thank You for purchasing this product for years to the back of your TV using the two screws provided. Installing a wall-mount... the battery compartment. 3 Replace the cover. Use 2 or more people to the screen. Programming your remote control To program an existing universal remote control to work with your universal Insignia remote control to the stand with the + and - Warning- Connecting power Plug the AC power cord into ...
Quick Setup Guide (English)
Page 2
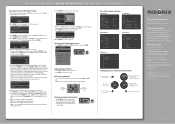
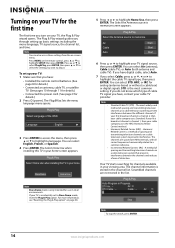
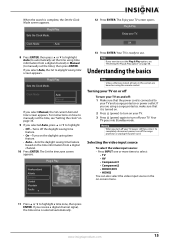
42"/50" PLASMA HDTV I QUICK SETUP GUIDE I NS-42P650A11/NS-50P650A11 Turning on your TV for the rst time 1 Connect the power ...know which type of their respective owners. The Enjoy your TV. Plug & Play Enjoy your TV screen opens. INSIGNIA is a trademark of the OSD screen opens. Registered in your home. ENGLISH 09-11571 Press ▲ or...& Play Input Language Time Game Mode V-Chip Caption Energy Saving : English : Off : Off Navigating menus with your remote control Press to return to the previous menu Press to move to highlight: • O -Turns o the daylight saving...
42"/50" PLASMA HDTV I QUICK SETUP GUIDE I NS-42P650A11/NS-50P650A11 Turning on your TV for the rst time 1 Connect the power ...know which type of their respective owners. The Enjoy your TV. Plug & Play Enjoy your TV screen opens. INSIGNIA is a trademark of the OSD screen opens. Registered in your home. ENGLISH 09-11571 Press ▲ or...& Play Input Language Time Game Mode V-Chip Caption Energy Saving : English : Off : Off Navigating menus with your remote control Press to return to the previous menu Press to move to highlight: • O -Turns o the daylight saving...
User Manual (English)
Page 2
... stand 4 Securing your TV to a wall or cabinet 4 Installing a wall-mount bracket 5 TV components 5 Accessories 5 Cleaning cloth 6 Front 6 Back 7 Remote control 7 Using the remote control 8 Installing remote control batteries 8 Aiming the remote control 9 Programming a universal remote control to work with your TV . . . . 9 Making connections 9 Connecting the power 9 Installing the ferrite core 9 Connecting an outdoor antenna...
... stand 4 Securing your TV to a wall or cabinet 4 Installing a wall-mount bracket 5 TV components 5 Accessories 5 Cleaning cloth 6 Front 6 Back 7 Remote control 7 Using the remote control 8 Installing remote control batteries 8 Aiming the remote control 9 Programming a universal remote control to work with your TV . . . . 9 Making connections 9 Connecting the power 9 Installing the ferrite core 9 Connecting an outdoor antenna...
User Manual (English)
Page 5
... has been damaged in the vicinity of power supplied to be fatal. If you connect the Class I apparatus to a grounding-type, three-prong outlet. 17 Remote control batteries should not be exposed to excessive heat such as sunshine, fire, or the like. 18 The apparatus should not be exposed to dripping...
... has been damaged in the vicinity of power supplied to be fatal. If you connect the Class I apparatus to a grounding-type, three-prong outlet. 17 Remote control batteries should not be exposed to excessive heat such as sunshine, fire, or the like. 18 The apparatus should not be exposed to dripping...
User Manual (English)
Page 8
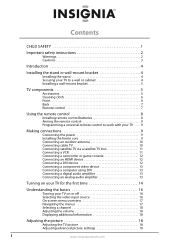
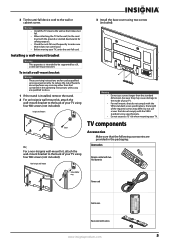
...Screw Or, For a non-Insignia wall-mount kit, attach the wall-mount bracket to the back of hazards, do so. 1 If the stand is intended to be supported by qualified service personnel only. Do not use screws that contained in the packaging: Accessories Remote control with two AAA batteries ... not come loose. • Before moving your TV. TV components Accessories Make sure that do not comply with screws www.insigniaproducts.com 5 Non-Insignia wall mount 3 Install the base cover using four M8 screws (not included). Warning • Install the TV close to the wall so that ...
...Screw Or, For a non-Insignia wall-mount kit, attach the wall-mount bracket to the back of hazards, do so. 1 If the stand is intended to be supported by qualified service personnel only. Do not use screws that contained in the packaging: Accessories Remote control with two AAA batteries ... not come loose. • Before moving your TV. TV components Accessories Make sure that do not comply with screws www.insigniaproducts.com 5 Non-Insignia wall mount 3 Install the base cover using four M8 screws (not included). Warning • Install the TV close to the wall so that ...
User Manual (English)
Page 9
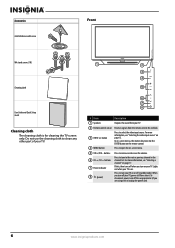
...see "Selecting a channel" on page 15. Do not use the cleaning cloth to turn your TV on or off your TV. 2 Remote control sensor Receives signals from the remote control. Blinks, then turns off the surge protector (if you are using one) or unplug the power cord. 6 www.insigniaproducts.com Press...Quick Setup Guide Cleaning cloth The cleaning cloth is on -screen menu. 5 VOL+/VOL- To disconnect power, turn off when you turn on the remote control. 4 MENU button Press to select the video input source. In on-screen menus, this button functions like the ENTER button on your TV ...
...see "Selecting a channel" on page 15. Do not use the cleaning cloth to turn your TV on or off your TV. 2 Remote control sensor Receives signals from the remote control. Blinks, then turns off the surge protector (if you are using one) or unplug the power cord. 6 www.insigniaproducts.com Press...Quick Setup Guide Cleaning cloth The cleaning cloth is on -screen menu. 5 VOL+/VOL- To disconnect power, turn off when you turn on the remote control. 4 MENU button Press to select the video input source. In on-screen menus, this button functions like the ENTER button on your TV ...
User Manual (English)
Page 10
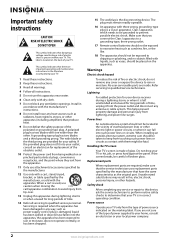
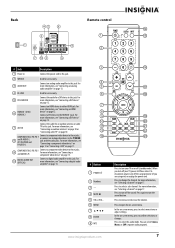
... amplifier" on page 13. 10 DIGITAL AUDIO OUT (OPTICAL) Connect a digital audio amplifier to this jack. Press to select menu items or adjust settings. Back Remote control # Jack Description 1 Power in Connect the power cord to this jack. 2 SERVICE Used for a DVI device to this jack. For more information, see "Connecting...
... amplifier" on page 13. 10 DIGITAL AUDIO OUT (OPTICAL) Connect a digital audio amplifier to this jack. Press to select menu items or adjust settings. Back Remote control # Jack Description 1 Power in Connect the power cord to this jack. 2 SERVICE Used for a DVI device to this jack. For more information, see "Connecting...
User Manual (English)
Page 11
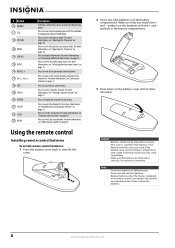
...Press to set the sleep timer. For more information, see "Displaying additional information" on page 17. Using the remote control Installing remote control batteries To install remote control batteries: 1 Press the battery cover latch in the battery compartment. 3 Press down on the battery cover until... it clicks into the battery compartment. If the remote control is depleted. Press to select a favorite channel. Press to close the on-screen menu. Cautions • Batteries should not be...
...Press to set the sleep timer. For more information, see "Displaying additional information" on page 17. Using the remote control Installing remote control batteries To install remote control batteries: 1 Press the battery cover latch in the battery compartment. 3 Press down on the battery cover until... it clicks into the battery compartment. If the remote control is depleted. Press to select a favorite channel. Press to close the on-screen menu. Cautions • Batteries should not be...

User Manual (English)
Page 12
..., and the model number is turned on the chart, but many other compatible models are using the Insignia TV remote to work with a new or existing universal remote control. If you are listed on . Installing the ferrite core The ferrite core shields cables from the power ...outlet. You will use the numbered code to a surge protector or power outlet. See your universal remote control's instructions for details. 3 If all Insignia TVs manufactured after Jan. 1, 2007) Universal remote control manufacturers and models Philips PHDVD5, PH5DSS, PMDVR8, PDVR8 RCA RCU807 One for All URC-6690...
..., and the model number is turned on the chart, but many other compatible models are using the Insignia TV remote to work with a new or existing universal remote control. If you are listed on . Installing the ferrite core The ferrite core shields cables from the power ...outlet. You will use the numbered code to a surge protector or power outlet. See your universal remote control's instructions for details. 3 If all Insignia TVs manufactured after Jan. 1, 2007) Universal remote control manufacturers and models Philips PHDVD5, PH5DSS, PMDVR8, PDVR8 RCA RCU807 One for All URC-6690...
User Manual (English)
Page 17
...Carriers (IRC) - The Plug&Play Sets the menu language menu opens. Plug & Play Select Language of distortion. If you have : • Installed the remote control batteries. (See page 8 for details.) • Connected an antenna, cable TV, or satellite TV. (See pages 10 through setting up basic settings...the HRC (Harmonic Relate Carrier) method. The channel information is the most widely used method of spacing and transmitting television channels on the remote control, press or to prevent interference. Press or to select Plug&Play, press ENTER, then press or to select the setting you ...
...Carriers (IRC) - The Plug&Play Sets the menu language menu opens. Plug & Play Select Language of distortion. If you have : • Installed the remote control batteries. (See page 8 for details.) • Connected an antenna, cable TV, or satellite TV. (See pages 10 through setting up basic settings...the HRC (Harmonic Relate Carrier) method. The channel information is the most widely used method of spacing and transmitting television channels on the remote control, press or to prevent interference. Press or to select Plug&Play, press ENTER, then press or to select the setting you ...
User Manual (English)
Page 18
... reset the Plug & Play option, see "Setting the clock" on page 34. 9 If you selected Auto, press or to manually set the time using the remote control. OK 8 Press ENTER, then press or to highlight Auto (to automatically set the time), then press ENTER. For instructions on how to manually set...
... reset the Plug & Play option, see "Setting the clock" on page 34. 9 If you selected Auto, press or to manually set the time using the remote control. OK 8 Press ENTER, then press or to highlight Auto (to automatically set the time), then press ENTER. For instructions on how to manually set...
User Manual (English)
Page 21
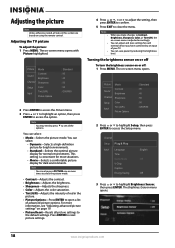
... brightness sensor on or off To turn the brightness sensor on -screen menu opens. to Contrast, Brightness, Sharpness, Color, or Tint G/R), the on using the remote control. Picture Mode Sound Channel Contrast Brightness Sharpness Setup Input Color Tint (G/R) Picture Options : Standard : 95 : 45 : 50 : 50 : G50/R50 2 Press or to highlight...
... brightness sensor on or off To turn the brightness sensor on -screen menu opens. to Contrast, Brightness, Sharpness, Color, or Tint G/R), the on using the remote control. Picture Mode Sound Channel Contrast Brightness Sharpness Setup Input Color Tint (G/R) Picture Options : Standard : 95 : 45 : 50 : 50 : G50/R50 2 Press or to highlight...
User Manual (English)
Page 25
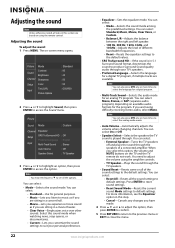
... to adjust the option, then press ENTER to confirm. 5 Press RETURN to return to the previous menu or EXIT to adjust the volume using the remote control. For more information, see all the options. Adjusting the sound Note Unless otherwise noted, all tasks in this section are based on the TV... and the TV remote do not work. Note You may need to close the menu. 22 www.insigniaproducts.com You can select: • Mode-Selects the sound mode. You...
... to adjust the option, then press ENTER to confirm. 5 Press RETURN to return to the previous menu or EXIT to adjust the volume using the remote control. For more information, see all the options. Adjusting the sound Note Unless otherwise noted, all tasks in this section are based on the TV... and the TV remote do not work. Note You may need to close the menu. 22 www.insigniaproducts.com You can select: • Mode-Selects the sound mode. You...
User Manual (English)
Page 26
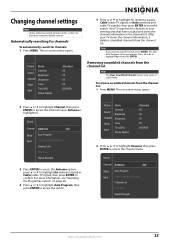
... : 50 : G50/R50 2 Press or to highlight Channel, then press ENTER to start the search. Press or to access the option. The on using the remote control. The Stop Auto Program? For more information, see "Resetting the Plug & Play option" on -screen menu opens. 2 Press or to highlight Channel, then press...
... : 50 : G50/R50 2 Press or to highlight Channel, then press ENTER to start the search. Press or to access the option. The on using the remote control. The Stop Auto Program? For more information, see "Resetting the Plug & Play option" on -screen menu opens. 2 Press or to highlight Channel, then press...
User Manual (English)
Page 30
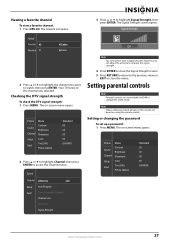
... Channel Channel List Fine Tune Signal Strength Note You cannot fine-tune a digital channel. Setting parental controls Note Parental controls are based on using the remote control. The Favorite List opens. 3 Press or to access the Channel menu. Checking the DTV signal strength To check the DTV signal strength: 1 Press MENU...
... Channel Channel List Fine Tune Signal Strength Note You cannot fine-tune a digital channel. Setting parental controls Note Parental controls are based on using the remote control. The Favorite List opens. 3 Press or to access the Channel menu. Checking the DTV signal strength To check the DTV signal strength: 1 Press MENU...
User Manual (English)
Page 35
... English. 8 Press or to access the Setup menu. Regardless of the menu language you select, the downloaded rating information will vary depending on using the remote control. Notes • • The rating screen and rating information that appears will always be in this section are based on the rating information provided...
... English. 8 Press or to access the Setup menu. Regardless of the menu language you select, the downloaded rating information will vary depending on using the remote control. Notes • • The rating screen and rating information that appears will always be in this section are based on the rating information provided...
User Manual (English)
Page 37
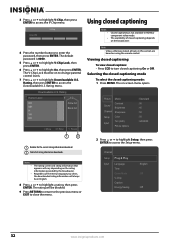
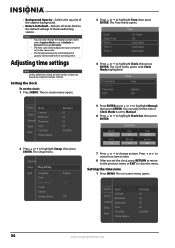
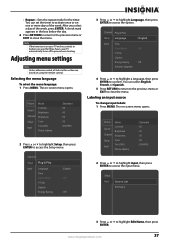
... Input Color Tint (G/R) Picture Options : Standard : 95 : 45 : 50 : 50 : G50/R50 2 Press or to highlight Clock Set, then press ENTER. The on using the remote control. You can only change an item. • Background Opacity-Selects the opacity of the broadcasting station.
... Input Color Tint (G/R) Picture Options : Standard : 95 : 45 : 50 : 50 : G50/R50 2 Press or to highlight Clock Set, then press ENTER. The on using the remote control. You can only change an item. • Background Opacity-Selects the opacity of the broadcasting station.
User Manual (English)
Page 40
... Name, then press ENTER. • Repeat-Sets the repeat mode for three hours, your TV automatically turns off to activate once or on using the remote control. Channel Plug & Play Setup Language Input Time Game Mode V-Chip Caption Energy Saving Software Upgrade : English : Off : Off 4 Press or to highlight a language, then...
... Name, then press ENTER. • Repeat-Sets the repeat mode for three hours, your TV automatically turns off to activate once or on using the remote control. Channel Plug & Play Setup Language Input Time Game Mode V-Chip Caption Energy Saving Software Upgrade : English : Off : Off 4 Press or to highlight a language, then...
User Manual (English)
Page 43
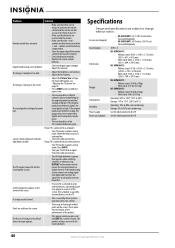
...remote. • Make sure that the + and - Pixels are reset to a computer: • Your TV may be in some external devices, a distorted picture may be perfect. Screen size (diagonal) Sound output Dimensions Weight Temperature Humidity Power supply Power consumption • NS-42P650A11...: 42.3 (107.44 cm) inches measured diagonally • NS-50P650A11: 49.9 inches (126.75 cm) measured diagonally 10 W × 2 NS-42P650A11: • Without stand: 40.54 × 24.81 ×...
...remote. • Make sure that the + and - Pixels are reset to a computer: • Your TV may be in some external devices, a distorted picture may be perfect. Screen size (diagonal) Sound output Dimensions Weight Temperature Humidity Power supply Power consumption • NS-42P650A11...: 42.3 (107.44 cm) inches measured diagonally • NS-50P650A11: 49.9 inches (126.75 cm) measured diagonally 10 W × 2 NS-42P650A11: • Without stand: 40.54 × 24.81 ×...


