
User Manual (English)
Page 2
...stand or wall-mount bracket 5 Installing the stand 5 Installing a wall-mount bracket 5 TV components 6 Package contents 6 Front 6 Back 7 Side 7 Remote control 8 Making connections 11 What connection should I use 11 Connecting power 12 Connecting a cable or satellite box 12 Connecting an antenna or cable TV (no box 15 Connecting a DVD or Blu-ray player 15 Connecting a VCR 17 Connecting a camcorder or game console 18 Connecting a computer 18 Connecting a USB flash drive 19 Connecting headphones 20 Connecting a basic home theater system 20 Connecting a soundbar 20 Connecting...
...stand or wall-mount bracket 5 Installing the stand 5 Installing a wall-mount bracket 5 TV components 6 Package contents 6 Front 6 Back 7 Side 7 Remote control 8 Making connections 11 What connection should I use 11 Connecting power 12 Connecting a cable or satellite box 12 Connecting an antenna or cable TV (no box 15 Connecting a DVD or Blu-ray player 15 Connecting a VCR 17 Connecting a camcorder or game console 18 Connecting a computer 18 Connecting a USB flash drive 19 Connecting headphones 20 Connecting a basic home theater system 20 Connecting a soundbar 20 Connecting...
User Manual (English)
Page 3
... 33 Setting parental controls 34 Setting or changing the password 34 Locking control buttons 35 Blocking unrated TV 35 Setting parental control levels 36 Downloading rating information 38 Using closed captioning 38 Turning closed captioning on or off 38 Selecting the analog closed captioning mode 39 Customizing digital closed captioning styles 39 Adjusting time settings 40 Setting the clock 40 Setting the sleep timer 41 Adjusting menu settings 42 Selecting the menu language 42 Turning Input Sensor on or off 42 Labeling an input source 43 Restoring settings to the defaults 43...
... 33 Setting parental controls 34 Setting or changing the password 34 Locking control buttons 35 Blocking unrated TV 35 Setting parental control levels 36 Downloading rating information 38 Using closed captioning 38 Turning closed captioning on or off 38 Selecting the analog closed captioning mode 39 Customizing digital closed captioning styles 39 Adjusting time settings 40 Setting the clock 40 Setting the sleep timer 41 Adjusting menu settings 42 Selecting the menu language 42 Turning Input Sensor on or off 42 Labeling an input source 43 Restoring settings to the defaults 43...

User Manual (English)
Page 5
... not fit all . At least two people are not always supported on the proper stands or installed according to walls backed with entertainment system furniture and TVs. • Don't place TVs on or play with steel studs or cinder blocks. Use only a wall mount rated for proper use your flat panel display As you enjoy your new product, keep these safety tips...
... not fit all . At least two people are not always supported on the proper stands or installed according to walls backed with entertainment system furniture and TVs. • Don't place TVs on or play with steel studs or cinder blocks. Use only a wall mount rated for proper use your flat panel display As you enjoy your new product, keep these safety tips...
User Manual (English)
Page 13
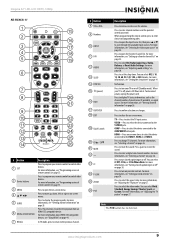
... to change TV channels. Press to enter channel numbers and the parental control password. For more information, see "Turning closed captioning on page 38. Press to program your remote control to select SRS TruSurround, Bass, Treble, Balance, or Reset Audio Settings. Press to control other devices. Press to the COMPONENT video jacks. COMP-Press to select the device connected to turn your TV is off " on or off (Standby mode). For more information, see "Programming universal remote controls"on...
... to change TV channels. Press to enter channel numbers and the parental control password. For more information, see "Turning closed captioning on page 38. Press to program your remote control to select SRS TruSurround, Bass, Treble, Balance, or Reset Audio Settings. Press to control other devices. Press to the COMPONENT video jacks. COMP-Press to select the device connected to turn your TV is off " on or off (Standby mode). For more information, see "Programming universal remote controls"on...
User Manual (English)
Page 14
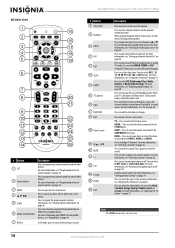
.... Note The PVR button has no function. 10 www.insigniaproducts.com You can select MONO, STEREO, or SAP. HDMI-Press one of the preset audio modes in on-screen menus. 5 GUIDE Press to display the program guide. For more information, see "Selecting the video input source" on page 26. Press to the COMPONENT video jacks. For more information, see "Selecting a channel" on page 24. NS-42E760A12 Insignia 42" LED-LCD HDTV, 1080p NS-RC01G-09 1 15...
.... Note The PVR button has no function. 10 www.insigniaproducts.com You can select MONO, STEREO, or SAP. HDMI-Press one of the preset audio modes in on-screen menus. 5 GUIDE Press to display the program guide. For more information, see "Selecting the video input source" on page 26. Press to the COMPONENT video jacks. For more information, see "Selecting a channel" on page 24. NS-42E760A12 Insignia 42" LED-LCD HDTV, 1080p NS-RC01G-09 1 15...
User Manual (English)
Page 16
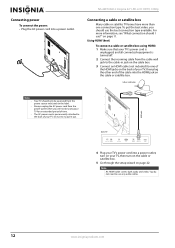
... not need to the back of TV AUDIO OUT DIGITAL OUTPUT ANT /CABLE VGA PC / DVI AUDIO IN HDMI 1 / DVI HDMI 2 (ARC) 4 Plug your TV's power cord into a power outlet, turn on your TV, then turn on the cable or satellite box. 5 Go through the setup wizard on the back of your TV, then plug the other end of time. Connecting power To connect the power: • Plug the AC power cord into the HDMI jack on page 11. Cable or satellite box Notes...
... not need to the back of TV AUDIO OUT DIGITAL OUTPUT ANT /CABLE VGA PC / DVI AUDIO IN HDMI 1 / DVI HDMI 2 (ARC) 4 Plug your TV's power cord into a power outlet, turn on your TV, then turn on the cable or satellite box. 5 Go through the setup wizard on the back of your TV, then plug the other end of time. Connecting power To connect the power: • Plug the AC power cord into the HDMI jack on page 11. Cable or satellite box Notes...
User Manual (English)
Page 19
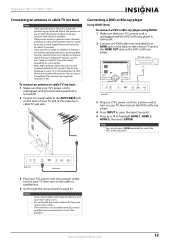
The picture displayed on your TV is still displayed as SD, thus the picture quality will not be as clear or crisp as it would be distorted. AUDIO OUT DIGITAL OUTPUT Back of TV ANT /CABLE VGA PC / DVI AUDIO IN HDMI 1 / DVI HDMI 2 (ARC) Coaxial cable 3 Plug your TV's power cord into a power outlet, turn on your TV, then turn on the cable or satellite box. 4 Go through the setup wizard on page 22. If...
The picture displayed on your TV is still displayed as SD, thus the picture quality will not be as clear or crisp as it would be distorted. AUDIO OUT DIGITAL OUTPUT Back of TV ANT /CABLE VGA PC / DVI AUDIO IN HDMI 1 / DVI HDMI 2 (ARC) Coaxial cable 3 Plug your TV's power cord into a power outlet, turn on your TV, then turn on the cable or satellite box. 4 Go through the setup wizard on page 22. If...
User Manual (English)
Page 22
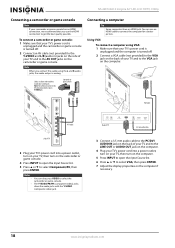
..., then turn on the camcorder or game console. 4 Press INPUT to open the Input Source list. 6 Press S or T to select VGA, then press ENTER. 7 Adjust the display properties on the computer if necessary. 18 www.insigniaproducts.com VGA cable A/V cable Side of TV 3 Plug your TV's power cord into the green Y-VIDEO jack. Cables are often color-coded to get the best quality possible. Using VGA To connect a computer using the L and R audio jacks, the audio output is analog. You...
..., then turn on the camcorder or game console. 4 Press INPUT to open the Input Source list. 6 Press S or T to select VGA, then press ENTER. 7 Adjust the display properties on the computer if necessary. 18 www.insigniaproducts.com VGA cable A/V cable Side of TV 3 Plug your TV's power cord into the green Y-VIDEO jack. Cables are often color-coded to get the best quality possible. Using VGA To connect a computer using the L and R audio jacks, the audio output is analog. You...
User Manual (English)
Page 23
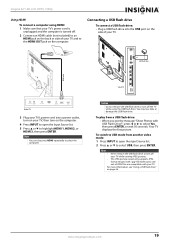
... displays the first picture. To switch to USB mode from a USB flash drive: • When you see "Using a USB flash drive" on page 46. USB flash drive HDMI cable AUDIO OUT DIGITAL OUTPUT ANT /CABLE VGA Back of TV PC / DVI AUDIO IN HDMI 1 / DVI HDMI 2 (ARC) 3 Plug your TV's power cord into the USB port on the side of your TV, then turn on the computer. 4 Press INPUT to open the Input Source list. 2 Press S or T to select USB, then press ENTER. To play from another video mode...
... displays the first picture. To switch to USB mode from a USB flash drive: • When you see "Using a USB flash drive" on page 46. USB flash drive HDMI cable AUDIO OUT DIGITAL OUTPUT ANT /CABLE VGA Back of TV PC / DVI AUDIO IN HDMI 1 / DVI HDMI 2 (ARC) 3 Plug your TV's power cord into the USB port on the side of your TV, then turn on the computer. 4 Press INPUT to open the Input Source list. 2 Press S or T to select USB, then press ENTER. To play from another video mode...
User Manual (English)
Page 26
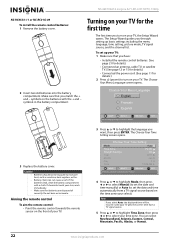
... MOVE OK ENTER SELECT MENU PREVIOUS Set menu language to select your TV. Aiming the remote control To aim the remote control: • Point the remote control towards the remote sensor on the batteries with a cloth. The Setup Wizard guides you through setting up your TV: 1 Make sure that you turn on your time zone. NS-42E760A12 Insignia 42" LED-LCD HDTV, 1080p NS-RC05A1-11 or NS-RC01G-09 To install the remote control batteries: 1 Remove the battery...
... MOVE OK ENTER SELECT MENU PREVIOUS Set menu language to select your TV. Aiming the remote control To aim the remote control: • Point the remote control towards the remote sensor on the batteries with a cloth. The Setup Wizard guides you through setting up your TV: 1 Make sure that you turn on your time zone. NS-42E760A12 Insignia 42" LED-LCD HDTV, 1080p NS-RC05A1-11 or NS-RC01G-09 To install the remote control batteries: 1 Remove the battery...
User Manual (English)
Page 38
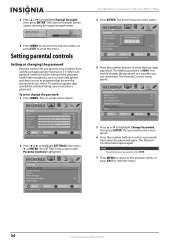
.... The Parental Controls menu opens again. Picture Mode Brightness Contrast Color Tint Sharpness PICTURE AUDIO CHANNELS SETTINGS USB Energy Savings 48 50 60 0 +10 MOVE OK ENTER SELECT Adjust settings to affect picture quality MENU PREVIOUS EXIT EXIT 2 Press W or X to enter the four-digit password. Settings Parental Controls Closed Caption Time Menu Settings Auto Input Sensing Input Labels PICTURE AUDIO CHANNELS SETTINGS USB On MOVE OK ENTER SELECT Set TV parental controls MENU PREVIOUS EXIT EXIT NS-42E760A12 Insignia 42" LED-LCD HDTV, 1080p 3 Press ENTER. Default is...
.... The Parental Controls menu opens again. Picture Mode Brightness Contrast Color Tint Sharpness PICTURE AUDIO CHANNELS SETTINGS USB Energy Savings 48 50 60 0 +10 MOVE OK ENTER SELECT Adjust settings to affect picture quality MENU PREVIOUS EXIT EXIT 2 Press W or X to enter the four-digit password. Settings Parental Controls Closed Caption Time Menu Settings Auto Input Sensing Input Labels PICTURE AUDIO CHANNELS SETTINGS USB On MOVE OK ENTER SELECT Set TV parental controls MENU PREVIOUS EXIT EXIT NS-42E760A12 Insignia 42" LED-LCD HDTV, 1080p 3 Press ENTER. Default is...
User Manual (English)
Page 54
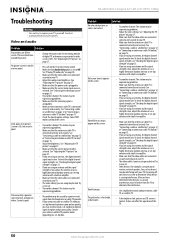
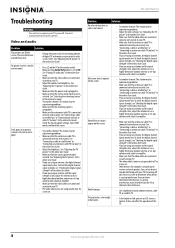
... antenna or cable TV (no box)" on the TV or the remote control. • Make sure that the video cables are connected securely to your TV. NS-42E760A12 Insignia 42" LED-LCD HDTV, 1080p Troubleshooting Warning Do not try to repair your cable or satellite TV provider about upgrading to a set-top box. Try a new set. • Other devices (for example, surround sound receiver, external speakers, fans, or hair dryers) may be experiencing problems. • Adjust...
... antenna or cable TV (no box)" on the TV or the remote control. • Make sure that the video cables are connected securely to your TV. NS-42E760A12 Insignia 42" LED-LCD HDTV, 1080p Troubleshooting Warning Do not try to repair your cable or satellite TV provider about upgrading to a set-top box. Try a new set. • Other devices (for example, surround sound receiver, external speakers, fans, or hair dryers) may be experiencing problems. • Adjust...
User Manual (English)
Page 55
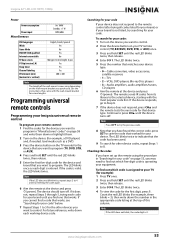
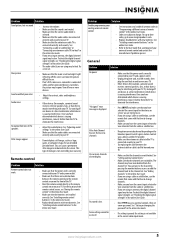
.... Trouble programming your existing universal remote control. • See instructions and a table of common codes in "Programming universal remote controls" on page 53. • Codes are wrapped tightly in and turn on your TV. • Other devices (for an extended period of time. See "Connecting a cable or satellite box" on page 12 or "Connecting an antenna or cable TV (no box)" on page 15. • If you are using an antenna, the digital channel signal may...
.... Trouble programming your existing universal remote control. • See instructions and a table of common codes in "Programming universal remote controls" on page 53. • Codes are wrapped tightly in and turn on your TV. • Other devices (for an extended period of time. See "Connecting a cable or satellite box" on page 12 or "Connecting an antenna or cable TV (no box)" on page 15. • If you are using an antenna, the digital channel signal may...
User Manual (English)
Page 56
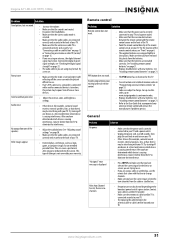
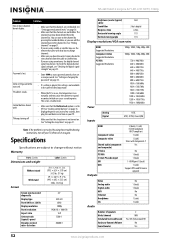
... are using an antenna, the digital channel signal may have the correct input selected to view channels from the channel list. NS-42E760A12 Insignia 42" LED-LCD HDTV, 1080p Problem Solution One or more channels do not work TV keeps turning off your TV. • Make sure that the sleep timer is in . (99.3 × 68.2 × 23.3 cm) 32lbs. (14.5 kg) Screen size measured diagonally Display type Panel 60 Hz vs.120 Hz Display resolution Panel resolution Aspect ratio Contrast ratio (typical)-panel Dynamic contrast ratio-list...
... are using an antenna, the digital channel signal may have the correct input selected to view channels from the channel list. NS-42E760A12 Insignia 42" LED-LCD HDTV, 1080p Problem Solution One or more channels do not work TV keeps turning off your TV. • Make sure that the sleep timer is in . (99.3 × 68.2 × 23.3 cm) 32lbs. (14.5 kg) Screen size measured diagonally Display type Panel 60 Hz vs.120 Hz Display resolution Panel resolution Aspect ratio Contrast ratio (typical)-panel Dynamic contrast ratio-list...
User Manual (English)
Page 57
Insignia 42" LED-LCD HDTV, 1080p Power Power consumption Power input Miscellaneous On: 100W Standby:
Insignia 42" LED-LCD HDTV, 1080p Power Power consumption Power input Miscellaneous On: 100W Standby:
Quick Setup Guide (English)
Page 1
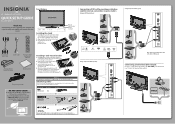
... of the HDMI cable that connects to www.insigniaproducts.com, click Support & Service, enter your model number in the box but is intended to the TV with the wall-mount bracket for information about how to the Antenna/Cable wall jack. Go to the DVI device's jack. Front feature 42" 1080p LED-LCD HDTV QUICK SETUP GUIDE NS-42E760A12 Thank You for purchasing this product for years to come Installing the stand 1 Carefully place your TV screen face...
... of the HDMI cable that connects to www.insigniaproducts.com, click Support & Service, enter your model number in the box but is intended to the TV with the wall-mount bracket for information about how to the Antenna/Cable wall jack. Go to the DVI device's jack. Front feature 42" 1080p LED-LCD HDTV QUICK SETUP GUIDE NS-42E760A12 Thank You for purchasing this product for years to come Installing the stand 1 Carefully place your TV screen face...
Quick Setup Guide (English)
Page 2
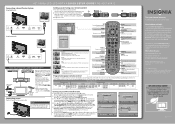
...-screen) aspect ratio. Enter a digital sub-channel number. The Choose Your Time Setting screen opens with your TV scans for common codes. If you select Manual, you have problems programming your remote or need to connect a separate digital audio cable: • Have a game console connected to one of your TV's HDMI 1/HDMI3 jacks. • When you connect the AV receiver's HDMI OUT jack to your TV's HDMI2 (ARC) jack by using an HDMI-ARC compliant cable. See your model number in the box but is connected to an antenna...
...-screen) aspect ratio. Enter a digital sub-channel number. The Choose Your Time Setting screen opens with your TV scans for common codes. If you select Manual, you have problems programming your remote or need to connect a separate digital audio cable: • Have a game console connected to one of your TV's HDMI 1/HDMI3 jacks. • When you connect the AV receiver's HDMI OUT jack to your TV's HDMI2 (ARC) jack by using an HDMI-ARC compliant cable. See your model number in the box but is connected to an antenna...
Important Information (English)
Page 6
... the digital signal strength" in the online User Guide. • Check the closed caption settings. NS-42E760A12 Troubleshooting Warning Do not try to repair your TV. • The video cable(s) you are using an antenna, the digital channel signal may be low. Contact authorized service personnel. Video and audio Problem Solution Picture does not fill the screen. There are using an antenna and the signal strength is low, adjust the antenna or use a highly directional outdoor antenna or set . See "Adjusting the TV picture" in the online User Guide...
... the digital signal strength" in the online User Guide. • Check the closed caption settings. NS-42E760A12 Troubleshooting Warning Do not try to repair your TV. • The video cable(s) you are using an antenna, the digital channel signal may be low. Contact authorized service personnel. Video and audio Problem Solution Picture does not fill the screen. There are using an antenna and the signal strength is low, adjust the antenna or use a highly directional outdoor antenna or set . See "Adjusting the TV picture" in the online User Guide...
Important Information (English)
Page 7
.... See "Installing remote control batteries" in the online User Guide. • Codes are no obstructions between the antenna/cable or cable/satellite box and your TV. • Make sure that the audio cables are using an antenna, the digital channel signal may be low. Some settings cannot be burned into the screen. General Problem Solution No power • Make sure that the power cord is not covered by pressing the number buttons or you are connected correctly...
.... See "Installing remote control batteries" in the online User Guide. • Codes are no obstructions between the antenna/cable or cable/satellite box and your TV. • Make sure that the audio cables are using an antenna, the digital channel signal may be low. Some settings cannot be burned into the screen. General Problem Solution No power • Make sure that the power cord is not covered by pressing the number buttons or you are connected correctly...
Important Information (English)
Page 8
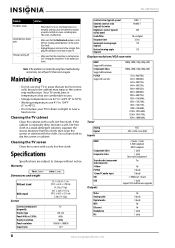
... the cabinet with a soft, lint-free cloth. Cleaning the TV screen Clean the screen with a soft, lint-free cloth. HDMI port 1 (back) 1 (side) Support JPEG and firmware upgrade Video Analog audio Digital audio WiFi Ethernet Headphone INc No 1 (back) 1 (back) No No 1 (side) 1 (side) 6 www.insigniaproducts.com NS-42E760A12 Problem Solution TV cabinet creaks. Use a clean cloth to Off. Warranty Parts: 2 years Dimensions and weight Labor: 2 years Without stand With stand Screen 39.1 × 24.6 × 1.5 in...
... the cabinet with a soft, lint-free cloth. Cleaning the TV screen Clean the screen with a soft, lint-free cloth. HDMI port 1 (back) 1 (side) Support JPEG and firmware upgrade Video Analog audio Digital audio WiFi Ethernet Headphone INc No 1 (back) 1 (back) No No 1 (side) 1 (side) 6 www.insigniaproducts.com NS-42E760A12 Problem Solution TV cabinet creaks. Use a clean cloth to Off. Warranty Parts: 2 years Dimensions and weight Labor: 2 years Without stand With stand Screen 39.1 × 24.6 × 1.5 in...


