
English Manual
Page 2
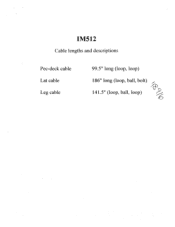
IM512 Cable lengths and descriptions Pec-deck cable Lat cable Leg cable 99.5" long (loop, loop) 186" long (loop, ball, bolt) 7C) c 141.5" (loop, ball, loop)
IM512 Cable lengths and descriptions Pec-deck cable Lat cable Leg cable 99.5" long (loop, loop) 186" long (loop, ball, bolt) 7C) c 141.5" (loop, ball, loop)

English Manual
Page 3
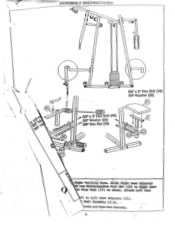
Attach Grips to Right Seat Adjustor (20). ASSEMBLY INSTRUCTIONS .6 9 0 's • 3/8" x 2" Hex Bolt (67) 3i8" Washer (60) 0 0 22 I 8mm Hex Bolt (68) 0 3/8" Washer (60) • Attach Large Seat for Pec Deck and Press Bar Stations. Attach Back Rests (6) for Press Bar Side (18) and Holder Assembly (22) to Holder Assembly and slip Right Seat Adjustor into Right Seat Assembly.
Attach Grips to Right Seat Adjustor (20). ASSEMBLY INSTRUCTIONS .6 9 0 's • 3/8" x 2" Hex Bolt (67) 3i8" Washer (60) 0 0 22 I 8mm Hex Bolt (68) 0 3/8" Washer (60) • Attach Large Seat for Pec Deck and Press Bar Stations. Attach Back Rests (6) for Press Bar Side (18) and Holder Assembly (22) to Holder Assembly and slip Right Seat Adjustor into Right Seat Assembly.
English Manual
Page 4
;-. Slide Right Seat Adjustor Leg Extension/Ann Curl Bar (15) to Left Seat Adjustor (21). \t\eSeat Assembly (5.5). mbly and Right Seat Assembly. 9 Attach Left Seat 9) to Right Seat Foan Pads (17) as shown. "" ASSEMBLY INSTRUCTION O • fl Il 3/8"x2" Hex Bolt (18) 3/81 Washer (60) 20 . 0 3/84 3/8" 3/8" x 34 Hex Batt Washer (60) Hex Nut (70) (66) 2; 16 -0, • (51) 17 5.5 C '.. r- Right Verticle Bean.
;-. Slide Right Seat Adjustor Leg Extension/Ann Curl Bar (15) to Left Seat Adjustor (21). \t\eSeat Assembly (5.5). mbly and Right Seat Assembly. 9 Attach Left Seat 9) to Right Seat Foan Pads (17) as shown. "" ASSEMBLY INSTRUCTION O • fl Il 3/8"x2" Hex Bolt (18) 3/81 Washer (60) 20 . 0 3/84 3/8" 3/8" x 34 Hex Batt Washer (60) Hex Nut (70) (66) 2; 16 -0, • (51) 17 5.5 C '.. r- Right Verticle Bean.
English Manual
Page 5
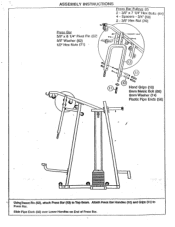
attach Press Bar (13) to Press Bar. Attach Press Bar Handles (10) and Grips (11) to Top Beam. ASSEMBLY INSTRUCTIONS Press Bar Pulleys (2) 2 - 3/8" x 7 1/4" Hex Bolts (64) 4 - O 11 • n , ,,n Using"Insert Pin (52). Slide Pipe Ends (58) over Lower Handles on End of Press Bar. Spacers - 3/4" (59) 2 - 3/8" Hex Nut (70) Press Bar 5/8" x 8 1/4" Pivot Pin (52) 5/8" Washer (62) 1/2" Hex Nuts (71) C 414 44- 0 - 0 O Hand Grips (10) 8mm Metric Bolt (68) 8mm Washer (74) Plastic Pipe Ends (58) 1.
attach Press Bar (13) to Press Bar. Attach Press Bar Handles (10) and Grips (11) to Top Beam. ASSEMBLY INSTRUCTIONS Press Bar Pulleys (2) 2 - 3/8" x 7 1/4" Hex Bolts (64) 4 - O 11 • n , ,,n Using"Insert Pin (52). Slide Pipe Ends (58) over Lower Handles on End of Press Bar. Spacers - 3/4" (59) 2 - 3/8" Hex Nut (70) Press Bar 5/8" x 8 1/4" Pivot Pin (52) 5/8" Washer (62) 1/2" Hex Nuts (71) C 414 44- 0 - 0 O Hand Grips (10) 8mm Metric Bolt (68) 8mm Washer (74) Plastic Pipe Ends (58) 1.

English Manual
Page 6
... (-74) 3itr x 3" Hex Scit (66) 3/8" Washers (60) 3/8" Ilex Nuts (70) C t. 0 • 3/8" x 2 3/4" Hex Bolt (65) 3/8" Washer (60) Attach Back Rest for VKR (45) Attach Elbow Rests for VKR (46) • 3/8" x.3" Hex Bolt (66) 3/8" Washer (60) 3/8" Hex Nut (70) 42 4 ao 8rnm Hex Bolt (68) 8mm Washer (74) 0 3/8" x 3" Hex Boit (66) 41 3/8" Washer (60) 3/8" Hex Nut (70...
... (-74) 3itr x 3" Hex Scit (66) 3/8" Washers (60) 3/8" Ilex Nuts (70) C t. 0 • 3/8" x 2 3/4" Hex Bolt (65) 3/8" Washer (60) Attach Back Rest for VKR (45) Attach Elbow Rests for VKR (46) • 3/8" x.3" Hex Bolt (66) 3/8" Washer (60) 3/8" Hex Nut (70) 42 4 ao 8rnm Hex Bolt (68) 8mm Washer (74) 0 3/8" x 3" Hex Boit (66) 41 3/8" Washer (60) 3/8" Hex Nut (70...

English Manual
Page 7
4"14/ •D•D LAVI 3/8" x 2" Hex Botts (67) 3/8" Hex Nut (70) 4 M • . . 7 0 3/8" x 2 3/4" Hex Bolt (65) 3/8" r (60) 1/8" Hex N 0) a 3/8" x 3" Hex Bott (66) 3/8" Washer (60) 3/8" Hex Nut (70) *2 • O Attach Top Cross Beam.(7) to Top Cross Beam while inserting hide Rods into The Holes on Guide Rod Holder. 5 Attach Guide Rod Holder (7.5) to Left and Right Verticle- Beam.
4"14/ •D•D LAVI 3/8" x 2" Hex Botts (67) 3/8" Hex Nut (70) 4 M • . . 7 0 3/8" x 2 3/4" Hex Bolt (65) 3/8" r (60) 1/8" Hex N 0) a 3/8" x 3" Hex Bott (66) 3/8" Washer (60) 3/8" Hex Nut (70) *2 • O Attach Top Cross Beam.(7) to Top Cross Beam while inserting hide Rods into The Holes on Guide Rod Holder. 5 Attach Guide Rod Holder (7.5) to Left and Right Verticle- Beam.
English Manual
Page 8
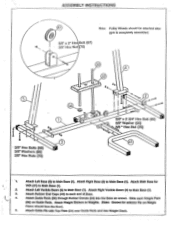
... Weight Plates should be attached after gym is completely assembled. 3/8" x 2' He Bott (67) 3/8" Hex Nut (70) 0 30 4 32 34 0 O 1 0 A 3 3/8" Hex Botts (66) 3/8" Washe:s (60) 3/8" Hex Nuts (70) 3/8" x 2 3/4" Hex Bolt (65) 3/8" WqSher (60) *-4 ,/)8 " Hex Nut (70) e 1. Slide each end of Base. 4. Attach Right Verticle Beam (4) to Main Base (1). 2. ASSEMBLY INSTRUCTIONS Note: Pulley Wheels should face the floor). 5• Attach Gdide Pin with...
... Weight Plates should be attached after gym is completely assembled. 3/8" x 2' He Bott (67) 3/8" Hex Nut (70) 0 30 4 32 34 0 O 1 0 A 3 3/8" Hex Botts (66) 3/8" Washe:s (60) 3/8" Hex Nuts (70) 3/8" x 2 3/4" Hex Bolt (65) 3/8" WqSher (60) *-4 ,/)8 " Hex Nut (70) e 1. Slide each end of Base. 4. Attach Right Verticle Beam (4) to Main Base (1). 2. ASSEMBLY INSTRUCTIONS Note: Pulley Wheels should face the floor). 5• Attach Gdide Pin with...
English Manual
Page 9
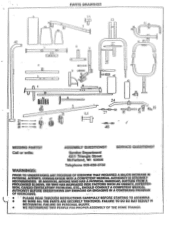
... HANDICAP, SUFFERS FROM A PROLONGED ILLNESS, OR WHO HAS INCREASED RISK FACTORS SUCH AS OBESITY, HYPERTEN- ASSEMBLY QUESTIONS? SION, CARDIO-CIRCULATORY PROBLEMS, ETC., SHOULD CONSULT A COMPETENT MEDICAL AUTHORITY BEFORE OF EXERCISING. PARTS DRAWINGS 6 7.5 22 -t is • i tEl\19 7 a O 21 2 xo AI ... TWO PEOPLE FOR PROPER ASSEMBLY OF THE HOME TRAINER. UNDERTAKING ANY EXERCISE.O[ R ENGAGING IN A CONTINUING PROGRAM • ' ' PLEASE READ THROUGH INSTRUCTIONS CAREFULLY BEFORE STARTING TO ASSEMBLE. • BE SURE Ati.THE PARTS ARE SECURELY TIGHTENED.
... HANDICAP, SUFFERS FROM A PROLONGED ILLNESS, OR WHO HAS INCREASED RISK FACTORS SUCH AS OBESITY, HYPERTEN- ASSEMBLY QUESTIONS? SION, CARDIO-CIRCULATORY PROBLEMS, ETC., SHOULD CONSULT A COMPETENT MEDICAL AUTHORITY BEFORE OF EXERCISING. PARTS DRAWINGS 6 7.5 22 -t is • i tEl\19 7 a O 21 2 xo AI ... TWO PEOPLE FOR PROPER ASSEMBLY OF THE HOME TRAINER. UNDERTAKING ANY EXERCISE.O[ R ENGAGING IN A CONTINUING PROGRAM • ' ' PLEASE READ THROUGH INSTRUCTIONS CAREFULLY BEFORE STARTING TO ASSEMBLE. • BE SURE Ati.THE PARTS ARE SECURELY TIGHTENED.
English Manual
Page 10
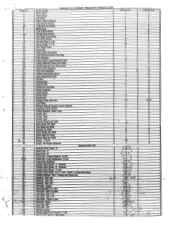
...cross beam Guic9 Rod Holder Pee Dock Assembly Pee Deck Arms Handle Pipe 6 7/8' Hand Grips 1' x 5' Pet Deck ads Press Bar Right Seat Assemb Leg ension/Arm Cud : Pad Holders Foam Pads, L • Extension Bar age • t toss *de Small Seat for VKR Elbow Rest tor-VKA Pulley 41/4' Chain tot Puilev Bracket HARDWARE 1(IT Rubber End Caps 2' kneed Pin 4' Insert Pin 3' Pivot Pin... Saari; Left Seat Adjuster Holder Assembly Block Seat Adjustment Pin Lat Bar Curling Bat Spring Clip Chain for Cud Bar Single Handle Ankle Strap Guide Rod Guide Pin Weight Plate 200 lbs.
...cross beam Guic9 Rod Holder Pee Dock Assembly Pee Deck Arms Handle Pipe 6 7/8' Hand Grips 1' x 5' Pet Deck ads Press Bar Right Seat Assemb Leg ension/Arm Cud : Pad Holders Foam Pads, L • Extension Bar age • t toss *de Small Seat for VKR Elbow Rest tor-VKA Pulley 41/4' Chain tot Puilev Bracket HARDWARE 1(IT Rubber End Caps 2' kneed Pin 4' Insert Pin 3' Pivot Pin... Saari; Left Seat Adjuster Holder Assembly Block Seat Adjustment Pin Lat Bar Curling Bat Spring Clip Chain for Cud Bar Single Handle Ankle Strap Guide Rod Guide Pin Weight Plate 200 lbs.
English Manual
Page 11
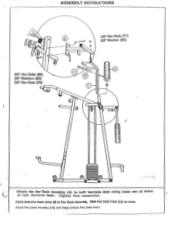
Slide Pec Deck Pads (12) on Left Verticle Beam. Attach Both Pec Deck Arms (9) to Pec Deck Arms. ASSEMBLY INSTRUCTIONS 0 0 I 3/8" Hex Botts (66) 3/8" Washers (60) 3/8" Hex Nuts (70) 1/2 Hex Nuts (71) 5/8" Washer (62) 11 0 12 CZ, _FP J. 0 Attach the PecbeckAssembly (8) to Left Verticle Bean using lower set of holes U on Arms. Mach Pec Deck Handles (10) and Grips (11) to Pec Deck Assembly. Tighten this connection.
Slide Pec Deck Pads (12) on Left Verticle Beam. Attach Both Pec Deck Arms (9) to Pec Deck Arms. ASSEMBLY INSTRUCTIONS 0 0 I 3/8" Hex Botts (66) 3/8" Washers (60) 3/8" Hex Nuts (70) 1/2 Hex Nuts (71) 5/8" Washer (62) 11 0 12 CZ, _FP J. 0 Attach the PecbeckAssembly (8) to Left Verticle Bean using lower set of holes U on Arms. Mach Pec Deck Handles (10) and Grips (11) to Pec Deck Assembly. Tighten this connection.


