
English Manual
Page 1
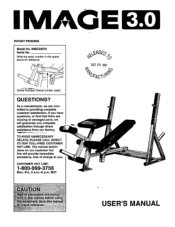
... UNNECESSARY DELAYS, PLEASE CALL DIRECT TO OUR TOLL-FREE CUSTOMER HOT LINE. Write the serial number in the space above for reference. If you have questions, or find that there are missing or damaged paris, we are committed to you complete satisfaction through direct assistance from our factory. IMAGE 3.0 PATENT PENDING Model No. The trained technicians on our customer...
... UNNECESSARY DELAYS, PLEASE CALL DIRECT TO OUR TOLL-FREE CUSTOMER HOT LINE. Write the serial number in the space above for reference. If you have questions, or find that there are missing or damaged paris, we are committed to you complete satisfaction through direct assistance from our factory. IMAGE 3.0 PATENT PENDING Model No. The trained technicians on our customer...
English Manual
Page 2
... . ICON HEALTH & FITNESS, INC., 1500 S. 1000 W., LOGAN, UT 84321-9813 2 The warranty extended hereunder is in lieu of any implied warranties of merchantability or fitness for which vary from the date of incidental or consequential damages. TABLE OF CONTENTS LIMITED WARRANTY IMPORTANT PRECAUTIONS BEFORE YOU BEGIN PART IDENTIFICATION CHART ASSEMBLY ADJUSTING THE IMAGE 3.0 EXERCISE GUIDELINES ORDERING REPLACEMENT PARTS 2 3 4 5 6 10 12 Back Cover Note: A PART LIST/EXPLODED DRAWING is limited in...
... . ICON HEALTH & FITNESS, INC., 1500 S. 1000 W., LOGAN, UT 84321-9813 2 The warranty extended hereunder is in lieu of any implied warranties of merchantability or fitness for which vary from the date of incidental or consequential damages. TABLE OF CONTENTS LIMITED WARRANTY IMPORTANT PRECAUTIONS BEFORE YOU BEGIN PART IDENTIFICATION CHART ASSEMBLY ADJUSTING THE IMAGE 3.0 EXERCISE GUIDELINES ORDERING REPLACEMENT PARTS 2 3 4 5 6 10 12 Back Cover Note: A PART LIST/EXPLODED DRAWING is limited in...
English Manual
Page 3
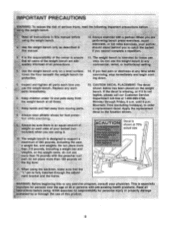
... the replacement decal to support a maximum of 35 or persons with pre-existing health problem& Read all times. 7. ICON assumes' no reSponsibility for exercising, stop immediately and begin cool- Do not use of your barbell (not included) when you use more than 75 pounds with a partner. Inspect and tighten all instructions in this or any time while Cover the floor beneath the weight bench...
... the replacement decal to support a maximum of 35 or persons with pre-existing health problem& Read all times. 7. ICON assumes' no reSponsibility for exercising, stop immediately and begin cool- Do not use of your barbell (not included) when you use more than 75 pounds with a partner. Inspect and tighten all instructions in this or any time while Cover the floor beneath the weight bench...
English Manual
Page 4
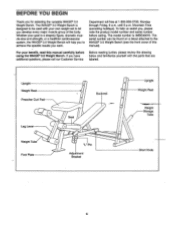
... the specific results you , please note the product model number and serial number before using the IMAGE® 3.0 Weight Bench. BEFORE YOU BEGIN Thank you to the IMAGE® 3.0 Weight Bench (see the front cover of the body. The IMAGE® 3.0 Weight Bench is a shapely figure, dramatic muscle size and strength, or a healthier cardiovascular system, the IMAGE® 3.0 Weight Bench will help us assist you want. The serial number can be used with the parts...
... the specific results you , please note the product model number and serial number before using the IMAGE® 3.0 Weight Bench. BEFORE YOU BEGIN Thank you to the IMAGE® 3.0 Weight Bench (see the front cover of the body. The IMAGE® 3.0 Weight Bench is a shapely figure, dramatic muscle size and strength, or a healthier cardiovascular system, the IMAGE® 3.0 Weight Bench will help us assist you want. The serial number can be used with the parts...
English Manual
Page 5
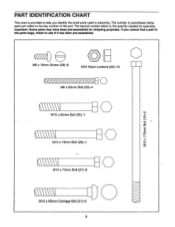
... Bolt (26)-1 \\\\\\\\ M10 x 70mm Bolt (27)-8 M10 x 65mm Carriage Bolt (21)-2 5 If you cannot find a part in the parts bags, check to help you identify the small parts used in parenthesis below each part refers to the quantity needed for shipping purposes. The second number refers to the key number of the part. M6 x 16mm Screw (28)-6 0 M10 Nylon Locknut (22)-14 V M- The number in assembly...
... Bolt (26)-1 \\\\\\\\ M10 x 70mm Bolt (27)-8 M10 x 65mm Carriage Bolt (21)-2 5 If you cannot find a part in the parts bags, check to help you identify the small parts used in parenthesis below each part refers to the quantity needed for shipping purposes. The second number refers to the key number of the part. M6 x 16mm Screw (28)-6 0 M10 Nylon Locknut (22)-14 V M- The number in assembly...
English Manual
Page 6
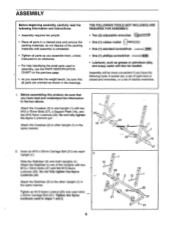
... weight bench, be sure that all parts in a cleared area and remove the packing materials; Do not fully tighten the Nylon Locknuts yet. Tighten the Nylon Locknuts used in the 18 same manner. 22 18 27 2. In the box above. 1 Attach the Crossbar (3) to the other Upright (1) in assembly, use the PART IDENTIFICATION CHART on the previous page. • As you assemble them, unless instructed...
... weight bench, be sure that all parts in a cleared area and remove the packing materials; Do not fully tighten the Nylon Locknuts yet. Tighten the Nylon Locknuts used in the 18 same manner. 22 18 27 2. In the box above. 1 Attach the Crossbar (3) to the other Upright (1) in assembly, use the PART IDENTIFICATION CHART on the previous page. • As you assemble them, unless instructed...
English Manual
Page 7
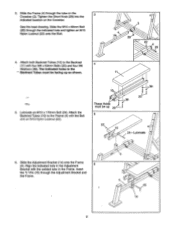
.... Tighten the Short Knob (29) into the indicated location on the 3 Crossbar (3). Attach the Backrest Tubes (10) to the Backrest 4 (11) with the welded tube in the Backrest Tubes must be facing up 20 5 : 38 20 /7/ 22 \• 10 24-Lubricate 6. See the inset drawing. Slide the Adjustment Bracket (14) onto the Frame (4). Insert the "L"-Pin (15...
.... Tighten the Short Knob (29) into the indicated location on the 3 Crossbar (3). Attach the Backrest Tubes (10) to the Backrest 4 (11) with the welded tube in the Backrest Tubes must be facing up 20 5 : 38 20 /7/ 22 \• 10 24-Lubricate 6. See the inset drawing. Slide the Adjustment Bracket (14) onto the Frame (4). Insert the "L"-Pin (15...
English Manual
Page 8
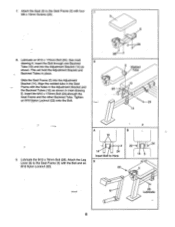
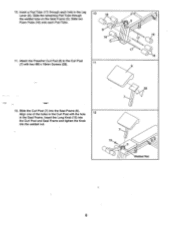
... the Seat Frame (5) into the Adjustment Bracket (14) as shown in the Seat Frame with the Bolt and an M10 Nylon Locknut (22). Lubricate the M10 x 76mm Bolt (26). Attach the Leg Lever (6) to the Seat Frame (5) with the holes in the Adjustment Bracket and the Backrest Tubes (10) as shown. Lubricate an M10 x 170mm Bolt (24). Insert the M10 x 170mm Bolt (24...
... the Seat Frame (5) into the Adjustment Bracket (14) as shown in the Seat Frame with the Bolt and an M10 Nylon Locknut (22). Lubricate the M10 x 76mm Bolt (26). Attach the Leg Lever (6) to the Seat Frame (5) with the holes in the Adjustment Bracket and the Backrest Tubes (10) as shown. Lubricate an M10 x 170mm Bolt (24). Insert the M10 x 170mm Bolt (24...
English Manual
Page 9
...Post with two M6 x 16mm Screws (28). 11 5 C 16 17 1 16 8 12. Attach the Preacher Curl Pad (8) to the Curl Post (7) with the hole 12 in the Leg Lever (6). Insert the Long Knob (19) into the Curl Post and Seat Frame and tighten the Knob into the Seat Frame (5). Insert a Pad Tube... (17) through the welded tube on the Seat Frame (5). Slide the...
...Post with two M6 x 16mm Screws (28). 11 5 C 16 17 1 16 8 12. Attach the Preacher Curl Pad (8) to the Curl Post (7) with the hole 12 in the Leg Lever (6). Insert the Long Knob (19) into the Curl Post and Seat Frame and tighten the Knob into the Seat Frame (5). Insert a Pad Tube... (17) through the welded tube on the Seat Frame (5). Slide the...
English Manual
Page 10
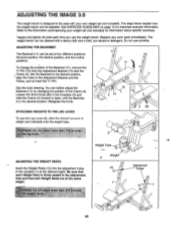
... information about specific exercises. To change the position of the Frame (4). ATTACHING WEIGHTS TO THE LEG LEVER 11 ..I 15 4 14 4 29 To use solvents. ADJUSTING THE BACKREST The Backrest (11) can further adjust the Backrest (11) by changing the position of the Backrest (11), remove the "L"-Pin (15) from the Adjustment Bracket (14) and the Frame (4). O O ADJUSTING THE WEIGHT RESTS Insert the Weight Rests (13) into the adjustment...
... information about specific exercises. To change the position of the Frame (4). ATTACHING WEIGHTS TO THE LEG LEVER 11 ..I 15 4 14 4 29 To use solvents. ADJUSTING THE BACKREST The Backrest (11) can further adjust the Backrest (11) by changing the position of the Backrest (11), remove the "L"-Pin (15) from the Adjustment Bracket (14) and the Frame (4). O O ADJUSTING THE WEIGHT RESTS Insert the Weight Rests (13) into the adjustment...

English Manual
Page 11
... (7), remove the 48mm Square Inner Cap (31) from the Seat Frame (5). Slide the Curl Post into the welded nut. t c ° . . 1 Weight . Weight Storage Tube USING THE LEG LEVER To perform leg extension exercises (see drawing A), the Backrest must be set at the level position. a , Position 14 15 B o 0 i 11 USING THE WEIGHT STORAGE TUBES The weight storage tubes on the Uprights (1) can be set at the highest incline. See ADJUSTING...
... (7), remove the 48mm Square Inner Cap (31) from the Seat Frame (5). Slide the Curl Post into the welded nut. t c ° . . 1 Weight . Weight Storage Tube USING THE LEG LEVER To perform leg extension exercises (see drawing A), the Backrest must be set at the level position. a , Position 14 15 B o 0 i 11 USING THE WEIGHT STORAGE TUBES The weight storage tubes on the Uprights (1) can be set at the highest incline. See ADJUSTING...
English Manual
Page 12
... your muscles to warm up. Begin with aerobic exercise, you want to regenerate. Rest for a maximum of 30 seconds between sets. • Cross Training In the pursuit of a complete and well-balanced fitness program, many have not specified an exact length of time for each workout, or a specific number of repetitions or sets for every major muscle group, with emphasis on...
... your muscles to warm up. Begin with aerobic exercise, you want to regenerate. Rest for a maximum of 30 seconds between sets. • Cross Training In the pursuit of a complete and well-balanced fitness program, many have not specified an exact length of time for each workout, or a specific number of repetitions or sets for every major muscle group, with emphasis on...
English Manual
Page 13
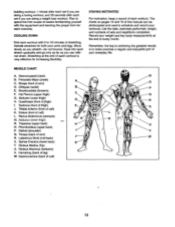
... repetitions completed. Rhomboideus (upper back) P. Gluteus Medius (hip) U. List the date, exercises performed, weight, and numbers of calf) K. MUSCLE CHART A. building workout, 1 minute after each set if you are doing a weight loss workout. Pectoralis Major (chest) A C. Biceps (front of arm) R. Trapezius (upper back) H O. Stemomastoid (neck) N B. Triceps (back of arm) O D. Obliques (waist) B E. Deltoid (shoulder) Q. Latissimus Dorsi (mid back) S. Brachioradials (forearm) F. Hamstring (back of...
... repetitions completed. Rhomboideus (upper back) P. Gluteus Medius (hip) U. List the date, exercises performed, weight, and numbers of calf) K. MUSCLE CHART A. building workout, 1 minute after each set if you are doing a weight loss workout. Pectoralis Major (chest) A C. Biceps (front of arm) R. Trapezius (upper back) H O. Stemomastoid (neck) N B. Triceps (back of arm) O D. Obliques (waist) B E. Deltoid (shoulder) Q. Latissimus Dorsi (mid back) S. Brachioradials (forearm) F. Hamstring (back of...
English Manual
Page 14
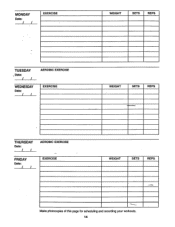
MONDAY Date: / / EXERCISE WEIGHT SETS REPS TUESDAY I Date: / / WEDNESDAY Date: / / AEROBIC EXERCISE EXERCISE WEIGHT SETS REPS THURSDAY Date: / / FRIDAY Date: / / AEROBIC EXERCISE EXERCISE WEIGHT SETS REPS --- Make photocopies of this page for scheduling and recording your workouts. 14
MONDAY Date: / / EXERCISE WEIGHT SETS REPS TUESDAY I Date: / / WEDNESDAY Date: / / AEROBIC EXERCISE EXERCISE WEIGHT SETS REPS THURSDAY Date: / / FRIDAY Date: / / AEROBIC EXERCISE EXERCISE WEIGHT SETS REPS --- Make photocopies of this page for scheduling and recording your workouts. 14
English Manual
Page 15
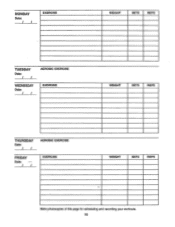
Make photocopies of this page for scheduling and recording your workouts. 15 MONDAY Date: / / EXERCISE WEIGHT SETS REPS TUESDAY Date: / / WEDNESDAY Date: / / AEROBIC EXERCISE EXERCISE WEIGHT SETS REPS THURSDAY Date: / / FRIDAY Date: - / AEROBIC EXERCISE EXERCISE WEIGHT SETS REPS .
Make photocopies of this page for scheduling and recording your workouts. 15 MONDAY Date: / / EXERCISE WEIGHT SETS REPS TUESDAY Date: / / WEDNESDAY Date: / / AEROBIC EXERCISE EXERCISE WEIGHT SETS REPS THURSDAY Date: / / FRIDAY Date: - / AEROBIC EXERCISE EXERCISE WEIGHT SETS REPS .
English Manual
Page 16
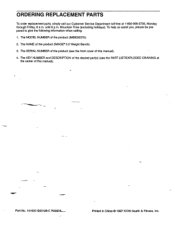
... MODEL NUMBER of the product (IMAGE® 3.0 Weight Bench). 3. Part No. 141600 G03128-C R0997A-- The KEY NUMBER and DESCRIPTION of the desired part(s) (see the front cover of this manual). 4. Printed in China © 1997 ICON Health & Fitness, Inc. The SERIAL NUMBER of the product (see the PART LIST/EXPLODED DRAWING at 1-800-999-3756, Monday through Friday, 6 a.m. ORDERING REPLACEMENT PARTS To order replacement parts, simply call our Customer Service Department toll-free at...
... MODEL NUMBER of the product (IMAGE® 3.0 Weight Bench). 3. Part No. 141600 G03128-C R0997A-- The KEY NUMBER and DESCRIPTION of the desired part(s) (see the front cover of this manual). 4. Printed in China © 1997 ICON Health & Fitness, Inc. The SERIAL NUMBER of the product (see the PART LIST/EXPLODED DRAWING at 1-800-999-3756, Monday through Friday, 6 a.m. ORDERING REPLACEMENT PARTS To order replacement parts, simply call our Customer Service Department toll-free at...
English Manual
Page 17
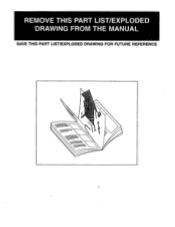
REMOVE THIS PART LIST/EXPLODED DRAWING FROM THE MANUAL SAVE THIS PART LIST/EXPLODED DRAWING FOR FUTURE REFERENCE a
REMOVE THIS PART LIST/EXPLODED DRAWING FROM THE MANUAL SAVE THIS PART LIST/EXPLODED DRAWING FOR FUTURE REFERENCE a
English Manual
Page 19
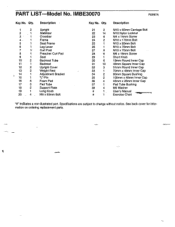
... Upright Cover Weight Rest Adjustment Bracket "L"-Pin Foam Pad Pad Tube Support Plate Long Knob M6 x 63mm Bolt Key No. IMBE30070 R0997A Key No. See back cover for information on ordering replacement parts. Qty. 21 2 22 14 23 6 24 2 25 1 26 1 27 8 28 • 6 29 1 30 6 31 10 32 3 33 1 34 2 35 2 36 4 37 1 38 4 # 1 # 1 Description M10 x 65mm Carriage Bolt M10 Nylon Locknut M4 x 14mm Screw...
... Upright Cover Weight Rest Adjustment Bracket "L"-Pin Foam Pad Pad Tube Support Plate Long Knob M6 x 63mm Bolt Key No. IMBE30070 R0997A Key No. See back cover for information on ordering replacement parts. Qty. 21 2 22 14 23 6 24 2 25 1 26 1 27 8 28 • 6 29 1 30 6 31 10 32 3 33 1 34 2 35 2 36 4 37 1 38 4 # 1 # 1 Description M10 x 65mm Carriage Bolt M10 Nylon Locknut M4 x 14mm Screw...


