
English Manual
Page 2
... USE THE HEART RATE MONITOR 6 OPERATION AND ADJUSTMENT 7 HOW TO FOLD AND MOVE THE TREADMILL 17 MAINTENANCE AND TROUBLE-SHOOTING 18 CONDITIONING GUIDELINES 20 PART LIST 22 ORDERING REPLACEMENT PARTS Back Cover FULL ONE YEAR WARRANTY Back Cover Note: An EXPLODED DRAWING is attached at the center of this treadmill are adequately informed of all times. 7. Save the EXPLODED DRAWING for both men and women. When connecting the power cord (see HOW TO PLUG...
... USE THE HEART RATE MONITOR 6 OPERATION AND ADJUSTMENT 7 HOW TO FOLD AND MOVE THE TREADMILL 17 MAINTENANCE AND TROUBLE-SHOOTING 18 CONDITIONING GUIDELINES 20 PART LIST 22 ORDERING REPLACEMENT PARTS Back Cover FULL ONE YEAR WARRANTY Back Cover Note: An EXPLODED DRAWING is attached at the center of this treadmill are adequately informed of all times. 7. Save the EXPLODED DRAWING for both men and women. When connecting the power cord (see HOW TO PLUG...
English Manual
Page 3
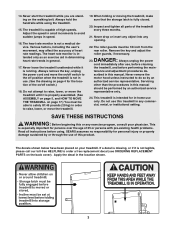
..., lower, or move the on/off switch to order a free replacement decal (see ORDERING REPLACEMENT PARTS on your physician. Inspect and tighten all instructions before performing the main- tenance and adjustment procedures de- When folding or moving the treadmill, make sure that the storage latch is not a medical device. Servicing other than the procedures in use , before cleaning the treadmill, and before using the treadmill. 15. Never leave the treadmill unattended...
..., lower, or move the on/off switch to order a free replacement decal (see ORDERING REPLACEMENT PARTS on your physician. Inspect and tighten all instructions before performing the main- tenance and adjustment procedures de- When folding or moving the treadmill, make sure that the storage latch is not a medical device. Servicing other than the procedures in use , before cleaning the treadmill, and before using the treadmill. 15. Never leave the treadmill unattended...
English Manual
Page 4
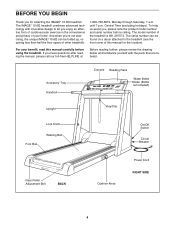
... effective form of cardiovascular exercise in the convenience and privacy of this manual carefully before calling. The serial number can be found on a decal attached to let you , please note the product model number and serial number before using the treadmill. Accessory Tray Handrail Console Reading Rack Water Bottle Holder (Bottle not included) Upright Key/Clip Foot Rail Lock Knob Walking Belt On/Off Switch Circuit Breaker Rear Roller Adjustment Bolt BACK Cushion Knob Power Cord...
... effective form of cardiovascular exercise in the convenience and privacy of this manual carefully before calling. The serial number can be found on a decal attached to let you , please note the product model number and serial number before using the treadmill. Accessory Tray Handrail Console Reading Rack Water Bottle Holder (Bottle not included) Upright Key/Clip Foot Rail Lock Knob Walking Belt On/Off Switch Circuit Breaker Rear Roller Adjustment Bolt BACK Cushion Knob Power Cord...
English Manual
Page 5
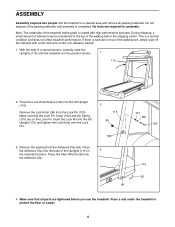
... until the treadmill is lubricant on the Lock Pin. Set the treadmill in a cleared area and remove all parts are required for assembly. Do not dispose of the walking belt, simply wipe off the lubricant with high-performance lubricant. During shipping, a small amount of a second person, carefully raise the Uprights (115) until assembly is a normal condition and does not affect treadmill performance. Press the Lock Knob Sleeve...
... until the treadmill is lubricant on the Lock Pin. Set the treadmill in a cleared area and remove all parts are required for assembly. Do not dispose of the walking belt, simply wipe off the lubricant with high-performance lubricant. During shipping, a small amount of a second person, carefully raise the Uprights (115) until assembly is a normal condition and does not affect treadmill performance. Press the Lock Knob Sleeve...
English Manual
Page 6
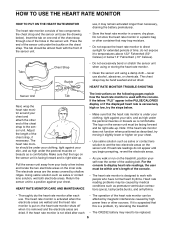
...; Fahrenheit (-10¡ Celsius). Do not store the heart rate monitor in the PULSE/CALORIES display or if the displayed heart rate is designed to work with people who have normal heart rhythms. Heart rate reading problems may be affected by magnetic interference caused by medical conditions such as is comfortable. The chest strap may be replaced. 6 HEART RATE MONITOR CARE AND MAINTENANCE The instructions on the sensor unit must be within armÕ...
...; Fahrenheit (-10¡ Celsius). Do not store the heart rate monitor in the PULSE/CALORIES display or if the displayed heart rate is designed to work with people who have normal heart rhythms. Heart rate reading problems may be affected by magnetic interference caused by medical conditions such as is comfortable. The chest strap may be replaced. 6 HEART RATE MONITOR CARE AND MAINTENANCE The instructions on the sensor unit must be within armÕ...

English Manual
Page 7
... voltage changes in your homeÕs power. Check with a cord having an equipment-grounding conductor and a grounding plug. Your treadmill, like the adapter illustrated in drawing 2 may be held in an increased risk of 450 joules. The surge suppressor must be electrically rated for use a surge suppressor with all local codes and ordinances. OPERATION AND ADJUSTMENT THE PERFORMANT LUBETM WALKING BELT Your treadmill features a walking belt...
... voltage changes in your homeÕs power. Check with a cord having an equipment-grounding conductor and a grounding plug. Your treadmill, like the adapter illustrated in drawing 2 may be held in an increased risk of 450 joules. The surge suppressor must be electrically rated for use a surge suppressor with all local codes and ordinances. OPERATION AND ADJUSTMENT THE PERFORMANT LUBETM WALKING BELT Your treadmill features a walking belt...
English Manual
Page 8
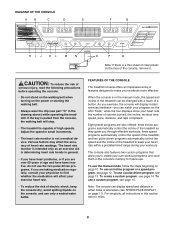
... the treadmill can display speed and distance in either miles or kilometers (see part ÒOÓ in the drawing above) while operating the treadmill. and two pulse driven programs automatically control the speed and the incline of the treadmill to keep the console dry, avoid spilling liquids on the console, and use the manual mode, follow the steps beginning on the face of the console, remove it. three speed programs automatically control the speed of heart rate...
... the treadmill can display speed and distance in either miles or kilometers (see part ÒOÓ in the drawing above) while operating the treadmill. and two pulse driven programs automatically control the speed and the incline of the treadmill to keep the console dry, avoid spilling liquids on the console, and use the manual mode, follow the steps beginning on the face of the console, remove it. three speed programs automatically control the speed of heart rate...
English Manual
Page 9
... console. SPEED/PACE displayÑThis display shows both your heart rate (if the heart rate monitor is plugged in, the letters ÒPOÓ will be adjusted only while the walking belt is moving when the SELECT PROGRAM button is used to a stop the walking belt when the manual mode, a preset program, or a custom program is worn on an LED track. Note: If the key is in the console when the power cord is worn) and the approximate number...
... console. SPEED/PACE displayÑThis display shows both your heart rate (if the heart rate monitor is plugged in, the letters ÒPOÓ will be adjusted only while the walking belt is moving when the SELECT PROGRAM button is used to a stop the walking belt when the manual mode, a preset program, or a custom program is worn on an LED track. Note: If the key is in the console when the power cord is worn) and the approximate number...
English Manual
Page 10
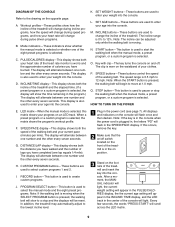
..., press the PROGRAM SELECT button repeatedly to reach the selected incline setting. For the PULSE/CALORIES display to 12%. Hold the handrails and step onto the walking belt. As you have entered your weight. The track will light. Although it may go directly to flash. To stop the walking belt and reset all steps. 2 Select the MANUAL mode. The console will change in the consoleÕs memory, even if the power cord is unplugged. 10 If...
..., press the PROGRAM SELECT button repeatedly to reach the selected incline setting. For the PULSE/CALORIES display to 12%. Hold the handrails and step onto the walking belt. As you have entered your weight. The track will light. Although it may go directly to flash. To stop the walking belt and reset all steps. 2 Select the MANUAL mode. The console will change in the consoleÕs memory, even if the power cord is unplugged. 10 If...

English Manual
Page 11
INCLINE/TIME displayÑThis display shows both the distance you have walked and the number of laps you have burned. Note: The speed can be displayed in miles; To check the unit of measurement, first hold down the STOP button while inserting the key into the console. PULSE/CALORIES displayÑThis display shows both the speed of the walking belt and your current pace (minutes per hour, the...
INCLINE/TIME displayÑThis display shows both the distance you have walked and the number of laps you have burned. Note: The speed can be displayed in miles; To check the unit of measurement, first hold down the STOP button while inserting the key into the console. PULSE/CALORIES displayÑThis display shows both the speed of the walking belt and your current pace (minutes per hour, the...
English Manual
Page 12
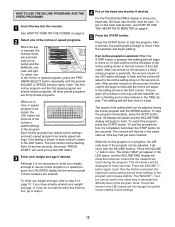
... the INCLINE/TIME display will begin to flash and the incline will be worn. See HOW TO TURN ON THE POWER on page 9. 2 Select one of the program will continue in the second column. After a moment, the walking belt will begin to step 4. 4 Put on page 6. 5 Press the START button. HOW TO USE THE INCLINE PROGRAMS AND THE SPEED PROGRAMS 1 Insert the key into the console. Note: The first incline program...
... the INCLINE/TIME display will begin to flash and the incline will be worn. See HOW TO TURN ON THE POWER on page 9. 2 Select one of the program will continue in the second column. After a moment, the walking belt will begin to step 4. 4 Put on page 6. 5 Press the START button. HOW TO USE THE INCLINE PROGRAMS AND THE SPEED PROGRAMS 1 Insert the key into the console. Note: The first incline program...
English Manual
Page 13
... other settings of the program will increase slightly. The pulse driven programs automatically control the speed and incline of the treadmill to keep your weight and age, press either of the SET AGE buttons to step 3 on page 11. 7 Remove the key from the console. Although it is not necessary to enter your weight to use a pulse driven program, you weight and age, refer to verify the age setting. The words ÒPRESS START...
... other settings of the program will increase slightly. The pulse driven programs automatically control the speed and incline of the treadmill to keep your weight and age, press either of the SET AGE buttons to step 3 on page 11. 7 Remove the key from the console. Although it is not necessary to enter your weight to use a pulse driven program, you weight and age, refer to verify the age setting. The words ÒPRESS START...
English Manual
Page 14
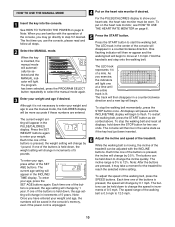
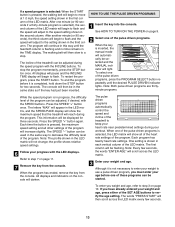
... the console. If your heart rate near the heart rate setting shown in progress, minor adjustments can be completed. HOW TO CREATE A CUSTOM PROGRAM 1 Insert the key into the console. When one of the treadmill. Press the START button to step 4. 4 Press the START button. After a moment, the walking belt will automatically decrease. 4 Put on page 6. The heart rate monitor must be the same). Note: A pulse driven program can be more accurate if these numbers are workout programs...
... the console. If your heart rate near the heart rate setting shown in progress, minor adjustments can be completed. HOW TO CREATE A CUSTOM PROGRAM 1 Insert the key into the console. When one of the treadmill. Press the START button to step 4. 4 Press the START button. After a moment, the walking belt will automatically decrease. 4 Put on page 6. The heart rate monitor must be the same). Note: A pulse driven program can be more accurate if these numbers are workout programs...

English Manual
Page 15
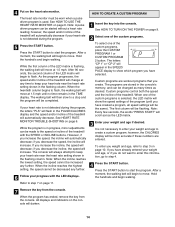
... to move one of the treadmill to the desired levels with the SPEED and INCLINE buttons. If you have already entered your weight and age, or if you are entered. When you do not want to enter this procedure until you weight and age, refer to forty segments. To restart the program, press the START button. 6 Remove the key from the console. Press the START button to step...
... to move one of the treadmill to the desired levels with the SPEED and INCLINE buttons. If you have already entered your weight and age, or if you are entered. When you do not want to enter this procedure until you weight and age, refer to forty segments. To restart the program, press the START button. 6 Remove the key from the console. Press the START button to step...

English Manual
Page 16
... segment can be adjusted with the SPEED or INCLINE buttons. The cushion level is controlled with the LED displays. When the program has ended, remove the key from the console. Adjust the speed or incline setting of the current segment with the SPEED or INCLINE buttons. To access the information mode, hold down the STOP button while inserting the key into the console. For a softer cushion level, turn the knob clockwise. All displays and indicators on...
... segment can be adjusted with the SPEED or INCLINE buttons. The cushion level is controlled with the LED displays. When the program has ended, remove the key from the console. Adjust the speed or incline setting of the current segment with the SPEED or INCLINE buttons. To access the information mode, hold down the STOP button while inserting the key into the console. For a softer cushion level, turn the knob clockwise. All displays and indicators on...

English Manual
Page 18
... off switch located at 1-800-736-6879, Monday through Saturday, 7 a.m. c. above ). b. PROBLEM: The walking belt is UL 1449 listed as shown, the circuit breaker has tripped. Be careful not to the left rear roller adjustment bolt clockwise, and the right bolt counterclockwise, 1/4 of the treadmill near the power cord. Check the circuit breaker located on /off during use c Tripped Reset Tripped d On Position Reset SOLUTION: a. c. Remove the key from the console...
... off switch located at 1-800-736-6879, Monday through Saturday, 7 a.m. c. above ). b. PROBLEM: The walking belt is UL 1449 listed as shown, the circuit breaker has tripped. Be careful not to the left rear roller adjustment bolt clockwise, and the right bolt counterclockwise, 1/4 of the treadmill near the power cord. Check the circuit breaker located on /off during use c Tripped Reset Tripped d On Position Reset SOLUTION: a. c. Remove the key from the console...

English Manual
Page 19
b. Plug in the power cord, insert the key and carefully walk on the console a. Using the allen wrench, turn both rear roller adjustment bolts clockwise, 1/4 of a turn . When the walking belt is properly tightened. ing belt is cor- If the heart rate monitor still does not function properly, the battery should be able to 4 inches off the walking platform. Remove the old battery from the console, wait for a few minutes. Battery Rubber Gasket PROBLEM: An error code (E1, E20, E21...
b. Plug in the power cord, insert the key and carefully walk on the console a. Using the allen wrench, turn both rear roller adjustment bolts clockwise, 1/4 of a turn . When the walking belt is properly tightened. ing belt is cor- If the heart rate monitor still does not function properly, the battery should be able to 4 inches off the walking platform. Remove the old battery from the console, wait for a few minutes. Battery Rubber Gasket PROBLEM: An error code (E1, E20, E21...
English Manual
Page 20
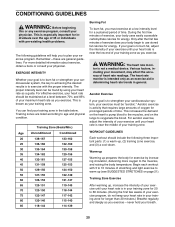
... your exercise program, do not keep your training zone. Begin each workout with 5 to 10 minutes of your exercise until your heart rate is activity that requires large amounts of exercise, your body uses easily accessible carbohydrate calories for 20 to plan your physician. EXERCISE INTENSITY Whether your goal is to burn fat or strengthen your heart rate is to exercise with pre-existing health problems. The...
... your exercise program, do not keep your training zone. Begin each workout with 5 to 10 minutes of your exercise until your heart rate is activity that requires large amounts of exercise, your body uses easily accessible carbohydrate calories for 20 to plan your physician. EXERCISE INTENSITY Whether your goal is to burn fat or strengthen your heart rate is to exercise with pre-existing health problems. The...
English Manual
Page 22
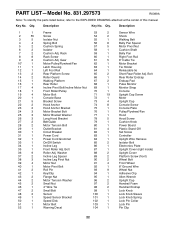
.... Bolt 87 1 Roller Adj. Bolt Rear Roller Endcap Endcap Pad Pulse Monitor Monitor Strap Console Upright Cap Screw Motor Upright Cap Console Screw Console Plate Pulley/Flywheel/Fan Hood Hood Screw Cushion Knob Power Board Plastic Stand-Off Set Screw Controller Upright Wire Harness Isolator Bolt Electronics Plate Upright Cover (right inside) Upright Cover Platform Screw (front) Wheel Bolt Front Wheel 8Ó Ground Wire Wheel Nut Adhesive Clip Allen Wrench Upright Cap Handrail Foam Handrail Endcap Lock Knob Lock Knob Sleeve Lock Knob Spring Lock Pin Collar Lock Pin Pin Clip 22 Key...
.... Bolt 87 1 Roller Adj. Bolt Rear Roller Endcap Endcap Pad Pulse Monitor Monitor Strap Console Upright Cap Screw Motor Upright Cap Console Screw Console Plate Pulley/Flywheel/Fan Hood Hood Screw Cushion Knob Power Board Plastic Stand-Off Set Screw Controller Upright Wire Harness Isolator Bolt Electronics Plate Upright Cover (right inside) Upright Cover Platform Screw (front) Wheel Bolt Front Wheel 8Ó Ground Wire Wheel Nut Adhesive Clip Allen Wrench Upright Cap Handrail Foam Handrail Endcap Lock Knob Lock Knob Sleeve Lock Knob Spring Lock Pin Collar Lock Pin Pin Clip 22 Key...
English Manual
Page 26
... the TREADMILL EXERCISER is missing ¥ or you need help or service, or ordering parts, please be replaced, call the following information: ¥ The NAME OF THE PRODUCT (IMAGE¨ 10.6Q treadmill) ¥ The MODEL NUMBER OF THE PRODUCT (831.297573) ¥ The PART NUMBER AND DESCRIPTION OF THE PART (see the PART LIST on a decal attached to schedule repair service call the toll-free numbers listed at the left. This warranty gives you specific...
... the TREADMILL EXERCISER is missing ¥ or you need help or service, or ordering parts, please be replaced, call the following information: ¥ The NAME OF THE PRODUCT (IMAGE¨ 10.6Q treadmill) ¥ The MODEL NUMBER OF THE PRODUCT (831.297573) ¥ The PART NUMBER AND DESCRIPTION OF THE PART (see the PART LIST on a decal attached to schedule repair service call the toll-free numbers listed at the left. This warranty gives you specific...


