User Guide
Page 4
...Using Security Profile by Device 30 Other settings in the IBM Setup Utility program 31 The startup sequence 31 Changing the startup sequence 31 Chapter 5. Customizing a Rapid Access Button 14 Rapid Access Wireless keyboard and mouse 14 Using the IBM ScrollPoint mouse 16 Accessing the optical drive 17 Using an optical drive 18 Handling a disc 18 Inserting and removing a disc 19 Using video features 20 Video device drivers 20 Using audio features 20 Controlling volume 20 Recording and playing back sound 21 Using power-management features 21 Using the Windows Start menu 22 Using...
...Using Security Profile by Device 30 Other settings in the IBM Setup Utility program 31 The startup sequence 31 Changing the startup sequence 31 Chapter 5. Customizing a Rapid Access Button 14 Rapid Access Wireless keyboard and mouse 14 Using the IBM ScrollPoint mouse 16 Accessing the optical drive 17 Using an optical drive 18 Handling a disc 18 Inserting and removing a disc 19 Using video features 20 Video device drivers 20 Using audio features 20 Controlling volume 20 Recording and playing back sound 21 Using power-management features 21 Using the Windows Start menu 22 Using...
User Guide
Page 5
...-test (POST 45 POST error codes 45 Device troubleshooting charts 48 Audio problems 50 Optical drive problems 51 DVD disc problems 52 Display/monitor problems 53 General problems 53 Intermittent problems 54 Rapid Access IIIe Keyboard problems 55 Rapid Access Wireless Keyboard problems 56 ScrollPoint III Mouse problems 57 ScrollPoint Wireless Mouse problems 58 Memory problems 59 Modem problems 60 Optional-device problems 63 Software problems 64 Universal Serial Bus (USB) problems 64 IBM Enhanced Diagnostics 64 Creating an IBM Enhanced Diagnostics diskette 65 Running the IBM...
...-test (POST 45 POST error codes 45 Device troubleshooting charts 48 Audio problems 50 Optical drive problems 51 DVD disc problems 52 Display/monitor problems 53 General problems 53 Intermittent problems 54 Rapid Access IIIe Keyboard problems 55 Rapid Access Wireless Keyboard problems 56 ScrollPoint III Mouse problems 57 ScrollPoint Wireless Mouse problems 58 Memory problems 59 Modem problems 60 Optional-device problems 63 Software problems 64 Universal Serial Bus (USB) problems 64 IBM Enhanced Diagnostics 64 Creating an IBM Enhanced Diagnostics diskette 65 Running the IBM...

User Guide
Page 16
... MB, or 1 GB non-parity, non-ECC DIMMs (optional) • 2 GB maximum SDRAM supported • Flash memory for your specific model, refer to the System Summary screen in stereo speakers to support multimedia applications Communications • Integrated 10/100 Ethernet • Peripheral Component Interconnect (PCI) modem (some models only) 2 User Guide Hardware features The following information covers a variety of built in the IBM Setup Utility. For more information, see Chapter 4, "Using...
... MB, or 1 GB non-parity, non-ECC DIMMs (optional) • 2 GB maximum SDRAM supported • Flash memory for your specific model, refer to the System Summary screen in stereo speakers to support multimedia applications Communications • Integrated 10/100 Ethernet • Peripheral Component Interconnect (PCI) modem (some models only) 2 User Guide Hardware features The following information covers a variety of built in the IBM Setup Utility. For more information, see Chapter 4, "Using...

User Guide
Page 17
...; Automatic power-on startup • System Management BIOS and software Keyboard and mouse features • IBM ScrollPoint® III mouse (some models) • IBM Rapid Access® IIIe, Universal Serial Bus (USB), keyboard (some models) • IBM Rapid Access Wireless keyboard and mouse (some models) • IBM Preferred USB keyboard (some models) Expansion capability • Two low-profile PCI adapter expansion slots • Six USB connectors • Two DIMM sockets • Parallel port • Audio ports Power • 160 Watt power adapter • Automatic switching between...
...; Automatic power-on startup • System Management BIOS and software Keyboard and mouse features • IBM ScrollPoint® III mouse (some models) • IBM Rapid Access® IIIe, Universal Serial Bus (USB), keyboard (some models) • IBM Rapid Access Wireless keyboard and mouse (some models) • IBM Preferred USB keyboard (some models) Expansion capability • Two low-profile PCI adapter expansion slots • Six USB connectors • Two DIMM sockets • Parallel port • Audio ports Power • 160 Watt power adapter • Automatic switching between...
User Guide
Page 23
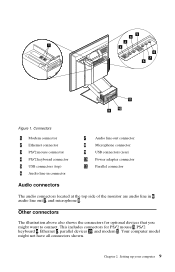
... 10, and modem 1. This includes connectors for optional devices that you might not have all connectors shown. Figure 1. Your computer model might want to connect. Setting up your computer 9 Connectors 1 Modem connector 2 Ethernet connector 3 PS/2 mouse connector 4 PS/2 keyboard connector 5 USB connectors (top) 6 Audio line-in connector 7 Audio line-out connector 8 Microphone connector 9 USB connectors (rear) 10 Power adapter connector 11 Parallel connector Audio connectors The audio connectors located at the top side of the monitor are audio line in 6, audio line out 7, and...
... 10, and modem 1. This includes connectors for optional devices that you might not have all connectors shown. Figure 1. Your computer model might want to connect. Setting up your computer 9 Connectors 1 Modem connector 2 Ethernet connector 3 PS/2 mouse connector 4 PS/2 keyboard connector 5 USB connectors (top) 6 Audio line-in connector 7 Audio line-out connector 8 Microphone connector 9 USB connectors (rear) 10 Power adapter connector 11 Parallel connector Audio connectors The audio connectors located at the top side of the monitor are audio line in 6, audio line out 7, and...

User Guide
Page 26
.... Hard disk drive in the Startup menu of the IBM Setup Utility program. If this hole if you turn off . Optical drive emergency eject hole: Insert a paper clip into this happens, hold this light is on, it indicates that your computer depends on the settings in -use indicator: When this button to lower the device bay for inserting or removing a disc. Power button: Press this indicator is displayed on the screen. However...
.... Hard disk drive in the Startup menu of the IBM Setup Utility program. If this hole if you turn off . Optical drive emergency eject hole: Insert a paper clip into this happens, hold this light is on, it indicates that your computer depends on the settings in -use indicator: When this button to lower the device bay for inserting or removing a disc. Power button: Press this indicator is displayed on the screen. However...
User Guide
Page 34
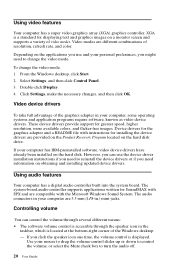
... drivers. The audio connectors in your computer has IBM-preinstalled software, video device drivers have already been installed on the hard disk. Video modes are compatible with SPX and are different combinations of video modes. The system-board audio controller supports applications written for greater speed, higher resolution, more available colors, and flicker-free images. These device drivers provide support for SoundMAX with the Microsoft Windows Sound System. If you use the device driver installation instructions if you need to turn the audio off. 20 User Guide...
... drivers. The audio connectors in your computer has IBM-preinstalled software, video device drivers have already been installed on the hard disk. Video modes are compatible with SPX and are different combinations of video modes. The system-board audio controller supports applications written for greater speed, higher resolution, more available colors, and flicker-free images. These device drivers provide support for SoundMAX with the Microsoft Windows Sound System. If you use the device driver installation instructions if you need to turn the audio off. 20 User Guide...

User Guide
Page 37
... the Windows desktop, click Start. 2. Select Settings; After the computer, hard disk drive or monitor has entered Standby mode, pressing the power button or an incoming modem ring, brings the computer out of your computer you can use the security features built into the Windows operating system to assign a password that comes with your computer 23 To restrict access to the operating system publication that locks the keyboard and mouse...
... the Windows desktop, click Start. 2. Select Settings; After the computer, hard disk drive or monitor has entered Standby mode, pressing the power button or an incoming modem ring, brings the computer out of your computer you can use the security features built into the Windows operating system to assign a password that comes with your computer 23 To restrict access to the operating system publication that locks the keyboard and mouse...
User Guide
Page 44
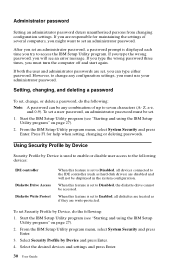
... Disabled, all diskettes are treated as hard disk drives) are write-protected. Select the desired devices and settings and press Enter. 30 User Guide From the IBM Setup Utility program menu, select System Security and press Enter. To set . 1. If you type the wrong password, you must use your administrator password. However, to the IDE controller (such as if they are disabled and will see an error message. When this feature is displayed...
... Disabled, all diskettes are treated as hard disk drives) are write-protected. Select the desired devices and settings and press Enter. 30 User Guide From the IBM Setup Utility program menu, select System Security and press Enter. To set . 1. If you type the wrong password, you must use your administrator password. However, to the IDE controller (such as if they are disabled and will see an error message. When this feature is displayed...
User Guide
Page 48
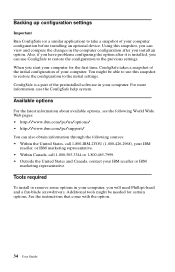
.../us/options/ • http://www.ibm.com/pc/support/ You can use ConfigSafe to restore the configuration to the previous settings. Backing up configuration settings Important Run ConfigSafe (or a similar application) to take a snapshot of your IBM reseller or IBM marketing representative. When you install an option. You might be able to use the ConfigSafe help system. Also, if you have problems configuring the option after you start your...
.../us/options/ • http://www.ibm.com/pc/support/ You can use ConfigSafe to restore the configuration to the previous settings. Backing up configuration settings Important Run ConfigSafe (or a similar application) to take a snapshot of your IBM reseller or IBM marketing representative. When you install an option. You might be able to use the ConfigSafe help system. Also, if you have problems configuring the option after you start your...
User Guide
Page 49
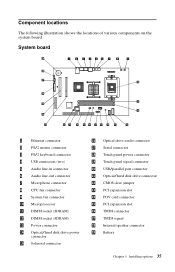
...6 Audio line-out connector 7 Microphone connector 8 CPU fan connector 9 System fan connector 10 Microprocessor 11 DIMM socket (SDRAM) 12 DIMM socket (SDRAM) 13 Power connector 14 Optical/hard disk drive power connector 15 Solenoid connector 16 Optical drive audio connector 17 Serial connector 18 Touch panel power connector 19 Touch panel signal connector 20 USB/parallel port connector 21 Optical/hard disk drive connector 22 CMOS clear jumper 23 PCI expansion slot 24 POV card connector 25 PCI expansion slot 26 TMDS connector 27 TMDS signal 28 Internal speaker connector 29 Battery...
...6 Audio line-out connector 7 Microphone connector 8 CPU fan connector 9 System fan connector 10 Microprocessor 11 DIMM socket (SDRAM) 12 DIMM socket (SDRAM) 13 Power connector 14 Optical/hard disk drive power connector 15 Solenoid connector 16 Optical drive audio connector 17 Serial connector 18 Touch panel power connector 19 Touch panel signal connector 20 USB/parallel port connector 21 Optical/hard disk drive connector 22 CMOS clear jumper 23 PCI expansion slot 24 POV card connector 25 PCI expansion slot 26 TMDS connector 27 TMDS signal 28 Internal speaker connector 29 Battery...

User Guide
Page 52
... already have adapters installed. To install an adapter, do the following: 1. Rotate the card retainer down using the blue handle. 3. Installing an adapter Your computer system board has two peripheral component interconnect (PCI) expansion slots. Rotate the card retainer up. 6. These adapters must not exceed 16.9 cm (6.66 inches) in length and 5.15 cm (2.04 inches) in any available PCI expansion slot. Remove the rear cover. Replace the rear cover. 38 User Guide
... already have adapters installed. To install an adapter, do the following: 1. Rotate the card retainer down using the blue handle. 3. Installing an adapter Your computer system board has two peripheral component interconnect (PCI) expansion slots. Rotate the card retainer up. 6. These adapters must not exceed 16.9 cm (6.66 inches) in length and 5.15 cm (2.04 inches) in any available PCI expansion slot. Remove the rear cover. Replace the rear cover. 38 User Guide

User Guide
Page 57
... such problems yourself or gather helpful information you have installed software applications yourself, see "IBM Enhanced Diagnostics" on to run the IBM Enhanced Diagnostics program provided by IBM. You can check the hardware by hardware, software, or user error (for a description of these programs). If you suspect that you can be caused by following tools are securely connected to recover from a BIOS update failure. You can use your computer. Troubleshooting...
... such problems yourself or gather helpful information you have installed software applications yourself, see "IBM Enhanced Diagnostics" on to run the IBM Enhanced Diagnostics program provided by IBM. You can check the hardware by hardware, software, or user error (for a description of these programs). If you suspect that you can be caused by following tools are securely connected to recover from a BIOS update failure. You can use your computer. Troubleshooting...

User Guide
Page 60
Make sure the keyboard is expected if you have the computer serviced. 46 User Guide Go to "Starting and using the IBM Setup Utility program" on page 27, and follow the instructions to reset the time and date. section, always begin by following the suggested action for instructions on running memory diagnostics. 301 Keyboard error 1. Replace the battery. If the keyboard is displayed. Note that is properly connected, have removed match memory. See "Replacing the battery" on page...
Make sure the keyboard is expected if you have the computer serviced. 46 User Guide Go to "Starting and using the IBM Setup Utility program" on page 27, and follow the instructions to reset the time and date. section, always begin by following the suggested action for instructions on running memory diagnostics. 301 Keyboard error 1. Replace the battery. If the keyboard is displayed. Note that is properly connected, have removed match memory. See "Replacing the battery" on page...

User Guide
Page 65
From the Windows desktop, double-click My Computer. 2. In the Control Panel window, double-click System. 4. Double-click the CD-ROM, DVD-ROM, or CD-RW list item and then double-click the listed CD-ROM option. 6. To remove dust or fingerprints, wipe the CD with your drive. Troubleshooting 51 Optical drive problems Symptom An audio or AutoPlay- To enable the AutoPlay feature, do not correct the problem, run the diagnostic programs (see Chapter...
From the Windows desktop, double-click My Computer. 2. In the Control Panel window, double-click System. 4. Double-click the CD-ROM, DVD-ROM, or CD-RW list item and then double-click the listed CD-ROM option. 6. To remove dust or fingerprints, wipe the CD with your drive. Troubleshooting 51 Optical drive problems Symptom An audio or AutoPlay- To enable the AutoPlay feature, do not correct the problem, run the diagnostic programs (see Chapter...
User Guide
Page 67
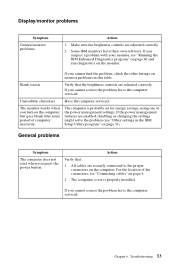
... the problem, check the other listings on monitor problems in the IBM Setup Utility program" on the monitor. Action Verify that the brightness controls are enabled, disabling or changing the settings might solve the problem (see "Connecting cables" on the computer. If you cannot correct the problem, have the computer serviced. If the power management features are adjusted correctly. All cables are adjusted correctly. 2. For the location of the power management settings. Display/monitor problems Symptom General monitor problems Action...
... the problem, check the other listings on monitor problems in the IBM Setup Utility program" on the monitor. Action Verify that the brightness controls are enabled, disabling or changing the settings might solve the problem (see "Connecting cables" on the computer. If you cannot correct the problem, have the computer serviced. If the power management features are adjusted correctly. All cables are adjusted correctly. 2. For the location of the power management settings. Display/monitor problems Symptom General monitor problems Action...

User Guide
Page 87
... custom installations. For technical assistance with the installation of information technology support, implementation, and management services. Getting information, help, and service 73 Chapter 7. network setup and configuration; For more information about these services, refer to the Integrated Technology Services Web site at http://support.microsoft.com/directory/, or you can contact the IBM HelpCenter. For more information or to register for IBM and non-IBM hardware, operating systems...
... custom installations. For technical assistance with the installation of information technology support, implementation, and management services. Getting information, help, and service 73 Chapter 7. network setup and configuration; For more information about these services, refer to the Integrated Technology Services Web site at http://support.microsoft.com/directory/, or you can contact the IBM HelpCenter. For more information or to register for IBM and non-IBM hardware, operating systems...

User Guide
Page 90
The foregoing is at those Web sites are not part of the materials for the date data processing capabilities of their associated documentation, to non-IBM Web sites are preinstalled or otherwise distributed by IBM. This IBM hardware product cannot prevent errors that might occur if software, upgrades, or peripheral devices you use of Microsoft Corporation in the United states, other...
The foregoing is at those Web sites are not part of the materials for the date data processing capabilities of their associated documentation, to non-IBM Web sites are preinstalled or otherwise distributed by IBM. This IBM hardware product cannot prevent errors that might occur if software, upgrades, or peripheral devices you use of Microsoft Corporation in the United states, other...
User Guide
Page 91
... Access Wireless 14 keyboard/mouse features 3 L locations, system board components 35 locking cover 23 locking the keyboard 23 M memory 2, 40 77 ning 66 IBM Setup Utility 27 exiting 29 other settings 31 passwords 29 viewing and changing settings 28 identifying your workspace 6 audio connectors 9 controlling volume 20 playing back sound 21 recording sound 21 audio problems 50 audio subsystem 2 available options 34 B backing up configuration 34 battery, replacing 66 buttons 11 C cables connecting 8 disconnecting 36 CD/DVD drive 17 cleaning computer 24 keyboard 24 monitor screen...
... Access Wireless 14 keyboard/mouse features 3 L locations, system board components 35 locking cover 23 locking the keyboard 23 M memory 2, 40 77 ning 66 IBM Setup Utility 27 exiting 29 other settings 31 passwords 29 viewing and changing settings 28 identifying your workspace 6 audio connectors 9 controlling volume 20 playing back sound 21 recording sound 21 audio problems 50 audio subsystem 2 available options 34 B backing up configuration 34 battery, replacing 66 buttons 11 C cables connecting 8 disconnecting 36 CD/DVD drive 17 cleaning computer 24 keyboard 24 monitor screen...
User Guide
Page 92
... passwords 29 PCI adapter card, adding 38 POST 45 POST error codes 45 power 3 power management 22 power-on self-test 45 preinstalled software 4 problem solving 43 problems audio 50 CD-ROM drive 51 display/monitor 53 DVD-ROM drive 52 general 53 intermittent 54 memory 59 optical drive 51 optional device 63 Rapid Access IIIe keyboard 55 Rapid Access Wireless keyboard 56 ScrollPoint III mouse 57 ScrollPoint Wireless mouse 58 software 64 USB 64 product overview 1 R RAM, adding 40 Rapid Access III keyboard 13 Rapid Access Wireless Keyboard 13 rear cover, removing 37 removing 78 User Guide hard disk...
... passwords 29 PCI adapter card, adding 38 POST 45 POST error codes 45 power 3 power management 22 power-on self-test 45 preinstalled software 4 problem solving 43 problems audio 50 CD-ROM drive 51 display/monitor 53 DVD-ROM drive 52 general 53 intermittent 54 memory 59 optical drive 51 optional device 63 Rapid Access IIIe keyboard 55 Rapid Access Wireless keyboard 56 ScrollPoint III mouse 57 ScrollPoint Wireless mouse 58 software 64 USB 64 product overview 1 R RAM, adding 40 Rapid Access III keyboard 13 Rapid Access Wireless Keyboard 13 rear cover, removing 37 removing 78 User Guide hard disk...


