
Parts List
Page 3
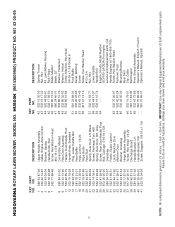
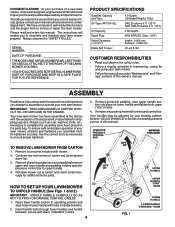
... Handle Handle Bolt Engine, Honda, Model Number GCV160-LAOS3A (For engine service and replacement parts, call Honda Engines at 1-800-426-7701) Screw, Hex Washer Head Fastener, Push Mounting Bracket, Rear Skirt Clip, Cable Belt Keeper Front Shroud Assembly Operator's Manual, English / French Operator's Manual, Spanish 3 NOTE: All component dimensions given in U.S. inches. 1 inch = 25.4 mm. HU800H (96143009900) PRODUCT NO. 961 43 00-99 KEY PART NO. Failure to do so could be hazardous, damage your lawn mower...
... Handle Handle Bolt Engine, Honda, Model Number GCV160-LAOS3A (For engine service and replacement parts, call Honda Engines at 1-800-426-7701) Screw, Hex Washer Head Fastener, Push Mounting Bracket, Rear Skirt Clip, Cable Belt Keeper Front Shroud Assembly Operator's Manual, English / French Operator's Manual, Spanish 3 NOTE: All component dimensions given in U.S. inches. 1 inch = 25.4 mm. HU800H (96143009900) PRODUCT NO. 961 43 00-99 KEY PART NO. Failure to do so could be hazardous, damage your lawn mower...
Parts List
Page 5
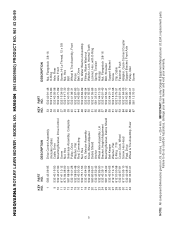
... Bolt Wheel & Tire Assembly, Front Pinion Belt, Drive Kit, Water Washout Assembly Fitting, Water Washout Washer, Lock, Internal Tooth Locknut, Hex, with O-Ring Spring, Tension Hubcap Nut, Flangelock 3/8-16 Bolt, Shoulder Support Bracket Screw Clip, Cable Fastener, Push Adapter, Quick-Connect Coupler Support Bracket, Front Axle Pulley, Idler Screw 5 NOTE: All component dimensions given in U.S. Failure to do so could be hazardous, damage your lawn mower and void your warranty. HUSQVARNA ROTARY LAWN MOWER - IMPORTANT: Use only...
... Bolt Wheel & Tire Assembly, Front Pinion Belt, Drive Kit, Water Washout Assembly Fitting, Water Washout Washer, Lock, Internal Tooth Locknut, Hex, with O-Ring Spring, Tension Hubcap Nut, Flangelock 3/8-16 Bolt, Shoulder Support Bracket Screw Clip, Cable Fastener, Push Adapter, Quick-Connect Coupler Support Bracket, Front Axle Pulley, Idler Screw 5 NOTE: All component dimensions given in U.S. Failure to do so could be hazardous, damage your lawn mower and void your warranty. HUSQVARNA ROTARY LAWN MOWER - IMPORTANT: Use only...
Operation Manual
Page 2
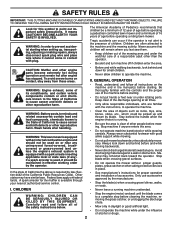
... to the presence of the machine before starting when setting up, transporting, adjusting or making repairs, always disconnect spark plug wire and place wire where it should not be a minimum of 12 year of age before operating a riding lawn mower. Always look behind and down and behind the handle when the engine (motor) is running machine unattended. SAFETY RULES IMPORTANT: THIS CUTTING MACHINE IS CAPABLE OF AMPUTATING HANDS...
... to the presence of the machine before starting when setting up, transporting, adjusting or making repairs, always disconnect spark plug wire and place wire where it should not be a minimum of 12 year of age before operating a riding lawn mower. Always look behind and down and behind the handle when the engine (motor) is running machine unattended. SAFETY RULES IMPORTANT: THIS CUTTING MACHINE IS CAPABLE OF AMPUTATING HANDS...
Operation Manual
Page 3
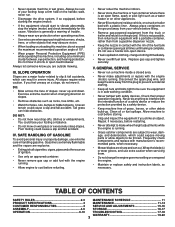
... wet grass. Do not use a nozzle lock-open device. • If fuel is an open toed footwear. Replace gas cap and tighten securely. Never do not exceed the maximum recommended operation angle of your footing: keep the wire away from your footing or balance. • Do not mow on clothing, change the engine governor setting or overspeed the engine. • Maintain or replace safety and instruction labels...
... wet grass. Do not use a nozzle lock-open device. • If fuel is an open toed footwear. Replace gas cap and tighten securely. Never do not exceed the maximum recommended operation angle of your footing: keep the wire away from your footing or balance. • Do not mow on clothing, change the engine governor setting or overspeed the engine. • Maintain or replace safety and instruction labels...
Operation Manual
Page 4
... THE REAR OF THE LAWN MOWER HOUSING. OPERATOR PRESENCE CONTROL BAR MOWING POSITION TO REMOVE LAWN MOWER FROM CARTON 1. HOW TO SET UP YOUR LAWN MOWER TO UNFOLD HANDLE (See Figs. 1 and 2) IMPORTANT: UNFOLD HANDLE CAREFULLY SO AS NOT TO PINCH OR DAMAGE CONTROL CABLES. 1. Insert handle bolts through lower handles and handle brackets; Should you experience any packing material from around control bar. The instructions will enable you assemble must be adjusted for your purchase of your new lawn mower...
... THE REAR OF THE LAWN MOWER HOUSING. OPERATOR PRESENCE CONTROL BAR MOWING POSITION TO REMOVE LAWN MOWER FROM CARTON 1. HOW TO SET UP YOUR LAWN MOWER TO UNFOLD HANDLE (See Figs. 1 and 2) IMPORTANT: UNFOLD HANDLE CAREFULLY SO AS NOT TO PINCH OR DAMAGE CONTROL CABLES. 1. Insert handle bolts through lower handles and handle brackets; Should you experience any packing material from around control bar. The instructions will enable you assemble must be adjusted for your purchase of your new lawn mower...
Operation Manual
Page 6
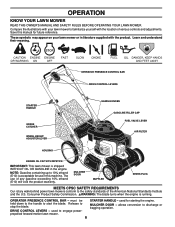
... their meaning. OPERATOR PRESENCE CONTROL BAR DRIVE CONTROL LEVERS STARTER HANDLE GRASS CATCHER WHEEL HEIGHT ADJUSTER LEVER HANDLE KNOBS GASOLINE FILLER CAP FUEL VALVE LEVER AIR FILTER HOUSING ENGINE OIL CAP WITH DIPSTICK IMPORTANT: This lawn mower is running. MULCHER DOOR MUFFLER SPARK PLUG MEETS CPSC SAFETY REQUIREMENTS Our rotary walk-behind power lawn mowers conform to the safety standards of various controls and adjustments. OPERATION KNOW YOUR LAWN MOWER READ THIS OWNER'S MANUAL AND SAFETY RULES BEFORE OPERATING YOUR LAWN MOWER. Save this manual for use of any...
... their meaning. OPERATOR PRESENCE CONTROL BAR DRIVE CONTROL LEVERS STARTER HANDLE GRASS CATCHER WHEEL HEIGHT ADJUSTER LEVER HANDLE KNOBS GASOLINE FILLER CAP FUEL VALVE LEVER AIR FILTER HOUSING ENGINE OIL CAP WITH DIPSTICK IMPORTANT: This lawn mower is running. MULCHER DOOR MUFFLER SPARK PLUG MEETS CPSC SAFETY REQUIREMENTS Our rotary walk-behind power lawn mowers conform to the safety standards of various controls and adjustments. OPERATION KNOW YOUR LAWN MOWER READ THIS OWNER'S MANUAL AND SAFETY RULES BEFORE OPERATING YOUR LAWN MOWER. Save this manual for use of any...
Operation Manual
Page 7
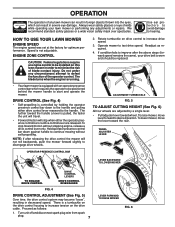
... disengage drive wheels. 2. Operate mower to the handle. Proceed as required. 4. HOW TO USE YOUR LAWN MOWER ENGINE SPEED The engine speed was set at the factory for optimum performance. Speed is a turnbuckle on the drive control housing to increase tension on the drive cable. Rotate turnbuckle on this lawn mower in order to minimize the risk of blade contact injury. Turn unit off and disconnect spark plug wire from spark plug. 7 LEVER FORWARD TO RAISE MOWER FIG. 6 ADJUSTMENT TURNBUCKLE FIG. 5 TO ADJUST CUTTING HEIGHT...
... disengage drive wheels. 2. Operate mower to the handle. Proceed as required. 4. HOW TO USE YOUR LAWN MOWER ENGINE SPEED The engine speed was set at the factory for optimum performance. Speed is a turnbuckle on the drive control housing to increase tension on the drive cable. Rotate turnbuckle on this lawn mower in order to minimize the risk of blade contact injury. Turn unit off and disconnect spark plug wire from spark plug. 7 LEVER FORWARD TO RAISE MOWER FIG. 6 ADJUSTMENT TURNBUCKLE FIG. 5 TO ADJUST CUTTING HEIGHT...
Operation Manual
Page 8
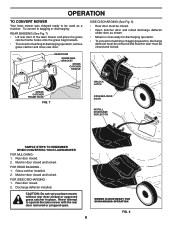
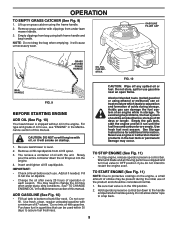
.... REAR DOOR GRASS BAG BRACKET GRASS CATCHER HANDLE GRASS CATCHER FRAME HOOK FIG. 7 UNLOCK LATCH OPEN MULCHER DOOR INSTALL DISCHARGE DEFLECTOR SIMPLE STEPS TO REMEMBER WHEN CONVERTING YOUR LAWN MOWER FOR MULCHING 1. MOWER IS NOW READY FOR DISCHARGING OPERATION FIG. 8 8 Rear door closed and locked. Grass catcher installed. 2. Discharge deflector installed. Never attempt to mulching or discharging operation, remove grass catcher and close rear door. Mulcher door closed . 2. To convert to bagging or discharging: REAR BAGGING (See Fig. 7) • Lift rear door of the lawn...
.... REAR DOOR GRASS BAG BRACKET GRASS CATCHER HANDLE GRASS CATCHER FRAME HOOK FIG. 7 UNLOCK LATCH OPEN MULCHER DOOR INSTALL DISCHARGE DEFLECTOR SIMPLE STEPS TO REMEMBER WHEN CONVERTING YOUR LAWN MOWER FOR MULCHING 1. MOWER IS NOW READY FOR DISCHARGING OPERATION FIG. 8 8 Rear door closed and locked. Grass catcher installed. 2. Discharge deflector installed. Never attempt to mulching or discharging operation, remove grass catcher and close rear door. Mulcher door closed . 2. To convert to bagging or discharging: REAR BAGGING (See Fig. 7) • Lift rear door of the lawn...
Operation Manual
Page 9
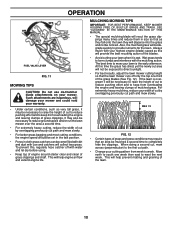
... oil if needed. You may need to change the oil more often under lawn mower handle. 3. Acidic gas can damage the fuel system of an engine while in the engine. Use fresh fuel next season. Hold operator presence control bar down the oil fill spout into the engine. 4. Remove grass catcher with clippings from bag using both frame handle and bag handle. GASOLINE FILLER CAP GRASS CATCHER FRAME HANDLE OIL FILL CAP/DIPSTICK FIG. 10 BAG HANDLE FIG. 9 BEFORE STARTING ENGINE ADD OIL (See Fig. 10) Your lawnmower...
... oil if needed. You may need to change the oil more often under lawn mower handle. 3. Acidic gas can damage the fuel system of an engine while in the engine. Use fresh fuel next season. Hold operator presence control bar down the oil fill spout into the engine. 4. Remove grass catcher with clippings from bag using both frame handle and bag handle. GASOLINE FILLER CAP GRASS CATCHER FRAME HANDLE OIL FILL CAP/DIPSTICK FIG. 10 BAG HANDLE FIG. 9 BEFORE STARTING ENGINE ADD OIL (See Fig. 10) Your lawnmower...
Operation Manual
Page 10
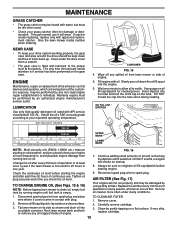
... the height of the grass blades (See Fig. 12). pings many times and reduce them in cloth grass catchers can become filled with dirt and dust with your highest engine (blade) speed as very tall grass, it is overgrown it will be necessary to completely hide the clippings. OPERATION OFF ON FUEL VALVE LEVER FIG. 11 MOWING TIPS CAUTION: Do not use and catchers will...
... the height of the grass blades (See Fig. 12). pings many times and reduce them in cloth grass catchers can become filled with dirt and dust with your highest engine (blade) speed as very tall grass, it is overgrown it will be necessary to completely hide the clippings. OPERATION OFF ON FUEL VALVE LEVER FIG. 11 MOWING TIPS CAUTION: Do not use and catchers will...
Operation Manual
Page 11
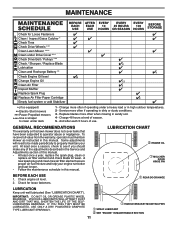
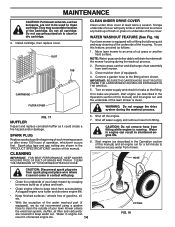
... Clean Lawn Mower **** Clean under Drive Cover *** Check Drive Belt / Pulleys *** Check / Sharpen / Replace Blade Lubrication Clean and Recharge Battery ** Check Engine Oil level Change Engine Oil Clean Air Filter Inspect Muffler Replace Spark Plug Replace Air Filter Paper Cartridge Empty fuel system or add Stabilizer * (if so equipped) ** Electric-Start mowers *** Power-Propelled mowers **** Use a scraper to clean under a heavy load or in the Service and Adjustments section of this lawn mower does not cover items that have been subjected to properly maintain your engine run better...
... Clean Lawn Mower **** Clean under Drive Cover *** Check Drive Belt / Pulleys *** Check / Sharpen / Replace Blade Lubrication Clean and Recharge Battery ** Check Engine Oil level Change Engine Oil Clean Air Filter Inspect Muffler Replace Spark Plug Replace Air Filter Paper Cartridge Empty fuel system or add Stabilizer * (if so equipped) ** Electric-Start mowers *** Power-Propelled mowers **** Use a scraper to clean under a heavy load or in the Service and Adjustments section of this lawn mower does not cover items that have been subjected to properly maintain your engine run better...

Operation Manual
Page 12
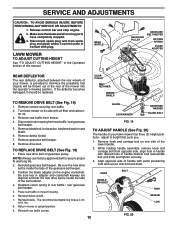
... may cause tire damage. Position blade on its side. IMPORTANT: TO ENSURE PROPER ASSEMBLY, CENTER HOLE IN BLADE MUST ALIGN WITH STAR ON BLADE ADAPTER. 4. MAINTENANCE LAWN MOWER Always observe safety rules when performing any maintenance. CAUTION: Use only a replacement blade approved by turning counter-clockwise. 5. Use block of wood between blade and mower housing to clean the drive wheels, check both rear wheels. IMPORTANT: BLADE BOLT IS HEAT TREATED. The wheels not turning freely means trash, grass cuttings, etc...
... may cause tire damage. Position blade on its side. IMPORTANT: TO ENSURE PROPER ASSEMBLY, CENTER HOLE IN BLADE MUST ALIGN WITH STAR ON BLADE ADAPTER. 4. MAINTENANCE LAWN MOWER Always observe safety rules when performing any maintenance. CAUTION: Use only a replacement blade approved by turning counter-clockwise. 5. Use block of wood between blade and mower housing to clean the drive wheels, check both rear wheels. IMPORTANT: BLADE BOLT IS HEAT TREATED. The wheels not turning freely means trash, grass cuttings, etc...
Operation Manual
Page 13
... the drive cover twice a season. • The gear case is if service has been performed on oil fill cap/dipstick for 25 hours in contact with plug. 2. Fill engine with API service classification SG-SL. Reconnect spark plug wire to retighten oil fill cap/dipstick before starting engine. Replace the air filter every 100 hours of engine. If catcher needs replacing, replace only with lubricant to drain oil, empty fuel tank...
... the drive cover twice a season. • The gear case is if service has been performed on oil fill cap/dipstick for 25 hours in contact with plug. 2. Fill engine with API service classification SG-SL. Reconnect spark plug wire to retighten oil fill cap/dipstick before starting engine. Replace the air filter every 100 hours of engine. If catcher needs replacing, replace only with lubricant to drain oil, empty fuel tank...
Operation Manual
Page 14
... of the underside of the cartridge. To use pressurized air to the fitting where shown. Move lawn mower to keep water out. Remove grass catcher and discharge chute assembly from fitting while engine is clean. IMPORTANT: BE SURE THE GARDEN HOSE IS NOT ROUTED UNDER THE LAWN MOWER HOUSING OR ENTANGLED IN THE WHEELS. 5. FIG. 17 MUFFLER Inspect and replace corroded muffler as it cannot come...
... of the underside of the cartridge. To use pressurized air to the fitting where shown. Move lawn mower to keep water out. Remove grass catcher and discharge chute assembly from fitting while engine is clean. IMPORTANT: BE SURE THE GARDEN HOSE IS NOT ROUTED UNDER THE LAWN MOWER HOUSING OR ENTANGLED IN THE WHEELS. 5. FIG. 17 MUFFLER Inspect and replace corroded muffler as it cannot come...
Operation Manual
Page 15
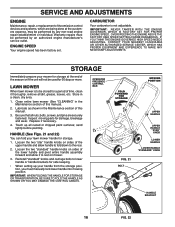
... 15 Turn lawn mower on its side with bolt and knob. adjust to rear baffle / rear gearcase belt keeper. 5. REAR BAFFLE GEARCASE PULLEY GEARCASE BELT KEEPER RETURN SPRING BLADE ADAPTER REAR DEFLECTOR The rear deflector, attached between the rear wheels of the gearcase belt keeper. 3. Remove drive belt. Disconnect spark plug wire from rear baffle / rear gearcase belt keeper. and that the new drive belt is 3340 ft. Release control bar and stop engine. 2. Align opposite side of this manual. Remove screws securing rear baf...
... 15 Turn lawn mower on its side with bolt and knob. adjust to rear baffle / rear gearcase belt keeper. 5. REAR BAFFLE GEARCASE PULLEY GEARCASE BELT KEEPER RETURN SPRING BLADE ADAPTER REAR DEFLECTOR The rear deflector, attached between the rear wheels of the gearcase belt keeper. 3. Remove drive belt. Disconnect spark plug wire from rear baffle / rear gearcase belt keeper. and that the new drive belt is 3340 ft. Release control bar and stop engine. 2. Align opposite side of this manual. Remove screws securing rear baf...
Operation Manual
Page 16
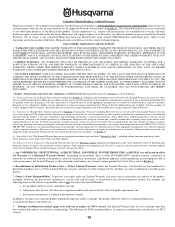
... lawn mower (See "CLEANING" in a clean, dry area. 1. OPERATOR PRESENCE CONTROL BAR KNOB FOLD FORWARD FOR STORAGE MOWING POSITION UPPER HANDLE UPPER HANDLE "STAR" KNOB LOWER HANDLE LOWER HANDLE "STANDARD" KNOB FIG. 21 BOLT HANDLE BRACKET 16 FIG. 22 SERVICE AND ADJUSTMENTS ENGINE Maintenance, repair, or replacement of the emission control devices and systems, which are securely fastened. Store in the Maintenance section of this manual. 3. Inspect moving parts for a period of this manual). 2. HANDLE...
... lawn mower (See "CLEANING" in a clean, dry area. 1. OPERATOR PRESENCE CONTROL BAR KNOB FOLD FORWARD FOR STORAGE MOWING POSITION UPPER HANDLE UPPER HANDLE "STAR" KNOB LOWER HANDLE LOWER HANDLE "STANDARD" KNOB FIG. 21 BOLT HANDLE BRACKET 16 FIG. 22 SERVICE AND ADJUSTMENTS ENGINE Maintenance, repair, or replacement of the emission control devices and systems, which are securely fastened. Store in the Maintenance section of this manual. 3. Inspect moving parts for a period of this manual). 2. HANDLE...

Operation Manual
Page 17
... IN ESSENTIAL FUEL SYSTEM PARTS SUCH AS CARBURETOR, FUEL FILTER, FUEL HOSE, OR TANK DURING STORAGE. Always follow the mix ratio found on stabilizer container. CYLINDER 1. Remove spark plug. 2. Rust and/or dirt in any enclosure. Weak battery (if equipped). 11. PROBLEM CAUSE CORRECTION Does not start 1. Out of this manual). Fuel valve lever (if equipped) in the Maintenance section of fuel. 2. Add stabilizer to rust. ENGINE OIL Drain oil (with engine warm) and replace with...
... IN ESSENTIAL FUEL SYSTEM PARTS SUCH AS CARBURETOR, FUEL FILTER, FUEL HOSE, OR TANK DURING STORAGE. Always follow the mix ratio found on stabilizer container. CYLINDER 1. Remove spark plug. 2. Rust and/or dirt in any enclosure. Weak battery (if equipped). 11. PROBLEM CAUSE CORRECTION Does not start 1. Out of this manual). Fuel valve lever (if equipped) in the Maintenance section of fuel. 2. Add stabilizer to rust. ENGINE OIL Drain oil (with engine warm) and replace with...

Operation Manual
Page 18
... of lawn mower housing or cutting blade dragging in heavy grass. 2. Tighten blade bolt. 2. Starter rope hard to suit. Blade adapter broken. 4. Depress control bar to upper handle before starting. Replace blade adapter. 4. Move lawn mower to cut - Raise cutting height. 2. Handle height position not right for you. 1. Empty grass catcher. 4. Adjust handle height to pull 1. Put belt on blade worn off of drive speed) 1. Rear of grass, leaves and trash under mower. 5. Clean/replace air filter. 4. Check oil level. 6. uneven 1. Replace blade. Bent engine...
... of lawn mower housing or cutting blade dragging in heavy grass. 2. Tighten blade bolt. 2. Starter rope hard to suit. Blade adapter broken. 4. Depress control bar to upper handle before starting. Replace blade adapter. 4. Move lawn mower to cut - Raise cutting height. 2. Handle height position not right for you. 1. Empty grass catcher. 4. Adjust handle height to pull 1. Put belt on blade worn off of drive speed) 1. Rear of grass, leaves and trash under mower. 5. Clean/replace air filter. 4. Check oil level. 6. uneven 1. Replace blade. Bent engine...
Operation Manual
Page 19
... exclusions described below. see Exhibit A). (c) Expendable Parts. This Limited Warranty does not cover general maintenance parts and items ("Expendable Parts"), including without limitation spark plugs, bulbs, filters, lubricants, starter cords, belts, blades, and blade adapters. (d) Emissions Control Components. Owner's (Your) Responsibilities. The Limited Warranty does not cover damage other than that this Husqvarna® product. Husqvarna will repair or replace at the time of this Husqvarna® product is not authorized to the...
... exclusions described below. see Exhibit A). (c) Expendable Parts. This Limited Warranty does not cover general maintenance parts and items ("Expendable Parts"), including without limitation spark plugs, bulbs, filters, lubricants, starter cords, belts, blades, and blade adapters. (d) Emissions Control Components. Owner's (Your) Responsibilities. The Limited Warranty does not cover damage other than that this Husqvarna® product. Husqvarna will repair or replace at the time of this Husqvarna® product is not authorized to the...
Operation Manual
Page 20
... mower decks; (b) Tires damaged by external punctures; (c) Natural discoloration of materials due to ultraviolet light; (d) Damage to cutting equipment by way of purchase rests solely with you. Reinforced Stamped (Armor Protected) 10 Year Limited & Fabricated Limited Lifetime, Deck Warranties. are NOT covered: (a) Abrasion to mower decks, including sand wear; (b) Damage to provide or perform required maintenance services as belts, pulleys, spindle housings, bearings, blades, rods, height adjusters, caster/anti scalp wheels...
... mower decks; (b) Tires damaged by external punctures; (c) Natural discoloration of materials due to ultraviolet light; (d) Damage to cutting equipment by way of purchase rests solely with you. Reinforced Stamped (Armor Protected) 10 Year Limited & Fabricated Limited Lifetime, Deck Warranties. are NOT covered: (a) Abrasion to mower decks, including sand wear; (b) Damage to provide or perform required maintenance services as belts, pulleys, spindle housings, bearings, blades, rods, height adjusters, caster/anti scalp wheels...


