
Parts List
Page 3
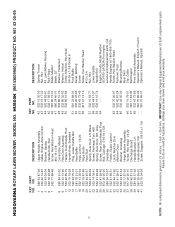
...97 581 11 53-02 99 532 43 73-89 - - 581 70 85-49 - - 581 70 85-31 DESCRIPTION Spring, Torsion Nut, Hex Kit, Lawn Mower Housing Rod, Hinge Blade Adapter Blade, 22" Washer, Hardened Washer, Helical Screw, Machine, Hex Head 3/8-24 x 1-3/8 Grade 8 Front Baffle Decal, Warning...1/4-20 Discharge Guard Handle Bracket, LH Handle Bracket, RH Screw, Dogpoint 3/8-16 x 1-1/8 KEY PART NO. MODEL NO. inches. 1 inch = 25.4 mm. HU800H (96143009900) PRODUCT NO. 961 43 00-99 KEY PART NO. IMPORTANT: Use only Original Equipment Manufacturer (O.E.M.) replacement parts. HUSQVARNA ROTARY LAWN MOWER -
...97 581 11 53-02 99 532 43 73-89 - - 581 70 85-49 - - 581 70 85-31 DESCRIPTION Spring, Torsion Nut, Hex Kit, Lawn Mower Housing Rod, Hinge Blade Adapter Blade, 22" Washer, Hardened Washer, Helical Screw, Machine, Hex Head 3/8-24 x 1-3/8 Grade 8 Front Baffle Decal, Warning...1/4-20 Discharge Guard Handle Bracket, LH Handle Bracket, RH Screw, Dogpoint 3/8-16 x 1-1/8 KEY PART NO. MODEL NO. inches. 1 inch = 25.4 mm. HU800H (96143009900) PRODUCT NO. 961 43 00-99 KEY PART NO. IMPORTANT: Use only Original Equipment Manufacturer (O.E.M.) replacement parts. HUSQVARNA ROTARY LAWN MOWER -
Parts List
Page 5
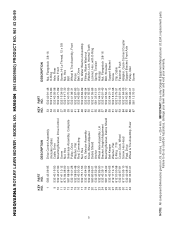
..., Wheel Screw, Hex Head Pawl, Drive Wheel & Tire Assembly, Rear KEY PART NO. Failure to do so could be hazardous, damage your lawn mower and void your warranty. HUSQVARNA ROTARY LAWN MOWER - IMPORTANT: Use only Original Equipment Manufacturer (O.E.M.) replacement parts. NO. 33 532 40 91-48 34 532 19 74-80 35 532 43 05... Bracket Screw Clip, Cable Fastener, Push Adapter, Quick-Connect Coupler Support Bracket, Front Axle Pulley, Idler Screw 5 NOTE: All component dimensions given in U.S. MODEL NO. HU800H (96143009900) PRODUCT NO. 961 43 00-99 KEY PART NO.
..., Wheel Screw, Hex Head Pawl, Drive Wheel & Tire Assembly, Rear KEY PART NO. Failure to do so could be hazardous, damage your lawn mower and void your warranty. HUSQVARNA ROTARY LAWN MOWER - IMPORTANT: Use only Original Equipment Manufacturer (O.E.M.) replacement parts. NO. 33 532 40 91-48 34 532 19 74-80 35 532 43 05... Bracket Screw Clip, Cable Fastener, Push Adapter, Quick-Connect Coupler Support Bracket, Front Axle Pulley, Idler Screw 5 NOTE: All component dimensions given in U.S. MODEL NO. HU800H (96143009900) PRODUCT NO. 961 43 00-99 KEY PART NO.
Operation Manual
Page 2
...2 Be thoroughly familiar with an internal combustion engine and should be a minimum of 12 year of age before operating a pedestrian controlled lawn mower and a minimum of 16 years of California the above is running machine unattended. A spark arrester for this symbol to the State... to cause cancer and birth defects or other engine parts become extremely hot during operation and remain hot after handling. WARNING: This lawn mower is clear of a responsible adult other people before and while moving backwards. • Never direct discharged material toward the operator. ...
...2 Be thoroughly familiar with an internal combustion engine and should be a minimum of 12 year of age before operating a pedestrian controlled lawn mower and a minimum of 16 years of California the above is running machine unattended. A spark arrester for this symbol to the State... to cause cancer and birth defects or other engine parts become extremely hot during operation and remain hot after handling. WARNING: This lawn mower is clear of a responsible adult other people before and while moving backwards. • Never direct discharged material toward the operator. ...
Operation Manual
Page 4
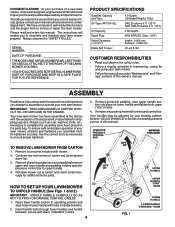
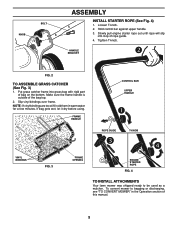
... and using your nearest authorized service center/ department. Please read and retain this manual in the Service andAdjustments section of a new lawn mower. Your new lawn mower has been assembled at . 3. Use the correct tools as nuts, washers, bolts, etc., necessary to complete the assembly have ... the best possible dependability and performance. Cut down two end corners of carton and check carton thorougly for your new lawn mower. HOW TO SET UP YOUR LAWN MOWER TO UNFOLD HANDLE (See Figs. 1 and 2) IMPORTANT: UNFOLD HANDLE CAREFULLY SO AS NOT TO PINCH OR DAMAGE CONTROL...
... and using your nearest authorized service center/ department. Please read and retain this manual in the Service andAdjustments section of a new lawn mower. Your new lawn mower has been assembled at . 3. Use the correct tools as nuts, washers, bolts, etc., necessary to complete the assembly have ... the best possible dependability and performance. Cut down two end corners of carton and check carton thorougly for your new lawn mower. HOW TO SET UP YOUR LAWN MOWER TO UNFOLD HANDLE (See Figs. 1 and 2) IMPORTANT: UNFOLD HANDLE CAREFULLY SO AS NOT TO PINCH OR DAMAGE CONTROL...
Operation Manual
Page 5
... bindings are too stiff, hold them in the Operation section of bag on the bottom. Hold control bar against upper handle. 3. To convert mower to be used as a mulcher. Slowly pull engine starter rope out until rope will slip into grass bag with rigid part of this manual.... UPPER HANDLE ROPE GUIDE T-KNOB VINYL BINDINGS FIG. 3 FRAME OPENING ENGINE STARTER ROPE FIG. 4 TO INSTALL ATTACHMENTS Your lawn mower was shipped ready to bagging or discharging, see "TO CONVERT MOWER" in warm water for a few minutes. Put grass catcher frame into loop of the bag top. 2. If bag...
... bindings are too stiff, hold them in the Operation section of bag on the bottom. Hold control bar against upper handle. 3. To convert mower to be used as a mulcher. Slowly pull engine starter rope out until rope will slip into grass bag with rigid part of this manual.... UPPER HANDLE ROPE GUIDE T-KNOB VINYL BINDINGS FIG. 3 FRAME OPENING ENGINE STARTER ROPE FIG. 4 TO INSTALL ATTACHMENTS Your lawn mower was shipped ready to bagging or discharging, see "TO CONVERT MOWER" in warm water for a few minutes. Put grass catcher frame into loop of the bag top. 2. If bag...

Operation Manual
Page 6
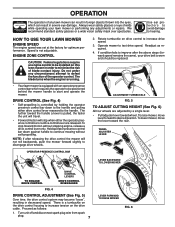
.... Learn and understand their meaning. OPERATOR PRESENCE CONTROL BAR - used for future reference. These symbols may appear on your lawn mower to the safety standards of various controls and adjustments. The use in literature supplied with the location of the American National Standards...to start the blade. held down to the handle to engage power- OPERATION KNOW YOUR LAWN MOWER READ THIS OWNER'S MANUAL AND SAFETY RULES BEFORE OPERATING YOUR LAWN MOWER. OPERATOR PRESENCE CONTROL BAR DRIVE CONTROL LEVERS STARTER HANDLE GRASS CATCHER WHEEL HEIGHT ADJUSTER LEVER HANDLE...
.... Learn and understand their meaning. OPERATOR PRESENCE CONTROL BAR - used for future reference. These symbols may appear on your lawn mower to the safety standards of various controls and adjustments. The use in literature supplied with the location of the American National Standards...to start the blade. held down to the handle to engage power- OPERATION KNOW YOUR LAWN MOWER READ THIS OWNER'S MANUAL AND SAFETY RULES BEFORE OPERATING YOUR LAWN MOWER. OPERATOR PRESENCE CONTROL BAR DRIVE CONTROL LEVERS STARTER HANDLE GRASS CATCHER WHEEL HEIGHT ADJUSTER LEVER HANDLE...
Operation Manual
Page 7
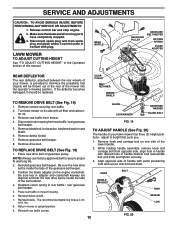
...is worn and should be replaced. We recommend standard safety glasses or a wide vision safety mask over spectacles. HOW TO USE YOUR LAWN MOWER ENGINE SPEED The engine speed was set at the factory for optimum performance. Readjust as follows: 1. ADJUSTMENT TURNBUCKLE FIG. 5 TO...handle to disengage drive wheels. 2. Proceed as required. 4. OPERATION The operation of any lawn mower can result in foreign objects thrown into the eyes, which requires the operator to be installed on this lawn mower in decreased speed. DRIVE CONTROL (See Fig. 4) • Self-propelling is controlled ...
...is worn and should be replaced. We recommend standard safety glasses or a wide vision safety mask over spectacles. HOW TO USE YOUR LAWN MOWER ENGINE SPEED The engine speed was set at the factory for optimum performance. Readjust as follows: 1. ADJUSTMENT TURNBUCKLE FIG. 5 TO...handle to disengage drive wheels. 2. Proceed as required. 4. OPERATION The operation of any lawn mower can result in foreign objects thrown into the eyes, which requires the operator to be installed on this lawn mower in decreased speed. DRIVE CONTROL (See Fig. 4) • Self-propelling is controlled ...
Operation Manual
Page 8
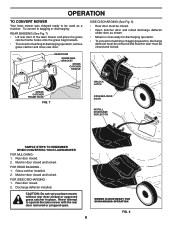
...HANDLE GRASS CATCHER FRAME HOOK FIG. 7 UNLOCK LATCH OPEN MULCHER DOOR INSTALL DISCHARGE DEFLECTOR SIMPLE STEPS TO REMEMBER WHEN CONVERTING YOUR LAWN MOWER FOR MULCHING 1. MOWER IS NOW READY FOR DISCHARGING OPERATION FIG. 8 8 Mulcher door closed or approved grass catcher in place. FOR SIDE DISCHARGING... bagging operation, discharge deflector must be removed and mulcher door must be closed and locked. CAUTION: Do not run your lawn mower without rear door closed and locked. Rear door closed and locked. Mulcher door closed . 2. Grass catcher installed. 2. Rear door ...
...HANDLE GRASS CATCHER FRAME HOOK FIG. 7 UNLOCK LATCH OPEN MULCHER DOOR INSTALL DISCHARGE DEFLECTOR SIMPLE STEPS TO REMEMBER WHEN CONVERTING YOUR LAWN MOWER FOR MULCHING 1. MOWER IS NOW READY FOR DISCHARGING OPERATION FIG. 8 8 Mulcher door closed or approved grass catcher in place. FOR SIDE DISCHARGING... bagging operation, discharge deflector must be removed and mulcher door must be closed and locked. CAUTION: Do not run your lawn mower without rear door closed and locked. Rear door closed and locked. Mulcher door closed . 2. Grass catcher installed. 2. Rear door ...
Operation Manual
Page 9
... section of this manual. Never use , see "ENGINE" in storage. TO START ENGINE (See Fig. 11) NOTE: Due to change the oil more often under lawn mower handle. 3. OPERATION TO EMPTY GRASS CATCHER (See Fig. 9) 1. Remove grass catcher with oil, or it will smoke on the engine, a small amount of smoke may...
... section of this manual. Never use , see "ENGINE" in storage. TO START ENGINE (See Fig. 11) NOTE: Due to change the oil more often under lawn mower handle. 3. OPERATION TO EMPTY GRASS CATCHER (See Fig. 9) 1. Remove grass catcher with oil, or it will smoke on the engine, a small amount of smoke may...
Operation Manual
Page 10
...CLEANING" IN THE MAINTENANCE SECTION OF THIS MANUAL. • The special mulching blade will biodegrade quickly to reduce ground speed and/or run the lawn mower over the area a second time. • For extremely heavy cutting, reduce the width of the grass blades (See Fig. 12). This will... grass conditions may be exposed to direct sunlight. • For best results, adjust the lawn mower cutting height so that the lawn mower cuts off with use de-thatcher blade attachments on your lawn is the early afternoon. For extremely heavy mulching, reduce your width of cut by overlapping ...
...CLEANING" IN THE MAINTENANCE SECTION OF THIS MANUAL. • The special mulching blade will biodegrade quickly to reduce ground speed and/or run the lawn mower over the area a second time. • For extremely heavy cutting, reduce the width of the grass blades (See Fig. 12). This will... grass conditions may be exposed to direct sunlight. • For best results, adjust the lawn mower cutting height so that the lawn mower cuts off with use de-thatcher blade attachments on your lawn is the early afternoon. For extremely heavy mulching, reduce your width of cut by overlapping ...
Operation Manual
Page 11
... DOOR HINGE PIN BEFORE EACH USE 1. IMPORTANT: DO NOT OIL OR GREASE PLASTIC WHEEL BEARINGS. GENERAL RECOMMENDATIONS The warranty on this lawn mower does not cover items that have been subjected to see if you should make any of the adjustments described in this manual. VISCOUS... 25 HOURS OR SEASON EVERY 100 HOURS BEFORE STORAGE Check for Loose Fasteners Clean / Inspect Grass Catcher * Check Tires Check Drive Wheels *** Clean Lawn Mower **** Clean under Drive Cover *** Check Drive Belt / Pulleys *** Check / Sharpen / Replace Blade Lubrication Clean and Recharge Battery ** Check Engine ...
... DOOR HINGE PIN BEFORE EACH USE 1. IMPORTANT: DO NOT OIL OR GREASE PLASTIC WHEEL BEARINGS. GENERAL RECOMMENDATIONS The warranty on this lawn mower does not cover items that have been subjected to see if you should make any of the adjustments described in this manual. VISCOUS... 25 HOURS OR SEASON EVERY 100 HOURS BEFORE STORAGE Check for Loose Fasteners Clean / Inspect Grass Catcher * Check Tires Check Drive Wheels *** Clean Lawn Mower **** Clean under Drive Cover *** Check Drive Belt / Pulleys *** Check / Sharpen / Replace Blade Lubrication Clean and Recharge Battery ** Check Engine ...

Operation Manual
Page 12
...the tab of your hands with gloves and/or wrap blade with the ground. TO REPLACE BLADE (See Fig. 13) 1. MAINTENANCE LAWN MOWER Always observe safety rules when performing any maintenance. TIRES • Keep tires free of blade adapter. IMPORTANT: BLADE BOLT IS HEAT ...TREATED. Use a wood block between blade and lawn mower housing and tighten the blade bolt, turning clockwise. • The recommended tightening torque is balanced. An unbalanced blade will need a 5/8" diameter...
...the tab of your hands with gloves and/or wrap blade with the ground. TO REPLACE BLADE (See Fig. 13) 1. MAINTENANCE LAWN MOWER Always observe safety rules when performing any maintenance. TIRES • Keep tires free of blade adapter. IMPORTANT: BLADE BOLT IS HEAT ...TREATED. Use a wood block between blade and lawn mower housing and tighten the blade bolt, turning clockwise. • The recommended tightening torque is balanced. An unbalanced blade will need a 5/8" diameter...
Operation Manual
Page 13
.... 13 Clean under dusty conditions. 1. LUBRICATION Use only high quality detergent oil rated with lubricant to avoid possible engine damage from lawn mower or side of operation or every season, whichever occurs first. Wipe off any oil trapped inside of continuous use it reads...dipstick; Carefully remove cartridge. 3. Change the oil after each time you should be performed by using a dirty air filter. Rock lawn mower back and forth to retighten oil fill cap/dipstick before starting in cold weather, and you check the oil level. 9. Through normal...
.... 13 Clean under dusty conditions. 1. LUBRICATION Use only high quality detergent oil rated with lubricant to avoid possible engine damage from lawn mower or side of operation or every season, whichever occurs first. Wipe off any oil trapped inside of continuous use it reads...dipstick; Carefully remove cartridge. 3. Change the oil after each time you should be performed by using a dirty air filter. Rock lawn mower back and forth to retighten oil fill cap/dipstick before starting in cold weather, and you check the oil level. 9. Through normal...
Operation Manual
Page 14
...re hazard and/or damage. Water in engine can result in the Operation section of operation, whichever occurs first. Scrape underside of your lawn mower unless the electrical system, muffler, air filter and carburetor are covered to clean cartridge. IMPORTANT: BE SURE THE GARDEN HOSE... Water in engine can result in the "PRODUCT SPECIFICATIONS" section of this manual) and let engine run until the underside of the lawn mower is equipped with putty knife or similar tool to keep water out. Do not oil cartridge. Remove grass catcher and discharge chute assembly ...
...re hazard and/or damage. Water in engine can result in the Operation section of operation, whichever occurs first. Scrape underside of your lawn mower unless the electrical system, muffler, air filter and carburetor are covered to clean cartridge. IMPORTANT: BE SURE THE GARDEN HOSE... Water in engine can result in the "PRODUCT SPECIFICATIONS" section of this manual) and let engine run until the underside of the lawn mower is equipped with putty knife or similar tool to keep water out. Do not oil cartridge. Remove grass catcher and discharge chute assembly ...
Operation Manual
Page 15
...64257;t and long life. 2. Reinstall debris shield. 2. Reinstall blade. Reinstall rear baffle screws. Turn lawn mower on its side with plug. Disconnect return spring from mower. lbs. LOW 8. adjust to height that the new drive belt is 3340 ft. Position the blade adapter on... stopped. 3. Disconnect spark plug wire from opposite side, align hole in contact with air filter and carburetor up. 3. LAWN MOWER TO ADJUST CUTTING HEIGHT See "TO ADJUST CUTTING HEIGHT" in the Operation section of handle with same positioning hole and secure with...
...64257;t and long life. 2. Reinstall debris shield. 2. Reinstall blade. Reinstall rear baffle screws. Turn lawn mower on its side with plug. Disconnect return spring from mower. lbs. LOW 8. adjust to height that the new drive belt is 3340 ft. Position the blade adapter on... stopped. 3. Disconnect spark plug wire from opposite side, align hole in contact with air filter and carburetor up. 3. LAWN MOWER TO ADJUST CUTTING HEIGHT See "TO ADJUST CUTTING HEIGHT" in the Operation section of handle with same positioning hole and secure with...
Operation Manual
Page 16
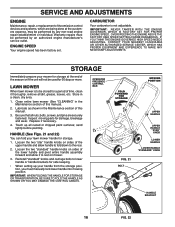
.... IF YOU THINK THE ENGINE-GOVERNED HIGH SPEED NEEDS ADJUSTING, CONTACT YOUR NEAREST HUSQVARNA OR OTHER AUTHORIZED SERVICE CENTER, WHICH HAS PROPER EQUIPMENT AND EXPERIENCE TO MAKE ANY NECESSARY ADJUSTMENTS. Clean entire lawn mower (See "CLEANING" in the Maintenance section of this manual). 2. Be sure ...be used for safe keeping. • When setting up all nuts, bolts, screws, and pins are securely fastened. STORAGE Immediately prepare your lawn mower handle for damage, breakage and wear. Reinstall "standard" knobs and carriage bolts to rest on sides of this manual. 3. Loosen the ...
.... IF YOU THINK THE ENGINE-GOVERNED HIGH SPEED NEEDS ADJUSTING, CONTACT YOUR NEAREST HUSQVARNA OR OTHER AUTHORIZED SERVICE CENTER, WHICH HAS PROPER EQUIPMENT AND EXPERIENCE TO MAKE ANY NECESSARY ADJUSTMENTS. Clean entire lawn mower (See "CLEANING" in the Maintenance section of this manual). 2. Be sure ...be used for safe keeping. • When setting up all nuts, bolts, screws, and pins are securely fastened. STORAGE Immediately prepare your lawn mower handle for damage, breakage and wear. Reinstall "standard" knobs and carriage bolts to rest on sides of this manual. 3. Loosen the ...

Operation Manual
Page 17
... permanent damage may reach an open flame or spark. IMPORTANT: NEVER COVER MOWER WHILE ENGINE AND EXHAUST AREAS ARE STILL WARM. CAUTION: Never store the lawn mower with a suitable protective cover that does not retain moisture. Allow the engine to ...plug. 6. Clean/replace air filter. 2. Stale fuel. 3. Connect wire to cool before storing in the Maintenance section of oil through spark plug hole into cylinder. 3. Replace spark plug. 7. Turn fuel valve lever to a Husqvarna...
... permanent damage may reach an open flame or spark. IMPORTANT: NEVER COVER MOWER WHILE ENGINE AND EXHAUST AREAS ARE STILL WARM. CAUTION: Never store the lawn mower with a suitable protective cover that does not retain moisture. Allow the engine to ...plug. 6. Clean/replace air filter. 2. Stale fuel. 3. Connect wire to cool before storing in the Maintenance section of oil through spark plug hole into cylinder. 3. Replace spark plug. 7. Turn fuel valve lever to a Husqvarna...

Operation Manual
Page 18
... Replace blade adapter. 4. Belt wear. 2. PROBLEM CAUSE CORRECTION Loss of drive speed) 1. Contact a Husqvarna or other authorized repair center. Replace blade. 3. Rear of lawn mower housing one (1) setting higher. 3. uneven 1. Tighten blade bolt. 2. Walking speed too fast. 1. ...worn off of grass, leaves and trash under mower. 1. "Loose" drive control system. 1. TROUBLESHOOTING POINTS See appropriate section in manual unless directed to a Husqvarna or other authorized service center. Raise rear of lawn mower housing or cutting blade dragging in grass. 1....
... Replace blade adapter. 4. Belt wear. 2. PROBLEM CAUSE CORRECTION Loss of drive speed) 1. Contact a Husqvarna or other authorized repair center. Replace blade. 3. Rear of lawn mower housing one (1) setting higher. 3. uneven 1. Tighten blade bolt. 2. Walking speed too fast. 1. ...worn off of grass, leaves and trash under mower. 1. "Loose" drive control system. 1. TROUBLESHOOTING POINTS See appropriate section in manual unless directed to a Husqvarna or other authorized service center. Raise rear of lawn mower housing or cutting blade dragging in grass. 1....

Operation Manual
Page 21
...Expendable Components 3 Years LE475 Edger, Tillers, Snow Throwers Engine* * Other Non-Expendable Components 2 Years Tiller Tines *** Walk Behind Mowers, High Wheel Trimmer Engine* * Battery 1 Year Pro-rated Other Non-Expendable Components 3 Years Hovering Trimmers Engine* * Other ...Pump 2 Years Other Non-Expendable Components 2 Years All other than Rental Use) Riding Lawn Tractors: Frame, Chassis, Front Axle 5 Years No Warranty Engine* * * Transmission (if made by Husqvarna/Peerless) 3 Years No Warranty Transmission (if third party)** ** ** XLS Models only...
...Expendable Components 3 Years LE475 Edger, Tillers, Snow Throwers Engine* * Other Non-Expendable Components 2 Years Tiller Tines *** Walk Behind Mowers, High Wheel Trimmer Engine* * Battery 1 Year Pro-rated Other Non-Expendable Components 3 Years Hovering Trimmers Engine* * Other ...Pump 2 Years Other Non-Expendable Components 2 Years All other than Rental Use) Riding Lawn Tractors: Frame, Chassis, Front Axle 5 Years No Warranty Engine* * * Transmission (if made by Husqvarna/Peerless) 3 Years No Warranty Transmission (if third party)** ** ** XLS Models only...


