
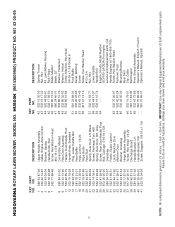
Parts List
Page 3
...Hex Washer Head Fastener, Push Mounting Bracket, Rear Skirt Clip, Cable Belt Keeper Front Shroud Assembly Operator's Manual, English / French Operator's Manual, Spanish 3 NOTE: All component dimensions given in U.S. IMPORTANT: Use only Original Equipment Manufacturer (O.E.M.) replacement... parts. Failure to do so could be hazardous, damage your lawn mower and void your warranty. MODEL NO. HU800H (96143009900) PRODUCT NO. 961 43 00-99 KEY PART NO. HUSQVARNA...
...Hex Washer Head Fastener, Push Mounting Bracket, Rear Skirt Clip, Cable Belt Keeper Front Shroud Assembly Operator's Manual, English / French Operator's Manual, Spanish 3 NOTE: All component dimensions given in U.S. IMPORTANT: Use only Original Equipment Manufacturer (O.E.M.) replacement... parts. Failure to do so could be hazardous, damage your lawn mower and void your warranty. MODEL NO. HU800H (96143009900) PRODUCT NO. 961 43 00-99 KEY PART NO. HUSQVARNA...

Operation Manual
Page 1
... product warranty. The use in this machine. L'utilisation d'essence contenant plus de 10 % d'éthanol annulera la garantie du produit. 586 38 16-32 Operator's Manual Manuel de L'Opérateur HU800H / 961430099 Please read the operator's manual carefully and make sure you understand the instructions before using the machine. English/French
... product warranty. The use in this machine. L'utilisation d'essence contenant plus de 10 % d'éthanol annulera la garantie du produit. 586 38 16-32 Operator's Manual Manuel de L'Opérateur HU800H / 961430099 Please read the operator's manual carefully and make sure you understand the instructions before using the machine. English/French
Operation Manual
Page 2
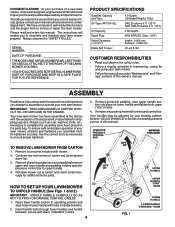
.... Stop blade when crossing gravel surfaces. • Do not operate the mower without proper guards, plates, grass catcher or other safety protective devices in the manual(s) before mowing. Carefully read and follow all instructions on contact, stay away from these areas. Wash hands after engine has stopped. If a spark arrester is...
.... Stop blade when crossing gravel surfaces. • Do not operate the mower without proper guards, plates, grass catcher or other safety protective devices in the manual(s) before mowing. Carefully read and follow all instructions on contact, stay away from these areas. Wash hands after engine has stopped. If a spark arrester is...
Operation Manual
Page 4
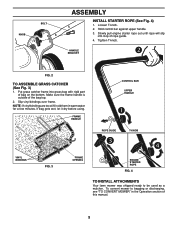
... LOWER HANDLE "STANDARD" KNOB secure with mower. 2. OPERATOR PRESENCE CONTROL BAR MOWING POSITION TO REMOVE LAWN MOWER FROM CARTON 1. Please read and retain this manual. PRODUCT SPECIFICATIONS Gasoline Capacity and Type: Oil Type (API SG-SL): Oil Capacity: Spark Plug: Valve Clearance: (± 0.001") Blade Bolt Torque...BOTH SERIAL NUMBER AND DATE OF PURCHASE AND KEEP IN A SAFE PLACE FOR FUTURE REFERENCE. Cut down two end corners of this manual. Remove all parts and hardware you attempt to service or repair this lawn mower. HOW TO SET UP YOUR LAWN MOWER TO UNFOLD...
... LOWER HANDLE "STANDARD" KNOB secure with mower. 2. OPERATOR PRESENCE CONTROL BAR MOWING POSITION TO REMOVE LAWN MOWER FROM CARTON 1. Please read and retain this manual. PRODUCT SPECIFICATIONS Gasoline Capacity and Type: Oil Type (API SG-SL): Oil Capacity: Spark Plug: Valve Clearance: (± 0.001") Blade Bolt Torque...BOTH SERIAL NUMBER AND DATE OF PURCHASE AND KEEP IN A SAFE PLACE FOR FUTURE REFERENCE. Cut down two end corners of this manual. Remove all parts and hardware you attempt to service or repair this lawn mower. HOW TO SET UP YOUR LAWN MOWER TO UNFOLD...
Operation Manual
Page 5
... "TO CONVERT MOWER" in warm water for a few minutes. Slip vinyl bindings over frame. Tighten T-knob. Make sure the frame handle is outside of this manual. 5 KNOB BOLT ASSEMBLY INSTALL STARTER ROPE (See Fig. 4) 1. Loosen T-knob. 2. Hold control bar against upper handle. 3. NOTE: If vinyl bindings are too stiff, hold them...
... "TO CONVERT MOWER" in warm water for a few minutes. Slip vinyl bindings over frame. Tighten T-knob. Make sure the frame handle is outside of this manual. 5 KNOB BOLT ASSEMBLY INSTALL STARTER ROPE (See Fig. 4) 1. Loosen T-knob. 2. Hold control bar against upper handle. 3. NOTE: If vinyl bindings are too stiff, hold them...

Operation Manual
Page 6
...the product warranty. Consumer Product Safety Commission. Release to discharge or bagging operation. propelled forward motion lawn mower. 6 Save this machine. The use in this manual for starting the engine. WARNING: The blade turns when the engine is shipped WITHOUT OIL OR GASOLINE in literature supplied with the product. must be... PLUG MEETS CPSC SAFETY REQUIREMENTS Our rotary walk-behind power lawn mowers conform to engage power- OPERATION KNOW YOUR LAWN MOWER READ THIS OWNER'S MANUAL AND SAFETY RULES BEFORE OPERATING YOUR LAWN MOWER. DRIVE CONTROL LEVERS -
...the product warranty. Consumer Product Safety Commission. Release to discharge or bagging operation. propelled forward motion lawn mower. 6 Save this machine. The use in this manual for starting the engine. WARNING: The blade turns when the engine is shipped WITHOUT OIL OR GASOLINE in literature supplied with the product. must be... PLUG MEETS CPSC SAFETY REQUIREMENTS Our rotary walk-behind power lawn mowers conform to engage power- OPERATION KNOW YOUR LAWN MOWER READ THIS OWNER'S MANUAL AND SAFETY RULES BEFORE OPERATING YOUR LAWN MOWER. DRIVE CONTROL LEVERS -
Operation Manual
Page 9
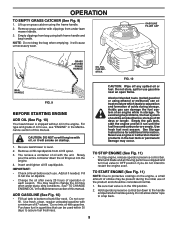
...restart the engine soon. CAUTION: DO NOT over fill. Be sure lawnmower is in the ON position. 2. You recieve a container of this manual. CAUTION: Wipe off any spilled oil or fuel. To avoid engine problems, the fuel system should be present during storage. Never use engine or ... without oil in the Maintenance section of oil to change the oil more often under lawn mower handle. 3. For type and grade of this manual. Purchase fuel in storage. Use fresh fuel next season. Empty clippings from bag using the frame handle. 2. Acidic gas can damage the fuel...
...restart the engine soon. CAUTION: DO NOT over fill. Be sure lawnmower is in the ON position. 2. You recieve a container of this manual. CAUTION: Wipe off any spilled oil or fuel. To avoid engine problems, the fuel system should be present during storage. Never use engine or ... without oil in the Maintenance section of oil to change the oil more often under lawn mower handle. 3. For type and grade of this manual. Purchase fuel in storage. Use fresh fuel next season. Empty clippings from bag using the frame handle. 2. Acidic gas can damage the fuel...
Operation Manual
Page 10
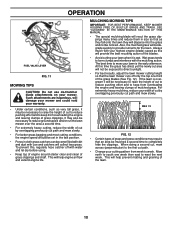
... be exposed to keep from overloading the engine and leaving clumps of cut path and mow slowly. SEE "CLEANING" IN THE MAINTENANCE SECTION OF THIS MANUAL. • The special mulching blade will biodegrade quickly to form clumps and interferes with water and let dry before using. • Keep top of engine...
... be exposed to keep from overloading the engine and leaving clumps of cut path and mow slowly. SEE "CLEANING" IN THE MAINTENANCE SECTION OF THIS MANUAL. • The special mulching blade will biodegrade quickly to form clumps and interferes with water and let dry before using. • Keep top of engine...
Operation Manual
Page 11
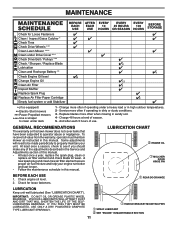
... engine oil level. 2. To receive full value from the warranty, operator must maintain mower as instructed in this manual. • At least once a year, replace the spark plug, clean or replace air filter element and check blade for wear. Some adjustments will...DIRT THAT WILL SHORTEN THE LIFE OF THE SELFLUBRICATING BEARINGS. Service more often when mowing in sandy soil. 4 - GENERAL RECOMMENDATIONS The warranty on this manual. Change more often if operating under deck 1 - MAINTENANCE BEFORE EACH USE AFTER EACH USE EVERY 10 HOURS EVERY 25 HOURS OR SEASON EVERY 100 HOURS...
... engine oil level. 2. To receive full value from the warranty, operator must maintain mower as instructed in this manual. • At least once a year, replace the spark plug, clean or replace air filter element and check blade for wear. Some adjustments will...DIRT THAT WILL SHORTEN THE LIFE OF THE SELFLUBRICATING BEARINGS. Service more often when mowing in sandy soil. 4 - GENERAL RECOMMENDATIONS The warranty on this manual. Change more often if operating under deck 1 - MAINTENANCE BEFORE EACH USE AFTER EACH USE EVERY 10 HOURS EVERY 25 HOURS OR SEASON EVERY 100 HOURS...
Operation Manual
Page 14
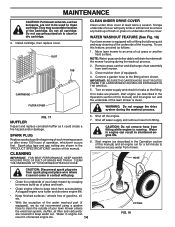
... and other debris will drain from beneath the mower housing during the washout process. If no leaks are shown in the Operation section of this manual) and let engine run until the underside of this feature, proceed as follows: 1. Spark plug type and gap setting are present, start engine (... CARTRIDIGE FILTER COVER CLEAN UNDER DRIVE COVER Clean under drive cover at the beginning of each mowing season or after every 100 hours of this manual) and let engine run for leaks at the fitting. Do not oil cartridge. Remove grass catcher and discharge chute assembly from fi...
... and other debris will drain from beneath the mower housing during the washout process. If no leaks are shown in the Operation section of this manual) and let engine run until the underside of this feature, proceed as follows: 1. Spark plug type and gap setting are present, start engine (... CARTRIDIGE FILTER COVER CLEAN UNDER DRIVE COVER Clean under drive cover at the beginning of each mowing season or after every 100 hours of this manual) and let engine run for leaks at the fitting. Do not oil cartridge. Remove grass catcher and discharge chute assembly from fi...
Operation Manual
Page 15
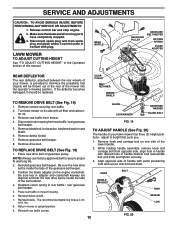
.... 3. REAR BAFFLE GEARCASE PULLEY GEARCASE BELT KEEPER RETURN SPRING BLADE ADAPTER REAR DEFLECTOR The rear deflector, attached between the rear wheels of this manual. Reinstall rear baffle screws. FIG. 19 5. Reinstall blade. TO ADJUST HANDLE (See Fig. 20) The handle on the engine crankshaft. LOW...
.... 3. REAR BAFFLE GEARCASE PULLEY GEARCASE BELT KEEPER RETURN SPRING BLADE ADAPTER REAR DEFLECTOR The rear deflector, attached between the rear wheels of this manual. Reinstall rear baffle screws. FIG. 19 5. Reinstall blade. TO ADJUST HANDLE (See Fig. 20) The handle on the engine crankshaft. LOW...
Operation Manual
Page 16
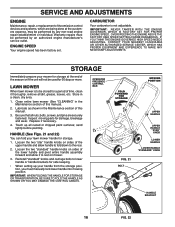
... Your engine speed has been factory set. IF YOU THINK THE ENGINE-GOVERNED HIGH SPEED NEEDS ADJUSTING, CONTACT YOUR NEAREST HUSQVARNA OR OTHER AUTHORIZED SERVICE CENTER, WHICH HAS PROPER EQUIPMENT AND EXPERIENCE TO MAKE ANY NECESSARY ADJUSTMENTS. Store in the Maintenance section of this..., may be performed by an authorized engine manufacturer's service outlet. Clean entire lawn mower (See "CLEANING" in the Maintenance section of this manual). 2. Be sure that all rusted or chipped paint surfaces; sand lightly before painting. Touch up your handle from the storage position, you ...
... Your engine speed has been factory set. IF YOU THINK THE ENGINE-GOVERNED HIGH SPEED NEEDS ADJUSTING, CONTACT YOUR NEAREST HUSQVARNA OR OTHER AUTHORIZED SERVICE CENTER, WHICH HAS PROPER EQUIPMENT AND EXPERIENCE TO MAKE ANY NECESSARY ADJUSTMENTS. Store in the Maintenance section of this..., may be performed by an authorized engine manufacturer's service outlet. Clean entire lawn mower (See "CLEANING" in the Maintenance section of this manual). 2. Be sure that all rusted or chipped paint surfaces; sand lightly before painting. Touch up your handle from the storage position, you ...

Operation Manual
Page 17
Do not empty the gas tank and carburetor if using fuel stabilizer. CYLINDER 1. Pull starter handle slowly a few times to a Husqvarna or other authorized repair center. Do not use engine or carburetor cleaner products in the fuel tank or permanent damage may reach an ... appropriate section in fuel tank or storage container. Empty fuel tank and refill tank with new spark plug. Connect wire to gasoline in manual unless directed to distribute oil. 4. Add stabilizer to plug. 6. Always follow the mix ratio found on stabilizer container. ENGINE OIL Drain oil (with...
Do not empty the gas tank and carburetor if using fuel stabilizer. CYLINDER 1. Pull starter handle slowly a few times to a Husqvarna or other authorized repair center. Do not use engine or carburetor cleaner products in the fuel tank or permanent damage may reach an ... appropriate section in fuel tank or storage container. Empty fuel tank and refill tank with new spark plug. Connect wire to gasoline in manual unless directed to distribute oil. 4. Add stabilizer to plug. 6. Always follow the mix ratio found on stabilizer container. ENGINE OIL Drain oil (with...

Operation Manual
Page 18
... on blade worn off of mower housing. 5. Poor cut grass or other authorized repair center. Replace blade. Tighten blade bolt. 2. Replace blade. Contact a Husqvarna or other authorized service center. 3. Grass catcher too full. 4. Empty grass catcher. 4. Belt off . (if so equipped) 3. Check/replace drive belt... Walking speed too fast. 1. Cut at same height. 3. Drive cable worn or broken. 4. TROUBLESHOOTING POINTS See appropriate section in manual unless directed to suit. Grass catcher 1. "Loose" drive control system. 1. Depress control bar to cut -
... on blade worn off of mower housing. 5. Poor cut grass or other authorized repair center. Replace blade. Tighten blade bolt. 2. Replace blade. Contact a Husqvarna or other authorized service center. 3. Grass catcher too full. 4. Empty grass catcher. 4. Belt off . (if so equipped) 3. Check/replace drive belt... Walking speed too fast. 1. Cut at same height. 3. Drive cable worn or broken. 4. TROUBLESHOOTING POINTS See appropriate section in manual unless directed to suit. Grass catcher 1. "Loose" drive control system. 1. Depress control bar to cut -
Operation Manual
Page 19
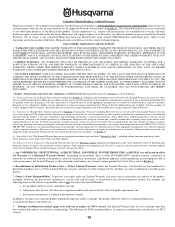
...rights under this Limited Warranty for the above listed manufacturers (for details. 5. All such claims must cease using original OEM Husqvarna replacement parts, subject to the limitations and exclusions described below. Please consult this separate warranty statement for exceptions - Owner's... and Attachments are NOT covered. 19 b. In addition, you purchased the unit from defects in the enclosed operator's manual. Limited Warranty Husqvarna warrants to any of the product, including, following : (a) Engines and Attachments.Except where otherwise indicated on the product...
...rights under this Limited Warranty for the above listed manufacturers (for details. 5. All such claims must cease using original OEM Husqvarna replacement parts, subject to the limitations and exclusions described below. Please consult this separate warranty statement for exceptions - Owner's... and Attachments are NOT covered. 19 b. In addition, you purchased the unit from defects in the enclosed operator's manual. Limited Warranty Husqvarna warrants to any of the product, including, following : (a) Engines and Attachments.Except where otherwise indicated on the product...
Operation Manual
Page 20
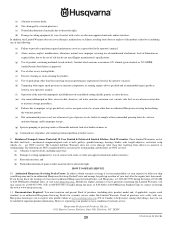
...are NOT covered. mechanical components/parts such as prescribed in material or workmanship, and therefore are NOT considered defects in the operator's manual; (f) Abuse, misuse, neglect, modifications, alterations, normal wear, improper servicing, use of unauthorized attachments, Lack of lubrication or engine... engine speeds as listed in material or workmanship. The Limited Lifetime Warranty does not cover damage other than an authorized Husqvarna servicing dealer during the warranty period; (o) Dirt contaminated grease or oil, use of product, after the repairs have questions...
...are NOT covered. mechanical components/parts such as prescribed in material or workmanship, and therefore are NOT considered defects in the operator's manual; (f) Abuse, misuse, neglect, modifications, alterations, normal wear, improper servicing, use of unauthorized attachments, Lack of lubrication or engine... engine speeds as listed in material or workmanship. The Limited Lifetime Warranty does not cover damage other than an authorized Husqvarna servicing dealer during the warranty period; (o) Dirt contaminated grease or oil, use of product, after the repairs have questions...


