Owner's Manual
Page 1
installation and operation manual for Hunter Ceiling Fans TYPE 3 Models 42700-01 • 01/15/08 For Your Records and Warranty Assistance Model Name Catalog/Model No Serial No Date Purchased Where Purchased For reference also attach your receipt or a copy of your receipt to the manual.
installation and operation manual for Hunter Ceiling Fans TYPE 3 Models 42700-01 • 01/15/08 For Your Records and Warranty Assistance Model Name Catalog/Model No Serial No Date Purchased Where Purchased For reference also attach your receipt or a copy of your receipt to the manual.
Owner's Manual
Page 2
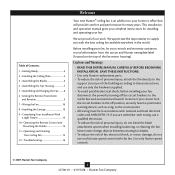
...; Installing the Ceiling Plate 5 3 • Assembling the Blades 6 4 • Assembling the Top Housing 7 5 • Assembling and Hanging the Fan..........8 6 • Setting the Remote Transmitter and Reveiver 9 7 • Wiring the Fan 10 8 • Installing the Canopy 12 9 • Completing Your Installation With a Light Fixture 13 10 • Operating the Remote Control and Mounting the Holder 14 11 • Operating and Cleaning Your Ceiling Fan 15 12 • Troubleshooting 16 Welcome Your new Hunter® ceiling fan is an addition to your fan, disconnect the power by...
...; Installing the Ceiling Plate 5 3 • Assembling the Blades 6 4 • Assembling the Top Housing 7 5 • Assembling and Hanging the Fan..........8 6 • Setting the Remote Transmitter and Reveiver 9 7 • Wiring the Fan 10 8 • Installing the Canopy 12 9 • Completing Your Installation With a Light Fixture 13 10 • Operating the Remote Control and Mounting the Holder 14 11 • Operating and Cleaning Your Ceiling Fan 15 12 • Troubleshooting 16 Welcome Your new Hunter® ceiling fan is an addition to your fan, disconnect the power by...
Owner's Manual
Page 3
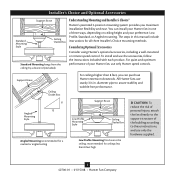
... Hunter fans use only Hunter speed controls. The steps in . You can purchase Hunter extension downrods. Considering Optional Accessories Consider using Hunter's optional accessories, including a wall-mounted or remote speed control. Support Brace Ceiling Outlet Box For ceilings higher than 8 feet, you maximum installation flexibility and ease. Angled Mounting Style 8 12 Angled Mounting recommended for a vaulted or angled ceiling Support Brace Low Profile Mounting Style Ceiling Outlet Box Low Profile Mounting fits close to the ceiling, recommended for all three Installer...
... Hunter fans use only Hunter speed controls. The steps in . You can purchase Hunter extension downrods. Considering Optional Accessories Consider using Hunter's optional accessories, including a wall-mounted or remote speed control. Support Brace Ceiling Outlet Box For ceilings higher than 8 feet, you maximum installation flexibility and ease. Angled Mounting Style 8 12 Angled Mounting recommended for a vaulted or angled ceiling Support Brace Low Profile Mounting Style Ceiling Outlet Box Low Profile Mounting fits close to the ceiling, recommended for all three Installer...
Owner's Manual
Page 4
... to the motor or fan blades. 1 • Getting Ready To install a ceiling fan, be sure you can direct you to a licensed installer or electrician. Preparing the Fan Site Before you begin installing the fan, follow all the instructions in ceiling. • Drill holes for any parts are installing more than one fan, keep the fan blades and blade irons (if applicable) in . Check for and install wood screws. • Identify and connect electrical wires. • Lift...
... to the motor or fan blades. 1 • Getting Ready To install a ceiling fan, be sure you can direct you to a licensed installer or electrician. Preparing the Fan Site Before you begin installing the fan, follow all the instructions in ceiling. • Drill holes for any parts are installing more than one fan, keep the fan blades and blade irons (if applicable) in . Check for and install wood screws. • Identify and connect electrical wires. • Lift...
Owner's Manual
Page 5
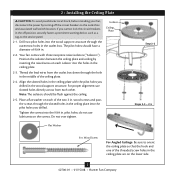
... . 2-2. Isolator Ceiling Plate Flat Washer Step 2-2 Steps 2-3 - 2-5 3 in the wood support structure. Wood Screw For Angled Ceilings: Be sure to the outlet box and associated wall switch location. Place a flat washer on the lower side. 5 42700-01 • 01/15/08 • Hunter Fan Company Do not over tighten. The pilot holes should be flush against the ceiling. 2-5. 2 • Installing the Ceiling Plate CAUTION: To avoid possible electrical shock, before installing your fan, disconnect...
... . 2-2. Isolator Ceiling Plate Flat Washer Step 2-2 Steps 2-3 - 2-5 3 in the wood support structure. Wood Screw For Angled Ceilings: Be sure to the outlet box and associated wall switch location. Place a flat washer on the lower side. 5 42700-01 • 01/15/08 • Hunter Fan Company Do not over tighten. The pilot holes should be flush against the ceiling. 2-5. 2 • Installing the Ceiling Plate CAUTION: To avoid possible electrical shock, before installing your fan, disconnect...
Owner's Manual
Page 6
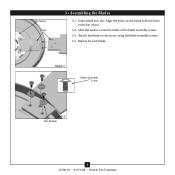
Slide flat washers onto the shafts of the blade assembly screws. 3-3. Repeat for each blade. Insert blade into slot. Attach the blade to the motor using the blade assembly screws. 3-4. Step 3-1 Blade Assembly Screw Step 3-2 Flat Washer 6 42700-01 • 01/15/08 • Hunter Fan Company 3 • Assembling tbe Blades Fan Motor Holes 3 • Assembling the Blades 3-1. Align the holes on the blade with the holes in the fan motor. 3-2.
Slide flat washers onto the shafts of the blade assembly screws. 3-3. Repeat for each blade. Insert blade into slot. Attach the blade to the motor using the blade assembly screws. 3-4. Step 3-1 Blade Assembly Screw Step 3-2 Flat Washer 6 42700-01 • 01/15/08 • Hunter Fan Company 3 • Assembling tbe Blades Fan Motor Holes 3 • Assembling the Blades 3-1. Align the holes on the blade with the holes in the fan motor. 3-2.
Owner's Manual
Page 7
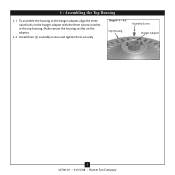
Install three (3) assembly screws and tighten them securely. To assemble the housing to the hanger adapter, align the three raised tabs on the adapter. 4-2. Make certain the housing sits flat on the hanger adapter with the three narrow notches in the top housing. Steps 4-1 - 4-2 Assembly Screw Top Housing Hanger Adapter 7 42700-01 • 01/15/08 • Hunter Fan Company 4 • Assembling the Top Housing 4-1.
Install three (3) assembly screws and tighten them securely. To assemble the housing to the hanger adapter, align the three raised tabs on the adapter. 4-2. Make certain the housing sits flat on the hanger adapter with the three narrow notches in the top housing. Steps 4-1 - 4-2 Assembly Screw Top Housing Hanger Adapter 7 42700-01 • 01/15/08 • Hunter Fan Company 4 • Assembling the Top Housing 4-1.
Owner's Manual
Page 8
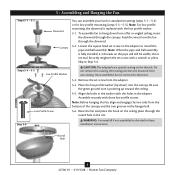
... the set screw from unscrewing. Remove the set screw with the low profile washer. 5-1. Be sure the green ground wire is replaced with a wrench or pliers. Note: For low profile mounting, the downrod is pointing up toward the ceiling. 5-5. this coating; the coating prevents the downrod from the adapter. 5-4. Note: Before hanging the fan, align and engage the two tabs from the fan through the round hole in the hanger ball. 5-6. Once assembled...
... the set screw from unscrewing. Remove the set screw with the low profile washer. 5-1. Be sure the green ground wire is replaced with a wrench or pliers. Note: For low profile mounting, the downrod is pointing up toward the ceiling. 5-5. this coating; the coating prevents the downrod from the adapter. 5-4. Note: Before hanging the fan, align and engage the two tabs from the fan through the round hole in the hanger ball. 5-6. Once assembled...
Owner's Manual
Page 9
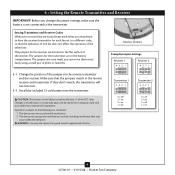
.... 6-2. WARNING: Use only the Hunter Fan speed control supplied with part 15 of pliers or tweezers. 6-1. Before you can move them most easily using a small pair of the FCC rules. you change the jumper settings, make sure the battery is subject to the transmitter. Install the included 12-volt battery into the transmitter. Setting Transmitter and Receiver Codes When two or more fans are very small; Operation is not connected to the...
.... 6-2. WARNING: Use only the Hunter Fan speed control supplied with part 15 of pliers or tweezers. 6-1. Before you can move them most easily using a small pair of the FCC rules. you change the jumper settings, make sure the battery is subject to the transmitter. Install the included 12-volt battery into the transmitter. Setting Transmitter and Receiver Codes When two or more fans are very small; Operation is not connected to the...
Owner's Manual
Page 10
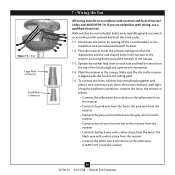
Steps 7-5 - 7-6 Large Wire connector Small Wire connector 7 • Wiring the Fan All wiring must be in accordance with national and local electrical codes. 7-1. Select an acceptable general-use switch in accordance with wiring, use a qualified electrician. Disconnect the power by turning off the circuit breakers to the white wire (LIGHT OUT) from the top of the canopy. 7-3. If you are not included. To connect the wires, hold the bare metal...
Steps 7-5 - 7-6 Large Wire connector Small Wire connector 7 • Wiring the Fan All wiring must be in accordance with national and local electrical codes. 7-1. Select an acceptable general-use switch in accordance with wiring, use a qualified electrician. Disconnect the power by turning off the circuit breakers to the white wire (LIGHT OUT) from the top of the canopy. 7-3. If you are not included. To connect the wires, hold the bare metal...
Owner's Manual
Page 11
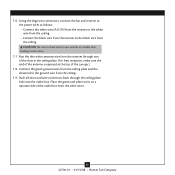
...; Hunter Fan Company Connect the green ground wires from the ceiling plate and the downrod to the black wire from the ceiling. 7-9. Push all wires and wire connectors back through one of the slots in the ceiling plate. (For best reception, make sure the end of the antenna is exposed at the top of the outlet box from the receiver through the ceiling plate hole into the outlet box. Using the large wire connectors, connect the fan and receiver...
...; Hunter Fan Company Connect the green ground wires from the ceiling plate and the downrod to the black wire from the ceiling. 7-9. Push all wires and wire connectors back through one of the slots in the ceiling plate. (For best reception, make sure the end of the antenna is exposed at the top of the outlet box from the receiver through the ceiling plate hole into the outlet box. Using the large wire connectors, connect the fan and receiver...
Owner's Manual
Page 12
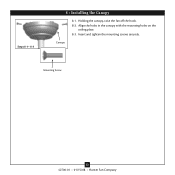
Holding the canopy, raise the fan off the hook. 8-2. Insert and tighten the mounting screws securely. Steps 8-1- 8-3 8 • Installing the Canopy 8-1. Align the holes in the canopy with the mounting holes on the ceiling plate. 8-3. Canopy Mounting Screw 12 42700-01 • 01/15/08 • Hunter Fan Company
Holding the canopy, raise the fan off the hook. 8-2. Insert and tighten the mounting screws securely. Steps 8-1- 8-3 8 • Installing the Canopy 8-1. Align the holes in the canopy with the mounting holes on the ceiling plate. 8-3. Canopy Mounting Screw 12 42700-01 • 01/15/08 • Hunter Fan Company
Owner's Manual
Page 13
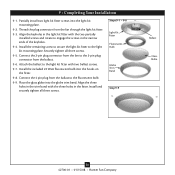
... three screws. Connect the 2-pin plug connector from the fan to the 2-pin plug connector from the ballast to the light kit mounting plate. Connect the 4 pin plug from the ballast. 9-6. Steps 9-1 - 9-8 Light Kit Fitter Fluorescent Bulb Globe Trim Band Step 9-9 Ballast Glass Globe 13 42700-01 • 01/15/08 • Hunter Fan Company Install and securely tighten all three screws. 9-5. Thread the plug connector from the fan through the light kit fitter. 9-3. Align the three holes in the trim band...
... three screws. Connect the 2-pin plug connector from the fan to the 2-pin plug connector from the ballast to the light kit mounting plate. Connect the 4 pin plug from the ballast. 9-6. Steps 9-1 - 9-8 Light Kit Fitter Fluorescent Bulb Globe Trim Band Step 9-9 Ballast Glass Globe 13 42700-01 • 01/15/08 • Hunter Fan Company Install and securely tighten all three screws. 9-5. Thread the plug connector from the fan through the light kit fitter. 9-3. Align the three holes in the trim band...
Owner's Manual
Page 14
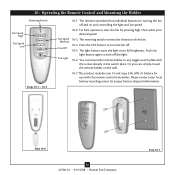
... the wall. 10-7.This product includes one 12-volt type 23A, MN-21 battery for proper battery disposal information. Press the OFF button to turn the fan off and on to any toggle switch plate with the remote control transmitter. Or, you can mount the remote holder to full brightness. 10 • Operating the Remote Control and Mounting the Holder Reversing Switch Fan Speed High Fan Speed Low Steps 10-1 - 10-5 10-1. Fan Speed Medium Fan Off Fan Light...
... the wall. 10-7.This product includes one 12-volt type 23A, MN-21 battery for proper battery disposal information. Press the OFF button to turn the fan off and on to any toggle switch plate with the remote control transmitter. Or, you can mount the remote holder to full brightness. 10 • Operating the Remote Control and Mounting the Holder Reversing Switch Fan Speed High Fan Speed Low Steps 10-1 - 10-5 10-1. Fan Speed Medium Fan Off Fan Light...
Owner's Manual
Page 15
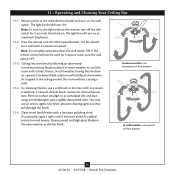
... the wall switch. Remove surface smudges or accumulated dirt and dust using a mild detergent and a slightly dampened cloth. If the remote control will distribute the warmer air trapped at the ceiling around the room without the remote, turn the wall switch OFF. 11-3. Clean wood finish blades with a direct breeze. You may use upward air flow pattern 15 42700-01 • 01/15/08 • Hunter Fan Company Restore power at...
... the wall switch. Remove surface smudges or accumulated dirt and dust using a mild detergent and a slightly dampened cloth. If the remote control will distribute the warmer air trapped at the ceiling around the room without the remote, turn the wall switch OFF. 11-3. Clean wood finish blades with a direct breeze. You may use upward air flow pattern 15 42700-01 • 01/15/08 • Hunter Fan Company Restore power at...
Owner's Manual
Page 16
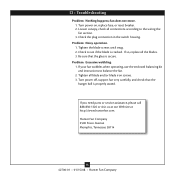
.... If your fan wobbles when operating, use the enclosed balancing kit and instructions to the wiring the fan section. 3. fan does not move. 1. Problem: Noisy operation. 1. Tighten the blade screws until snug. 2. 12 • Troubleshooting Problem: Nothing happens; Check to see if the blade is secure. Turn power off, support fan very carefully, and check that the glass is cracked. Turn power on, replace fuse, or reset breaker. 2. If you need parts or service assistance...
.... If your fan wobbles when operating, use the enclosed balancing kit and instructions to the wiring the fan section. 3. fan does not move. 1. Problem: Noisy operation. 1. Tighten the blade screws until snug. 2. 12 • Troubleshooting Problem: Nothing happens; Check to see if the blade is secure. Turn power off, support fan very carefully, and check that the glass is cracked. Turn power on, replace fuse, or reset breaker. 2. If you need parts or service assistance...


