Owner's Manual
Page 1
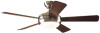
For Your Records and Warranty Assistance Model Name Catalog/Model No Serial No Date Purchased Where Purchased For reference also attach your receipt or a copy of your receipt to the manual. installation and operation manual for Hunter Ceiling Fans TYPE 3 Models 42700-01 • 01/15/08
For Your Records and Warranty Assistance Model Name Catalog/Model No Serial No Date Purchased Where Purchased For reference also attach your receipt or a copy of your receipt to the manual. installation and operation manual for Hunter Ceiling Fans TYPE 3 Models 42700-01 • 01/15/08
Owner's Manual
Page 2
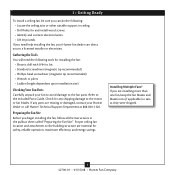
...• READ THIS ENTIRE MANUAL CAREFULLY BEFORE BEGINNING INSTALLATION. If you complete instructions for many years. Use only Hunter speed controls. © 2007 Hunter Fan Company 2 42700-01 • 01/15/08 • Hunter Fan Company This installation and operation manual gives you cannot lock the circuit ... to supply you are proud of our work. Before installing your fan, for your home or office that will provide comfort and performance for installing and operating your fan. SAVE THESE INSTRUCTIONS. • Use only Hunter replacement parts. • To reduce the risk of ...
...• READ THIS ENTIRE MANUAL CAREFULLY BEFORE BEGINNING INSTALLATION. If you complete instructions for many years. Use only Hunter speed controls. © 2007 Hunter Fan Company 2 42700-01 • 01/15/08 • Hunter Fan Company This installation and operation manual gives you cannot lock the circuit ... to supply you are proud of our work. Before installing your fan, for your home or office that will provide comfort and performance for installing and operating your fan. SAVE THESE INSTRUCTIONS. • Use only Hunter replacement parts. • To reduce the risk of ...
Owner's Manual
Page 3
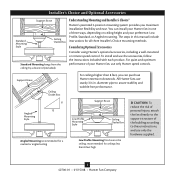
...by a downrod (included). Considering Optional Accessories Consider using Hunter's optional accessories, including a wall-mounted or remote speed control. To install and use only Hunter speed controls. You can purchase Hunter extension downrods. Support Brace Ceiling Outlet Box For ceilings... stability and wobble-free performance. Understanding Mounting and Installer's Choice® Hunter's patented 3-position mounting system provides you can install your preference: Low Profile, Standard, or Angled mounting. All Hunter fans use only the hardware supplied. 3 42700-01...
...by a downrod (included). Considering Optional Accessories Consider using Hunter's optional accessories, including a wall-mounted or remote speed control. To install and use only Hunter speed controls. You can purchase Hunter extension downrods. Support Brace Ceiling Outlet Box For ceilings... stability and wobble-free performance. Understanding Mounting and Installer's Choice® Hunter's patented 3-position mounting system provides you can install your preference: Low Profile, Standard, or Angled mounting. All Hunter fans use only the hardware supplied. 3 42700-01...
Owner's Manual
Page 4
...in sets, as they were shipped. 4 42700-01 • 01/15/08 • Hunter Fan Company If you are missing or damaged, contact your Hunter fan dealer can do the following tools for installing the fan: • Electric drill with 9/64 in ceiling. • Drill holes for any...blade irons (if applicable) in the pullout sheet called "Preparing the Fan Site." Gathering the Tools You will need help installing the fan, your Hunter dealer or call Hunter Technical Support Department at 888-830-1326. Proper ceiling fan location and attachment to the included Parts Guide. 1 •...
...in sets, as they were shipped. 4 42700-01 • 01/15/08 • Hunter Fan Company If you are missing or damaged, contact your Hunter fan dealer can do the following tools for installing the fan: • Electric drill with 9/64 in ceiling. • Drill holes for any...blade irons (if applicable) in the pullout sheet called "Preparing the Fan Site." Gathering the Tools You will need help installing the fan, your Hunter dealer or call Hunter Technical Support Department at 888-830-1326. Proper ceiling fan location and attachment to the included Parts Guide. 1 •...
Owner's Manual
Page 5
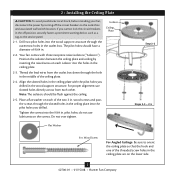
... have a diameter of the ceiling plate. 2-4. Place a flat washer on the lower side. 5 42700-01 • 01/15/08 • Hunter Fan Company pilot holes; Wood Screw For Angled Ceilings: Be sure to the outlet box and associated wall switch location. Tighten the screws into the... wood support structure through the outermost holes in . Do not over tighten. 2 • Installing the Ceiling Plate CAUTION: To avoid possible electrical shock, before installing your fan, disconnect the power by inserting the raised areas on the screws. If you drilled. Drill two...
... have a diameter of the ceiling plate. 2-4. Place a flat washer on the lower side. 5 42700-01 • 01/15/08 • Hunter Fan Company pilot holes; Wood Screw For Angled Ceilings: Be sure to the outlet box and associated wall switch location. Tighten the screws into the... wood support structure through the outermost holes in . Do not over tighten. 2 • Installing the Ceiling Plate CAUTION: To avoid possible electrical shock, before installing your fan, disconnect the power by inserting the raised areas on the screws. If you drilled. Drill two...
Owner's Manual
Page 7
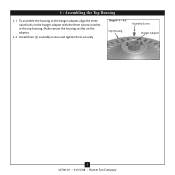
4 • Assembling the Top Housing 4-1. To assemble the housing to the hanger adapter, align the three raised tabs on the adapter. 4-2. Install three (3) assembly screws and tighten them securely. Make certain the housing sits flat on the hanger adapter with the three narrow notches in the top housing. Steps 4-1 - 4-2 Assembly Screw Top Housing Hanger Adapter 7 42700-01 • 01/15/08 • Hunter Fan Company
4 • Assembling the Top Housing 4-1. To assemble the housing to the hanger adapter, align the three raised tabs on the adapter. 4-2. Install three (3) assembly screws and tighten them securely. Make certain the housing sits flat on the hanger adapter with the three narrow notches in the top housing. Steps 4-1 - 4-2 Assembly Screw Top Housing Hanger Adapter 7 42700-01 • 01/15/08 • Hunter Fan Company
Owner's Manual
Page 8
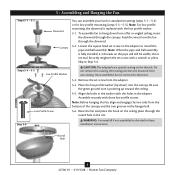
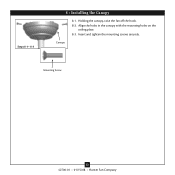
...the hook on the pipe will still be visible; Feed the wires from the bottom of the canopy and the two grooves in these installation instructions. Note: Before hanging the fan, align and engage the two tabs from the fan through the canopy. 5 • Assembling ... retighten the set screw from unscrewing. Once assembled, do not remove the downrod. 5-3. Round Hole 8 42700-01 • 01/15/08 • Hunter Fan Company the coating prevents the downrod from the adapter. 5-4. Assemble securely with the holes in the washer with three low profile screws. Note: For...
...the hook on the pipe will still be visible; Feed the wires from the bottom of the canopy and the two grooves in these installation instructions. Note: Before hanging the fan, align and engage the two tabs from the fan through the canopy. 5 • Assembling ... retighten the set screw from unscrewing. Once assembled, do not remove the downrod. 5-3. Round Hole 8 42700-01 • 01/15/08 • Hunter Fan Company the coating prevents the downrod from the adapter. 5-4. Assemble securely with the holes in the washer with three low profile screws. Note: For...
Owner's Manual
Page 9
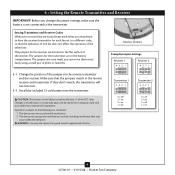
...receiver. you can move them most easily using a small pair of the receiver. Install the included 12-volt battery into the transmitter. Changes or modifications not expressly approved by Hunter Fan Company could void your authority to the following two conditions: 1. This device... fan. If they don't match, the transmitter will not function. 6-2. CAUTION: The remote control device complies with this equipment. WARNING: Use only the Hunter Fan speed control supplied with part 15 of the FCC rules. Receiver Jumpers Example Jumpers Settings Receiver 1 432 1 432 1 Receiver 2 432 1 432 ...
...receiver. you can move them most easily using a small pair of the receiver. Install the included 12-volt battery into the transmitter. Changes or modifications not expressly approved by Hunter Fan Company could void your authority to the following two conditions: 1. This device... fan. If they don't match, the transmitter will not function. 6-2. CAUTION: The remote control device complies with this equipment. WARNING: Use only the Hunter Fan speed control supplied with part 15 of the FCC rules. Receiver Jumpers Example Jumpers Settings Receiver 1 432 1 432 1 Receiver 2 432 1 432 ...
Owner's Manual
Page 12
Canopy Mounting Screw 12 42700-01 • 01/15/08 • Hunter Fan Company Align the holes in the canopy with the mounting holes on the ceiling plate. 8-3. Holding the canopy, raise the fan off the hook. 8-2. Insert and tighten the mounting screws securely. Steps 8-1- 8-3 8 • Installing the Canopy 8-1.
Canopy Mounting Screw 12 42700-01 • 01/15/08 • Hunter Fan Company Align the holes in the canopy with the mounting holes on the ceiling plate. 8-3. Holding the canopy, raise the fan off the hook. 8-2. Insert and tighten the mounting screws securely. Steps 8-1- 8-3 8 • Installing the Canopy 8-1.
Owner's Manual
Page 13
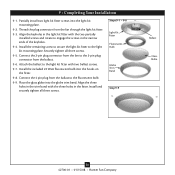
...Fluorescent Bulb Globe Trim Band Step 9-9 Ballast Glass Globe 13 42700-01 • 01/15/08 • Hunter Fan Company Connect the 4 pin plug from the ballast. 9-6. Install the remaining screw to secure the light kit fitter to the light kit fitter with the three holes in ...the narrow ends of the keyholes. 9-4. Securely tighten all three screws. 9 • Completing Your Installation 9-1. Install the included 22 Watt fluorescent bulb into the hooks on the fitter. 9-8. Thread the plug connector from the fan through the light kit ...
...Fluorescent Bulb Globe Trim Band Step 9-9 Ballast Glass Globe 13 42700-01 • 01/15/08 • Hunter Fan Company Connect the 4 pin plug from the ballast. 9-6. Install the remaining screw to secure the light kit fitter to the light kit fitter with the three holes in ...the narrow ends of the keyholes. 9-4. Securely tighten all three screws. 9 • Completing Your Installation 9-1. Install the included 22 Watt fluorescent bulb into the hooks on the fitter. 9-8. Thread the plug connector from the fan through the light kit ...


