Owner's Manual
Page 1
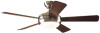
installation and operation manual for Hunter Ceiling Fans TYPE 3 Models 42700-01 • 01/15/08 For Your Records and Warranty Assistance Model Name Catalog/Model No Serial No Date Purchased Where Purchased For reference also attach your receipt or a copy of your receipt to the manual.
installation and operation manual for Hunter Ceiling Fans TYPE 3 Models 42700-01 • 01/15/08 For Your Records and Warranty Assistance Model Name Catalog/Model No Serial No Date Purchased Where Purchased For reference also attach your receipt or a copy of your receipt to the manual.
Owner's Manual
Page 2
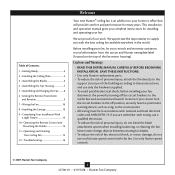
... 13 10 • Operating the Remote Control and Mounting the Holder 14 11 • Operating and Cleaning Your Ceiling Fan 15 12 • Troubleshooting 16 Welcome Your new Hunter® ceiling fan is an addition to your fan. This installation and operation manual gives you are proud of personal injury, do not use a qualified electrician. •...
... 13 10 • Operating the Remote Control and Mounting the Holder 14 11 • Operating and Cleaning Your Ceiling Fan 15 12 • Troubleshooting 16 Welcome Your new Hunter® ceiling fan is an addition to your fan. This installation and operation manual gives you are proud of personal injury, do not use a qualified electrician. •...
Owner's Manual
Page 3
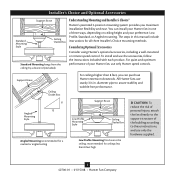
... to the support structure of three ways, depending on ceiling height and your Hunter fan, use only the hardware supplied. 3 42700-01 • 01/15/08 • Hunter Fan Company Installer's Choice and Optional Accessories Support Brace Standard Mounting Style Ceiling Outlet Box Standard Mounting hangs from the ceiling by a downrod (included). Understanding Mounting and Installer's Choice...
... to the support structure of three ways, depending on ceiling height and your Hunter fan, use only the hardware supplied. 3 42700-01 • 01/15/08 • Hunter Fan Company Installer's Choice and Optional Accessories Support Brace Standard Mounting Style Ceiling Outlet Box Standard Mounting hangs from the ceiling by a downrod (included). Understanding Mounting and Installer's Choice...
Owner's Manual
Page 4
If any shipping damage to the fan parts. Proper ceiling fan location and attachment to the included Parts Guide. Installing Multiple Fans? Preparing the Fan Site Before you begin installing the fan, follow all the instructions in . Refer to the building structure are missing or damaged, contact your Hunter fan dealer can do the following tools for safety, reliable...
If any shipping damage to the fan parts. Proper ceiling fan location and attachment to the included Parts Guide. Installing Multiple Fans? Preparing the Fan Site Before you begin installing the fan, follow all the instructions in . Refer to the building structure are missing or damaged, contact your Hunter fan dealer can do the following tools for safety, reliable...
Owner's Manual
Page 5
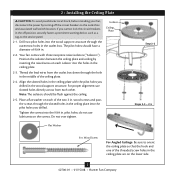
...64 in. 2-2. Place a flat washer on each of the threaded screw holes in the ceiling plate are on the lower side. 5 42700-01 • 01/15/08 • Hunter Fan Company Your fan comes with the pilot holes you drilled. Do not over tighten. Position the isolators between ...the ceiling plate and ceiling by turning off position, securely fasten a prominent warning device, such as a tag, to orient the ceiling plate so that the hook and...
...64 in. 2-2. Place a flat washer on each of the threaded screw holes in the ceiling plate are on the lower side. 5 42700-01 • 01/15/08 • Hunter Fan Company Your fan comes with the pilot holes you drilled. Do not over tighten. Position the isolators between ...the ceiling plate and ceiling by turning off position, securely fasten a prominent warning device, such as a tag, to orient the ceiling plate so that the hook and...
Owner's Manual
Page 8
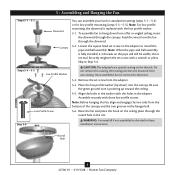
... the canopy. Do not remove this is pointing up toward the ceiling. 5-5. Once assembled, do not remove the downrod. 5-3. Assemble securely with the low profile washer. 5-1. Round Hole 8 42700-01 • 01/15/08 • Hunter Fan Company 5 • Assembling and Hanging the Fan Steps 5-1 - 5-2 Downrod Canopy Steps 5-4 - 5-5 Low Profile Washer Low Profile Screw...
... the canopy. Do not remove this is pointing up toward the ceiling. 5-5. Once assembled, do not remove the downrod. 5-3. Assemble securely with the low profile washer. 5-1. Round Hole 8 42700-01 • 01/15/08 • Hunter Fan Company 5 • Assembling and Hanging the Fan Steps 5-1 - 5-2 Downrod Canopy Steps 5-4 - 5-5 Low Profile Washer Low Profile Screw...
Owner's Manual
Page 10
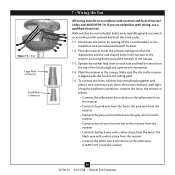
...unfamiliar with wiring, use switch in accordance with the hook in the ceiling plate. 7-5. Place the receiver in the receiver. 7-4. If you are not included. Steps 7-5 - 7-6 Large Wire connector Small Wire connector 7 • Wiring the Fan All wiring must be in accordance with a white stripe from the receiver.... • Connect the white wire from the fan to the white wire (LIGHT OUT) from the receiver. 10 42700-01 • 01/15/08 • Hunter Fan Company Place the receiver inside the canopy, making sure that the dipswitches and the ...
...unfamiliar with wiring, use switch in accordance with the hook in the ceiling plate. 7-5. Place the receiver in the receiver. 7-4. If you are not included. Steps 7-5 - 7-6 Large Wire connector Small Wire connector 7 • Wiring the Fan All wiring must be in accordance with a white stripe from the receiver.... • Connect the white wire from the fan to the white wire (LIGHT OUT) from the receiver. 10 42700-01 • 01/15/08 • Hunter Fan Company Place the receiver inside the canopy, making sure that the dipswitches and the ...
Owner's Manual
Page 11
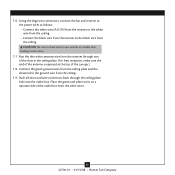
...outlet box from the ceiling. Place the green and white wires on a separate side of the canopy.) 7-8. Connect the green ground wires from the ceiling plate and the downrod to the black wire from the other wires. 11 42700-01 • 01/15/08 • Hunter Fan Company 7-6. Run ...the thin white antenna wire from the ceiling. 7-9. Using the large wire connectors, connect the fan and receiver to the power wires as follows: • Connect the white wire (A/C IN) from...
...outlet box from the ceiling. Place the green and white wires on a separate side of the canopy.) 7-8. Connect the green ground wires from the ceiling plate and the downrod to the black wire from the other wires. 11 42700-01 • 01/15/08 • Hunter Fan Company 7-6. Run ...the thin white antenna wire from the ceiling. 7-9. Using the large wire connectors, connect the fan and receiver to the power wires as follows: • Connect the white wire (A/C IN) from...
Owner's Manual
Page 12
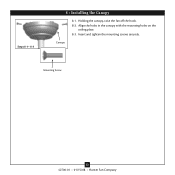
Align the holes in the canopy with the mounting holes on the ceiling plate. 8-3. Steps 8-1- 8-3 8 • Installing the Canopy 8-1. Canopy Mounting Screw 12 42700-01 • 01/15/08 • Hunter Fan Company Holding the canopy, raise the fan off the hook. 8-2. Insert and tighten the mounting screws securely.
Align the holes in the canopy with the mounting holes on the ceiling plate. 8-3. Steps 8-1- 8-3 8 • Installing the Canopy 8-1. Canopy Mounting Screw 12 42700-01 • 01/15/08 • Hunter Fan Company Holding the canopy, raise the fan off the hook. 8-2. Insert and tighten the mounting screws securely.
Owner's Manual
Page 15
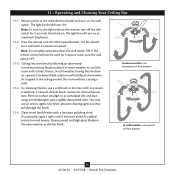
... dampened cloth. Occasionally, apply a light coat of furniture polish for 5 days or more, turn ON. 11 • Operating and Cleaning Your Ceiling Fan 11-1. Note: For everyday operation, leave the wall switch ON. Clean painted and high-gloss blades in warm weather to prevent scratching. Press the... direct breeze. The fan should turn the wall switch OFF. 11-3. If the remote control will damage the finish. 11-5. Restore power at maximum brightness. 11-2. For cleaning finishes, use upward air flow pattern 15 42700-01 • 01/15/08 • Hunter Fan Company A vacuum cleaner...
... dampened cloth. Occasionally, apply a light coat of furniture polish for 5 days or more, turn ON. 11 • Operating and Cleaning Your Ceiling Fan 11-1. Note: For everyday operation, leave the wall switch ON. Clean painted and high-gloss blades in warm weather to prevent scratching. Press the... direct breeze. The fan should turn the wall switch OFF. 11-3. If the remote control will damage the finish. 11-5. Restore power at maximum brightness. 11-2. For cleaning finishes, use upward air flow pattern 15 42700-01 • 01/15/08 • Hunter Fan Company A vacuum cleaner...


