
User Manual
Page 3
... from the satellite dish. Do not stand the receiver on top of the receiver. ** 6. CONNECTION TO THE SATELLITE DISH LNB ** Disconnect the receiver from the mains before connecting or disconnecting the cable from the mains before connecting or disconnecting the cable from the type of power supplied to dust the receiver. ** ** 5. EARTHING ** The LNB cable must be hazardous or cause damage the receiver. ** 7. If you start any maintenance or installation procedures. ** 2. Do...
... from the satellite dish. Do not stand the receiver on top of the receiver. ** 6. CONNECTION TO THE SATELLITE DISH LNB ** Disconnect the receiver from the mains before connecting or disconnecting the cable from the mains before connecting or disconnecting the cable from the type of power supplied to dust the receiver. ** ** 5. EARTHING ** The LNB cable must be hazardous or cause damage the receiver. ** 7. If you start any maintenance or installation procedures. ** 2. Do...

User Manual
Page 6
Setup 2.1 Connecting to TV, VCR and Hi-Fi system 2.2 Connecting to the Antenna 2.3 Powering On GB17 ** GB17 GB20 GB22 3. Basic Operation GB26 ** ** 4.1 Switching Channel GB26 4.2 Volume Control GB26 4.3 Change the Subtitle Language GB26 4.4 Change a Audio Language GB27 4.5 Programme Information (I-plate) GB27 4.6 Option List GB29 5. PIP and Time Shifted Recording 5.1 Picture-in-Picture (PIP) Screen 5.2 Time Shifted Recording (TSR) GB32 ** GB32 GB34 ** GB 6 ** ** ** ** ** ** ** Before Using the Receiver 1.1 Package Contents 1.2 Front Panel 1.3 Rear Panel 1.4 ...
Setup 2.1 Connecting to TV, VCR and Hi-Fi system 2.2 Connecting to the Antenna 2.3 Powering On GB17 ** GB17 GB20 GB22 3. Basic Operation GB26 ** ** 4.1 Switching Channel GB26 4.2 Volume Control GB26 4.3 Change the Subtitle Language GB26 4.4 Change a Audio Language GB27 4.5 Programme Information (I-plate) GB27 4.6 Option List GB29 5. PIP and Time Shifted Recording 5.1 Picture-in-Picture (PIP) Screen 5.2 Time Shifted Recording (TSR) GB32 ** GB32 GB34 ** GB 6 ** ** ** ** ** ** ** Before Using the Receiver 1.1 Package Contents 1.2 Front Panel 1.3 Rear Panel 1.4 ...

User Manual
Page 10
... Using the Receiver ** 1.2 Front Panel ** 1. STANDBY Button ** ** Switches between TV and Radio. 3. USB Slave Port ** Connect to the PC port. (For moving the information of digital album or MP3 to the Warning part. 8. PLAY LED ** Turn on when a programme is being recorded. 7. Lock and Unlock ** Lock when a hard disk drive is reading or writing HDD. 5. TV/RADIO Button ** ** Switches between Operation and Standby modes. 2. RECORD LED ** Turn on when a recorded programme is being played back. 6. Unlock when you separate a hard...
... Using the Receiver ** 1.2 Front Panel ** 1. STANDBY Button ** ** Switches between TV and Radio. 3. USB Slave Port ** Connect to the PC port. (For moving the information of digital album or MP3 to the Warning part. 8. PLAY LED ** Turn on when a programme is being recorded. 7. Lock and Unlock ** Lock when a hard disk drive is reading or writing HDD. 5. TV/RADIO Button ** ** Switches between Operation and Standby modes. 2. RECORD LED ** Turn on when a recorded programme is being played back. 6. Unlock when you separate a hard...
User Manual
Page 20
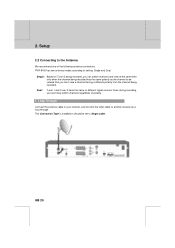
... different signal sources. Loop Through Connect the antenna cable to your receiver, and connect the other cable to another receiver as the channel to be set to the Antenna. But you can freely switch channels regardless of the following antenna connections. The Connection Type in Installation should be viewed. ** ** ** ** ** 2. Even during recording, you can switch channels and view at the same time only when the channel being recorded. We recommend one of polarity. 1. Setup ** 2.2 Connecting to Single cable. ** ** ** ** GB...
... different signal sources. Loop Through Connect the antenna cable to your receiver, and connect the other cable to another receiver as the channel to be set to the Antenna. But you can freely switch channels regardless of the following antenna connections. The Connection Type in Installation should be viewed. ** ** ** ** ** 2. Even during recording, you can switch channels and view at the same time only when the channel being recorded. We recommend one of polarity. 1. Setup ** 2.2 Connecting to Single cable. ** ** ** ** GB...

User Manual
Page 24
...(Same). 2. Set the Connection Type. When using Universal LNB, select Universal for LNB Frequency which are located at signal strength bar and quality bar, which is correctly set up, the level at the bottom of the screen, are generally moved up the antenna, please contact your local receiver installer or distributor. 3.4 Automatic Search You can automatically search for finishing the Automatic Search. Set the DiSEqC Input switch. Set the Satellite. Note: When using 22kHz tone switch, select...
...(Same). 2. Set the Connection Type. When using Universal LNB, select Universal for LNB Frequency which are located at signal strength bar and quality bar, which is correctly set up, the level at the bottom of the screen, are generally moved up the antenna, please contact your local receiver installer or distributor. 3.4 Automatic Search You can automatically search for finishing the Automatic Search. Set the DiSEqC Input switch. Set the Satellite. Note: When using 22kHz tone switch, select...

User Manual
Page 26
... channel list or programme guide. Note: The mute function keeps enabled while you change the channel. ** ** 4.3 Change the Subtitle Language If the current programme provides Subtitle information, you can select a default subtitle language by selecting MENU - Then the subtitle will be displayed in the selected language at the bottom of the following methods. 1. Note: You can select the language for watching programmes. 4.1 Switching Channel You can switch channel using one of the screen...
... channel list or programme guide. Note: The mute function keeps enabled while you change the channel. ** ** 4.3 Change the Subtitle Language If the current programme provides Subtitle information, you can select a default subtitle language by selecting MENU - Then the subtitle will be displayed in the selected language at the bottom of the following methods. 1. Note: You can select the language for watching programmes. 4.1 Switching Channel You can switch channel using one of the screen...

User Manual
Page 37
... selected block repeatedly. button at the desired position to set up. ** - Up to recorded programme. Note: Press the BOOKMARK LIST or EXIT button to a bookmark Press the BOOKMARK LIST button. Going to hide the bookmark list screen. ** - Press the STOP button to a position directly by bookmark function in recorded programme playback. Adding a bookmark Press the ADD BOOKMARK back a recorded programme. You can perform the time shift operations like VCR functions using the button and...
... selected block repeatedly. button at the desired position to set up. ** - Up to recorded programme. Note: Press the BOOKMARK LIST or EXIT button to a bookmark Press the BOOKMARK LIST button. Going to hide the bookmark list screen. ** - Press the STOP button to a position directly by bookmark function in recorded programme playback. Adding a bookmark Press the ADD BOOKMARK back a recorded programme. You can perform the time shift operations like VCR functions using the button and...

User Manual
Page 39
... press the OK button to add a 2. button to complete entering. 7. button and the NUMERICAL 4. Editing Recording Reservations 1. Select Edit using he NUMERICAL (0~9) button. 3. ** ** ** ** ** ** ** 1. Select one , adjust the reservation so as not to overlap. ** • If the target channel is locked, restricted by watching time or parental control, you have to enter a password for recording. ** • If the programme to delete the reserved programme. 3. Select Lock mode using the button and press the...
... press the OK button to add a 2. button to complete entering. 7. button and the NUMERICAL 4. Editing Recording Reservations 1. Select Edit using he NUMERICAL (0~9) button. 3. ** ** ** ** ** ** ** 1. Select one , adjust the reservation so as not to overlap. ** • If the target channel is locked, restricted by watching time or parental control, you have to enter a password for recording. ** • If the programme to delete the reserved programme. 3. Select Lock mode using the button and press the...

User Manual
Page 45
... types. The list of channel search. Preferences - Select Off by the result of channel search. 7.1 Displaying and Switching Channel List You can organise channels by the result of all TV channels with 2 subgroups: one is sorted by channel number, the other is decided by your desired channel using the button and ** press the OK button to MENU - The number of the favourite channels with different colours. Press the LIST or OK button while watching...
... types. The list of channel search. Preferences - Select Off by the result of channel search. 7.1 Displaying and Switching Channel List You can organise channels by the result of all TV channels with 2 subgroups: one is sorted by channel number, the other is decided by your desired channel using the button and ** press the OK button to MENU - The number of the favourite channels with different colours. Press the LIST or OK button while watching...

User Manual
Page 55
... move as follows. Note: Guide provides programme information from the previous day to the previous programme or 30 minutes before. If the channel is locked, parental controlled or restricted by selecting the scheduled programme and pressing the OK button. 1. Viewing Programme Information Using Time Bar You can automatically reserve your Password to one day after . Press the GREEN button to the next programme or...
... move as follows. Note: Guide provides programme information from the previous day to the previous programme or 30 minutes before. If the channel is locked, parental controlled or restricted by selecting the scheduled programme and pressing the OK button. 1. Viewing Programme Information Using Time Bar You can automatically reserve your Password to one day after . Press the GREEN button to the next programme or...

User Manual
Page 58
... Repeat mode options among Once, Daily, and Weekly using the button. 6. button to complete the ** reservation. ** Note: • Lock mode is displayed only for the receiver with hard disk drive. • You can also select your desired programme is locked, restricted by watching time, you will be prompted to enter your Password to 7. If the channel is overlapped other programme, adjust the reservation appropriately. ** GB 58 ** ** ** ** ** ** ** Programme Guide ** 2. Change Time using button...
... Repeat mode options among Once, Daily, and Weekly using the button. 6. button to complete the ** reservation. ** Note: • Lock mode is displayed only for the receiver with hard disk drive. • You can also select your desired programme is locked, restricted by watching time, you will be prompted to enter your Password to 7. If the channel is overlapped other programme, adjust the reservation appropriately. ** GB 58 ** ** ** ** ** ** ** Programme Guide ** 2. Change Time using button...

User Manual
Page 69
...** ** ** ** Connection Type LNB 1 LNB 2 ** Single cable Fixed Antenna ** Motor Antenna SMATV Dual cable (Same) Dual cable (Diff) Fixed Antenna Fixed Antenna Motor Antenna Fixed Antenna Motor Antenna 1. Refer to use Installation Menu. You can select either of procedures. The options in bold font represent default settings. Dual cable(Same) Connect both of the antenna cables providing the same broadcasting signal to your receiver. Enter Password to directly move to another receiver as the following table shows. Dual cable(Diff) Connect the two antenna cables providing...
...** ** ** ** Connection Type LNB 1 LNB 2 ** Single cable Fixed Antenna ** Motor Antenna SMATV Dual cable (Same) Dual cable (Diff) Fixed Antenna Fixed Antenna Motor Antenna Fixed Antenna Motor Antenna 1. Refer to use Installation Menu. You can select either of procedures. The options in bold font represent default settings. Dual cable(Same) Connect both of the antenna cables providing the same broadcasting signal to your receiver. Enter Password to directly move to another receiver as the following table shows. Dual cable(Diff) Connect the two antenna cables providing...

User Manual
Page 70
...LNB 2 is set Antenna and LNB Information for channel search. Enter Password to directly move to the Connection Type. 1. Select Antenna Setting using the button, and press the OK or button. 2. Note: If no satellite is registered from Antenna Setting menu, Channel Search such as Automatic Search, Manual Search, Multiple Manual Search, Advanced Search is required to enter Antenna Setting. Installation ** 2. Select LNB 1 using the button, and press ** the OK or button to use Installation Menu. Antenna Setting of the fixed antenna You can set the following option...
...LNB 2 is set Antenna and LNB Information for channel search. Enter Password to directly move to the Connection Type. 1. Select Antenna Setting using the button, and press the OK or button. 2. Note: If no satellite is registered from Antenna Setting menu, Channel Search such as Automatic Search, Manual Search, Multiple Manual Search, Advanced Search is required to enter Antenna Setting. Installation ** 2. Select LNB 1 using the button, and press ** the OK or button to use Installation Menu. Antenna Setting of the fixed antenna You can set the following option...

User Manual
Page 73
Set LNB Frequency. Motor Antenna using the button, and press the OK or button. Antenna Setting of the motor antenna If you should set the Motor Type before Channel Search. Select one value among LNB frequency list. Set LNB Voltage Refer to the Antenna Setting of 60m. 3. LNB Voltage. Antenna Setting - If desired LNB frMotor Typeequency is operated by motor, you use Motor Antenna, which is not in the list, enter LNB Frequency value using DiSEqC 1.2. The distance between antenna and receiver is set the antenna as Motor...
Set LNB Frequency. Motor Antenna using the button, and press the OK or button. Antenna Setting of the motor antenna If you should set the Motor Type before Channel Search. Select one value among LNB frequency list. Set LNB Voltage Refer to the Antenna Setting of 60m. 3. LNB Voltage. Antenna Setting - If desired LNB frMotor Typeequency is operated by motor, you use Motor Antenna, which is not in the list, enter LNB Frequency value using DiSEqC 1.2. The distance between antenna and receiver is set the antenna as Motor...

User Manual
Page 84
... delete Transponder data. Note: Settings for Transponder. 1. Select Add and press the OK button to delete. 5. Select TP List Edit from the transponder list, press the OK button, select Delete, and then press the OK button to edit Transponder data. 4. Select a specific transponder from Multiple Manual Search, and press the OK or button. 2. button, default transponder list is useful when repeating Manual Search. Installation ** 3. You can select multiple transponders to add a new Transponder data. ** 3. ** ** ** ** ** 10. This function...
... delete Transponder data. Note: Settings for Transponder. 1. Select Add and press the OK button to delete. 5. Select TP List Edit from the transponder list, press the OK button, select Delete, and then press the OK button to edit Transponder data. 4. Select a specific transponder from Multiple Manual Search, and press the OK or button. 2. button, default transponder list is useful when repeating Manual Search. Installation ** 3. You can select multiple transponders to add a new Transponder data. ** 3. ** ** ** ** ** 10. This function...
User Manual
Page 86
... be tuned properly to release through Antenna system. It is not recommendable, perform the software update later. ** Caution: • Please be updated or work at the Humax website - The equipment should have normal loader software, the equipment may not work. ** Note: • The other functions of receiving signal strength is recommended that the quality of receiver cannot work after software update. 2. Software Update ** In order to release software downloading via satellite...
... be tuned properly to release through Antenna system. It is not recommendable, perform the software update later. ** Caution: • Please be updated or work at the Humax website - The equipment should have normal loader software, the equipment may not work. ** Note: • The other functions of receiving signal strength is recommended that the quality of receiver cannot work after software update. 2. Software Update ** In order to release software downloading via satellite...

User Manual
Page 87
...completing the software update, the equipment is automatically powered off and on again. 2. Enter Password using the button, and press the OK ** or button. ** 3. Select Update using the NUMERICAL (0~9) button. 4. Automatically search for new software. 2. Starts downloading new software. Press the MENU button. 2. Select No and press the OK button to return to start updating. Select Yes and press the OK software. ** ** ** ** ** ** ** 1. If updating software from Update screen using the OK or button. Select Installation using the button, and...
...completing the software update, the equipment is automatically powered off and on again. 2. Enter Password using the button, and press the OK ** or button. ** 3. Select Update using the NUMERICAL (0~9) button. 4. Automatically search for new software. 2. Starts downloading new software. Press the MENU button. 2. Select No and press the OK button to return to start updating. Select Yes and press the OK software. ** ** ** ** ** ** ** 1. If updating software from Update screen using the OK or button. Select Installation using the button, and...

User Manual
Page 89
...When completing the software update, the receiver is provided. 3. Satellite Alternative menu. button to start with Antenna Setting. 2. Select Yes and press the OK button to search 7. Select Manual Update from Update screen using the button, and press the OK or button. Select Symbol Rate value. Refer to Manual Search. ** 6. Enter Transponder Frequency in the List, select User Define and enter manually. 5. Antenna Setting - Manual Update You can also complete Game Update. ** GB 89 ** ** ** ** ** ** ** Select FEC value. Select Search and press the...
...When completing the software update, the receiver is provided. 3. Satellite Alternative menu. button to start with Antenna Setting. 2. Select Yes and press the OK button to search 7. Select Manual Update from Update screen using the button, and press the OK or button. Select Symbol Rate value. Refer to Manual Search. ** 6. Enter Transponder Frequency in the List, select User Define and enter manually. 5. Antenna Setting - Manual Update You can also complete Game Update. ** GB 89 ** ** ** ** ** ** ** Select FEC value. Select Search and press the...
User Manual
Page 94
... the following trouble shooting, please contact your local service, please make sure following instructions. Install the antenna in Operation Mode. - Use 75 coaxial cable to change the Sound Track type. ** GB 94 ** ** ** ** ** ** ** Make sure the receiving level, and adjust antenna if the level is firmly connected to the equipment. - Make sure that the receiver is weaken by weather. Check the channel is displayed on air. 3. No message is on the front panel or receiver has no...
... the following trouble shooting, please contact your local service, please make sure following instructions. Install the antenna in Operation Mode. - Use 75 coaxial cable to change the Sound Track type. ** GB 94 ** ** ** ** ** ** ** Make sure the receiving level, and adjust antenna if the level is firmly connected to the equipment. - Make sure that the receiver is weaken by weather. Check the channel is displayed on air. 3. No message is on the front panel or receiver has no...
User Manual
Page 101
... The Air) Means that software downloads where the manufacturer reserves the right to decide when and where to support trick-play back programmes directly using the embedded hard disk drive(s). ** RF (Radio Frequency) Frequencies occupied by radio waves of the total frequency range of electromagnetic waves. ** SCART ** A 21-pin connector used for digital audio output. Also called PIP. ** PVR (Personal Video Recorder) Video recorder that can display another small screen within the main screen. In...
... The Air) Means that software downloads where the manufacturer reserves the right to decide when and where to support trick-play back programmes directly using the embedded hard disk drive(s). ** RF (Radio Frequency) Frequencies occupied by radio waves of the total frequency range of electromagnetic waves. ** SCART ** A 21-pin connector used for digital audio output. Also called PIP. ** PVR (Personal Video Recorder) Video recorder that can display another small screen within the main screen. In...


