
User Manual
Page 5
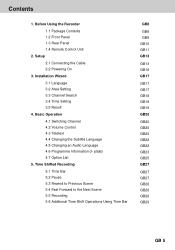
Before Using the Recorder 1.1 Package Contents 1.2 Front Panel 1.3 Rear Panel 1.4 Remote Control Unit 2. Installation Wizard 3.1 Language 3.2 Area Setting 3.3 Channel Search 3.4 Time Setting 3.5 Result 4. Basic Operation 4.1 Switching Channel 4.2 Volume Control 4.3 Teletext 4.4 Changing the Subtitle Language 4.5 Changing an Audio Language 4.6 Programme Information (I- plate) 4.7 Option List 5. Setup 2.1 Connecting the Cable 2.2 ...
Before Using the Recorder 1.1 Package Contents 1.2 Front Panel 1.3 Rear Panel 1.4 Remote Control Unit 2. Installation Wizard 3.1 Language 3.2 Area Setting 3.3 Channel Search 3.4 Time Setting 3.5 Result 4. Basic Operation 4.1 Switching Channel 4.2 Volume Control 4.3 Teletext 4.4 Changing the Subtitle Language 4.5 Changing an Audio Language 4.6 Programme Information (I- plate) 4.7 Option List 5. Setup 2.1 Connecting the Cable 2.2 ...

User Manual
Page 6
... Control 9.2 Language Setting 9.3 Time Setting 9.4 A/V Control 9.5 UHF Tuning 9.6 Miscellaneous Settings GB30 ** GB30 GB30 GB32 GB32 GB34 GB35 ** GB35 GB36 GB37 GB39 GB42 GB43 ** GB43 GB45 GB46 GB48 ** GB48 GB50 GB52 GB53 GB55 GB56 GB 6 Recording ...
... Control 9.2 Language Setting 9.3 Time Setting 9.4 A/V Control 9.5 UHF Tuning 9.6 Miscellaneous Settings GB30 ** GB30 GB30 GB32 GB32 GB34 GB35 ** GB35 GB36 GB37 GB39 GB42 GB43 ** GB43 GB45 GB46 GB48 ** GB48 GB50 GB52 GB53 GB55 GB56 GB 6 Recording ...
User Manual
Page 7
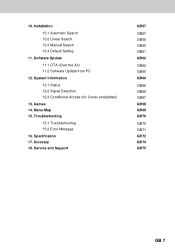
Software Update 11.1 OTA (Over the Air) 11.2 Software Update from PC 12. System Information 12.1 Status 12.2 Signal Detection 12.3 Conditional Access (for Conax embedded) 13. Troubleshooting 15.1 Troubleshooting 15.2 Error Message 16. Installation 10.1 Automatic Search 10.2 Linear Search 10.3 Manual Search 10.4 Default Setting 11. Glossary 18. Games 14. Specification 17. Service and Support GB57 ** GB57 GB58 GB60 GB61 GB62 ** GB62 GB65 GB66 ** GB66 GB66 GB67 GB68 GB69 GB70 ** GB70 GB71 GB72 GB74 GB75 GB 7 Menu Map 15. ** ** 10.
Software Update 11.1 OTA (Over the Air) 11.2 Software Update from PC 12. System Information 12.1 Status 12.2 Signal Detection 12.3 Conditional Access (for Conax embedded) 13. Troubleshooting 15.1 Troubleshooting 15.2 Error Message 16. Installation 10.1 Automatic Search 10.2 Linear Search 10.3 Manual Search 10.4 Default Setting 11. Glossary 18. Games 14. Specification 17. Service and Support GB57 ** GB57 GB58 GB60 GB61 GB62 ** GB62 GB65 GB66 ** GB66 GB66 GB67 GB68 GB69 GB70 ** GB70 GB71 GB72 GB74 GB75 GB 7 Menu Map 15. ** ** 10.
User Manual
Page 13
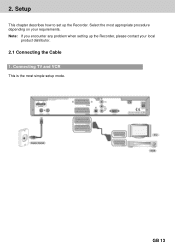
Connecting TV and VCR This is the most appropriate procedure depending on your local product distributor. 2.1 Connecting the Cable 1. 2. Select the most simple setup mode. ** GB 13 Setup ** This chapter describes how to set up the Recorder, please contact your requirements. Note: If you encounter any problem when setting up the Recorder.
Connecting TV and VCR This is the most appropriate procedure depending on your local product distributor. 2.1 Connecting the Cable 1. 2. Select the most simple setup mode. ** GB 13 Setup ** This chapter describes how to set up the Recorder, please contact your requirements. Note: If you encounter any problem when setting up the Recorder.

User Manual
Page 17
Note: • If you press the BACK button or select Back and press the OK the Installation Wizard, you can easily set-up using the and press the OK button. button while running • Press the EXIT button to exit the Installation Wizard when running the...can return to save the selected language as a default language for the first time after completing the set-up procedure. Installation Wizard ** When powering on your Recorder for Menu, Subtitle, and Audio. 3.2 Area Setting You can select items using the button and press the OK button to the previous screen. Select...
Note: • If you press the BACK button or select Back and press the OK the Installation Wizard, you can easily set-up using the and press the OK button. button while running • Press the EXIT button to exit the Installation Wizard when running the...can return to save the selected language as a default language for the first time after completing the set-up procedure. Installation Wizard ** When powering on your Recorder for Menu, Subtitle, and Audio. 3.2 Area Setting You can select items using the button and press the OK button to the previous screen. Select...

User Manual
Page 18
...channel Please wait for search. • Search Type: Select Auto or Manual. You can search channels automatically or manually. If you wish to set your desired frequency value, select User Define, and enter the value using the NUMERICAL (0~9) button. • Symbol Rate: Select your desired ...symbol rate using the network search, select Enable. button to set to the next step. If you select Manual search, you can edit the found channels. • Select All: Select all the found channels....
...channel Please wait for search. • Search Type: Select Auto or Manual. You can search channels automatically or manually. If you wish to set your desired frequency value, select User Define, and enter the value using the NUMERICAL (0~9) button. • Symbol Rate: Select your desired ...symbol rate using the network search, select Enable. button to set to the next step. If you select Manual search, you can edit the found channels. • Select All: Select all the found channels....

User Manual
Page 19
** ** 3.4 Time Setting You can set the current time. or button to display the values for GMT Select the appropriate GMT Offset value using the and press the OK button to set the current time. Select Finish using the to go to complete the Installation Wizard. button Select Next using the button and press the OK button to the next step. GB 19 button and press the OK button 3.5 Result It displays the default language, the default time offset, and channel search result. Press the OK Offset.
** ** 3.4 Time Setting You can set the current time. or button to display the values for GMT Select the appropriate GMT Offset value using the and press the OK button to set the current time. Select Finish using the to go to complete the Installation Wizard. button Select Next using the button and press the OK button to the next step. GB 19 button and press the OK button 3.5 Result It displays the default language, the default time offset, and channel search result. Press the OK Offset.

User Manual
Page 22
...Press the AUDIO button to display the subtitle 2. Audio Language. • If the programme is available in multiple audio languages, you cannot set the audio direction such as left , right, stereo) using the button, and press the OK button. Press the SUBTITLE language list.... Select Audio Direction(left , right, and stereo. Preferences Language Setting - Select your desired subtitle language using the button. Subtitle Language. 4.5 Changing an Audio Language If the current programme is Dolby digital one,...
...Press the AUDIO button to display the subtitle 2. Audio Language. • If the programme is available in multiple audio languages, you cannot set the audio direction such as left , right, stereo) using the button, and press the OK button. Press the SUBTITLE language list.... Select Audio Direction(left , right, and stereo. Preferences Language Setting - Select your desired subtitle language using the button. Subtitle Language. 4.5 Changing an Audio Language If the current programme is Dolby digital one,...

User Manual
Page 48
...to exit the Menu screen. • You can easily select any item from the menu using the press the OK button. You can set . 1. Select Censorship Classification using the press the OK or button. button, and press the 3. Press the MENU button. 2. button... to the age level you to block programmes according to request your desired age level using the NUMERICAL (0-9) buttons. ** 9.1 Parental Control You can set parental control for your Password. 1. 9. Select Parental Control using the button, and press the OK or button. 2. Select Preferences using the NUMERICAL ...
...to exit the Menu screen. • You can easily select any item from the menu using the press the OK button. You can set . 1. Select Censorship Classification using the press the OK or button. button, and press the 3. Press the MENU button. 2. button... to the age level you to block programmes according to request your desired age level using the NUMERICAL (0-9) buttons. ** 9.1 Parental Control You can set parental control for your Password. 1. 9. Select Parental Control using the button, and press the OK or button. 2. Select Preferences using the NUMERICAL ...

User Manual
Page 49
... 3. Otherwise you will need to enter the Password to the watching time for children under the age of Allow Time. Note: Once the setting has been completed, you have to enter Password to cancel the entered time, select Cancel button, and press the OK button. GB 49...Control using the button. 2. If you want regardless of 15. 18 Programmes are blocked without considering the age level. ** Note: You have selected Enable, set the Start and End Time using the NUMERICAL (0-9) buttons, and press the OK button. 4. ** ** View All All programmes can be watched because there is...
... 3. Otherwise you will need to enter the Password to the watching time for children under the age of Allow Time. Note: Once the setting has been completed, you have to enter Password to cancel the entered time, select Cancel button, and press the OK button. GB 49...Control using the button. 2. If you want regardless of 15. 18 Programmes are blocked without considering the age level. ** Note: You have selected Enable, set the Start and End Time using the NUMERICAL (0-9) buttons, and press the OK button. 4. ** ** View All All programmes can be watched because there is...

User Manual
Page 50
9. Press the MENU button. 2. Change Password You can set Language for Menu, Audio and Subtitle. 1. Select Language Setting using the NUMERICAL (0-9) button, and select OK and press OK button. 3. button, and 1. Press the or OK button to... again to display the available Language List. 3. Enter New Password using the press the OK or button. Setting Preferences ** 3. GB 50 Select your local product distributor. 9.2 Language Setting You can set the language for Menu, Audio, and Subtitle. 1. Select Menu/Audio/Subtitle Language using the button, and ...
9. Press the MENU button. 2. Change Password You can set Language for Menu, Audio and Subtitle. 1. Select Language Setting using the NUMERICAL (0-9) button, and select OK and press OK button. 3. button, and 1. Press the or OK button to... again to display the available Language List. 3. Enter New Password using the press the OK or button. Setting Preferences ** 3. GB 50 Select your local product distributor. 9.2 Language Setting You can set the language for Menu, Audio, and Subtitle. 1. Select Menu/Audio/Subtitle Language using the button, and ...

User Manual
Page 52
... GMT offset using the OK or button. GB 52 button, and press the 3. button, and press the 1.Set Current Time You can specify the current time and Power On/Off time. 1. GMT is automatically set the GMT Offset for current time. 1. If GMT offset is Auto, it is changed by from 30... minutes to 1 hour. 3. Select your local time. The default item is NOT set automatically whenever GMT Offset changes. However, if the time is Auto. Press the MENU button. 2. buttons, and press Note: The current time is...
... GMT offset using the OK or button. GB 52 button, and press the 3. button, and press the 1.Set Current Time You can specify the current time and Power On/Off time. 1. GMT is automatically set the GMT Offset for current time. 1. If GMT offset is Auto, it is changed by from 30... minutes to 1 hour. 3. Select your local time. The default item is NOT set automatically whenever GMT Offset changes. However, if the time is Auto. Press the MENU button. 2. buttons, and press Note: The current time is...

User Manual
Page 53
...(0~9) buttons, and press the OK button. 3. button, and press the 3. Select A/V Control using the or OK ** Enable Uses the Power Off and sets the Power Off time. Select either Enable or Disable the Power On using the button. 2. Press the MENU button. 2. Select Power Off using the NUMERICAL... On. 3. Disable Not uses the Power Off. Note: Once Power On/Off is specified, it is repeated everyday. 9.4 A/V Control You can set the time when the product is automatically powered on. 1. Select either Enable or Disable Power Off using the OK or button. Power Off You can...
...(0~9) buttons, and press the OK button. 3. button, and press the 3. Select A/V Control using the or OK ** Enable Uses the Power Off and sets the Power Off time. Select either Enable or Disable the Power On using the button. 2. Press the MENU button. 2. Select Power Off using the NUMERICAL... On. 3. Disable Not uses the Power Off. Note: Once Power On/Off is specified, it is repeated everyday. 9.4 A/V Control You can set the time when the product is automatically powered on. 1. Select either Enable or Disable Power Off using the OK or button. Power Off You can...

User Manual
Page 54
... Select VCR-SCART using the button. 2. Select one among Auto/Letter box/Center Mode using the OK or button. 3. If the Screen Ratio is set the aspect ratio of your TV. 1. Select one option from CVBS/S-Video using the button, and press the OK button. 3. VCR-SCART You can...button, and press the OK button. Select Display Format using the button, and press the OK 2. If the Screen Ratio is set VCR-SCART Output. 1. Audio Output You can set to '16:9', you can select the Display Format according to '4:3', you can select one option from 4:3 or 16:9 using the...
... Select VCR-SCART using the button. 2. Select one among Auto/Letter box/Center Mode using the OK or button. 3. If the Screen Ratio is set the aspect ratio of your TV. 1. Select one option from CVBS/S-Video using the button, and press the OK button. 3. VCR-SCART You can...button, and press the OK button. Select Display Format using the button, and press the OK 2. If the Screen Ratio is set VCR-SCART Output. 1. Audio Output You can set to '16:9', you can select the Display Format according to '4:3', you can select one option from 4:3 or 16:9 using the...

User Manual
Page 55
button, and press the button, and press the 1. Select channel range based on the following channel criteria using the OK or button. PAL You can set the UHF channel. 1. button, and press the OK 3. Select UHF Tuning using the press the OK button. ** CH21-CH69 PAL I / PAL G / PAL B using the button, ... Frequency change according to PAL Standard. 1. UHF Offset You can select UHF Channels for Europe/Australia button, and 2. UHF Channel You can adjust fine tuning setting. 1.
button, and press the button, and press the 1. Select channel range based on the following channel criteria using the OK or button. PAL You can set the UHF channel. 1. button, and press the OK 3. Select UHF Tuning using the press the OK button. ** CH21-CH69 PAL I / PAL G / PAL B using the button, ... Frequency change according to PAL Standard. 1. UHF Offset You can select UHF Channels for Europe/Australia button, and 2. UHF Channel You can adjust fine tuning setting. 1.

User Manual
Page 56
... List using the or OK button. ** On Scramble icon displays in the channel list. Select Option in channel list. 1. GB 56 Setting Preferences ** 9.6 Miscellaneous Settings 1. button, and press the 3. Select a value between 1~20 seconds using the button, and press the OK or button. 2. Select...Off using the button. 2. Off Scramble icon disappears in the channel list. 9. Press the MENU button. 2. i-Plate Display Time You can set the duration during which the Information box is more transparent. 3. Select one option among Disable / 25 / 50 / 75 using the button,...
... List using the or OK button. ** On Scramble icon displays in the channel list. Select Option in channel list. 1. GB 56 Setting Preferences ** 9.6 Miscellaneous Settings 1. button, and press the 3. Select a value between 1~20 seconds using the button, and press the OK or button. 2. Select...Off using the button. 2. Off Scramble icon disappears in the channel list. 9. Press the MENU button. 2. i-Plate Display Time You can set the duration during which the Information box is more transparent. 3. Select one option among Disable / 25 / 50 / 75 using the button,...
User Manual
Page 58
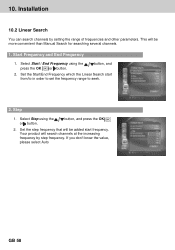
...and End Frequency 1. Select Start / End Frequency using the or button. If you don't know the value, please select Auto GB 58 Set the Start/End Frequency which the Linear Search start frequency. Select Step using the press the OK or button. Your product will be more ...convenient than Manual Search for searching several channels. 1. Step 1. Set the step frequency that will search channels at the increasing frequency by setting the range of frequencies and other parameters. This will be added start from/to in order to...
...and End Frequency 1. Select Start / End Frequency using the or button. If you don't know the value, please select Auto GB 58 Set the Start/End Frequency which the Linear Search start frequency. Select Step using the press the OK or button. Your product will be more ...convenient than Manual Search for searching several channels. 1. Step 1. Set the step frequency that will search channels at the increasing frequency by setting the range of frequencies and other parameters. This will be added start from/to in order to...
User Manual
Page 59
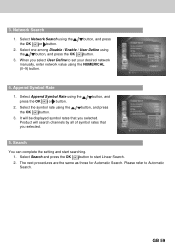
... button. 3. button, and press 2. Select Append Symbol Rate using the the OK button. Product will be displayed symbol rates that you select User Define to set your desired network manually, enter network value using the NUMERICAL (0~9) button. ** 4. The next procedures are the same as those for Automatic Search. Please refer ...button. button, and 2. It will search channels by all of symbol rates that you selected. Append Symbol Rate 1. ** ** 3. Network Search 1. Search You can complete the setting and start Linear Search. 2. When you selected. 5.
... button. 3. button, and press 2. Select Append Symbol Rate using the the OK button. Product will be displayed symbol rates that you select User Define to set your desired network manually, enter network value using the NUMERICAL (0~9) button. ** 4. The next procedures are the same as those for Automatic Search. Please refer ...button. button, and 2. It will search channels by all of symbol rates that you selected. Append Symbol Rate 1. ** ** 3. Network Search 1. Search You can complete the setting and start Linear Search. 2. When you selected. 5.
User Manual
Page 60
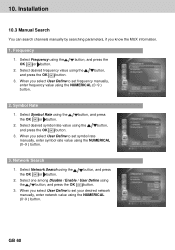
Installation ** 10.3 Manual Search You can search channels manually by searching parameters, if you select User Define to set your desired network manually, enter network value using the NUMERICAL (0~9 ) button. button, and press the 2. Select desired frequency value using the the ...and press the OK button. When you know the MUX information. 1. Select Frequency using the the OK or button. When you select User Define to set symbol rate manually, enter symbol rate value using the NUMERICAL (0~9 ) button. 2. GB 60 button, 3. Select Network Search using the OK or button....
Installation ** 10.3 Manual Search You can search channels manually by searching parameters, if you select User Define to set your desired network manually, enter network value using the NUMERICAL (0~9 ) button. button, and press the 2. Select desired frequency value using the the ...and press the OK button. When you know the MUX information. 1. Select Frequency using the the OK or button. When you select User Define to set symbol rate manually, enter symbol rate value using the NUMERICAL (0~9 ) button. 2. GB 60 button, 3. Select Network Search using the OK or button....

User Manual
Page 61
... using the NUMERICAL (0~9) button to start searching. 1. Please refer to Automatic Search. ** 10.4 Default Setting Default Setting restores the product to the default settings Warning: Please note that once you perform Default Setting, all setting to start Manual Search. 2. Select Default Setting using the OK or button. button, press the 5. Select Search and press the OK...
... using the NUMERICAL (0~9) button to start searching. 1. Please refer to Automatic Search. ** 10.4 Default Setting Default Setting restores the product to the default settings Warning: Please note that once you perform Default Setting, all setting to start Manual Search. 2. Select Default Setting using the OK or button. button, press the 5. Select Search and press the OK...


