
User Manual
Page 2
... provided instructions. Notice ** Read this manual carefully and make the user aware of possible problems and information of any importance to help the user to understand, to use and to the following marks that presents a risk of electric shock, do not remove cover (or back). Warnings, Cautions and Notes Throughout the whole manual, pay special attention to maintain the installation. ** ** To...
... provided instructions. Notice ** Read this manual carefully and make the user aware of possible problems and information of any importance to help the user to understand, to use and to the following marks that presents a risk of electric shock, do not remove cover (or back). Warnings, Cautions and Notes Throughout the whole manual, pay special attention to maintain the installation. ** ** To...

User Manual
Page 3
... Warning ** This Personal Video Recorder has been manufactured to dust the product. ** 5. Use a light damp cloth (no objects filled with international safety standards. Do not stand the product on the marking label. Do not stack electronic equipment on top of power source indicated on soft furnishings or carpets. CONNECTION TO THE CABLE TV SIGNAL AND TV ** Connect all components before cleaning.
... Warning ** This Personal Video Recorder has been manufactured to dust the product. ** 5. Use a light damp cloth (no objects filled with international safety standards. Do not stand the product on the marking label. Do not stack electronic equipment on top of power source indicated on soft furnishings or carpets. CONNECTION TO THE CABLE TV SIGNAL AND TV ** Connect all components before cleaning.
User Manual
Page 5
plate) 4.7 Option List 5. Installation Wizard 3.1 Language 3.2 Area Setting 3.3 Channel Search 3.4 Time Setting 3.5 Result 4. Setup 2.1 Connecting the Cable 2.2 Powering On 3. Time Shifted Recording 5.1 Time Bar 5.2 Pause 5.3 Rewind to Previous Scene 5.4 Fast Forward to the Next Scene 5.5 Recording 5.6 Additional Time Shift Operations Using Time Bar GB8 ** GB8 GB9 GB10 GB11 GB13 ** GB13 GB16 GB17 ** GB17 GB17 GB18 GB19 GB19 GB20 ** GB20 GB20 GB20 GB22 GB22 GB23 GB25 GB27 ** GB27 ...
plate) 4.7 Option List 5. Installation Wizard 3.1 Language 3.2 Area Setting 3.3 Channel Search 3.4 Time Setting 3.5 Result 4. Setup 2.1 Connecting the Cable 2.2 Powering On 3. Time Shifted Recording 5.1 Time Bar 5.2 Pause 5.3 Rewind to Previous Scene 5.4 Fast Forward to the Next Scene 5.5 Recording 5.6 Additional Time Shift Operations Using Time Bar GB8 ** GB8 GB9 GB10 GB11 GB13 ** GB13 GB16 GB17 ** GB17 GB17 GB18 GB19 GB19 GB20 ** GB20 GB20 GB20 GB22 GB22 GB23 GB25 GB27 ** GB27 ...
User Manual
Page 8
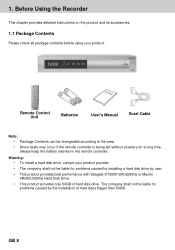
... install a hard disk drive, contact your product. ** ** Remote Control Unit ** ** ** Batteries User's Manual Scart Cable ** ** Note: • Package Contents can be liable for problems caused by user. • This product provides best performance with Seagate ST380012ACE(80G) or Maxtor 4R080L0(80G) Hard Disk Drive. • This product provides only 80GB of hard discs bigger than 80GB. GB 8 Before Using the Recorder ** This chapter provides detailed instructions...
... install a hard disk drive, contact your product. ** ** Remote Control Unit ** ** ** Batteries User's Manual Scart Cable ** ** Note: • Package Contents can be liable for problems caused by user. • This product provides best performance with Seagate ST380012ACE(80G) or Maxtor 4R080L0(80G) Hard Disk Drive. • This product provides only 80GB of hard discs bigger than 80GB. GB 8 Before Using the Recorder ** This chapter provides detailed instructions...

User Manual
Page 10
...on /off. ** GB 10 ON/OFF ** Power on the Recorder. ** 2. VCR SCART ** Connects a VCR SCART cable. ** 5. TV SCART ** Connects a TV SCART cable. ** 4. 1. VIDEO ** Connects to RF(ANT) input jack on your TV or VCR and output Video signals. ** 7. TV/VCR ** Connects a RF signal from your recorder to your TV or VCR. ** 3. AUDIO L/R ** Connects to your PC to your TV or VCR and output Audio signals. ** 8. RS-232C ** Connects to upgrade product's software programme. ** 9. S/PDIF ** Outputs the digital audio signals. ** 6. Before Using the Recorder ** 1.3 Rear Panel ** ** 1.
...on /off. ** GB 10 ON/OFF ** Power on the Recorder. ** 2. VCR SCART ** Connects a VCR SCART cable. ** 5. TV SCART ** Connects a TV SCART cable. ** 4. 1. VIDEO ** Connects to RF(ANT) input jack on your TV or VCR and output Video signals. ** 7. TV/VCR ** Connects a RF signal from your recorder to your TV or VCR. ** 3. AUDIO L/R ** Connects to your PC to your TV or VCR and output Audio signals. ** 8. RS-232C ** Connects to upgrade product's software programme. ** 9. S/PDIF ** Outputs the digital audio signals. ** 6. Before Using the Recorder ** 1.3 Rear Panel ** ** 1.

User Manual
Page 12
...+ ** Changes the Channel or Page. ** 10. EXIT ** Exits the main menu or Guide screen. ** 15. SOURCE ** Selects the input source between TV and Radio modes. ** 3. BACK ** Returns to the up, down, left or right menu option. ** 7. PLAYBACK CONTROL BUTTONS ** Includes fast rewind, play, fast forward, record, stop, pause buttons. ** 12. i (INFORMATION) ** Displays the information about the channel and programme. ** 20. OK ** Selects a menu, or confirms the selected operation. MUTE ** Pauses the audio temporarily. LIST ** Displays...
...+ ** Changes the Channel or Page. ** 10. EXIT ** Exits the main menu or Guide screen. ** 15. SOURCE ** Selects the input source between TV and Radio modes. ** 3. BACK ** Returns to the up, down, left or right menu option. ** 7. PLAYBACK CONTROL BUTTONS ** Includes fast rewind, play, fast forward, record, stop, pause buttons. ** 12. i (INFORMATION) ** Displays the information about the channel and programme. ** 20. OK ** Selects a menu, or confirms the selected operation. MUTE ** Pauses the audio temporarily. LIST ** Displays...

User Manual
Page 16
Setup ** 2.2 Powering On 1. Turn on the power switch, located at the left on the back of the Recorder. ** button at the front of the recorder. Power on Red. ** ** 3. 2. Connect the power cord of the recorder to a wall outlet. 2. Make sure that the Standby LED indicator is turned on by pressing the STANDBY button at Remote Controller or the STANDBY GB 16
Setup ** 2.2 Powering On 1. Turn on the power switch, located at the left on the back of the Recorder. ** button at the front of the recorder. Power on Red. ** ** 3. 2. Connect the power cord of the recorder to a wall outlet. 2. Make sure that the Standby LED indicator is turned on by pressing the STANDBY button at Remote Controller or the STANDBY GB 16

User Manual
Page 18
.... 3. Installation Wizard ** 3.3 Channel Search You can also disable the network search by selecting Disable. When entering the Network ID, select User Define. button to the next step. If you select Manual search, you want to set parameters for finishing the Channel Search. You can search channels automatically or manually. If Manual is selected, the following options will be activated. • Frequency: The default value is not listed, then select User Define, and enter the value using the NUMERICAL (0~9) button...
.... 3. Installation Wizard ** 3.3 Channel Search You can also disable the network search by selecting Disable. When entering the Network ID, select User Define. button to the next step. If you select Manual search, you want to set parameters for finishing the Channel Search. You can search channels automatically or manually. If Manual is selected, the following options will be activated. • Frequency: The default value is not listed, then select User Define, and enter the value using the NUMERICAL (0~9) button...

User Manual
Page 20
... the OK button. Note: You can switch the current channel using the Channel List or Programme Guide. Using Teletext Menu 1. Basic Operation ** This chapter describes functions such as switching channel, volume control, and basic features for more information. 4.2 Volume Control 1. Press the TV/RADIO button to display teletext menu in 2. button to switch between TV channel and Radio channel. Press the V-/V+ 2. To enter Teletext mode, press the SUBTITLE button to Chapter 7 and 8 for watching programmes. 4.1 Switching Channel You can switch channel using one...
... the OK button. Note: You can switch the current channel using the Channel List or Programme Guide. Using Teletext Menu 1. Basic Operation ** This chapter describes functions such as switching channel, volume control, and basic features for more information. 4.2 Volume Control 1. Press the TV/RADIO button to display teletext menu in 2. button to switch between TV channel and Radio channel. Press the V-/V+ 2. To enter Teletext mode, press the SUBTITLE button to Chapter 7 and 8 for watching programmes. 4.1 Switching Channel You can switch channel using one...

User Manual
Page 28
... any time. For more information about recording, refer to watch the scene passed by some previous operations such as pause, slow motion, and rewind. You can use the fast forward operation only when there is played at normal speed. If the watching point reaches to the current broadcasting point. Time Shifted Recording ** 5.3 Rewind to Previous Scene Press the REWIND button on the remote controller to start...
... any time. For more information about recording, refer to watch the scene passed by some previous operations such as pause, slow motion, and rewind. You can use the fast forward operation only when there is played at normal speed. If the watching point reaches to the current broadcasting point. Time Shifted Recording ** 5.3 Rewind to Previous Scene Press the REWIND button on the remote controller to start...

User Manual
Page 30
... recording of hard disk space. button to add a 5. Enter Recording Start Time using the or button. GB 30 Recording Schedule and Guide. Select Recording Schedule using Guide, refer to stop . button, and 3. Press the STOP button to Chapter 8 . 1. Select Record using the NUMERICAL (0~9) buttons. button to 1. Enter Channel Number using Menu - Note: • You cannot change channels during the recording operation. • Ensure that there is insufficient, recording will stop recording. Select a blank list and press the OK new recording reservation. Adding Recording...
... recording of hard disk space. button to add a 5. Enter Recording Start Time using the or button. GB 30 Recording Schedule and Guide. Select Recording Schedule using Guide, refer to stop . button, and 3. Press the STOP button to Chapter 8 . 1. Select Record using the NUMERICAL (0~9) buttons. button to 1. Enter Channel Number using Menu - Note: • You cannot change channels during the recording operation. • Ensure that there is insufficient, recording will stop recording. Select a blank list and press the OK new recording reservation. Adding Recording...

User Manual
Page 32
... edit the information of the time bar while you are watching a programme. 1. GB 32 Record - Otherwise, you can view the programme list recorded by instant recording or recording reservation by selecting Menu - Select Record using the Playback control buttons on the remote controller or the additional buttons on the recorded programme. button, and press the OK 3. Press the STOP button to display the record programme list. 4. You can easily view the recorded programme list using the button, and...
... edit the information of the time bar while you are watching a programme. 1. GB 32 Record - Otherwise, you can view the programme list recorded by instant recording or recording reservation by selecting Menu - Select Record using the Playback control buttons on the remote controller or the additional buttons on the recorded programme. button, and press the OK 3. Press the STOP button to display the record programme list. 4. You can easily view the recorded programme list using the button, and...

User Manual
Page 40
... using . 2. GB 40 Add/Remove favourite channels You can switch between TV and Radio channel list using the button, and press the OK button. 5. Move favourite channels You can move within the Favourite channel list. 1. Move the cursor to a specific Favourite channel list or remove the added favourite channel(s) from the list. 1. Note: You can add favourite channel(s) to your desired location within the Favourite channel list and press the OK button. 3. Channel List ** 1. Select your desired channel...
... using . 2. GB 40 Add/Remove favourite channels You can switch between TV and Radio channel list using the button, and press the OK button. 5. Move favourite channels You can move within the Favourite channel list. 1. Move the cursor to a specific Favourite channel list or remove the added favourite channel(s) from the list. 1. Note: You can add favourite channel(s) to your desired location within the Favourite channel list and press the OK button. 3. Channel List ** 1. Select your desired channel...

User Manual
Page 44
... press the OK programme. 8. Note: Guide provides programme information from the previous day to the next programme or 30 minutes after . 5. Enter your desired amount of time. Press the Green button to one day after . If the channel is displayed on the reserved programme. 3. When a reservation has been completed, the icon is locked, parental controlled or restricted by selecting the scheduled...
... press the OK programme. 8. Note: Guide provides programme information from the previous day to the next programme or 30 minutes after . 5. Enter your desired amount of time. Press the Green button to one day after . If the channel is displayed on the reserved programme. 3. When a reservation has been completed, the icon is locked, parental controlled or restricted by selecting the scheduled...

User Manual
Page 62
... keep the power on and the power cord plugged in during software update, it may cause fatal damage to maintain proper performance of software versions may not work at the Humax website http://www.humaxdigital.com. If the power is recommended that you periodically check for the availability of software upgrades. 11.1 OTA (Over the Air) OTA, an abbreviation of "over the cable...
... keep the power on and the power cord plugged in during software update, it may cause fatal damage to maintain proper performance of software versions may not work at the Humax website http://www.humaxdigital.com. If the power is recommended that you periodically check for the availability of software upgrades. 11.1 OTA (Over the Air) OTA, an abbreviation of "over the cable...

User Manual
Page 63
... finish Search. 7. A message will be displayed to start upgrading. When completing the software update, the equipment is not found when powering on again. 2. Select Automatic Update using the OK or button. Starts downloading new software. button, and 5. Select Yes and press the OK button to notify that new software is found . 2. Press the MENU button. 2. Select Installation using the press the OK or button. Select Yes and press the OK button to the previous screen. If a new...
... finish Search. 7. A message will be displayed to start upgrading. When completing the software update, the equipment is not found when powering on again. 2. Select Automatic Update using the OK or button. Starts downloading new software. button, and 5. Select Yes and press the OK button to notify that new software is found . 2. Press the MENU button. 2. Select Installation using the press the OK or button. Select Yes and press the OK button to the previous screen. If a new...

User Manual
Page 64
Manual Update You can enter the specific value by selecting User Define Note: How to setting parameters in Manual Search. It is automatically powered off and on again. When completing the software update, the product is displayed whether or not New Software exist. Press the MENU button. 2. Enter Password using the the OK or button. Select Manual Update using the NUMERICAL (0~9) buttons. 4. Performs Software Update. Select Search and press the OK software. Please wait until it is the same...
Manual Update You can enter the specific value by selecting User Define Note: How to setting parameters in Manual Search. It is automatically powered off and on again. When completing the software update, the product is displayed whether or not New Software exist. Press the MENU button. 2. Enter Password using the the OK or button. Select Manual Update using the NUMERICAL (0~9) buttons. 4. Performs Software Update. Select Search and press the OK software. Please wait until it is the same...

User Manual
Page 67
... displays information about Conax CA - software version, interface version, card number, number of Conax channels in this menu, there will be no action even after selecting. ** 2. Subscription Status This shows the authorised list of session, language, and conditional access system identification. To watch the Conax scrambled channel. GB 67 Note: The supported functions vary depending on CAS version. When the cursor is located in the smart card. 3. Change...
... displays information about Conax CA - software version, interface version, card number, number of Conax channels in this menu, there will be no action even after selecting. ** 2. Subscription Status This shows the authorised list of session, language, and conditional access system identification. To watch the Conax scrambled channel. GB 67 Note: The supported functions vary depending on CAS version. When the cursor is located in the smart card. 3. Change...

User Manual
Page 70
... following troubleshooting, please contact your local service, please read the following instructions. Make sure that it is not overlapped with remote controller, the remote controller's emitting part should directly point towards the receiving part of product's remote controller. - No or poor sound ** - Check the battery of the TV and product. - Check the correct smart card is displayed on air. 3. GB 70 No message is plugged in . - Check the main power cable and...
... following troubleshooting, please contact your local service, please read the following instructions. Make sure that it is not overlapped with remote controller, the remote controller's emitting part should directly point towards the receiving part of product's remote controller. - No or poor sound ** - Check the battery of the TV and product. - Check the correct smart card is displayed on air. 3. GB 70 No message is plugged in . - Check the main power cable and...

User Manual
Page 74
... hertz ** FTA (Free-To-Air) An unscrambled broadcast, which you can view without changing into analog signals because conversion into analog signals can play back all the audio frequencies of the human, which is used to indicate good quality of current and scheduled programmes. It outputs audio signals directly as Personal Video Recorder allows the viewer to know on the screen directly. OSD information includes brightness, contrast, tuning, RGB adjustment...
... hertz ** FTA (Free-To-Air) An unscrambled broadcast, which you can view without changing into analog signals because conversion into analog signals can play back all the audio frequencies of the human, which is used to indicate good quality of current and scheduled programmes. It outputs audio signals directly as Personal Video Recorder allows the viewer to know on the screen directly. OSD information includes brightness, contrast, tuning, RGB adjustment...


