Manual
Page 1
For assistance, please call Customer Service at 1-800-944-9200 Mon-Fri 8am-7pm EST before returning this product to the store. Questions or concerns? All rights reserved. #960009623 ID100507-R0 IF USED COMMERCIALLY WARRANTY IS VOID. ©2009 Techtronic Floor Care Technology Limited. THIS PRODUCT IS INTENDED FOR HOUSEHOLD USE ONLY. página E1 FloorMate™ SpinScrub® Hard Floor Cleaner www.hoover.com IMPORTANT: READ CAREFULLY BEFORE ASSEMBLY AND USE. Owner's Manual Operating and Servicing Instructions Español -
For assistance, please call Customer Service at 1-800-944-9200 Mon-Fri 8am-7pm EST before returning this product to the store. Questions or concerns? All rights reserved. #960009623 ID100507-R0 IF USED COMMERCIALLY WARRANTY IS VOID. ©2009 Techtronic Floor Care Technology Limited. THIS PRODUCT IS INTENDED FOR HOUSEHOLD USE ONLY. página E1 FloorMate™ SpinScrub® Hard Floor Cleaner www.hoover.com IMPORTANT: READ CAREFULLY BEFORE ASSEMBLY AND USE. Owner's Manual Operating and Servicing Instructions Español -
Manual
Page 2
... code (Label located under cleaner) Contents Important Safeguards 3 Cleaner Assembly...5 Carton Contents 5 Attach Handle...5 Install Brushes and Nozzle 5 Unfold Handle...6 How to Fold Handle 6 How To Use...6 Cleaner Description 6 ON/OFF Switch...6 Handle Release Pedal 6 Transporting...7 Mode Selector Dial 7 The Tanks ...8 Filters...9 How To Clean...10 Recommended Cleaning Sequence 10 Cleaning Floors 10 Picking Up Spills 10 Maintenance...11 Nozzle...11 Brushes...12 Storage...12 Lubrication...12 Troubleshooting...13 Service...14 Cleaning Products...15 Warranty...16 If you need...
... code (Label located under cleaner) Contents Important Safeguards 3 Cleaner Assembly...5 Carton Contents 5 Attach Handle...5 Install Brushes and Nozzle 5 Unfold Handle...6 How to Fold Handle 6 How To Use...6 Cleaner Description 6 ON/OFF Switch...6 Handle Release Pedal 6 Transporting...7 Mode Selector Dial 7 The Tanks ...8 Filters...9 How To Clean...10 Recommended Cleaning Sequence 10 Cleaning Floors 10 Picking Up Spills 10 Maintenance...11 Nozzle...11 Brushes...12 Storage...12 Lubrication...12 Troubleshooting...13 Service...14 Cleaning Products...15 Warranty...16 If you need...
Manual
Page 3
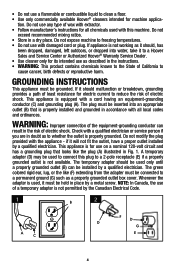
... unplug, grasp the plug, not the cord. • Never handle plug or appliance with any opening blocked; Turn off all parts of an extension cord is absolutely necessary, use . Do not immerse product. • For use of body away from electrical outlet before servicing the cleaner. • Unplug cleaner when not in place. • Use extra care when cleaning on surfaces moistened by cord, use with wet hands. • Connect to...
... unplug, grasp the plug, not the cord. • Never handle plug or appliance with any opening blocked; Turn off all parts of an extension cord is absolutely necessary, use . Do not immerse product. • For use of body away from electrical outlet before servicing the cleaner. • Unplug cleaner when not in place. • Use extra care when cleaning on surfaces moistened by cord, use with wet hands. • Connect to...
Manual
Page 4
... to a Hoover Sales and Service Center or Authorized Hoover® Warranty Service Dealer. • Use cleaner only for its intended use any type of wax with extractor. • Follow manufacturer's instructions for use with a cord having an equipment-grounding conductor (C) and grounding plug (A). If it must be installed by a qualified electrician. Do not use as a properly grounded outlet box cover. If appliance is not working as...
... to a Hoover Sales and Service Center or Authorized Hoover® Warranty Service Dealer. • Use cleaner only for its intended use any type of wax with extractor. • Follow manufacturer's instructions for use with a cord having an equipment-grounding conductor (C) and grounding plug (A). If it must be installed by a qualified electrician. Do not use as a properly grounded outlet box cover. If appliance is not working as...
Manual
Page 5
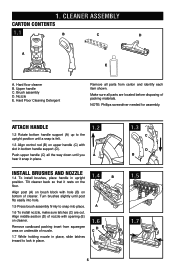
... handle C. Attach handle 1.2 Rotate bottom handle support (A) up to the upright position until a snap is felt. 1.3 Align control rod (B) on cleaner. Turn brushes slightly until you hear it rests on bottom of nozzle with opening (E) on upper handle (C) with hole (B) on the floor. Align middle section (D) of cleaner. Brush assembly D. Nozzle E. Make sure all parts are out. A 1.6 To install nozzle, make sure latches (C) are located before disposing of nozzle. 1.6 DE C 1.7 While holding nozzle...
... handle C. Attach handle 1.2 Rotate bottom handle support (A) up to the upright position until a snap is felt. 1.3 Align control rod (B) on cleaner. Turn brushes slightly until you hear it rests on bottom of nozzle with opening (E) on upper handle (C) with hole (B) on the floor. Align middle section (D) of cleaner. Brush assembly D. Nozzle E. Make sure all parts are out. A 1.6 To install nozzle, make sure latches (C) are located before disposing of nozzle. 1.6 DE C 1.7 While holding nozzle...
Manual
Page 6
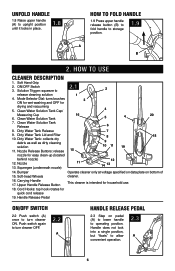
... switch 2.2 Push switch (A) once to turn cleaner OFF. 2.2 A Handle release pedal 2.3 Step on bottom of 15. Solution Trigger: squeeze to storage position. 1.9 A B 2. Mode Selector Dial: turns brushes 3 ON for wet washing and OFF for easy clean-up (located behind nozzle) 12. Clean Water Solution Tank Release 6 8. Nozzle Release Buttons: release 15 8 18 9 10 11 19 nozzle for drying and vacuuming 5. Soft-tread Wheels cleaner. 16. Cord Hooks: top hook rotates for household use. 18. Dirty Water Tank Release 7 9. Dirty Water...
... switch 2.2 Push switch (A) once to turn cleaner OFF. 2.2 A Handle release pedal 2.3 Step on bottom of 15. Solution Trigger: squeeze to storage position. 1.9 A B 2. Mode Selector Dial: turns brushes 3 ON for wet washing and OFF for easy clean-up (located behind nozzle) 12. Clean Water Solution Tank Release 6 8. Nozzle Release Buttons: release 15 8 18 9 10 11 19 nozzle for drying and vacuuming 5. Soft-tread Wheels cleaner. 16. Cord Hooks: top hook rotates for household use. 18. Dirty Water Tank Release 7 9. Dirty Water...
Manual
Page 7
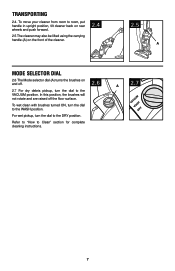
... rear wheels and push forward. 2.5 The cleaner may also be lifted using the carrying handle (A) on the front of the cleaner. 2.4 2.5 A Mode selector dial 2.6 The Mode selector dial (A) turns the brushes on and off the floor surface. In this position, the brushes will not rotate and are raised off . 2.7 For dry debris pickup, turn the dial to the VACUUM position. For wet pickup, turn...
... rear wheels and push forward. 2.5 The cleaner may also be lifted using the carrying handle (A) on the front of the cleaner. 2.4 2.5 A Mode selector dial 2.6 The Mode selector dial (A) turns the brushes on and off the floor surface. In this position, the brushes will not rotate and are raised off . 2.7 For dry debris pickup, turn the dial to the VACUUM position. For wet pickup, turn...
Manual
Page 8
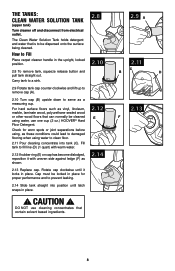
... up to remove cap (A). 2.10 Turn cap (B) upside down to clean floor. 2.11 Pour cleaning concentrate into position until it with uneven side against ledge (F) as a measuring cup. CAUTION ! DO NOT use cleaning concentrates that can normally be cleaned using water, use one cup (2 oz.) HOOVER® Hard Floor Detergent. How to Fill Place carpet cleaner handle in place for worn spots or joint separations before using water to serve...
... up to remove cap (A). 2.10 Turn cap (B) upside down to clean floor. 2.11 Pour cleaning concentrate into position until it with uneven side against ledge (F) as a measuring cup. CAUTION ! DO NOT use cleaning concentrates that can normally be cleaned using water, use one cup (2 oz.) HOOVER® Hard Floor Detergent. How to Fill Place carpet cleaner handle in place for worn spots or joint separations before using water to serve...

Manual
Page 9
... Water Tank be emptied after dry vacuuming and before wet operation. When the shut-off activates, the cleaner will not pick up debris and the sound of tank behind ledge (D) and push tank straight into the Dirty Water Tank to air dry between uses. Check the Clean Water Solution Tank also. Empty tank. 2.15 G filters The tank lid contains a washable, reusable filter. Dry or loose debris will change. Replace...
... Water Tank be emptied after dry vacuuming and before wet operation. When the shut-off activates, the cleaner will not pick up debris and the sound of tank behind ledge (D) and push tank straight into the Dirty Water Tank to air dry between uses. Check the Clean Water Solution Tank also. Empty tank. 2.15 G filters The tank lid contains a washable, reusable filter. Dry or loose debris will change. Replace...
Manual
Page 10
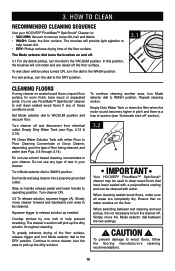
... wet cleaning and wet pickup, it is a loss of wax in your cleaner. To wet clean with either Floor to the WASH position. Set Mode selector dial to remove loose dirt, hair and debris. • WASH: Clean the floor surface. Slowly move cleaner over area to be used to clean wood floors that no water remains on handle release pedal and lower handle to WASH position. When switching between the two settings. ! 3. Turn cleaner off . Do not use...
... wet cleaning and wet pickup, it is a loss of wax in your cleaner. To wet clean with either Floor to the WASH position. Set Mode selector dial to remove loose dirt, hair and debris. • WASH: Clean the floor surface. Slowly move cleaner over area to be used to clean wood floors that no water remains on handle release pedal and lower handle to WASH position. When switching between the two settings. ! 3. Turn cleaner off . Do not use...
Manual
Page 11
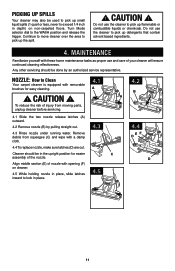
... cleaning effectiveness. Cleaner should be done by pulling straight out. 4.3 Rinse nozzle under running water. Do not use and care of injury from squeegee (C) and wipe with removable brushes for easier assembly of nozzle with these home maintenance tasks as proper use the cleaner to pick up flammable or combustible liquids or chemicals. Turn Mode selector dial to Clean Your carpet cleaner is equipped with a damp cloth. 4.4 To replace nozzle...
... cleaning effectiveness. Cleaner should be done by pulling straight out. 4.3 Rinse nozzle under running water. Do not use and care of injury from squeegee (C) and wipe with removable brushes for easier assembly of nozzle with these home maintenance tasks as proper use the cleaner to pick up flammable or combustible liquids or chemicals. Turn Mode selector dial to Clean Your carpet cleaner is equipped with a damp cloth. 4.4 To replace nozzle...
Manual
Page 12
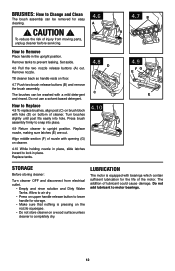
... cleaner on floor. 4.7 Push two brush release buttons (B) and remove the brush assembly. Turn brushes slightly until post fits easily into place. 4.9 Return cleaner to motor bearings. 12 Replace nozzle, making sure latches (E) are out. Lubrication The motor is completely dry. Do not add lubricant to upright position. brushes: How to Change and Clean The brush assembly can be removed for easy cleaning. 4.6 A ! Remove tanks to Remove Place handle in place. Replace tanks. 4.8 D C 4.10 4.7 B A 4.9 FG E E StorAGE Before storing cleaner: Turn cleaner...
... cleaner on floor. 4.7 Push two brush release buttons (B) and remove the brush assembly. Turn brushes slightly until post fits easily into place. 4.9 Return cleaner to motor bearings. 12 Replace nozzle, making sure latches (E) are out. Lubrication The motor is completely dry. Do not add lubricant to upright position. brushes: How to Change and Clean The brush assembly can be removed for easy cleaning. 4.6 A ! Remove tanks to Remove Place handle in place. Replace tanks. 4.8 D C 4.10 4.7 B A 4.9 FG E E StorAGE Before storing cleaner: Turn cleaner...
Manual
Page 13
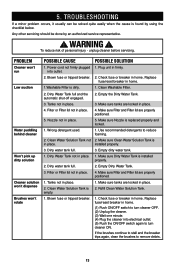
.... 1. Refill Clean Water Solution Tank. 1. TROUBLESHOOTING If a minor problem occurs, it usually can be done by using the checklist below. Make sure Nozzle is empty. 1. installed properly. 3. WARNING ! Power cord not firmly plugged into electrical outlet. (5) Push the ON/OFF switch again to turn cleaner ON. Clean Washable Filter. 2. Filter or Filter lid not in place. 2. Clean Water Solution Tank is replaced properly and locked. Use recommended detergents to remove debris. 13 Check fuse or...
.... 1. Refill Clean Water Solution Tank. 1. TROUBLESHOOTING If a minor problem occurs, it usually can be done by using the checklist below. Make sure Nozzle is empty. 1. installed properly. 3. WARNING ! Power cord not firmly plugged into electrical outlet. (5) Push the ON/OFF switch again to turn cleaner ON. Clean Washable Filter. 2. Filter or Filter lid not in place. 2. Clean Water Solution Tank is replaced properly and locked. Use recommended detergents to remove debris. 13 Check fuse or...
Manual
Page 14
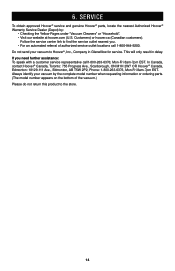
... only result in Glenwillow for service. Service To obtain approved Hoover® service and genuine Hoover® parts, locate the nearest Authorized Hoover® Warranty Service Dealer (Depot) by the complete model number when requesting information or ordering parts. (The model number appears on the bottom of authorized service outlet locations call 1-800-944-9200. Customers) or hoover.ca (Canadian customers). In Canada, contact Hoover® Canada, Toronto: 755...
... only result in Glenwillow for service. Service To obtain approved Hoover® service and genuine Hoover® parts, locate the nearest Authorized Hoover® Warranty Service Dealer (Depot) by the complete model number when requesting information or ordering parts. (The model number appears on the bottom of authorized service outlet locations call 1-800-944-9200. Customers) or hoover.ca (Canadian customers). In Canada, contact Hoover® Canada, Toronto: 755...

Manual
Page 15
...174; Hoover Cleaning Product Guide Hoover Hoover Platinum Platinum Collection® Collection® Deep Professional Pet Plus Product Name Cleansing Premium Pet Oxy Anti-Allergen1 Hard Floor Strength Hoover® Quick & Light™ PPP P PP Hoover® SteamVac® P P P P 2 PP P Hoover® 3 P P P P P P P SteamVac® Dual V® Hoover® SteamVac® Dual V® P P P P P P P All Terrain Hoover Platinum Collection® P P P P PP Hoover® FloorMate® 1 Allergens: pollen, pet dander, dirt, and dust. 2 When cleaning a hard...
...174; Hoover Cleaning Product Guide Hoover Hoover Platinum Platinum Collection® Collection® Deep Professional Pet Plus Product Name Cleansing Premium Pet Oxy Anti-Allergen1 Hard Floor Strength Hoover® Quick & Light™ PPP P PP Hoover® SteamVac® P P P P 2 PP P Hoover® 3 P P P P P P P SteamVac® Dual V® Hoover® SteamVac® Dual V® P P P P P P P All Terrain Hoover Platinum Collection® P P P P PP Hoover® FloorMate® 1 Allergens: pollen, pet dander, dirt, and dust. 2 When cleaning a hard...
Manual
Page 16
... to you specific rights; This warranty gives you . WHAT THIS WARRANTY DOES NOT COVER This Warranty does not cover: use of the product in a commercial operation (such as maid, janitorial and equipment rental services), improper maintenance of the product, damage due to misuse, acts of God, nature, vandalism or other acts beyond the control of Hoover®, owner's acts or omissions, use and in...
... to you specific rights; This warranty gives you . WHAT THIS WARRANTY DOES NOT COVER This Warranty does not cover: use of the product in a commercial operation (such as maid, janitorial and equipment rental services), improper maintenance of the product, damage due to misuse, acts of God, nature, vandalism or other acts beyond the control of Hoover®, owner's acts or omissions, use and in...


